Gaps in the upper hinges of VAZ 2101-2107
To independently diagnose the condition of ball joints, you will need a special device for measuring play and a torque wrench.
The diagnostic procedure looks like this:
- Before checking the ball joint, you need to place the car on a level surface and raise the side on which the diagnosis is being carried out.
- Loosen the bolts on the wheel in advance, and after lifting, unscrew them.
- Remove the wheel and place it under the engine.
- A wooden block must be installed under the lower ball joint. Its height should be 19 cm.
- Lower the car onto the block. The surface on which it is installed must be hard. Work cannot be done on the ground.
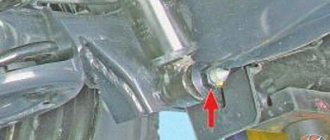
- Install the device bushing on the upper ball fastening nut, which is located closer to the brake disc protective casing.
- Place the device on the sleeve and secure it with a bolt.
- Move the tool to position the lever in a vertical position. Its lower edge should rest against the brake disc housing. After this, tighten the bolt.
- Install the indicator in the base stand until it stops. The interference should be no more than 2-3 mm.
- Attach the bracket to the wheel hub using two wheel bolts.
- Install the torque wrench on the hex head.
- Turn the key with a torque of 196 N*m (or 20 kgf/m) in one and the other direction.
- Add up the readings that will appear on the indicator.
The sum of the readings should not be more than 0.8 mm. If it differs from this value, then the ball joint needs to be replaced. Driving with a broken one is not only uncomfortable, but also dangerous - at any moment your finger can be torn out of the clip. And if this happens at high speed, a fatal outcome cannot be avoided.
How to check ball joints on a VAZ 2107 for...
Self-check of ball joints
with your hands... you jack up the wheel and loosen it with one hand from below, the other from above... you will understand there... Elana
These are bearings. Ball by removing the load on them. Alexie
Find an old repair book (about 80 years old). Everything is clearly spelled out there. Alexi
Mount on a pit or overpass, on the backlash.Lea
then jack up any front wheel and rock in different directions, if there is a knocking noise, it means screw them or the tips of the Galchonok
and you need to hang the bottom one on something and shake the top. Alona
they don't knock, that means they're normal. shake the front of the car, swing the wheel along the axle, and to check the bottom, put a brick under the lever to hang the wheel and swing it too. Under
You put the jack up. Right and left - tips, up and down ball. Nothing should be loose. For tips jack for rocking chairVera
How do you mean “under the rocking chair”? Datian
it’s not difficult, the top one is usually checked together with the side member, that is, you take it out of the blue by the top of the wheel in the usual form, you don’t need to remove or unscrew anything, and you pull as hard as you can, if there is any suspicious sound, take it apart... and the bottom is there there is a grease hole (so there’s a hole in it, and the front end is already raised, a match goes in, how many mm, for the life of me I don’t remember) that’s where the working permits are and it’s time to change..., it’s simple))) Sayan
Jack it up, put a 17 cm piece of wood under the ball, it seems, lower it onto it and then swing it up and down by the wheel
as Anatoly said! balls are checked under load. you pull sharply on the top of the wheel and if there is any play, you take it apart. the top one means one hundred percent dead. and with the lower one you just ask someone to pull it and you can determine by touch whether there is any play! Irinara
Jack up higher, put something under the lever, lower the jack. This way you will unload the lower ball and put it in the working position. Swing by the bottom of the wheel or let someone swing and you watch. This way you can check both at once. The safest way is to disconnect the ball joints and check them with your hands. If it hangs even a little, change it. Aleko
You put a support on the jack, under the lower suspension arm, you can remove the wheel, lower it and swing it by the disk from bottom to top. It takes two people with the wheel, you swing it, he looks. Balloons can be heard along the highway. There is also a pendulum, along the direction of the car, on the right. He knocks too. When driving quietly, it can be heard on the right side of the cabin; you need to remove the cotter pin and tighten the castle nut by one slot. There is no need to pull hard. The steering will be heavy. If you have a new car, it's the swingarm. He needs a lift. Grisha
how to remove the starter on a vaz 21072? I need instructions for the kettle
There is no power from the ignition switch to the starter. What could be the reason? VAZ-21072
VAZ 11193 "KALINA". The battery died and after replacement it will not start. no indica ENGINE, starter does not turn, fuses are intact
how to open the hood if the cable comes off on a VAZ 11193 (Kalina) please help
VAZ 1119 Kalina engine 1, 4 16V if the timing belt breaks, does it bend the valve?
Second diagnostic method
But such a tool for measuring backlash is not always at hand. It is much easier to complete all the work with a mounting blade. To do this, you will need an assistant who needs to be seated behind the wheel. The diagnostic procedure looks like this:
- A partner must press the brake pedal to hold the hub. This will eliminate the possibility of bearing play influencing the diagnosis.
- Raise the side of the car that needs to be diagnosed.
- Rock the wheel sharply, holding it by the top.
- You can use a mounting blade; to do this, you need to install it between the upper arm and the hub. Move the lever up and down, assessing the play between the support cage and the pin.
If you find play in the upper ball joint, be sure to replace the element.
We diagnose the signal and its activation buttons
In order to find out whether your car uses a correctly working signal, you should disconnect its wires from the relay and connect them directly to the battery. If the sound does not appear in this case, the causes of the breakdown may be the following:
- contacts located directly in the device body are burnt or heavily soiled;
- The signal is not configured correctly, causing the dial tone to sound very low or not audible at all.
Troubleshooting is done by adjusting the signal (to do this you just need to turn a special screw installed in the back of the case) and cleaning the contacts.
Another reason why the signal may not work is a broken or worn button. To restore its normal functioning, you can either replace the entire part, or again put the contacts to which the wires are connected in perfect order.
As you can see, you don’t have to go to a car service center to diagnose and repair the sound signal. Almost any work can be easily done with your own hands without spending a lot of time on it. We only strongly recommend that you do not delay this, so as not to expose yourself to the risk of a traffic accident due to a non-functioning horn.
On the VAZ 2105 car, two types of sound signals can be installed - single and double. As a rule, the main repair work that needs to be carried out with the signal is its adjustment of the tone of the sound produced, or dismantling it in order to completely replace it with a new one in case of failure. Since they cannot be repaired, if they break, they are replaced. We carry out dismantling on a de-energized vehicle, disconnecting the minus terminal from the battery. To carry out repair work, prepare a standard set of tools, and then perform the following sequence of actions:
- Disconnect the power cables from the signal.
- Next, use a thirteen wrench to unscrew the nuts securing it to the bracket and remove it.
This completes the removal repair work. Replace it, and then perform the installation in the reverse order.
To adjust the sound tone, do the following:
- In the case of a double signal, we adjust each one separately; to do this, we disconnect the supply wire from the second one.
- Find the adjustment screw on the body, then ask an assistant to press the horn button, while you, in the meantime, turn the screw with a screwdriver to achieve optimal sound.
- If the bad sound cannot be eliminated, we replace it.
At this point, the repair work on replacing and adjusting sound signals on the VAZ 2105 has been completed.
Sources
- https://ladaautos.ru/vaz-2107/pochemu-ne-rabotaet-signal-na-vaz-2107-i-chto-delat.html
- https://remont-vaz2106.ru/vaz-2105-zamena-i-regulirovka-zvukovogo-signala
Diagnostics of the lower ball
And now about how to check the ball joint located on the lower arm on a VAZ. To do this you will need to perform several steps:
- If there is dirt on the bottom of the ball joint, it is imperative to remove it.
- Using a key set to “7”, you need to unscrew the plug, which is located on the bottom of the holder.
- It is convenient to carry out diagnostics on an overpass or inspection pit. To do this, you need to install a caliper in the hole and measure the distance from the ball pin sphere to the bottom edge of the body.
- If it is not possible to install a caliper depth gauge, you can use thin wire or even a match. Place it in the hole, then measure the distance with a ruler.
- The maximum distance from the finger should be 11.8 mm. If less, then the ball joint can continue to be used. But if this value is greater, the hinge will need to be replaced.
Basic faults
The engine does not start. In this case, several options for eliminating the breakdown are possible. The first thing you need to check is the presence of fuel in the VAZ 2105 carburetor. If there is fuel, you should carefully examine the fuel pump. It may become clogged or completely defective.
If everything is fine with the pump, pay attention to the ignition system. If there are no problems with it, then the reason is a leak in the carburetor. The engine runs rough or begins to stall at idle
There may be several reasons for this problem. These include: incorrect adjustment of the idle speed in the engine, malfunctions in the carburetor, damaged drain pipe, worn gaskets, damaged pipeline hose, incorrectly set gaps, breakdown of the ignition system.
The VAZ 2105 engine cannot develop full power. The reasons are as follows: the carburetor throttle valve is not fully open, the air filter is clogged, the ignition system is faulty. You need to check all these points to fix the problem.
These are the main malfunctions of the VAZ 2105 engine. It also does not hurt for a car enthusiast to remember how the car should be operated correctly.
At first, you should not use the maximum speed limit of the car. The driver needs to get used to driving the VAZ 2105. If you choose the wrong speed of the car when driving, you risk damaging the front suspension elements and causing the rear axle beam to bend. Also, at maximum driving speed, rapid tire wear is possible, and increased body vibration will lead to instability of the car.
Preparing for replacement
After you have checked the ball joints on the VAZ and found that they are damaged, be sure to replace them. During the preparation phase, you will need to complete the following steps:
- Place a jack under the side of the car that is being repaired.
- Place wheel chocks under the rear wheels.
- Loosen the bolts on the wheels, then lift the side of the car. Remove the wheel and place it under the bottom of the engine.
That's it, the preparation is over. Now it is necessary to dismantle the old ball joints and install new ones.
Checking the technical condition of the front suspension parts on a Niva Chevrolet
We install the car on a lift or inspection ditch
The suspension must be thoroughly washed before inspection.
Inspecting the rubber-metal hinges of the lower arms of the front suspension
Hinges need to be replaced if:
— ruptures and one-sided swelling of rubber;
- wear of rubber at the ends of the hinge;
— displacement of the outer joint bushing relative to the inner one is more than 2.5 mm;
- if the width of the rubber belt between the ends of the outer bushing and the thrust washer of the hinge does not fall within the limits of 3.0-7.5 mm.
In the same way we evaluate the condition of the upper arms.
We inspect the shock absorbers and springs of the front and rear suspensions.
The springs must not be damaged. Tearing, cracking and severe deformation of rubber bushings, cushions and compression buffers of shock absorbers are unacceptable.
Liquid leakage from shock absorbers is not allowed. A slight “fogging” of the shock absorber in its upper part, while maintaining the characteristics, is not a malfunction.
Hanging the front wheels one by one (while the car must be securely fixed on the support stand), we check the condition of the front wheel hub bearings
The wheel should rotate evenly by hand, without jamming or knocking.
Holding the wheel in a vertical plane, we alternately sharply pull the upper part of the wheel toward ourselves, and the lower part away from us, and vice versa.
We make sure there is no play (knock). If there is a knocking sound, ask an assistant to press the brake pedal.
If the knocking noise disappears, it means the wheel bearing is faulty, and if the knocking noise remains, then the ball joint is most likely worn out.
If there is excessive play, adjust the clearance in the bearings. We check the condition of the protective covers of the upper and lower ball joints of the front suspension.
We replace ball joints with torn or cracked covers.
You can preliminary assess the condition of the upper ball joint by strongly shaking the upper part of the wheel in a plane perpendicular to the longitudinal axis of the car (in this case, it is necessary for an assistant to press the brake pedal all the way).
The presence of play (knock) in the suspension is a reason for a more detailed check of the upper ball joint.
To do this, hang out and remove the wheel
Place a wooden block under the lower ball joint and lower the car onto it until the spring is fully compressed.
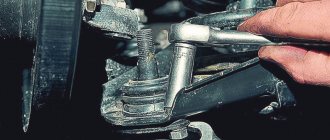
Using a long mounting blade, we alternately swing the upper arm of the front suspension down and up, creating a load, respectively, on pressing and pulling the ball joint pin out of the support housing.
At the same time, we monitor the movement of the ball joint housing relative to the steering knuckle
If there is play, then replace the ball joint
To check the condition of the lower ball joint, remove the front wheel
Having placed a support under the lower arm (as close as possible to the ball joint), lower the car onto it until the spring is fully compressed
Using a long mounting spatula, alternately pump the upper front arm down and up
And we observe the movement of the support body relative to the steering knuckle
If play is detected, then change the lower ball joint.
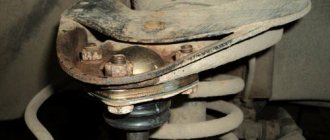
Replacing the upper supports
To remove the upper support you will need to perform the following manipulations:
- Using a “22” wrench, you need to unscrew the nut that is located on the hinge pin.
- Then you need to press out the hinge pin using a special puller consisting of two levers. One edge rests against the lower ball pin, the other against the upper one. You can do this job without a puller, but you will have to hit it very hard with a hammer. As a result, you can easily break the suspension arm.
- After the ball pin comes out of its place, you need to use “13” keys to unscrew the nuts that secure the cage to the lever.
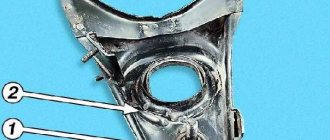
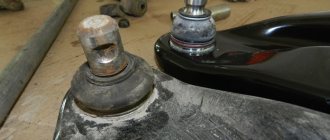
Checking the ball joint boot
When checking the condition of the ball joint, you must pay attention to its boot. It is made of rubber and its task is to prevent moisture, dust and various debris from getting into the joint from the road during operation of the machine.
The boot, by and large, is a consumable item and must be periodically replaced. As a result of temperature changes (including in winter), mechanical influences, damage and simply the aging process, first small and then increasingly enlarged cracks may appear on its rubber body, through which dust, sand and other small debris will get inside the ball joint . This mixture will act as an abrasive, gradually breaking down metal surfaces and washing away lubricant.
Therefore, when performing an inspection, you should always pay attention to the condition of the boot, the presence of debris and lubricant in it. If it is damaged, it must be replaced with a new one, since the use of a torn boot leads to a sharp decrease in the overall service life of the ball
And when replacing the boot with a new one, you need to remember to fill it with lubricant (Litolom, ShRB-4 or their analogues).
There is another non-standard method of checking the ball, in particular due to damage to the boot. In particular, the method is suitable for testing on machines in which the ball is positioned vertically with its finger up, that is, if water gets inside, it remains inside like in a vessel, and it enters from above through the oil seal. So, on machines where it is difficult to dismantle and generally get to the support, you can take a regular medical syringe with a needle and pour a little liquid oil into it (2...3 cubes). Next, you need to pierce the boot at the top with a syringe needle and pour the existing oil inside. After this, compare the nature of the old knock and the knock after adding oil. If a difference appears, it means that the ball has failed and it is advisable to replace it. As for the hole from the needle, water will not get inside through it, so the car owner can be calm about this.
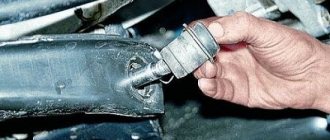
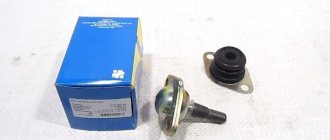
Replacing the lower supports
After checking the ball 2107 and making sure that it is broken, you need to unscrew the bolt from the pin. But you won’t be able to unscrew it completely; first, make a few turns. Further actions:
- Install the puller and remove the ball joint and hub knuckle pin. After this, you can completely unscrew the nut.
- Using keys set to “13”, you need to unscrew the three nuts that secure the ball joint housing to the suspension arm.
Before installing new elements, it is necessary to fill a sufficient amount of lubricant under the boot. Be sure to check the integrity of the rubber boots.
Ball joints are the most short-lived parts of the AvtoVAZ classic suspension. Considering the state of domestic roads, the ball joint on a VAZ 2107 is the first part that has to be changed after a certain mileage of the car. Novice car enthusiasts have questions about how to replace ball joints and which ball joints are best to install on a VAZ 2107 .
The role of support in the suspension and the consequences of failure
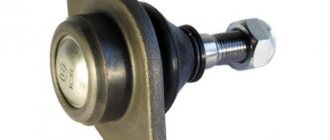
The part is a ball pin with a thread at the end, enclosed inside a metal housing. So that it can rotate, a sleeve made of hard plastic (usually fluoroplastic) is installed between the ball and the body. The pin is screwed with a nut to the steering knuckle of the wheel hub, and the part itself is bolted to the suspension arm. To prevent dirt from getting inside the hinge, it is protected on the open side with a rubber or silicone boot.
Note: in some car models, the ball joints are integral with the levers and are also replaced together.
The task of the element is to provide a hinged attachment of the hub to the lever so that it can rotate . That is, the support bears the load from the weight of the car, impacts from the wheel and the impact of friction when turning. Now it becomes clear what the risk of malfunctioning this important part is. First of all, the plastic sleeve wears out, causing the ball to begin to dangle inside the body. If measures are not taken, then on a strong bump the ball pin will pop out of the body, and the wheel will come off along with the hub.
Despite the fact that after separation the ball hub is held on a stand or on a second lever, the wheel becomes uncontrollable. The consequences are unpredictable and depend on the speed of movement at the time of the breakdown. That is why it is important to monitor the condition of these elements and respond in a timely manner to extraneous sounds coming from the chassis. If the first signs of a malfunction of the ball joint appear, it is advisable to check it and clarify the diagnosis in order to replace it with a new one in time.
Design and purpose of ball joints
The design of the front suspension with ball joints replaced the previously popular pivot mechanism and is the most common. The task of these units is to ensure vertical movement and rotation of the wheel while driving. Ball joints are constantly subject to strong variable loads while the vehicle is moving, and their failure can lead to a serious accident. Therefore, special requirements are placed on the material and quality of manufacture of ball joints. The rapid wear of the balls during operation even forced designers to develop suspension options without this “delicate” unit. But, as mentioned above, most cars (and the entire VAZ line of cars) include ball joints in the front suspension design.
“Ball” (as they are called for short) are manufactured in two versions: cast-in-place designs and products with a metal-ceramic liner. The first type is used in the upper, the second - in the lower ball joints. This is due to the different loads to which the liners are exposed. In the lower nodes, compression and tension alternately occur, in the upper nodes only compression occurs.
About other manufacturers
As mentioned above, the production of high-quality ball joints requires serious costs. And this cannot but affect the final cost of the product. Therefore, there are only four large manufacturers of supports for the VAZ 2107, and all of them are listed above. Of course, there are smaller companies that offer car enthusiasts ball joints at almost half the price. But any sane person understands: if a ball joint costs half as much, it means that the manufacturer saved on something during its manufacture. Most often, savings are made either on ultrasonic analysis of rod blanks or on heat treatment. Neither the first nor the second bodes well for the buyer of the support.
Cheap ball joints have a very short service life
And if the car owner is of sound mind, then he will not react to a temptingly low price and save on a detail on which his life literally depends. It is for this reason that little-known manufacturers of cheap supports will not be considered in this article.
Here we should mention another unpleasant thing: fakes. Recently, ball joints from well-known brands have begun to appear on the shelves of car dealerships, costing suspiciously cheaply. Upon closer examination, the vast majority of them turn out to be fake, and often the fakes are made so well that only a specialist can recognize them. For an ordinary car enthusiast, the criterion for selecting supports is still the same: price. It should be approximately the same as indicated above. And if a ball joint from a well-known brand costs half as much, then buying such a part is categorically not recommended.
When is it time to change ball joints?
The reliability of the ball joints is extremely important for safety, so their condition must be carefully monitored and replaced at the first sign of malfunction, which manifests itself in the following:
- knocking noise while driving at low speed;
- creaking when turning the steering wheel, coming from the wheel mounting area;
- unstable course retention;
- uneven tire wear;
You can replace ball joints yourself, without involving car service mechanics.
Symptoms and causes of element wear
While driving, a worn ball joint manifests itself as follows:
- overcoming small bumps at medium or high speed, you will hear a dull knocking sound coming from the front suspension;
- with average wear, a knock may be heard on the steering wheel;
- In heavily worn bearings, the ball begins to wedge, causing a creaking sound when turning the steering wheel.
If you find one of these signs, you should contact a service station for diagnostics or check the functionality of the parts yourself and without a lift. The service life of ball joints on cars made in Russia, China and Korea is in the range of 20-50 thousand km. Higher quality parts of European and Japanese foreign cars can last up to 150 thousand kilometers. It is necessary to focus on these intervals when troubleshooting .
Contrary to popular belief, the behavior of a car with worn joints when driving on a flat road changes little. The deviation from a straight line and the lateral abrasion of the rubber are so small that an inexperienced driver will not notice the changes, unless the ball joint becomes completely loose. A clear sign is a distinct knocking sound.