Modifications of protective nets on Lada Granta Liftback
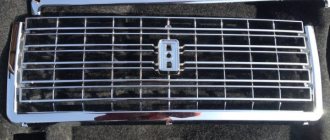
- metal mesh with a perimeter frame made of polymer;
- all-metal mesh;
- all-metal with chrome inserts along the outer perimeter.
Each of the presented models has its own advantages and disadvantages. Let's look at them. Plastic frames are susceptible to the negative effects of direct rays of the sun and high/low ambient temperatures. Loose fit, vibration, metal knocking are the first signs of deformation.
The all-metal mesh on the radiator grill is more resistant to overheating. At the same time, even the slightest blow to the metal can deform the fasteners. As a result, driving a car is accompanied by knocking and vibration in the area where the radiator grille is located.
Metal with chrome inserts - more aesthetics than practicality. This is how you can briefly describe the accessory. Poor manufacturing is the first factor contributing to the destruction of the spray layer.
When choosing and purchasing “protection”, pay attention to the cell diameter. Too large will allow the passage of leaves, fluff, small stones
A cell that is too small will quickly become clogged and interfere with natural air flow. Premature overheating of the power unit is not excluded. The original protection is equipped with a solid rubber plug for use in winter. Thus, using the accessory, there is no need to dismantle the metal grill for the winter.
We independently install a radiator protective mesh on a LADA Granta car.
Hello! It so happens that I write articles on various topics on Zen. This article will be devoted to how I independently installed the radiator mesh on a LADA Granta. When buying a new LADA Granta car, I didn’t even notice it; it turns out it has no protection, that is, no radiator mesh.
If you do not install a mesh, then in the summer the radiator can become filled with all sorts of debris, especially flies and bees. A stone can easily fly in and make a hole in the radiator.
I don't think there's any way I can handle this on my own. I went to the service center, found out the prices, and said I’ll think about it. Prices: remove the front bumper - 550 rubles, for installing a net - 500 rubles, you also need to buy a net - 300 rubles, and also work services - 200 rubles. It turns out the service is the cheapest. As a result, more than 1,500 rubles.
How to remove the radiator grille of Renault Duster
How to make tuning of the VAZ-2107 radiator grille
We will need:
Flexible Torx screwdriver with T20 tip;
Upper grille
1). Open the hood.
2). We unscrew the 4 screws from the top and bend the grille forward.
3). Using a flexible screwdriver, we approach the screws on the side (they are fixed at the same level as the central point of the emblem) and unscrew them.
4). We are trying to remove the grille from the grooves (see photo). Each “horn” ends in a groove in which the lattice protrusion is placed.
5). If you have dealt with the side fastenings, then with the “central spur” everything will work out quickly. It is necessary to move the plastic protrusion upward, then tilt the grille forward. The fastener should snap off immediately.
The bumper and grille are “sewn” together with plastic tabs. They go in one row, 5 on each side. And you can remove the Renault Duster radiator grille, and not break it, only by snapping off all 10 tabs.
Lower grille
It is impossible to get to the lower grille from the outside, so you will need to remove the bumper.
1). Place the entire assembly on a flat surface, then use a screwdriver to snap off the plastic tabs. But before that we remove the shields (see photo).
2). The design does not use self-tapping screws, only plastic fasteners. Each shield is secured with 5 separate tabs. 9 tongues hold the grille itself (4 at the bottom and 5 at the top).
How to remove radiator grille on Kia Rio, photo, video
Lada Kalina Hatchback RED DRAGON Logbook Replacing the heater radiator without removing the panel and steering wheel
The reasons for removing or upgrading the radiator grille are completely different. For some, this is the preferred way to minimize coolant cooling. For others, it’s a simple procedure of tuning another part of the car to make it stand out from the crowd. And for others, it is necessary to install an additional, finer mesh, for example, to prevent small foreign objects from getting inside.
In any case, you will have to remove the factory radiator grille. And this, simplest at first glance, process of replacing a Kia Rio spare part, no matter how surprising it may seem, has its own subtleties and nuances.
In general, there are two methods of dismantling.
Removing the radiator grill separately
From the name it may seem that this method is simpler. Unfortunately, not quite.
In this case, you will need a convenient 10mm wrench and a regular small Phillips screwdriver.
- First of all, you need to remove the four bolts located on top of the engine compartment. They are located in a visible place and there should not be any difficulties here.
- Now, you need to unscrew the ten screws that secure the radiator grille from the inside. And this is where the difficulties begin, because getting close to them is not so easy, and you have to work in not the most comfortable positions.
- If you were still able to accomplish this small “feat”, you should carefully pull the radiator grill towards you, pressing the two fastening latches at the bottom (see photo above). If you can’t snap them off from the inside, you can try to “bend” them from the outside with a thin long object, pushing it between the bumper and the grille.
All that remains is to do what it all started for.
For example, install an additional small protective mesh, which, by the way, you can make yourself by cutting it to the desired geometry from an ordinary household mesh.
And secure it to the inside of the standard accessory.
Or install a new grille purchased at a car store.
Removing the grille along with the bumper
Tip: if something remains unclear, be sure to watch the video example at the end.
If you don’t want to bother with unscrewing the “hidden” screws, another method is proposed - remove the entire structure, and then disassemble it into the necessary components, including the desired radiator grille.
- Unscrew the top two of the four mounting bolts. The remaining ones will prevent the bumper from falling after the latches are disconnected.
- Remove the mounting screw holding the side of the bumper. In the official instructions, and this can be seen in the attached picture, it is recommended to remove the part immediately. But! To avoid breaking the clips, do not disconnect it at this stage (see point 5).
- Remove the lower fasteners.
- Disconnect the left fog light connector.
- Now, a little trick that complements point 2. Due to the fact that the clips on the side joints that fasten the bumper to the wing are held apart by screws, in order to remove them without consequences, you need to bend the fender liner a little and unscrew the screws, and only then remove the parts.
- Finally, you can carefully pull the bumper down and disconnect the right fog light connector. Don't forget about the two latches under the headlights.
- Remove the remaining top bolts.
The removal process can be considered complete. All that remains is to remove the radiator grille, which should now not cause any problems, and replace or tune it.
Assembly is carried out similarly, in reverse order.
How to remove the radiator grille of Renault Sandero
Protective mesh for radiator grille
The radiator grille is designed to protect the radiator itself from mechanical damage when the car is moving. When driving on any road, there is always a chance that a stone or other object will fly out from under the wheels of the car in front and hit the radiator. In order to protect the unit from mechanical damage, you can install a mesh behind the plastic.
There are several ways to remove the radiator grille on a Renault Sandero. Any of them will take some time and require a specific tool.
Without dismantling
You need to start by unscrewing several screws that secure the lower part of the bumper to the Sandero body. This will loosen the tension, making it easier to remove the radiator grille. This is done using Torx screws. Self-tapping screws have a six-point head. You won’t be able to unscrew them with a simple Phillips screwdriver, so it’s better to stock up on the right tool.
After unscrewing the screws, the tool will no longer be needed. The remaining procedures are carried out manually. As already mentioned, the plastic part itself is held in the bumper by latches. To dismantle it, you need to press each latch down and press the plastic itself inward. This way you can take him out of the holds one by one. We do the same with the remaining latches of the lower part.
Next, the plastic needs to be shifted to the right. At this stage it is necessary to act extremely carefully. Having moved it to the right, you need to slightly lift the upper edge of the bumper, and then pull the part towards you. Thus, the left part will be dismantled. Then you need to slightly bend it in the plane and move it to the left.
Thus, you can remove the radiator grille without removing the Renault bumper
In some cases, such operations can lead to the fastening elements breaking, so you must act with extreme caution
Partial dismantling
This method will allow you to easily remove the radiator grille without fear for its safety. In this case, you can spend more time on partial dismantling. However, it will be much easier to get the right part.
Before starting work, you need to unscrew the bolts around the perimeter of the bumper that are attached to the Sandero body. The next step is to unscrew the bolts under the wheel arch. They are located at the junction of the bumper and fender of the car on both sides. After this, you need to open the hood and unscrew 4 more fasteners.
It is worth noting that in addition to the bolts, the bumper is held in place by 3 more plastic latches on each side of the Sandero. They are attached to the wings. To remove it, it is best to pull the bumper away from the car.
Since the method involves partial dismantling, you only need to remove one side from the latches. Next, you need to disconnect the plastic part from the latches, pressing it into the space that appears, and remove it.
This method is preferable, since there is no risk of damaging the plastic part itself. However, you will have to spend time on it in this Renault model.
With dismantling
The problem with dismantling this element is relevant for all Sandero owners. In any case, the process takes some time and requires special tools, without which dismantling is not possible.
Installation of a protective mesh in the bumper (radiator grille) of Lada Priora, Granta and Kalina
Lada Granta, Kalina and Priora car models have two grilles (upper and lower) in the front bumper.
Their main task is to prevent stones from entering the engine radiator, but not midges (the cells are too large). Let's look at a simple way to install an insect screen with smaller honeycombs. Required
: decorative mesh, scissors, plastic clamps (preferably black).
Installation
The protective mesh can be made in two ways:
- With dismantling the front bumper (instructions for Grants, Priora, Kalina);
- Without removing the bumper. To do this, we first dismantle the upper radiator grille (instructions for Granta, Priora and Kalina), and gain access to the rear of the lower grille through the top.
Next, we cut out pieces of the required sizes from the aluminum mesh. We attach the mesh to the back of the radiator grilles using plastic clamps or self-tapping screws. To prevent the clamps from being visible, we paint over their visible parts with a black marker, or make small holes for them in the bumper cross members.
Instructions for installing a protective mesh in the bumper are also shown in the video:
It's worth noting that there are alternative ways to protect your engine radiator from pea gravel and insects, such as installing a different grille with smaller holes or no holes at all. Or use a trim that is attached to the outside of the bumper. Have you used this modification? How did you protect the radiator?
Let us remind you that on the website you can find other simple upgrades for Lada cars, for example, installing fan-type washer nozzles or covering the interior of the car with vinyl film.
Share on social networks:
Found an error? Select it and press Ctrl+Enter..
Source
The radiator grille on Granta is the last steps towards the ideal
1.3k
Anyone who has at least once seen the latest car model from the VAZ concern will say that a new radiator grille for the Grant is an extremely necessary thing. Don’t worry, the item fully complies with all standards and has a modern appearance. However, unlike the grilles on previous Lada models, it tends to let in a large amount of dust, which severely clogs the radiator and engine of the car.
1 Improvement of Lada Granta
When purchasing the newest model from the Volzhsky Automobile Plant, you can expect that you are getting a reliable, modern car at an appropriate price. The car is equipped with reliable parts, an original body and a full list of instruments necessary for comfortable everyday driving. Despite this, craftsmen do tuning, most often replacing optics, wheel rims and completely painting the car.
The radiator grille is also often replaced. It is by this detail that many judge the character of the car and the capabilities of its owner. Another reason for the huge demand for new grilles is the ease of DIY installation. To do this, you do not need to have certain skills or buy expensive equipment. All you need is straight hands and standard tools that are found in every garage.
https://youtube.com/watch?v=cchvdNUAfEE
2 Making a grid from household mesh
Many new owners of Grants, who are just planning to tune the radiator grille, begin to visit specialized salons in the hope of finding an original part. It is worth saying that this method works great, but only if the buyer has an amount of 5–6 thousand rubles or more. And if you add the payment for installing the grille, then the owner of the new Lada model will have to “take it out and put it in” more than 8 thousand rubles.
To save money, you can create the element yourself. The main material for the manufacture of the radiator grille on the Lada will be a regular chain-link mesh with small cells. You can purchase this product at any hardware store in the country. On the shelves there are both plastic and steel products. In addition to the material for manufacturing, we will also need:
- file;
- needle file;
- hacksaw for working with metal;
- sandpaper or sanding paper;
- cold welding tool;
- fasteners.
First you need to remove the standard Lada grille. To do this, we need an “8” key, a Phillips screwdriver and a TORX T20 key. You need to dismantle the part very carefully - it is quite possible that you will need it again. The work of removing the grating must be carried out according to a certain algorithm. First you need to lift the Granta's hood and remove the front bumper. There are 9 nuts under the bumper that need to be unscrewed. After this, you need to pull out the side clamps of the grille and then remove the part.
Upon completion of dismantling, you need to make a frame for tuning. To do this, you will need to cut off the vertical and horizontal jumpers of the bumper. Do not be alarmed if the coating in the front part of the Lada body becomes less rigid - this is a common effect of such tuning. The burrs that appear after removal must be sanded with sandpaper, and then cold welded all the holes obtained after cutting off the jumpers and stiffeners.
3 Installation of the radiator grille
After processing, the radiator grille is installed on the Grant. To do this, take the finished part and insert it into the opening in front of the radiator. Next, we fix the product with fasteners and check the front part of the body for any irregularities. If there are any, the Lada bumper can be carefully cleaned with a file or fine-grained sandpaper.
To more effectively protect their Lada Granta, experienced drivers resort to installing additional products, one of which is an additional grille. To make it, you can use the same Chainlink, which needs to be cut and placed in a special frame. The finished protection is attached with bolts in the upper part, and from the bottom - to the “ears” of the radiator, which go out under the bumper.
By tuning the radiator grille and installing external protection on the Grant, every owner of this car can sleep peacefully. Now no insects, dust and small debris are scary.
1.3k
Granta radiator grille
Content
Types of gratings
Tuning and protection
Proper grate removal
Production: we do it ourselves
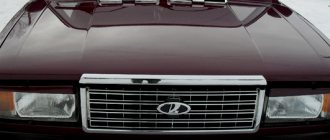
Lada GRANTA was released as a budget car in 2011.
The queue for it was huge, and this is understandable. For the people of our country, such a car is an excellent alternative to expensive foreign cars. But some shortcomings were made during development. One of them is the unprotected Granta radiator grille. For some reason, it does not have a mesh to protect it from dust, midges and flying pebbles when moving. Car enthusiasts have always found a way out of such situations.
There are already several ways to improve both the protective properties and appearance of vehicles.
Types of gratings
Several types of front grille have been developed for this Lada model. For car owners, there are a variety of configurations with which you can change your car beyond recognition.
Changing the appearance is nothing more than a stylish tuning that attracts attention and glances. A variety of fashionable “clothes” for your favorite car are presented in online stores and car markets.
It’s not difficult to choose the option you like and install a new grille on the front.
The most popular option is “Hulk”. Three wide ribs create powerful, imposing front features. The car looks bigger and more massive. Adherents of the classics will also like the Phoenix - it does not violate the concept of the car and protects the radiator well. Owners of cars participating in racing tend to buy sports pads. A special hole prevents overheating.
The many options for radiator grilles for the “Gad Grant” provide a huge choice available to every car enthusiast. By purchasing such a body kit, you can install it by entrusting the car to the specialists at the service station. But for true connoisseurs, this process becomes creative, and installation yourself is a matter of honor. Moreover, every owner wants to spend an extra hour with his “iron horse”.
Radiator grille "Hulk"
Tuning and protection
It’s quite easy to create protection and a “new face” for vehicles with your own hands. It is not necessary to run to the store and buy a grille of a different configuration. To make a grant radiator grille and tune it, you don’t need any super-expensive and fashionable materials.
A regular mesh with a fine mesh is perfect for this process. It can be either plastic or steel. It can be purchased at a regular hardware or hardware store. The price will be minimal, because not so much mesh will be needed.
It is necessary to measure the distance that you plan to close and buy as much as you need.
In addition to the mesh itself, a certain tool is required:
- hacksaw for metal;
- file;
- needle file;
- sandpaper of different grain sizes;
- fastening screws or bolts;
- cold welding.
When all the tools and material are ready, you need to dismantle the factory body kit directly.
Flat file 16mm
Proper grate removal
How to remove the radiator grille on a grant? There are two options for this. The first is classic and requires no effort on the part of the car owner:
- remove the front bumper along with the grille;
- after that, unscrew 9 fasteners from the inside of the bumper;
- then unclip the grille latches.
The second option will allow you to remove the body kit without removing the bumper itself:
- lift the hood and fix it on the rack;
- Using a 10mm wrench, unscrew the 6 fastening nuts on the grille from above;
- then carefully bend the grille, stick your hand into the gap formed and unscrew the 4 bolts at the top;
- then also unscrew the 5 nuts at the bottom using a size 8 wrench;
- then all that remains is to unclip the latches that hold the grille in place.
Removing the front grille on Grant
Production: we do it ourselves
After dismantling has been completed, you can proceed directly to manufacturing. The jumpers are cut off using a hacksaw. On the Lada Granta, the radiator grilles have a standard arrangement of fins, and only horizontal ones will have to be cut.
You need to act carefully, otherwise any damage will lead to irreparable consequences. After removing the jumpers, the frame itself loses its rigidity, and all subsequent manipulations are carried out with extreme caution. The places where there were jumpers must be leveled using a needle file or file and sanded.
The frame itself is sanded with fine sandpaper and prepared for further painting or filming.
The chain-link is measured according to the shape of the resulting frame, and fastened with self-tapping screws, which need to be heated before screwing. This will prevent the plastic from cracking. If the mesh was purchased from plastic, this simplifies the process. It is simply glued along the contour with a glue gun and that’s it. Some craftsmen advise securing them with clamps for reliability, but this is everyone’s business.
The Lada Granta radiator grille is tuned not only for beauty, but also to protect against the adhesion of dirt, dust and midges. With such contamination, overheating may occur and the car will simply “boil.”
Therefore, the size of the mesh cells is chosen at the discretion of the owner. There are ready-made and fitted radiator nets that can be purchased at car markets and stores.
The actions that need to be carried out if you have a ready-made protection mesh are practically no different from the previous method.
Radiator grille "Riviera"
Installation method may vary. To do this, you need to make a frame to fit the radiator and attach the mesh to it in the standard way. Then the entire structure is attached directly to the air heat exchanger. This technique serves specifically as protection and does not require modification of the grilles. This also makes cleaning easier and does not bring problems with how to remove the radiator grille on the Grant.
With such a disadvantage in the Grant configuration, you need to think about replacing and installing a protective jumper right away. If you leave this point unattended, not only the radiator, but also the car’s stove may suffer.
It also attracts small dust particles, which over time clog it and lead to breakdown. Installing a net is not only a new “face” of the car, but also insurance against unwanted breakdowns.
And if an unforeseen situation occurs, the amount that will have to be paid for repairs will be much higher.
Source: https://1000sovetov.ru/article_reshetka-radiatora-granta
Radiator grille - how to remove and replace protection
The radiator grille has not only a decorative, but also a protective function. It protects the radiator from various damage caused by pebbles and dust getting into it. It would seem that if there is already a regular radiator grille, then why do you need a protective one? Let's try to find out why a protective radiator grille is needed, how is it removed and replaced with a new one?
Functions of the radiator grille
As you already know, the radiator grille must provide protection for the last element from various foreign objects that end up on the road and are picked up by oncoming traffic. However, designers do not always very accurately calculate the properties of the factory radiator grille. The fact is that it may have a fairly thick base, which provides a good protective function, but cannot pass a sufficiently large air flow necessary to cool the engine. As a result, the engine overheats and can easily fail.
The other side of the problem is that the distance between the cavities is too wide. Here the radiator receives enough air, but may be damaged by some small stone. A damaged radiator, at best, will lose its pleasant appearance, and at worst, it will be broken. A broken radiator will also cause the engine to overheat.
The solution to the problem is a protective radiator grille. Its design has the form of a metal mesh, which allows the radiator to receive a large amount of oncoming air and maximum protection from damage, since the mesh has thin cavities that have a small distance relative to each other
In addition, the protective radiator grille gives the car a different look, which is very important for the appearance of the vehicle. Thus, it solves three problems at once and is a universal car part
How to remove the radiator grille?
This procedure may be performed differently for many vehicles. This is due to the design difference and economic feasibility. So, for example, in the VAZ 2106 the radiator grille is attached with bolts, but in the VAZ 2109 with special strips. Therefore, in order to remove the radiator grille, you must first find out how it is attached and then use the appropriate tools (if necessary).
When removing the radiator grille, remember that driving without it can be dangerous for the radiator. After all, if it is not there, the radiator will no longer be protected and may be damaged due to oncoming debris on the road.
The grille is removed with the hood open. This makes it more convenient to get to the bolts or nuts that are tightened from the inside of the engine compartment of the car. In addition, this is where the fastening strips or latches are located.
Many radiator grilles can also be mounted on the bumper, which is why some cars need to be placed on a viewing hole in order to remove such an elementary element.
Replacement of the VAZ 2109 radiator protective grille
Replacing the radiator grille is necessary when it has suffered mechanical damage. This could be an accident in which the grille was completely destroyed or simply damaged due to a large pebble hitting it. In both cases, it is recommended to replace the faulty part as soon as possible.
Replacing the radiator grille “on a nine” is not uncommon. The fact is that the grille for it is made of plastic, which does not always cope with very strong mechanical stress.
To change the protective radiator grille on a VAZ 2109, you need to open the hood and use a screwdriver to unscrew the two screws located in the upper part of the mount. After this, take a flathead screwdriver and remove the end of the latch, thereby freeing the grille from its fastening. Now it needs to be removed from the brackets, tilting it in its direction.
Installing a new radiator grille occurs in the reverse order. This completes the replacement of the protective radiator grille.
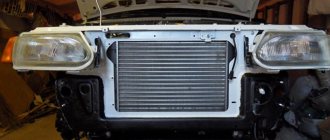
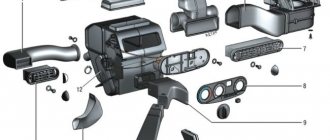
Radiator Lada Granta device, removal and installation of radiator Lada Granta
The Lada Granta radiator is the main element of the engine cooling and heating system of the car.
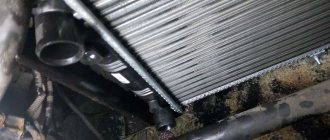
The radiator of the Lada Granta cooling system consists of two vertically located plastic tanks connected by aluminum tubes (arranged in one row) with cooling plates. The liquid enters the radiator through the upper pipe of the right tank, and is discharged from the radiator through the lower pipe of the left tank.
On top of the left radiator tank there is a fitting for a steam exhaust hose, which drains excess coolant during expansion into the expansion tank. At the bottom of the right tank there is a drain hole closed with a plug.
Below is a photo of the Granta radiator with all the symbols.
- 1 – steam outlet hose fitting
- 2 – supply hose pipe
- 3 – right tank
- 4 – drain plug
- 5 – lower radiator mounting cushion
- 6 – outlet hose pipe
- 7 – left tank
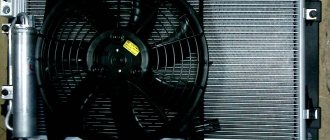
Removing the Lada Granta radiator
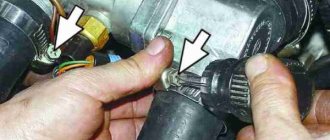
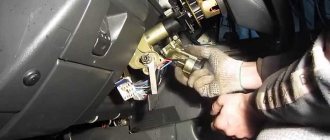
If the radiator of the Lada Grnat is damaged and begins to leak, it must be replaced. And to do this you will need to drain all the coolant and remove the radiator from the car. To avoid accidents, remove the radiator when it is cold. The sequence of actions is as follows -
1 – drain the liquid from the cooling system 2 – remove the radiator fan 3 – disconnect the radiator inlet and outlet hoses from the thermostat housing pipes and the pump inlet pipe, respectively, and disconnect the radiator steam hose from the expansion tank fitting 4 – unscrew the two nuts with a “10” head attaching the radiator to the upper cross member of the radiator frame. We tilt the radiator towards the engine so that it comes out from under the upper cross member of the radiator frame, lift the radiator and remove it complete with hoses from the engine compartment 5 - to remove the radiator supply hose, use pliers to compress the ends of the clamp and, by sliding the clamp along the hose, remove the hose from the pipe of the right radiator tank In the same way, disconnect the radiator outlet hose from the fitting of the left radiator tank, and the steam exhaust hose from the fitting of the left tank (when removing the hose from the fitting, be careful not to break off the fragile fitting)
6 – then using a 12mm head, unscrew the two bolts securing the radiator bar to its tanks and remove the bar.
We install the Lada Granta radiator in the reverse order. If, when removing the radiator, its lower mounting pads remain in the holes in the lower cross member of the radiator frame, then remove the pads from the holes and put them on the radiator pins. If the radiator cushions have lost their elasticity, are cracked or crushed, it is better to replace them with new ones.
Source: https://blaginin.net/2016/03/15/radiator-lada-granta-ustrojstvo-snyatie-i-ustanovka-radiatora-lada-granta/
| Anyone who has at least once seen the latest car model from the VAZ concern will say that a new radiator grille for the Grant is an extremely necessary thing. Don’t worry, the item fully complies with all standards and has a modern appearance. |
how to remove and tuning methods
In any car, the radiator grille is one of those elements that catches your eye when you first look at the car. It is located on the front of the car and is therefore so noticeable. The “facial expression” of a car also very much depends on how the radiator grill looks.
It is for this reason that many car owners change it or perform tuning to give their car some individuality. The Lada Granta radiator grill is no exception. You can see many attempts to improve it in various ways.
Many owners complain that this model has virtually no protection for the radiator from dust and dirt entering from the outside. Proper tuning helps eliminate this problem.
How to remove the radiator grille of a Lada Granta
Before tuning this element, let's figure out how it can be removed from the car.
The Lada Granta radiator grill can be removed in 2 ways. According to the classical method, you need to proceed as follows:
- remove the front bumper;
- on its inner side, unscrew the nuts securing the grille, there are 9 of them;
- Click to open 2 locks under the headlights.
The second method makes it possible to do without dismantling the front bumper. The algorithm looks like this:
- Unscrew 6 bolts from the top of the grille;
- bend it, stick your hand in, find by touch 4 bolts at the top and 5 nuts at the bottom - for this you will need a figure eight wrench;
- Under the headlights, use a screwdriver to open the 2 clamps.
After dismantling, you can begin tuning. After this, installation is performed in reverse order.
Tuning using a utility net
Tuning the front part of a Lada Granta car using a Chain-link mesh is very common. Such a mesh can be bought at any hardware store - it can be metal or plastic.
Choose the option with small cells
This is important to avoid excess dust getting under the hood of the car.
Next you need to follow a simple algorithm:
- using one of the methods described above to remove the radiator grille;
- cut off all horizontal and vertical jumpers, leaving only the outer frame;
- using cold welding, seal all the holes that were created after the jumpers were cut off;
- clean the surface from all irregularities and burrs;
- Cut the mesh to size and attach it to the frame. If the mesh is plastic, you can simply glue it. If it is made of metal, heat the frame so that it does not burst, and screw the mesh with self-tapping screws;
- paint and wait for it to dry. At this point the tuning can be considered complete.
Installing a radiator grille on a Lada Granta car
After tuning is completed, the Lada Granta radiator grill is installed back. To do this, the finished part is placed in the standard opening in front of the radiator and secured with nuts, bolts and clamps. Next, you need to check how correctly the fit is made and inspect the front part of the machine for irregularities, burrs and protrusions. If any are found, clean them with a file or fine sandpaper.
Conclusion
Tuning the radiator grille is a good way to make the appearance of a car more attractive, make it stand out from the crowd, and add originality. This can significantly change the visual perception of your car when looking at it from the front.
The car will acquire a more modern, stylish and attractive exterior. It is precisely these considerations that drive those car owners who decide on tuning.
In the case of the Lada Granta car, the argument in favor of alterations of this type is the actual lack of protection of the engine compartment from particles of dirt, dust and moisture entering from the front. This is unlikely to benefit the car. Therefore, many car enthusiasts resort to making radiator protection with their own hands.
Education: secondary specialized. Specialty: car mechanic. Professional diagnostics, repair, maintenance of passenger cars of foreign production 2000-2015. Extensive experience working with Japanese and German cars.
Without dismantling
This method will take less time than the other. However, it comes with some risks. The fact is that the grille in this Renault model uses special ears on the sides for clamping. They hold the plastic tightly in the bumper. During operation, if handled carelessly or if excessive force is applied, these ears can be torn off. In addition to the ears, the plastic is held in place by 8 more fasteners on top and 8 on the bottom.
You need to start by unscrewing several screws that secure the lower part of the bumper to the Sandero body. This will loosen the tension, making it easier to remove the radiator grille. This is done using Torx screws. Self-tapping screws have a six-point head. You won’t be able to unscrew them with a simple Phillips screwdriver, so it’s better to stock up on the right tool.
After unscrewing the screws, the tool will no longer be needed. The remaining procedures are carried out manually. As already mentioned, the plastic part itself is held in the bumper by latches. To dismantle it, you need to press each latch down and press the plastic itself inward. This way you can take him out of the holds one by one. We do the same with the remaining latches of the lower part.
When the lower part is released, you need to slightly press it inward. We perform the same operation with the upper part.
Next, the plastic needs to be shifted to the right. At this stage it is necessary to act extremely carefully. Having moved it to the right, you need to slightly lift the upper edge of the bumper, and then pull the part towards you. Thus, the left part will be dismantled. Then you need to slightly bend it in the plane and move it to the left.
Experts' recommendations for choosing a radiator protective mesh
- Regardless of the modification of the accessory, always buy only from certified points of sale and official representative offices;
- any quality-made part will last longer than a cheap fake;
- if the car is often used in rough terrain, with poor road surfaces, it is not rational to install chrome-plated protection for aesthetic reasons;
- To visually distinguish the original from the fake, look at the method of fixing the grille to the body. The presence of nylon ties will indicate a factory type of manufacture, while typical plastic latches indicate a handicraft production.
Review of producer prices. The influence of workmanship on product cost
| Name/article | Price, rub.) |
| RE-53263 with cell at “15” | from 3400 |
| RE-53259, cell "11 - 15" | from 2000 |
| RE-67016 cell “11 - 15” | from 1700 |
| 99999219004100 original Lada, metal frame | from 1000 / pcs. |
| 99999219008756 original Lada, metal frame | from 1000 / pcs. |
*prices are current as of 10/05/2018.