Replacing injectors on a 16-valve valve
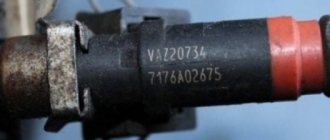
From the manufacturer's factory, VAZ-2112 cars were equipped with injectors from “Bosch” and “Siemens” ( mainly Bosch 0 280 158 996 – approx.) the service life of which before the first cleaning is within 50 thousand kilometers.
Step-by-step work order
- First of all, we remove the air filter housing, the mass air flow sensor (MAF – approx.) and the pipe.
- Then you need to relieve the pressure in the fuel system. In order not to suffer, and to do this work easier, we place a rag under the pipes and unscrew the connections. This will release the pressure quickly, and the remaining gasoline will flow out onto the rag.
Using two wrenches, unscrew the fuel line.
The power supply is disconnected.
Place the loosened bolts in a safe place.
To remove the ramp, you will have to make an effort.
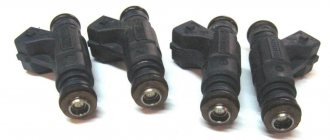
When the fuel rail is removed, we carry out work to dismantle a specific injector:
- We remove the power supply from the injector, first moving the block to the side.
We remove the pads one by one.
Increase in working volume
The most common option for increasing the working volume to 1600 cc. cm is to increase the piston stroke to 74.8 mm (standard - 71 mm) by replacing the crankshaft and pistons. There are several options here
a) “Forged” pistons, common sizes 82.0, 82.4, 82.5 84.0 mm of various classes. “Forged” pistons come in both regular and T-shape shapes. The latter are much lighter in weight. b) Standard pistons that have undergone special mechanical modification. c) Using pistons 21213 with mechanical modification and replacement of connecting rods for a “floating” piston pin.
In addition to the most common crankshaft with a piston stroke of 74.8 mm, there are also CVs with a piston stroke of 75.6 (standard from 1.6) 78, 79, 80 and even 84 mm. By using these crankshafts, volumes from 1580 to 1862 cc can be obtained. cm, and almost all configurations can be accommodated in a block of standard height. In this case, naturally, the “torque” of the engine suffers due to non-optimal R/S.
The crankshafts themselves are produced in three “weight categories” - light, medium and heavy, from different blanks - 2112, 11183, etc.
In production VAZ cars with a volume of 1.6 liters. a crankshaft of 75.6, 1.5 liters is used. – 71 mm.
Owners of 16-cl. engines (for whom money does not matter, they can avoid this hemorrhoids and purchase a VAZ 21128 engine with a volume of 1.8 liters (100 hp, 160 Nm) or a volume of 2.0 liters and a power of 118 hp.
In the 21128 engine, the weight of the crank mechanism is reduced by 190 g, a “high” block is used (1.9 mm higher), an original crankshaft, connecting rods 129 mm long, and lightweight pistons. According to the manufacturers, this modification does not bend the valves when the timing belt breaks.
For 8V, a new engine 21084 with a volume of 1.6 liters is produced at the same OPP. 21084 is available for OPP only in a carburetor version.
| Specifications | 21203 | 21128 | 21084 |
| Cylinder diameter, mm | 82 | 82,5 | 82 |
| Piston stroke, mm | 94 | 74,8 | |
| Working volume, cm³ | 1980 | 1580 | |
| Compression ratio | 10,6 | 10 | |
| Rated power, kW/rpm | 80/5400 | 60/5600 | |
| Rated torque N*m at rpm | 182/3200 | 160/? | 124/3600 |
| Number of cylinders | 4 | 4 | 4 |
| Valve drive | Hydraulic pushers | Hydraulic pushers | |
| Clutch/diameter mm | 21203/215 | ||
| Connecting rod length, mm | — | 129 | |
| Octane number of gasoline | AI 95 | AI 95 | AI 91 |
| checkpoint | 21203, 2123 |
Replacement or cleaning?
In order to understand what needs to be done with the nozzle, change it or simply clean it, it is better to diagnose them on a special stand. Under such conditions, you can test it in operation under different pressures, and also visually see how tightly it closes, and whether it is “snotty.”
If any of the injectors needs to be replaced, then you should buy a new one with exactly the same part number as the old one. Also, during installation of cleaned injectors, all O-rings should be replaced (2 pieces on each injector - approx.).
Installation is carried out strictly in the reverse order, similar to the removal procedure.
Video about cleaning injectors
Attention! When working with injectors, observe all fire safety measures, since gasoline vapors are highly flammable and pose a high fire hazard.
Cleaning methods
There are three main ways that will allow you to clean your injectors. Decide for yourself which one to use.
Way
Peculiarities
Quite effective, but financially expensive. Plus, working with chemicals is risky because it is very dangerous to your health. Cleaning is carried out only in full compliance with safety regulations
Car services will now do everything for your money. But you'll have to pay a lot. Don’t forget that finding a really good, responsible and inexpensive service station is something out of the realm of fantasy. Therefore, either questionable quality of work, or impressive money for effective cleaning
The most economically profitable way to save money and complete the task efficiently. You should choose this option only if you have an idea about the design of the motor, the location and functions of the injectors
Do not carry out cleaning yourself if you have never climbed into the engine compartment yourself to replace or repair engine components. Trust trusted specialists, do not take risks.
Before and after cleaning
What are injectors?
An injector is a special mechanical sprayer located in the “head” of the engine, through which fuel is supplied to the cylinders under high pressure.
Injector malfunctions
Among the most common causes of injector failure may be the following:
- The injector nozzle is coked - in this case, increased fuel consumption may be observed, vehicle dynamics will decrease, and engine starting will be difficult at subzero ambient temperatures. Otherwise there are no differences.
- The injector valve does not close hermetically (“the injector is snotty” - note) - here there may be increased fuel consumption, “tripleting” and increased detonation (about checking the knock sensor here), unstable idling.
- Valve sticking - engine troubles. In order to diagnose it, with the engine running, turn off the power supply to each injector in turn. With a non-working injector, no changes in engine operation will be observed, but with a working injector, the speed will drop.
If you find a non-working injector on your car, or they need cleaning, you need to know how to properly dismantle them. You could already read more about this above.
A problem arose - the injector nozzle was coked - we repaired it ourselves, thank you very much to the author of the article. When replacing, we found the same ones, plus we bought several o-rings at the car market, they cost pennies. The repair was very inexpensive!
Operating principle and structure of the injector
VAZ 2110 how to clean the injector yourself
Below are the operating principles:
- There is a channel inside the injector that is filled with gasoline;
- the shut-off needle regulates the injector channel and thus controls the supply of gasoline;
- the locking needle is pressed by a spring so that it fits tightly to the injector channel;
- when the needle is raised, a wide stream of fuel is formed, which drips onto the engine cylinders, having previously been well mixed with air;
- the outlet (from where the fuel comes) closes when the needle is lowered, thus stopping the fuel supply;
- The injector contains an electromagnetic coil that regulates the position of the needle: when current is supplied, the needle rises, when there is no current, it lowers.
Note. If possible, the landing spring inside the injector should be made of high-quality metal, which should conduct current well and be resistant to corrosion. If it is not financially possible to purchase one, then it is necessary to regularly treat the landing spring with an anti-corrosion coating.
Diagnostics of the functioning of the injector and obvious signs of a malfunction
Objective signs of injector clogging, when you need to immediately flush the injector on a VAZ 2110:
- as the temperature outside dropped, the engine cooled down and began to start with great difficulty;
- at idle the engine is extremely unstable;
- when you press the gas pedal, you can objectively feel its complete or partial failure;
- reduction in acceleration speed and overall engine power;
- increase in gasoline consumption;
- increased toxicity of engine gases (emissions);
- since the fuel mixture receives an insufficient amount of oxygen, the temperature in the internal combustion chamber rises, which in turn entails a significant increase in engine detonation;
VAZ 2110 injector cleaning
- Popping noises can be objectively heard directly in the exhaust system itself with constant frequency;
- failure of various sensors, including the catalytic converter, and prematurely.
Note. In practice, it is not necessary that all of the above symptoms will be observed when the injector is clogged; the manifestation of at least one is sufficient. Flushing the injector is a simple procedure, however, it must be done on time. Since late flushing of the injector may be ineffective and most likely it will need to be completely replaced.
Removing injectors VAZ 21124
We dismantle the fuel rail if it is necessary to remove the injector, as well as in other cases when repairing the engine.
Before performing the operation, read the safety rules when servicing and repairing the power system (see “Safety precautions when servicing and repairing the power system”).
1. Relieve the fuel pressure in the fuel line (see “Fuel line - pressure relief”).
2. Remove the intake pipe (see “Intake pipe of engine 21124 (1.6i 16V) - removal and installation, replacement of o-rings”).
3. Disconnect the wiring harness connectors from the injectors (the photo shows a view from the radiator side).
4. Cut the two clamps securing the wiring harness to the fuel rail and move the harness to the side.
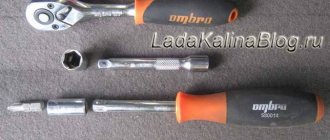
5. 17 mm
Unscrew the fuel pipe fitting from the rail, holding the hex end of the fuel rail with a wrench of the same size.
6. Using a Phillips screwdriver, unscrew the screw securing the fuel pipe tube.
7. Remove the end of the fuel line tube from the fuel rail.
If the fuel pipe O-ring is damaged, it must be replaced.
8. Remove the rubber sealing ring from the fuel line tube.
5mm hex wrench
unscrew the two bolts securing the fuel rail to the cylinder head.
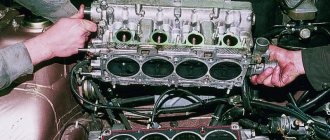
10. Remove the fuel rail assembly with injectors.
11. Remove the injector retainer from the fuel rail.
12. Remove the nozzle from the ramp.
13. Similarly, remove the three remaining injectors.
Assembly and installation
We assemble and install the fuel rail in the reverse order.
Before assembly, coat the rubber O-rings with a thin layer of engine oil.
Before installing the ramp, replace the lower injector rings.
Why did I start this? Everything is simple here. I began to feel that the car began to react very sharply when dropping the throttle, and at first speed it generally behaved aggressively, there was no smoothness. Therefore, I first changed the mesh in the fuel pump, and then I dared to carry out this procedure. At first I wanted to remove the injectors myself and take them for cleaning, but then vaser-x told me that clean them yourself then, everything is very simple
We begin cleaning using the technology described above.
We understand that one of the injectors does not close and is constantly working. We're going to get a new injector.
We sentence the old one to DEATH.
See BEFORE and AFTER cleaning the fan spray
We rejoice, we are putting everything back together. At the same time, I also changed the rollers, otherwise last time I limited myself to just replacing the belt:
Issue price:
bosch injector 0 280 158 022 = 770 rub. Carb Cleaner = 200 rub.
**Click “like” for the picture with “Sentencing the injector to death”
Replacing and removing injectors on a VAZ-2112 16 valves on your own
Dismantling
Before replacing or cleaning the injectors, they will need to be removed from the fuel rail. To achieve this, the following activities are carried out:
- Make sure the engine has cooled down properly. It is not safe to work on a hot engine;
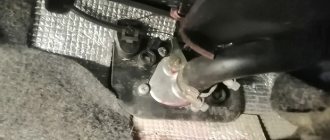
- Disconnect the power wires from the fuel pump to de-energize the device;
- Try to reduce the pressure in the engine power system as much as possible. To do this, the engine starts, and then you need to wait until it stalls at idle speed;
- Repeat this procedure several times until the car simply stops responding to turns of the ignition key;
- That's it, now our goal is the fuel rail. To remove it, you must first remove the terminals from the battery, turn off the power to the ramp itself, disconnect the fuel supply hoses, and also disconnect all electrical appliances going to it. These are pressure, idle, throttle position sensors;
- If you have an 8-valve engine, then you do not need to remove the receiver. This step is relevant for engines with 16 valves;
- Experts do not recommend removing the intake manifold without dismantling the throttle valve and the hose going to it. It is better to unscrew and disconnect everything at once, which will allow you to continue working more conveniently;
- Cover the exhaust manifold openings with something to protect them from foreign objects;
- Using a hex wrench, you can unscrew a couple of bolts and remove the fuel rail along with the injectors;
- Make sure that there are no distortions when removing the ramp, otherwise problems may arise with the dismantling processes;
- We remove the injectors. To do this, remove the mounting brackets that hold the electrical connector. You also need to remove the bracket that holds the injector in its seat.
After dismantling the elements, be sure to close the seats to prevent debris and other objects from getting in, and place the nozzles themselves on a table or floor, after laying down a dry rag.
Here you can decide whether to change or clean the elements of the fuel system. If replacement is required, install new injectors in place of the old ones and follow the assembly procedure.
Step-by-step work order
- The most important thing is to remove the air filter housing, the mass air flow sensor (MAF – approx.) and the pipe.
- Then you need to relieve the pressure in the fuel system. If you set a goal not to suffer, and this work is easier to do, put a rag under the pipes and unscrew the connections. This will release the pressure quickly, and the remaining gasoline will flow out onto the rag.
When using two keys, unscrew the fuel line.
The power supply is disconnected.
How to remove injectors on a VAZ 2112 16 valves.
Place the loosened bolts in a safe place.
To remove the ramp, you will have to make an effort.
When the fuel rail is removed, we carry out work to dismantle a specific injector:
Meet the model
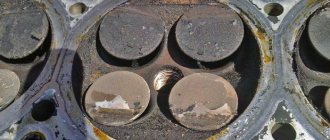
With a new engine, the unit was given the name VAZ 21124, this car actively fights against the ecology of the external environment. In addition to everything, when the car starts, the traction at the bottom has become noticeable, and the engine now runs calmer, without sudden jumps. We often hear questions from owners of 16-valve engines: “What needs to be done so that the valves do not bend in the piston?” In the VAZ 21124, this problem will not exist; in the bottom of the piston there are holes and sports shafts that control the rise of the piston, and don’t let the knocking and noise of the VAZ 21124 engine scare you, this is its normal environment.
Upgrading a car is now the most important goal for every modern and self-respecting driver. Tuning the VAZ 21124 includes changes to both the internal and external characteristics of the car. Styling the appearance of a car includes installing a body kit on the bumper fenders, sills, hoods and doors, this gives your car an individuality, a sporty look, and also improves its aerodynamic performance. To create a sports car VAZ 21124, it is impossible to do without replacing body elements with plastic material. Plastic parts reduce the weight of the car, making it easy to drive on the road. The final feature of a sports car is the installation of alloy wheels and sports tires.
Replacement or cleaning?
In order to understand what needs to be done with the nozzle, change it or simply clean it, it is better to diagnose them on a special stand. Under such conditions, you can test it in operation under different pressures, and also visually see how tightly it closes, and whether it is “snotty.”
If any of the injectors needs to be replaced, then you should buy a new one with exactly the same part number as the old one. Also, during installation of cleaned injectors, all O-rings should be replaced (2 pieces on each injector - approx.).
KEY-DOP
Installation is carried out strictly in the reverse order, similar to the removal procedure.
Gearbox rows, main pair
The choice of gearbox and GP depends on the goals and capabilities of the engine. The table lists the main popular rows of the budget series.
| Rows | 1 | 2 | 3 | 4 | 5 | 6 |
| Standard | 3,636 | 1,950 | 1,357 | 0,941 | 0,784 | |
| 21083-05 | 2,923 | 1,810 | 1,276 | 1,030 | 0,880 | |
| 21083-06 | 2,923 | 1,810 | 1,276 | 1,063 | 0,941 | 0,784 |
| 21083-07 | 2,923 | 2,053 | 1,555 | 1,310 | 1,129 | |
| 21083-08 | 3,416 | 2,105 | 1,357 | 0,969 | 0,784 | |
| 21083-11 | 3,636 | 2,222 | 1,538 | 1,167 | 0,941 | 0,784 |
| 21083-12 | 3,250 | 1,950 | 1,357 | 1,030 | 0,784 | |
| 21083-18 | 3,170 | 2,105 | 1,480 | 1,129 | 0,886 | 0,784 |
On cars 2108-09-99-15, a gearbox with a gear ratio of 3.9 is installed as standard, on the “tenth” family - 3.7. By installing a GP with a large gear ratio on a car, you can significantly increase the dynamics at the bottom, although losing in maximum speed. As a rule, ready-made “commercial” gearbox ranges are offered on the market, with which they can be used in addition to standard GP 3.7; 3.9; 4.1, tuning GP – 3.5; 4.3; 4.5; 4.7; 4.9 and 5.1. The most important parameter when calculating a transmission is the total gear ratio (gearbox + gearbox) in each gear.
A good example of an illiterate approach to transmission calculations is the standard gearbox of front-wheel drive VAZs. As a result of the inconsistency in speed in 1st and 2nd gear, the latter experiences strong overloads when shifting, which causes it to fail earlier than others. When installing rows in cars of the 10th family, it is desirable to use a 083 secondary shaft.
Gear ratios and speed characteristics of different options for “crossing” the gearbox and gearbox rows can be calculated here
Injector malfunctions
Among the most common causes of injector failure may be the following:
- The injector nozzle is coked - in this case, increased fuel consumption may be observed, vehicle dynamics will decrease, and engine starting will be difficult at subzero ambient temperatures. Otherwise there are no differences.
- The injector valve does not close hermetically (“the injector is snotty” - note) - here there may be increased fuel consumption, “tripleting” and increased detonation (about checking the knock sensor here), unstable idling.
- Valve sticking - engine troubles. In order to diagnose it, with the engine running, turn off the power supply to each injector in turn. With a non-working injector, no changes in engine operation will be observed, but with a working injector, the speed will drop.
If you find a non-working injector on your car, or they need cleaning, you need to know how to properly dismantle them. You could already read more about this above.
Exhaust system.
As a rule, tuning cars are equipped with 4-2-1 “spiders” that work well in a fairly wide speed range. 4-1 systems have not taken root in civilian tuning due to a very narrow range of effective operation. The principle of operation of such an exhaust is based on creating a vacuum in front of the exhaust valve that is not yet open, which contributes to better purging of the cylinder. Learn more about setting up a release.
The most common “tuning” in our country is the installation of a “sports” muffler. The most common (and, naturally, the cheapest) products are Nex (IMHO - it sucks) and PowerFull, less common are Remus, Asso, Sebring... Such a muffler can only be useful in combination with a direct-flow “spider”, a proprietary main and additional muffler with pipes of increased diameter (at least 55 mm for engines 1.6 and above). Otherwise, it’s just a deeply pathetic sound. Moreover, Powerfull produces the least “noisy” models, ASSO – the most aggressive and loud. PRO-SPORT offers “cans” with the ability to adjust the “volume” +/- 10db using a removable earbud. Well, of particular interest is the Pro-Sport muffler with electric (from the cabin) volume control, from standard to “Super-Sport” (difference 30 db). The exhaust sound is a matter of taste, personally I like the quiet “roar” - this is the big PowerFull can (in the center) and the Remus twin-pipe (DTM). However, the price of the first is 75-80 USD, the second – more than 300...
Repair
Before removing the injectors from the dismantled rack, it is advisable to check their functionality. To check you will need:
- four identical containers,
- tester,
- wires.
Functionality check
- Connect the gasoline supply and drain hoses and the power connector to the rail with injectors.
- Place the rack over the measuring cups.
Place the rack over the measuring cups
The shape of the cloud should be approximately the same for all nozzles
After the war, Germany received a ban on the development of injectors for aircraft engines. And engineers began adapting direct injection systems for passenger cars, discovering another important advantage compared to carburetors - efficiency.
Vladimir Berestenev