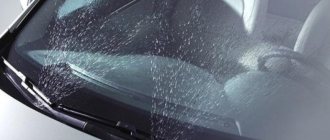
Like many here, I was not entirely satisfied with the performance of the standard windshield washer nozzles. Someone quite rightly called them “three streams of pies.” If it was heavily soiled, the part of the glass closer to the passenger door remained dirty (or rather, the dirt was smeared).
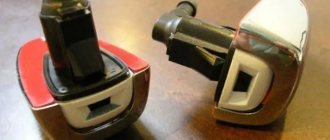
Fan nozzles are a completely different matter. As a rule, they are installed from more expensive KIA brothers. Their prices are not cheap, but you can find quite reasonable ones. So, I went through different options and settled on these: 986301R800
and
986301R100
- right and left, respectively.
And a check valve 9888629000
so that the liquid does not escape.
I bought all this at Avtodok. It turned out to be 2 times cheaper than in Exist. And in general, Autodok somehow pleased me - it’s fast and cheap!
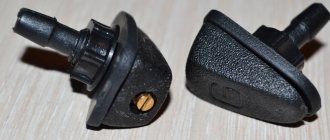
Now how to install all this. In general, many have already written, I’ll add on my own: standard injectors are very difficult to remove. Their fasteners are the same as the fan ones (latches), so there is no point in hooking them with anything from the sides. It is best to slip thin flat-head screwdrivers in front and behind, thereby pressing on the latches, and pull them up using a rocking motion.
I started to remove it from the passenger side, but didn’t push the front latch in completely, and as a result, I broke off a piece of plastic. Everything went smoothly with the second one.
Another thing is installing new ones. A nice click and everything is in place. Contrary to some, I will say: there is no need to undermine or file anything anywhere !
Everything fits perfectly.
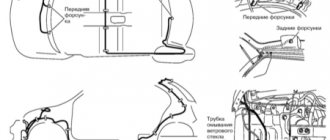
There should be no issues with the check valve. It is installed instead of the hose connector. Location below.
The main point is the arrow on the valve. Indicates the direction of fluid movement.
Now impressions. No words, better! Not perfect, but much better than it was. The main flow of liquid is rather low, but a copious flow of spray flies all the way to the roof.
It might make sense to place something under the front of the injector, pushing its nose up. Or maybe not, because the brushes will take most of the liquid from below and spread it all over the glass. Time will show.
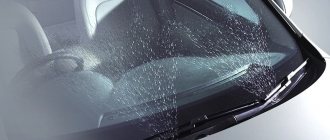
The standard windshield washer nozzles on the Kia Rio-3 supply water in three directed jets, which is not of sufficient quality to allow the brushes to wash away dirt . To clean the glass, the brushes have to make 3 movements or more. This is due to the fact that the jet nozzles do not supply enough water.
Fan nozzles are another matter. They cover a large surface of the glass with water and allow you to get rid of dirt on the glass much faster and with better quality.
Of course, fan nozzles have two disadvantages :
- Increased water consumption;
- Temporarily reduced visibility of the road due to a dense flow of water while washing the glass.
When replacing injectors in a Kia Rio-3, it is advisable to install a check valve , which will maintain pressure in the system and prevent water from flowing back into the tank. This will allow you to instantly wet the glass and prevent the brushes from rubbing the glass “dry”.
Types of windshield washer nozzles
Washer nozzles are divided into 2 groups:
Jet nozzles
Spray the liquid in 2-3 jets in different directions. They are very inconvenient because they are not able to wash an entire glass at once. The pressure of water in them is adjusted manually using a screw, which causes its own inconvenience. Installed on old and inexpensive cars.
Fan type nozzles
Their difference is that they spray liquid over the entire plane of the glass. Several small streams are formed that wash all the glass at once. No manual configuration required. Most auto manufacturers are gradually introducing this group of products.
Advantages of fan-type nozzles
The advantage of fan nozzles is that water does not fall on the front glass in drops or pairs of liquid jets, but in multiple drops at once, due to which a large square of glass is covered.
Due to this, windshield wipers begin their work on moistened glass, carefully removing sediment or dirt stains. Of course, this poses a lower risk that the wipers will make scratches on the glass, because the sweeps will no longer be carried out on a dried plane.
Many car owners confirm that using this type of nozzle reduces the consumption of windshield washer fluid. There is one drawback: the unusual design, because of which they soon freeze in winter, but then the solution would be to choose models with a heating function.
Stories from our readers
“Fucking basin. "
Hi all! My name is Mikhail, now I’ll tell you a story about how I managed to exchange my two-wheeler for a 2010 Camry. It all started with the fact that I began to be wildly irritated by the breakdowns of the two-wheeler, it seemed like nothing serious was broken, but damn it, there were so many little things that really started to irritate me. This is where the idea arose that it was time to change the car to a foreign car. The choice fell on the melting Camry of the tenth years.
Yes, I had matured morally, but financially I just couldn’t handle it. I’ll say right away that I am against loans and taking a car, especially not a new one, on credit is unreasonable. My salary is 24k a month, so collecting 600-700 thousand is almost impossible for me. I started looking for different ways to make money on the Internet. You can’t imagine how many scams there are, what I haven’t tried: sports betting, network marketing, and even the volcano casino, where I successfully lost about 10 thousand ((The only direction in which it seemed to me that I could make money was currency trading on the stock exchange, they call it Forex. But when I started delving into it, I realized that it was very difficult for me. I continued to dig further and came across binary options. The essence is the same as in Forex, but it’s much easier to understand. I started reading forums, studying trading strategies. I tried it on a demo account, then opened a real account. To be honest, I didn’t manage to start earning money right away, until I understood all the mechanics of options, I lost about 3,000 rubles, but as it turned out, it was a precious experience. Now I earn 5-7 thousand rubles a day. I managed to get the car buy after half a year, but in my opinion this is a good result, and it’s not about the car, my life has changed, I naturally quit my job, I have more free time for myself and my family. You’ll laugh, but I work directly on the phone)) If If you want to change your life like me, then here’s what I advise you to do right now: 1. Register on the site 2. Practice on a Demo account (it’s free). 3. As soon as you get something on the Demo account, top up your REAL ACCOUNT and go to REAL MONEY! I also advise you to download the application to your phone, it’s much more convenient to work from your phone. Download here.
However, others do not like the very high washer fluid consumption . There is a desire to increase the glass irrigation area .
To reduce fluid consumption when washing glass, you need to change the nozzles (nozzles):
- For fan nozzles
- For dual washer nozzles
Thus, after replacing the nozzles, the consumption of windshield washer fluid will decrease by approximately 2 times. In addition, you can install injectors from a foreign car on the VAZ 2110 (if you happen to have them at hand)
To increase the area of glass washing (watering), you can:
- Install an additional nozzle
- Move the glass washer nozzles to the frill
- Replace jet nozzles with fan nozzles
- Move the injectors from the frill to the hood
By analogy, an additional nozzle is installed on the fifth door of the VAZ 2111-12.
You can move the nozzles for watering the windshield to the top of the frill. Also in the example, the jet nozzles were replaced with double nozzles of the VAZ 2110.
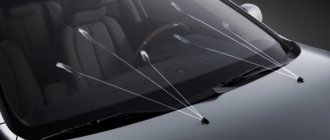
An example of the operation of standard jet and fan nozzles.
To install injectors on the hood of a VAZ 2110, you will need to drill it and treat it with anticorrosive. The original injectors were replaced with new ones from Shniva. The glass wash now has a larger area than before. This is how they wash the injectors of a Niva-Chevrolet from the hood of a VAZ 2110 :
Improved speed of spraying washer fluid onto glass
Refinement of glass washer system tubes
Have you ever had to modify your car's windshield washer systems?
TOP reasons why injectors do not work
Let's look at the reasons that force a car owner to remove windshield washer nozzles:
- The water spray holes are clogged. Sometimes it is enough to blow them out with an air stream, but if this does not solve the problem, you will need to remove them.
- Failure. Such parts are made of plastic; it tends to spin, crack and crumble. That's why they need to be changed.
- Changing inkjet options to fan models. Drivers who want to improve the performance of the washer system take out the old sprinklers and replace them with a modern look.
Preparing to remove the windshield washer nozzles
When unwinding parts, you will need to remove a large number of plastic parts, which tend to crack and break at very low temperatures. Therefore, it is recommended to carry out work, for example, in a warm garage.
You need to give the car time to stay in a warm garage after the frost. The removal of these parts is determined by their design, the presence of fluid heating and the brand of the machine. The following is an approximate diagram:
- Windshield wipers are removed. The method of their removal depends on the design. In some models, you need to remove the plastic plug. To do this, a plastic spatula is placed under it, and the decorative element is carefully detached with a click. In older car models, you will need to make a little effort. The nuts securing the wipers are unscrewed. You cannot unscrew them all the way, because when you remove the windshield wipers, they tend to bounce off and break the glass. Then, using rocking movements, the windshield wiper is pulled out;
- remove the foam rubber pads on the hood, secured with tape. These components can be later secured with fresh adhesive tape, but they are often replaced with new elements;
- insulation is removed. In some cars, you also need to remove the insulation on the hood, which is attached to the back to save heat. The warm layer is held in place by clips, which are carefully removed. To replace damaged clips, the same clips are sold, also for older models;
- the frill is removed. This is a plastic lining between the hood lid and the glass. If you try to move it to remove the injectors, it may be damaged. The plastic plane will crack and will need to be replaced. To remove the frill, remove the fasteners that hold it, carefully pry up the plastic part and disconnect it from the body. Before removal, the parts must be removed from the latch located at the bottom center;
- The injector heating system is removed. In cars equipped with an injector heating system, it will need to be disconnected. To do this, remove the washer heating chip and plugs. The nozzles are disconnected from the washer hose attached to them at the end.
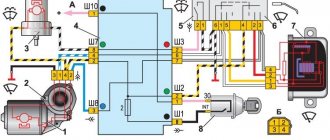
How the windshield washer works
The windshield washer system in a car is part of the windshield wiper. With its help, liquid is sprayed onto the windshield, which allows you to better clean it from dirt while driving.
Glass washer device
The design of a modern windshield washer includes the following components:
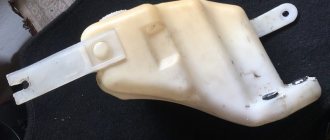
- tank—container for washer fluid (coolant);
- coolant level sensor in the tank, if provided;
- connecting tubes;
- an electric pump that supplies coolant under pressure to the injectors;
- windshield washer nozzles mounted on the hood, as well as a rear window washer nozzle;
- switch.
To activate the windshield washer system, the driver must press the steering column switch. After this, the pump will turn on and coolant will be sprayed under pressure onto the windshield. At the same time, the wipers start working (video author - Anton AUTO).
Step-by-step instructions for removing washer nozzles
In order to remove the injectors, you need to disconnect them from the body. The release method depends on the fastening method.
- In older models, they are secured to the hood using nuts. The key is placed on the fastening nut and turned 2-3 times. You need to completely unscrew the nut, remove and remove the fastener, and then you can put it back in place.
- In modern car models, the injectors are held on by latches. To remove it, you need to carefully press the latch and move the outer part towards the glass. If the part is difficult to remove, then a plastic spatula is inserted under the outer part of the nozzle and, carefully shaking, this part of the washer system is removed.
- There are certain brands of cars, where 1-2 injectors are covered with a plastic casing, secured with screws and seals. Sometimes it is possible to remove the protection only by carefully separating it. When it is necessary to install it back, then the casing is soldered or glued in place.
Sometimes, along with the injectors, the heating wiring is also removed and replaced with a new one. However, if desired, you can leave it and continue to use it. After removal, you need to carefully inspect all the elongated parts made of plastic and foam rubber. Those elements that have lost their elasticity, are twisted, or cracked are replaced with new ones.
Replacement
If the old motor has failed, there is no point in trying to repair it somehow. To buy a new part, you will have to spend very little money. And the replacement procedure on most cars is extremely simple.
I will describe the main stages of work associated with replacing this element of the windshield cleaning system of any car.
- Turning off the vehicle's power. A safety measure without which further work makes no sense. Be sure to remove the negative terminal from the car. It's simple but important. Otherwise, you not only risk burning the wiring, but also getting an unpleasant electric shock yourself.
- Search for a motor. It all starts with identifying where your windshield wiper motor is located. It depends on your car. On some cars, just lift the hood and you will immediately see the washer reservoir. The motor itself is located on the reservoir (partially inside) of the windshield wiper, into which the liquid is poured. Do you see the tank? If yes, then you are in luck. If not, then you will have to look for it by removing elements of the engine compartment. On some car models, the tank is hidden so that the fender protection has to be removed.
- Disconnect the connectors with wires from the motor. Then remove the tank itself.
- The hose and fitting are separated from each other. Don't forget to drain the liquid. Filling a new one will not be difficult. Yes, and for prevention it won’t hurt to do it.
- Using a screwdriver, push the intake seal out of the bushing. This will allow you to completely remove the windshield washer motor.
- Don't forget to install a new bushing when reassembling. This often leads to the washer pump itself breaking down. So the old bushing goes to the landfill.
- Reassemble the assembly in reverse order. Here many craftsmen relax, because they consider the work done. In fact, reassembly causes more problems than disassembly. Advice from someone who made similar mistakes. That is, from me. Do not try to remember the location of parts unless you are confident in your memory capabilities. We got distracted by something, forgot, got confused. This happens to everyone, and there is nothing wrong with it. To ensure proper reassembly sequence, you can record, mark, or label the parts in the order in which they are removed. This will make it easier to put everything back together the way it was before.
The instructions are for informational purposes only, as the procedure may differ depending on the car model. Consult your machine's owner's manual for assistance. This is the best visual aid for self-repair.
There is nothing complicated in this work. Even the car owner who prefers to solve most problems with the help of a car service can easily cope with it. Repairs cost several hundred rubles and take a maximum of a few hours.
Cleaning windshield washer nozzles (step by step)
The car owner can clean the injectors himself, and it won’t be a difficult task. There are several ways. They differ from each other only in the tools used. Starting from them, you can cleanse yourself by:
- syringe;
- pins and fishing lines;
- compressor.
Taking a pin, you need to insert it into the hole of the part and push it all the way, then pull it out and check the functionality of the sprayer. When the mud plug was located close to the outlet, then a stream of water would throw it out.
When working with thin instruments, you need to try not to damage the calibration of the hole, since then the jet will begin to disperse unevenly and not reach the top. According to many car owners, the simplest of them is cleaning with a syringe.
To do this, liquid is drawn into the syringe and gradually introduced into the nozzle. This is done through the nozzle in the opposite direction. The hoses must be disconnected ahead of time so that the cleaning water can come out along with the dirt on that side.
You should not use very aggressive household chemicals; you should not overdo it, as it can not only clean, but also damage the element. Many people recommend choosing citric acid; it cleans perfectly and does not harm the nozzle.
How to fix watering on a VAZ
Suppose a breakdown occurred on a VAZ car. Let's talk first about the “tenth” family. To replace washer nozzles on a VAZ 2110, we will need the following tools:
- wrenches;
- screwdrivers.
Begin.
- First of all, we dismantle the air intake grille.
- Next, unscrew the fasteners and remove the decorative trim.
- Having unscrewed the screws securing the defective elements, we dismantle the latter.
- We pull out the ends of the tubes from the dismantled elements.
- We install new spare parts and reassemble in the reverse order.
If the spray nozzles are broken on the “twelfth” model, then we replace the defective windshield washers on the VAZ 2112 using exactly the same technology.
However, it happens that the pump of the washer fluid spray system breaks down (due to, say, turning on a system filled with water in subzero weather). Then, to replace the “dead” windshield washer motor, you will have to remove the battery, remove the system reservoir, disconnect the wires and reinstall the unit.
Now let's talk about Samara's family. To replace the injectors on a VAZ 2114, we’ll take some tools, namely pliers.
Everything is much simpler here. Let's get started.
- We open the hood and find our broken parts.
- We pull out the hoses from them.
- Gently squeezing the fasteners from below with pliers, we pull out the defective units.
- We install new ones in the reverse order.
And here’s how Kalina’s replacement goes. Only a screwdriver is taken from the tool. They start by opening the hood.
- Using a tool, pull out the clips securing the hood trim.
- Remove the casing.
- Remove the tubes from the broken jets.
- Remove the faulty elements and install new ones. Then everything is assembled on the way back.
Now as for Priora. To replace the washer nozzles from Priora, we take the following accessories:
- flat screwdriver;
- piece of fabric.
- Having placed a quadruple piece of fabric, we pry the defective element with a tool and pull it out from the hood hole.
- We remove the pipe from it.
- We install the new spare part in the reverse order.
However, the picture will be more detailed if we look at popular foreign cars.
What to do with foreign cars
To replace the windshield injectors on Renault Logan, we will need pliers. We act like this.
- We open the hood and find the defective element.
- Remove the flexible tube from it.
- Gently squeezing the clamps with pliers, pull the sprinkler out.
- We install the new spare part in the reverse order.
As you can see, for this car it is very easy to carry out the entire process with your own hands.
The situation is somewhat different with the Korean foreign car. To replace the windshield washer nozzle on a Kia Sid, you need to use a flat-head screwdriver. What are we doing.
- Carefully insert the tip of the tool from the front seats of the car under the jet. Then press the latch.
- We take out the broken part to ourselves.
- We disconnect the flexible tube from the dismantled element.
- We install the new sprayer, moving backwards step by step.
Here we mention that replacement is carried out in almost the same way at Solaris. You just need to use a screwdriver a little differently. More precisely, you need to take two screwdrivers. Use one to pry the jet from the side of the window, and the second from the inside of the hood.
But when changing the windshield washer nozzles on a Chevrolet Trailblazer, we proceed one by one as in the instructions just given.
It is much more difficult to replace the windshield washer nozzles on an Opel Astra. For this car, in order to get to the broken nozzles, you must first unfasten the wiper arms by removing the caps and unscrewing the nuts. And then you still need to dismantle the plastic panel on which the replacement fittings are attached. It won't be difficult to remove them from the panel.
The cost of such a simple operation is low
It is not difficult to assume that the cost of performing such a simple operation in a car service center is also low. And if someone is afraid of breaking something, they can safely go to a service station.
Approximate prices in Russia are shown in this table.
| City | Cost to reinstall the kit |
| Moscow | 1000 rub. |
| St. Petersburg | 800 rub. |
| Ekaterinburg | 700 rub. |
| Samara | 500 rub. |
Here are the average data for reinstalling the jets of the system of a foreign car. And if it is necessary to replace the windshield washer pump, the cost of such an operation will become twice as expensive.
Well, above we have outlined detailed instructions for restoring the washer spray system, both for domestic cars and for popular foreign cars. If the above operation did not lead to success, the conclusion is obvious - either something was missed when installing the fittings, or they do not fit the given car model.