Modern automotive industry is, first of all, technologies that will help the vehicle owner recognize a malfunction in time. The engine of a car is its “heart”. If the engine does not function normally, its elements will eventually become unusable, and then the components will have to be replaced.
Vehicles are equipped with an oil pressure sensor, which is an element of the oil system. Sometimes the meter is faulty, and then the device needs to be replaced. But before that, you need to know where the oil pressure sensor is located and what it is needed for.
Why do you need a device, its varieties
First, it is important to explain why an oil pressure sensor is needed. It is required to automatically measure the pressure of technical fluid, which is necessary to lubricate the main components of the engine. If there is not enough oil in the system, then irreversible changes will occur to the engine: the friction force of the cylinders and other moving parts will increase several times, which will lead to their further replacement.
Pressure sensors are divided into two types:
- Control. This is an electrical device that consists of a resistor and a converter. All information is transmitted to the ECU.
- Emergency oil pressure sensor. Installed on most vehicles. It shows the driver how much technical fluid is in the system. As a rule, the pressure is displayed on a dial indicator.
Video: do-it-yourself installation of a remote oil pressure meter
Filmed by the “Auto Repair and Tuning” channel.
Do you have any questions? Specialists and readers of the AUTODVIG website will help you ask a question
Was this article helpful?
Thank you for your opinion!
The article was useful. Please share the information with your friends.
Yes (100.00%)
No
X
Please write what is wrong and leave recommendations on the article
Cancel reply
Rate this article: ( 4 votes, average: 5.00 out of 5)
Discuss the article:
The principle of operation of an electronic and mechanical device
Before you learn how the oil pressure sensor works, you need to consider what elements it consists of.
Electronic controller circuit:
- filter;
- stub;
- pusher;
- pump drive;
- electrical terminals;
- indicator.
How does a mechanical controller work:
- stub;
- stock;
- spiral winding;
- dial indicator.
Operating principle of the electronic oil pressure sensor:
- After the motorist starts the vehicle, oil is supplied to the system.
- The oil filter pusher is automatically activated and the plug is displaced.
- The circuit opens and the signal goes to the oil sensor.
- The indicator lights up and informs the driver about the operating status of the system.
How does a mechanical oil pressure sensor work:
- Under pressure in the line, the plug begins to shift.
- Given the position of the plug, the rod moves and affects the dial indicator.
Location
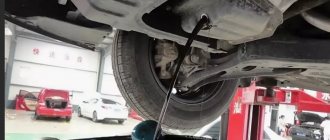
The location of the oil pressure sensor depends on the design features of the vehicle. As a rule, the emergency controller is located on the cylinder head. You can find it at the radiator tap. A high pressure manifold is used to secure the device.
Modern cars may use two meters. The emergency lamp controller is installed before the bypass valve, and the second after the pressure reducing valve.
If you carry out a visual inspection, the sensor in the engine will look like this: the meter is installed in the cylinder head, and a black conductor approaches the connector. No other elements are provided.
Where is the oil pressure sensor located on different machines:
- VAZ 8, 9 and 10 series (8 valves). Finding it will not be difficult, just look at the main cylinder block. The controller will be located near the belt flap.
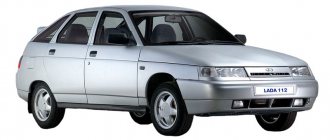
- VAZ-2110 and 2111 (16 valves). The car enthusiast needs to look at the camshaft. The measuring device will be installed directly on the block.
- Lada Kalina. You need to open the hood of the car and look at the main cylinder block. The measuring device will be mounted in a socket near the belt flap.
- Audi (model range until 2010). It is necessary to open the hood and pay attention to the oil filter, because the device is located there. The second oil temperature sensor will be located near the cylinder head.
- Chevrolet Lanos. You can find the controller by driving the car into a garage with a pit, since the device is built into the pump.
- Ford (model range until 2008). The vehicle owner needs to look under the front bumper, since the device is installed near the radiator.
- Mitsubishi Lancer. Oil pressure sensors are located near the filter and radiator.
- Nissan X-Trail. To locate the meter, you need to remove the right wheel and disconnect the belt flap. The device is located next to the power steering.
- Opel Astra. If you remove the right wheel, the device can be found near the generator.
- Volkswagen Golf. The car uses two devices at once. One is installed on the end of the cylinder head, and the other on the filter.
- Volkswagen Passat. This also uses two controllers. One is built into the filter, the other is located on the filter exhaust manifold.
- GAZ with engine ZMZ No. 405. Finding the controller is not difficult; just open the hood and look at the main cylinder block. The meter will be screwed directly into it.
Important nuances
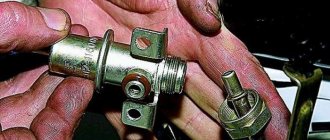
When removing the plastic cap from the oil sensor, extreme care should be taken. The cap on the Daewoo oil sensor is made of very fragile plastic. This part is held in place by two very fragile plastic latches that break easily, especially in the cold. A seemingly insignificant cap can become a source of real headache for the driver, since it is almost impossible to find it on sale
This part is not sold individually. And you will only have to buy it together with a new spare part (and only on the condition that the purchased sample is equipped with its own wiring and cap, which is not always the case);
When unscrewing the sensor from the oil line socket, we must not forget about the copper o-ring, which is located under this device. If you remove the device without due care, the O-ring will fall off and fall straight into the crankcase. And to remove it, the crankcase will have to be completely dismantled; The copper o-ring easily falls from the oil sensor of the Daewoo car into the engine crankcase. When removing the sensor, you should remember that there may be oil in the line behind it, and this lubricant may be under pressure. This means that some oil will inevitably leak out. Therefore, after the replacement, the driver must check the lubricant level in the engine. This is done with a special probe. And if the level is too low, you should add oil to the line to the required level; To prevent oil pouring from the engine from getting onto the garage floor, you should place some kind of container under the sensor hole. A small basin is ideal for this purpose; When replacing the sensor, it is better to drain the engine oil into a small container; unscrewing the sensor in cars of the Daewoo family is best done not with an open-end wrench, but with a spanner wrench, such as the one shown in the photo above. The location is such that it is almost impossible to unscrew it with an open-end wrench: there is very little space for this key (with one movement of the open-end wrench, the sensor can only be turned a third of a turn, so it is simply impossible to put such a key on it again); Sometimes the part cannot be unscrewed even with a convenient spanner due to the fact that it literally sticks to the oil line socket. It is categorically not recommended to make additional efforts in such a situation: the fragile device will simply break at the root. The threaded part will remain in the main socket. And it will be almost impossible to remove this fragment from the line without damaging the thread on the socket. The solution is simple: generously pour WD40 onto the welded part and wait 15 minutes.
Even a novice car enthusiast who has held a wrench in his hands at least once in his life can replace the sensor on a car from the Daewoo family. All it takes is 20 minutes of free time and a little patience.
Copywriter with five years of experience.
Signs of breakdown
Novice drivers can also determine if the sensor is broken. Typically, the on-board computer processes commands from all controllers and displays them on the screen. The corresponding indicators will also blink on the dashboard. If the system does not find any faults, the driver does not receive any warnings.
Signs:
- The car starts with difficulty, especially in the cold season.
- When the car owner starts the engine, it is worth paying attention to the blinking “Check Engine” indication, which indicates that the oil pressure is insufficient. It should also be noted that a similar signal may occur if oil with various types of impurities was used. It is necessary to carry out diagnostics to understand why the malfunction occurred.
- It is difficult to accelerate the engine to the required speed. Also, when the engine is running, excessive vibration may occur.
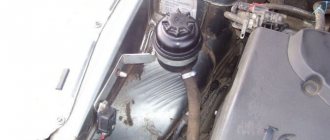
Installing a remote oil pressure sensor
DDM of any type (mechanical or electrical) is installed in the engine compartment, but the readings must be displayed in the passenger compartment. The device is connected to the oil line using a high pressure pipe.
What will you need?
To complete the connection task, you only need a universal kit, which includes a sensor located under the hood and a meter mounted in the cabin. The latter can be displayed in the dashboard, if space allows, or on the center console.
Connection diagram
Connection diagram for external oil pressure controller
Letter designations from the electrical connection diagram:
- Ch - cable in black insulation, negative signal;
- F - yellow wire, positive impulse;
- K - brown cable, also conducts a positive signal;
- S - goes to the engine fluid pressure controller, in particular, to its terminal output marked G;
- WK - from the engine fluid pressure controller to the battery, to the negative battery output.
Step-by-step instruction
Step-by-step algorithm for installing the controller:
- The engine compartment opens in the car.
- The battery is disconnected; to do this, simply disconnect the negative terminal. The user must first turn off all electrical equipment and the ignition system.
- The engine fluid pressure controller is being dismantled. Instead of this device, an adapter is placed in its mounting socket.
- An oil pressure measuring device and a signaling mechanism are connected to the connectors of the installed tee. Depending on the configuration, the wire from the latter can be connected to the dashboard or an additional sensor can be installed on the center console.
- The cable must be pulled into the car interior and connected.
Photo gallery
1. Installing an adapter to connect an additional meter
2. Placement of an auxiliary oil pressure controller on the dashboard in the cabin
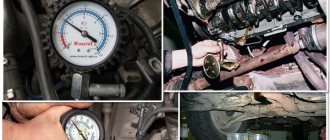
Checking the accuracy of the readings
To check the accuracy of the readings, you will need a pressure gauge with a measurement limit scale in the range from 0.2 to 6 atmospheres. It is desirable that the scale be as large as possible. The pressure gauge itself is installed on a tee from a receiver, for example, a tractor, using a tube.
You will also need a brake pipe and a nut to make a blow gun from the resulting elements. Using a nut, a wire is screwed to the device, which will connect to ground.
Measuring device for checking the correctness of readings
Diagnostics is carried out as follows:
- The sensor is removed from the seat.
- The meter is connected to the purge device.
- The additional cable from the gun must be connected to ground, and the wiring from the engine compartment must be connected through an extension cord to the meter.
- The blow gun is attached to the nozzle. The readings are read and compared with those that blink on the dashboard.
Why the meter may fail
Malfunctions of the oil pressure sensor are due to the following reasons:
- valves or pump diaphragm are damaged;
- deposits have formed on the walls of the pipe, which are caused by the accumulation of waste material;
- the motorist has not changed the oil for a long time;
- the filter is clogged with waste material;
- mechanical damage to the rod (it is because of this that there may be insufficient oil pressure);
- short circuit;
- Due to long-term operation, the main elements of the oil line have worn out.
Functionality check
Many novice car enthusiasts ask how to check the oil pressure sensor. Before starting the inspection, you should prepare the necessary tools and carry out the preparatory work:
- pressure gauge;
- pump;
- multimeter;
- hose.
Step-by-step instructions for checking an electronic device:
- Turn off the engine and give it time to cool.
- Set the multimeter to circuit testing mode. Connect the black probe directly to the controller, and ground the second one to the power plant housing.
- Connect the pump to the controller and secure it as much as possible so that there are no leaks. The results of the check will depend on this.
- After connecting the pump, release pressure to 1 atmosphere into the main line. The multimeter should show a shorted electrical circuit. If this does not happen, you should proceed to replacing the device.
Instructions for checking a mechanical device:
- Take a rubber hose of small diameter, connect one end to the pump and the other to the sensor.
- Carefully release the pressure to 1 atmosphere.
- The membrane should change its position, and the parameters should be displayed on the dial indicator.
If the arrow does not move, the device should be replaced.
Testing DDM using a multimeter
Disconnect the connector from the sensor, check the connection between the contacts. If the switch has two contacts, the test should be between them. If there is one contact, then check the resistance between the pin and ground (negative pole).
- When the engine is not running, the value of the electrical resistance of the multimeter, in the case of a type “A” switch, should be infinite (contacts disconnected - turned off). And in the case of type “B” it should be zero (contacts are connected - turned on).
- When the engine is running, the opposite is true: for type “A” - the resistance should be zero (contacts connected - turned on). And in the case of type “B” it should be infinite (contacts disabled - switched off).
Replacement instructions
If the oil pressure sensor in the engine is faulty, then do not hesitate; you must immediately buy a new element and begin replacing it. You can fix the problem yourself, without contacting specialized service centers. It is enough to have basic skills. Before starting work, you need to prepare the following tools:
- rags;
- silicone grease WD-40;
- key.
Step-by-step instruction:
- Turn off the engine and let it cool.
- Remove the car battery.
- Remove fasteners.
- If the sensor is stuck to the cylinder head, it needs to be treated with WD-40 lubricant.
- Remove the device from the mount using a suitable wrench.
- Carefully unscrew the sensor from the mounting hole.
- Clean the mounting hole from dirt, rust, sediment and lubricate it with engine oil.
- Place a sealed ring, screw in the new controller and tighten it tightly without any extra effort.
- Put the battery back.
- Start the engine.
After starting, you need to check if the Check Engine warning light is flashing.
Operation and care
To avoid malfunctions, you should adhere to the operating rules:
- periodically carry out preventive maintenance of the oil system;
- check the operation of the pump;
- clean the filter from waste materials;
- control the lubrication of power plant units;
- if the technical fluid has changed color, change it immediately;
- If the low pressure signal constantly sounds, immediately diagnose the vehicle yourself or contact a car service center.
It is recommended to use engine oil only from trusted companies and suitable for a specific vehicle model. In inexpensive technical fluids, there is an excessive amount of impurities that settle in the lines and cylinders. They disable the main elements of the engine. It is also recommended to change the engine oil after a mileage of 10 or 15 thousand kilometers. Therefore, it is worth reading the car’s service book to find out all the details of the operating rules.
To summarize, we can conclude that the oil controller is one of the main measuring instruments of a vehicle. If it is faulty, then over time the internal elements of the power plant will be damaged, and then you will have to spend a lot of money on repairing the car. You can carry out the replacement yourself, without contacting a service center.