The Nissan Almera Classic is an unpretentious and reliable car. Front MacPherson struts can easily last more than 100 thousand km before replacement. At the first signs of malfunction, deterioration in controllability, comfort, they must be replaced with new ones or repaired. This operation is simple and can be done yourself in the garage using a minimal set of tools.
What types of struts are there for Nissan Almera Classic?
There are two types of front shock absorber struts: collapsible and non-dismountable. In the first case, a replaceable shock absorber (liner) is placed inside the body, which can be replaced separately. The cost of a single elastic element is noticeably lower than the entire rack assembly. Original units most often have a non-separable design.
Original Nissan struts are sold under article number 313851-2 for the left and 313851 for the right. These same units are used by dealers in service centers. Despite the high price of 2800 rubles per piece, they are of high quality and work well on our roads.
Non-original racks are presented by well-known and not so well-known brands. The most famous: KYB (article 333310-333311), Monroe, Mobiland, Miles, Stellox. The price for the most expensive parts from KYB will be about 3,000 rubles, while a cheap original can cost 1,800 rubles (as of December 2019). The difference in price is more than compensated by the long service life and excellent handling of the car on these racks.
The rear pillars on the AlmeraClassic are also represented by original and non-original parts. But due to their design, their cost is lower than for the front ones. On average 1900 for an original or a high-quality analogue from KYB. Shock absorber article number 341226. Replacing the rear shock absorbers of a Nissan Almera Classic may be required if an oil leak is detected or a “breakdown” of the struts themselves on uneven surfaces.
Signs that shock absorbers need to be replaced
Almera Classic has been widely sold since 2007 and was built on the basis of Almera in the N15 body. Suspension sores and the reasons for their occurrence are well known to repairmen. First of all, you need to pay attention to the following signs:
- body swaying when driving on uneven roads for no apparent reason;
- incomprehensible reactions of the car to turning the steering wheel, excessive rolliness of the car;
- the car pulls to the side, uneven tire wear;
- metallic knock when passing speed bumps;
- oil leak on the rack in the place of the boot.
Indirect signs of shock absorber failure may include a tear in the boot, excessive sagging of the car under load, or rust on the rod. All this may indicate an upcoming suspension repair.
Advice! There is a simple way to check the performance of shock absorbers. To do this, you need to press hard with all your weight on the front of the car and release. A serviceable elastic element will work once and stop the body in its original position. With a damaged rack, damped vibrations will occur or a metallic knock will be heard.
In addition to the shock absorbers themselves, the strut design includes support bearings and a rubber bumper, which can also fail and produce characteristic sounds. It is possible to finally determine their condition only after completely disassembling the shock absorber strut.
We independently check the operation of Almera G15 shock absorbers
Diagnostics will help you reliably verify the failure of the Nissan Almera G15 shock absorbers. It is especially relevant when the braking distance increases, the car is constantly pulled to the side, since these problems can be caused by a malfunction of other elements.
Inspect the shock absorber struts yourself:
- Oil leakage along the rack or rod. The reason is wear of the strut oil seal or the rod itself. When the oil level decreases, there will be increased wear on the internal components of the mechanism, as well as a reduction in its operating amplitude.
- Wear of silent blocks due to loss of elastic properties of rubber or its mechanical damage.
- Presence of mechanical flaws in the design. They can manifest themselves in the form of rust formation, destruction of fixing fasteners, dents on the body of the racks, etc.
- There is greater wear on the tires on the inside.
You can replace the Almera G15 springs with parts from the platform Largus, they are thicker
You can independently check the performance of Almera G15 shock absorbers by rocking the body. This can be done for each individual wheel, or in pairs for the front and rear of the car.
It is necessary to manually rock the body, resting against the stiffening rib, so as not to bend the body elements. After this, release the body and count the number of vibrations until the body stops completely. If the shock-absorbing devices are in good working order, one or one and a half vibrations will be noted; a higher number indicates a breakdown. This technique allows you to identify a completely damaged node. If the mechanism is in the process of losing its functions, then body rocking will not be relevant. This is due to the fact that the multi-link suspension will smooth out the resulting vibrations.
List of tools for replacing the Nissan Almera strut
For repairs, it is advisable to have an inspection hole or a lift, but you can get by with a flat platform. The car will have to be jacked up and placed on supports to make it convenient to remove and install the rack. The list of repair tools is as follows:
- ring and open-end wrenches for 8, 13 and 17;
- socket heads for 13 and 17 with ratchet and extension;
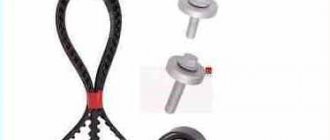
- special ties for springs;
- a special wrench for unscrewing the nut of the collapsible stand;
- metal brush;
- hammer and chisel.
Sometimes you have to use WD-40 or similar to unscrew a rusted nut. In difficult cases, use a gas burner.
Replacing the front shock absorbers of a Nissan Almera classic is often carried out together with the replacement of other spare parts: boot (55240-95F0A), supports (54320-95F0A), support bearing (54325-95F0A), alignment bolts and nuts.
Advice! This must be done together with removing the strut, because after this the front wheel alignment is adjusted. It is impractical to separately remove and disassemble the entire rack to replace the support bearing. Moreover, the resource of all these parts is approximately the same.
Instructions for step-by-step replacement of front struts
Replacing the front struts of a Nissan Almera classic is not fundamentally different from the same work on other Nissan cars with MacPherson-type front suspension.
The replacement order will be as follows:
- We install the car on a flat surface, put supports under the rear wheels. We hang the front axle and remove the wheels.
- We unscrew the two mounting bolts with a 17mm head at the point of attachment to the steering knuckle. The bottom bolt has special adjusting washers for the angle of inclination of the rack, so before removing it you need to mark the original position with a chisel.
- In this position, you can try to loosen the top nut securing the rod. It is accessible from under the hood. If the rod rotates with it, you will have to use a puller after dismantling the rack.
- Unscrew the bracket securing the brake hose to the body. It is not necessary to remove the hose itself; the stand can be carefully removed without touching it.
- Now you can unscrew the upper nuts 13 securing the support bearing to the body. After they are loosened, the entire strut will go down along with the suspension arm. Remove it by pressing down all the way and pulling it towards you. We do the same with the opposite one.
- Using ties, we compress the spring until it rotates freely relative to the rod. Now you can use a special wrench to unscrew the nut 17 securing the rod to the support. We remove the rack housing and evaluate the condition of all components.
- We install a new elastic element into the collapsible rack or replace the entire one. Before installing it on the machine, it must be bled according to the installation instructions.
- We put everything back together in reverse order. We install the spring, then the bump stop, boot, support bearing. Tighten the nut, after which you can loosen the spring tensioner.
Important ! The position of the support is indicated by an arrow pointing at the wheel.
- We install the racks in their place, while tightening the upper support bearing mounting nuts to the end only when the car is standing on the ground. We set the camber bolts according to the marks, but this still does not guarantee correct camber, so a visit to the stand is mandatory.
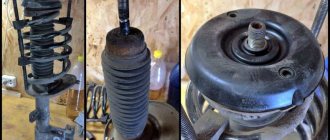
Removing the shock absorber strut and disassembling it
We remove the shock absorber strut to replace its elements.
We disassemble the shock absorber strut when it is necessary to replace its upper support, upper support bearing, spring, compression stroke buffer or shock absorber.
In the engine compartment...
... using a z-shaped wrench “21”, loosen the tightening of the nut of the upper fastening of the shock absorber strut, holding the shock absorber rod from turning with a hexagon “6”.
We remove the wheel and securely fix the car on a factory-made stand.
... use a 10mm spanner to unscrew the bolt securing the speed sensor wiring harness holder
We remove the holder with the wiring harness from the rack.
Before removing the strut, it is necessary to separate it from the steering knuckle. To do this, you need to remove the bolts securing the strut to the knuckle. The end of the wheel brake hose interferes with the exit of the lower bolt.
Using a 13mm spanner, unscrew the upper bolt securing the caliper to the guide pin, holding the pin from turning with the 17mm spanner.
Then we turn the caliper relative to the lower guide pin forward enough so that you can then remove the lower bolt securing the strut to the steering knuckle.
Using an 18mm socket, unscrew the nut of the bolt for the upper fastening of the strut to the steering knuckle, holding the bolt with a wrench of the same size
Similarly, unscrew the nut of the lower rack mounting bolt.
We take out the bolts or knock them out with a soft metal drift.
We remove the steering knuckle from the eye of the strut bracket
While holding the stand from falling, we finally unscrew the nut of its upper fastening.
Removing the shock absorber strut
Remove the rubber-metal support washer of the upper shock absorber strut mount
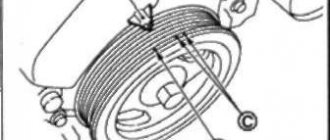
To disassemble the rack, we install two spring ties diametrically opposite each other, so that they engage four coils of the spring.
By evenly rotating the screws of the couplers, we compress the spring
Be careful when working with a compressed spring
After the spring stops pressing on the support cups...
... use a 27mm spanner to unscrew the nut securing the upper support, holding the rod from turning with a 6mm hexagon
We remove the spring with ties...
...compression stroke buffer with protective cover
We assemble and install the rack in the reverse order.
We install the spring like this...
...so that its lower coil rests against the protrusion of the lower spring cup...
...and the upper coil rested against the stamping of the upper spring cup.
Tighten the nut securing the upper support of the strut and the nuts of the bolts securing the strut to the steering knuckle to the prescribed torque. The nut securing the strut to the body is finally tightened to the prescribed torque in the “car on wheels” position.
Source
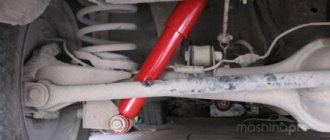
Replacing rear struts
To replace the rear struts, we use the same tools as for the front struts. The strut itself consists of a shock absorber, a spring, and a support. Replacement procedure:
- Raise the rear of the car and remove the wheel. From the trunk side, unscrew 2 nuts securing the strut support.
- Disconnect the lower bolt securing the shock absorber to the beam bracket. We remove the assembly assembly.
- We compress the spring with ties. Unscrew the top nut by 17, having first grabbed the locking nut by 8 with a wrench.
- Remove the upper support along with the rubber buffer. We remove the boot with the bumper (bushings). We inspect for damage and replace if necessary.
- We reassemble in reverse order. After installation on the vehicle, the tightness of all fastening nuts is checked again. No wheel alignment is required.
Replacing the rear and front shock absorbers on an Almere Classic yourself will not cause any difficulties even for a novice car enthusiast. The design is extremely simple and repairable. All work will take several hours and will save the owner money on visiting a car service center. The only operation that will require additional costs is a visit to adjust the front wheel alignment, which costs from 800 rubles for a given car.
Preliminary preparation for replacement
When replacing shock absorber struts, the parts listed in the table below may be required.
Table - List of elements that may be additionally required
| Name | Catalog number |
| Rear shock absorber boot | 5524095F0A |
| Front shock absorber boot | 5405295F0A |
| Front shock absorber support | 5432095F0A |
| Rear shock absorber support | 5532095F0A |
| Bolt | 0112595F0B |
| Nut securing the lower part of the shock absorber strut | 0122395F0E |
Anthers
Fastenings
Experienced car owners recommend pulling the hose onto the shock absorber strut spring. According to reviews, this significantly reduces squeaks and extraneous sounds from the suspension. Therefore, before starting repair work, it is recommended to acquire a hose of a suitable diameter.
Hose placed on a spring