Overcoming a deep puddle
Often a dispute arises between motorists about how best to cross a ford with a transfer case. Some people prefer to “fly” into a puddle from acceleration, others prefer to downshift. If you get into a mud pit, there is a high risk of water hammer - water gets into the cylinders through the filter, and the engine “chokes.” To exclude this, many install a special snorkel. But you can do without it. A deep puddle should be overcome in second low gear. This is done so that in case of trouble (when the car starts to fail) you can switch to first gear in time and not stall. If you enter the water from acceleration (which is a better decision), remember that the wheels may get stuck in the middle of the journey. The engine power is not enough to turn the wheels - the car stalls, and the engine experiences a hydraulic shock.
How to use it correctly?
There is a diagram on the shift lever. To engage a downshift, you need to move the lever to the right, up. To lock the differential, pull it all the way to the left. There are also Latin letters on the lever. So, L is a low gear, N is neutral, and H is high. Now let's find out how to use all this so that we don't have to repair the mechanism and change the transfer case bearings.
The Chevrolet Niva is a universal-purpose vehicle that is actively used not only on asphalt surfaces, but also off-road. So, if you have to overcome a ford or a puddle, you should stop completely and turn on a lower set of steps. Please note: it should only be turned on after a complete stop. Even at 5 kilometers per hour you will have problems with the transfer case. But you can lock the differential even while driving. This won't bring any surprises. Unless fuel consumption increases due to the constantly working two axles and axle shafts.
In what cases is it necessary to engage a downshift on a Chevrolet Niva? Its work will be needed when crossing “diagonals”, fords and during a long climb, which you climb slowly. Motorists often ask: is it possible to drive for a long time with a lock? Please note that it should only be enabled when absolutely necessary. Otherwise, the load on the teeth and shafts increases. If you drive like this on the asphalt at high speed, you will soon need to replace the transfer case on your Chevrolet Niva.
Replacing transfer case suspension cushions
what kind of engine can be installed on a Chevrolet Niva?
You will need: keys “13”, “17”.
1. Place a support under the transfer case.
2. Unscrew the nuts securing the cross member of the transfer case rear support to the body.
3. Unscrew the nut,
4. remove the bolt and
5. Remove the cross member complete with the support pad.
6. To replace the pillow, unscrew the two nuts that secure it.
7. If necessary, also replace the rubber bushings of the cross member.
8. To replace the transfer case side mounting cushion, unscrew the nut of the box mounting axis,
9. two nuts securing the airbag to the body and
10. Remove the pillow. The second pillow is removed in the same way.
11. Install the parts in the reverse order of removal.
Transfer case operating modes
Transfer case Niva 2121- Purpose and device
This mechanism can operate in five modes:
- Neutral is on.
- The differential is unlocked when the "lowering" is turned off. In this case, the torque is distributed in a ratio of one to two.
- The differential is locked when overdrive is engaged. Here, torque distribution is carried out automatically, depending on the quality of wheel grip on the road.
- Downshift is engaged and the differential lock is disabled. The transfer of forces occurs in the same ratio as in the first case.
- The differential is locked and the gearbox is engaged. In this case, all axles are rigidly locked together, including the axle shafts. Torque is produced unevenly, depending on the type of road surface (dirt, sand, etc.). In this mode of operation, the best cross-country ability of the vehicle is achieved. But driving with a constantly engaged downshift and with locks will not work. This increases the load on the transfer case bearings. The Chevrolet Niva will soon require serious intervention in the transmission. Fuel consumption also increases significantly, which greatly eats up the tires.
What is it for?
This unit is an indispensable element in all-wheel drive vehicles. The Chevrolet Niva transmission and transfer case redistribute torque between the drive axles (of which there are two in the car). This mechanism, if necessary, increases the torque when moving (the so-called lowering).
It is worth noting that the transfer case is installed not only on all-wheel drive SUVs. Car lifts, cranes and other special equipment are often equipped with such a system.
Transfer case purpose
transmission and drive of the KalinaReplacing the clutch and release bearing on the Lada KalinaLuK clutch on the Lada KalinaGearbox - automatic on the Lada Kalina
If you create a permanent all-wheel drive in a car and provide constant torque on the driveshafts of the rear and front axles, then such equipment is capable of overcoming obstacles such as off-road, but no more. However, the car will not be suitable for driving on the highway at relatively high speeds.
- There will be an excessive load on the parts that distribute the moment along the axes.
- Fuel consumption will increase.
- There will be a rubber eating effect.
The transfer case on a Chevrolet Niva car performs two functions at once. It ensures the distribution of torque along the axes with the possibility of supplying it to both axles simultaneously.
The transfer case also converts torque, increasing it by lowering the speed in gear. Here, transmission means a pair of gears that are in mesh and have a certain gear ratio. These two functions can be performed together or separately.
About the device
Despite the difference in varieties, the structure and operating principle of these boxes are the same. How does the transfer case (Niva Chevrolet) work? This node includes several elements:
- Drive shaft.
- Center differential locking mechanism.
- The differential itself.
- Chain or gear transmission.
- Drive shaft of the rear and front axle.
- Downshift.
All this is controlled from the interior. There is a transfer lever for this. "Niva Chevrolet" has both locking and downshifting. The torque that goes from the main transmission to the transfer case is transmitted through the drive shaft.
Next, the torque force is distributed between the axes. This is where the center differential comes into play. This unit allows the wheels to rotate at different angular speeds. By the way, the differential itself can be of several types:
- Asymmetrical (distributes torque in different ratios).
- Symmetrical (distributes forces equally).
Signs of a broken transfer case
Chevrolet Niva transfer case, appearance
To prevent the transfer case from losing its functions prematurely, it is advisable to diagnose it periodically (approximately every 15,000 km). During this procedure, all its components and the level of transmission fluid must be checked.
Rapid wear of the RK on Niva can occur as a result of its aggressive use. Repair of the transfer case is necessary if the following are observed:
- jerks appeared;
- dynamics worsened;
- the car accelerates more slowly;
- difficulty changing gears;
- There were knocks and vibrations from the transmission.
In some cases, changing the oil helps solve problems. If it is deficient, a characteristic howling sound is often noted when moving at high speed.
If the rod or fork of the differential lock clutch breaks or wears out, difficult gear shifting will occur. In rare cases, the transfer case control lever has a mechanical breakdown.
Complete disassembly of the transfer case allows you to accurately determine the nature of the existing malfunction. It is recommended to entrust this procedure to professionals who have experience in carrying out this work. To restore the normal functioning of the gearbox, it may be necessary to adjust the gear shift drive and replace gears.
Main causes of breakdowns
It is necessary to list the main reasons why the RK failed on a Chevrolet. The most common is frequent driving of a given vehicle at high speeds, which negatively affects the working life of the component parts of the box. In particular, the seals may wear out and the fastenings may become loose.
It is unacceptable for the Republic of Kazakhstan to add low-quality fuel. It is possible to measure the liquid level in the box using a dipstick.
The transfer case is noisy. To solve this problem, you can buy special silent levers for the RK. Thanks to this, the necessary noise insulation is achieved and vibrations will not be noted.
Changing the oil in the transfer case
According to the service book, the oil in the transfer case must be replaced every 45,000 km.
You will need: a 12mm hexagon, a syringe for filling transmission units, a container for used oil.
It is more convenient to perform this operation on an inspection ditch or on a lift.
It is recommended to drain the oil immediately after a trip, while the transfer case is still warm and the oil has good fluidity.
1. Remove the drain plug and drain the oil.
2. Screw in the drain plug and turn out the filler plug.
3. Using a syringe, fill in fresh oil to the level of the lower edge of the filler hole.
4. Close the filler plug.
How to enable differential lock on Niva
The Niva and its various modifications allow you to operate 3 differentials at once. Thanks to this factor, the vehicle’s cross-country ability increases significantly when driving in rural areas. The forced locking format involves connecting the driving wheels together, causing them to spin at different speeds. This approach allows you to use the maximum possible traction characteristics of the engine, which are transmitted to the wheels.
To lock the differential on the Niva, the manufacturer has provided a clutch for the locker. When forced locking is turned on, the wheels become interconnected and rotate in the same mode. When the inter-axle lock is activated, the axles located at the front and rear interact and distribute traction to all wheels. This mechanism is easy to use, which is confirmed by the unique cross-country ability of the Chevrolet Niva.
Differential
In the absence of a differential mechanism, this would cause detrimental consequences, such as wear and damage, because the result would be the following: when turning, one wheel would be in a slip state, and the second would simply rub against the road surface. The design features of the Niva transmission provide for the presence of 3 differentials. They are located in each of the bridges and in the transfer mechanism.
When the car moves on a flat road and in a straight line with differentials, the traction force is divided equally between all 4 wheels. If there is insufficient adhesion of the wheels to the surface or slipping occurs, the differentials will redistribute the load on the slipping and sliding wheel so that the first receives more force, and the second, accordingly, less.
We have already mentioned UAZ. Despite many similarities, it should be understood that the VAZ’s all-wheel drive is made in the “pat-time” style. This means that when connected, the axes are firmly connected to each other, and rotation occurs at the same speeds. This device imposes some restrictions on the use of all-wheel drive - it can only be used in cases where road conditions allow slipping. In cases with hard asphalt roads and highways, it is recommended to switch the car to single-drive mode.
Sometimes you can come across a misconception about why a small handle is needed next to the shift lever on a Niva. Some car owners believe that it is needed to connect front-wheel drive. However, the front-wheel drive of this car is permanently connected. As is the rear one. Cars of the Niva family have permanent all-wheel drive. The handle actually serves to switch the operating modes of the differential of the transfer mechanism.
In the “forward” position, the differential operates as usual, but if you move it back, the differential is locked, and the forces from the motor are applied to the differentials of the axles, which makes the drive more rigid. It is worth noting that there are also special types of locks for front and rear axles.
Design Features
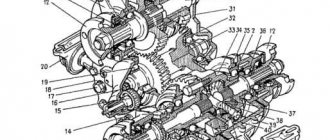
Rice. 5.5. Transfer case:
- driven gear;
- differential bearings;
- spring washer;
- retaining ring;
- differential lock clutch;
- differential housing ring gear;
- gear ring of the front axle drive shaft;
- front axle drive shaft bearing;
- oil deflector;
- mud deflector;
- front axle drive shaft;
- flange;
- stuffing box;
- oil drain plug;
- speedometer driven gear;
- speedometer drive gear;
- hole plug for filling and checking the oil level;
- transfer case front cover;
- intermediate shaft roller bearing;
- transfer case suspension bracket;
- drive shaft bearing cover;
- bearing thrust ring;
- drive shaft bearings;
- overdrive gear;
- gear shift hub;
- gear shift clutch;
- transfer case housing;
- reduction gear;
- low gear bushing;
- drive shaft;
- back cover;
- intermediate shaft ball bearing;
- intermediate shaft;
- differential housing;
- rear axle drive gear thrust washer;
- rear axle drive shaft bearing;
- rear axle drive gear;
- satellite;
- satellite axis;
- pinion axle retaining ring;
- transfer case suspension axis;
- spring washer;
- front axle drive gear
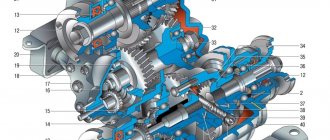
Rice. 5.6. Transfer case drive:
- differential lock clutch fork;
- differential lock clutch;
- fork retaining bolt;
- rod protective cover;
- lever spring;
- differential lock fork rod
- front axle drive housing cover;
- lock washer;
- lever axis bushing;
- lever axis;
- differential lock lever;
- shift fork rod;
- control lever fork;
- control lever;
- differential lock lever rod;
- gear shift clutch;
- gear shift fork;
- spacer sleeve;
- retainer ball;
- retainer spring bushing;
- retainer spring;
- differential lock warning lamp switch;
- control lever fork axis;
- fork mounting bolt
The transfer case is designed to vary the torque in magnitude and distribute it between the front and rear drive axles. The car is equipped with a two-speed transfer case with a center differential lock. The transfer case is controlled (selecting a higher or lower gear, turning on/off the differential lock) with one lever through a mechanical lever drive.
Operating a vehicle in different modes
A lower gear is engaged when it is necessary to increase torque. An example would be driving up a steep slope or driving through sticky ground. To overcome difficult areas, the lock is activated. To achieve a clearer and more fixed engagement, you need to wait for the moment of slipping, and then, with the clutch disengaged, move the lever to the left. While locked, you can only travel a limited distance at a speed of no more than 40 km/h.
As an example, we can simulate the situation. To overcome an obstacle in the form of a large puddle, you should stop and engage a lower gear. Blocking is appropriate if there are bumps and rutting. It is not recommended to lock the differential unless necessary, as problems with unlocking often occur. If such a situation occurs, you need to start moving in reverse and at the same time try to move the lever to the right position.
Hanging the car diagonally will cause the free wheels to spin and the car will remain motionless. In this case, a lock is provided, which can be activated in overdrive mode. It should be noted that when overcoming steep descents, it is recommended to use engine braking. If the surface is covered with mud or snow, the first low gear mode is selected.
Transfer case malfunctions
The transfer case is a complex unit, so it is important to correctly diagnose the malfunction and be able to quickly fix it. The most common sign of its incorrect operation is increased vibration.
If it is observed when driving in various modes, then the cause may be wear of the elastic coupling. A visual inspection will help verify this. Vibration under direct load (acceleration) indicates a loose attachment of the transfer case to the body, a faulty CV joint on the intermediate shaft, or a jammed joint on one of the cardan shafts. If vibration is observed at a constant speed, then there is a problem with the balancing of the cardan shafts themselves or the differential.
Malfunctions often occur due to difficulty switching modes
Here attention should be paid to the hinges of the control mechanism, as they usually become clogged with dirt. The fork or stem may be deformed
Over time, nicks appear on the splines of hubs and gears. They can be easily removed by grinding, but to identify the defect you have to remove and disassemble the entire assembly.
Preventive maintenance includes timely replacement of transmission lubricant. It is performed every 45,000 km
It is important to follow the rules for switching modes during operation, and also carefully monitor the timely unlocking of the differential
Other problems
Sometimes there is a knocking sound in the transfer case. The Chevrolet Niva is a more reliable car than the VAZ-2121, but such malfunctions should not be ruled out. The first thing you should pay attention to is the driveline. Previously, Nivas had crosses, the play in which caused a lot of noise and vibration.
If you have an old generation Niva, first inspect the crosspieces. As for the new versions, constant velocity joints are used here. There are no backlashes here. Therefore, we look for the reason in the alignment of the gears, which are located in the transfer case itself. If there are any backlashes or gaps, the gears must be replaced. It is also recommended to change the oil in the transfer case. An important point is that if the car overcomes a deep puddle, the lubricant in the box should be replaced as soon as possible. The presence of water in the transfer transmission oil reduces the life of gears and bearings. By the way, the latter also need to be checked and replaced. Perhaps the knocking is due to weak bearing seats. Motorists recommend using anaerobic sealant. They should treat the outer race of the bearings before installing the element into the grooves.
Another reason is the so-called helicopter. This is the splined part that secures the breakout with an elastic coupling. If such symptoms occur, check the wear of the splines. If there is play, replace it with a new one.
When to use low gear
For what purposes is a transfer case even needed, when does it make sense to engage the locking and downshift? Such seemingly simple, but at the same time serious questions will become clear when considering the following example. When driving on a country road on a hard surface, fourth gear is engaged. Suddenly, a large puddle with a soft, unreliable surface appears in front of the car. In such an obstacle the car can easily “sink”. To prevent this, you should engage a lower gear and slowly overcome such an obstacle without haste. This gear is designed specifically for driving on soft road surfaces, when even in first gear the car feels “hard”.
It is worth noting that in order to engage a lower gear on a Niva Chevrolet, you need to stop - this is how the car’s differential is designed. But you don’t need to stop at all to turn the lock on and off. But is it worth using such additional and, without a doubt, useful functions of the machine often? Experienced drivers recommend using them in places where the dirt is not located on level ground, but with various potholes and the like.
Thus, the low gear of the Chevrolet transfer case is designed for comfortable off-road driving and overcoming various obstacles. In such a gear you need to drive slowly, you cannot accelerate sharply, because at this moment the wheels will receive a large load, as a result of which a real hole can form, from which it will be very difficult for the car to get out.
With this driving style, the motorist will better feel the movement of the wheels, as a result of which, when they “bury”, as evidenced by the chaotic movement of the car, it will be possible to immediately do something after overcoming the obstacle. Most often, this is done by changing the trajectory of the car.
It is also worth noting that when driving through sticky mud or deep puddles, you should never suddenly engage second downshift. At the same time, the torque increases, as a result of which the car can simply “choke”, stalling at the most inopportune moment.
Rules for applying blocking on Niva
To ensure that the locking mechanism lasts for a long time, use the following rules:
- It is necessary to switch the transfer case when the Niva does not move.
- The differential can also be engaged while the vehicle is moving.
- To ensure efficient and long-term operation of the device, it is advisable for the Niva driver to turn on the lock from time to time. Once a week in winter is enough.
Where is the lever responsible for switching located? Pay attention to the area between the wings located in front, there are 2 levers there. One makes it possible to change gears at the gearbox, the other successfully controls the transfer case
The basis of the transfer case is a gearbox, which includes 2 stages. The control lever comes directly from it, you can move it forward and backward - this is how the gear is changed on the Niva. The direction of movement of the lever to the left and right allows you to activate the differential lock and vice versa to disable it.
Chevrolet Niva transfer case
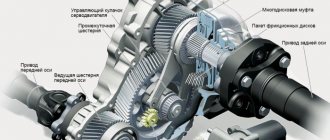
Despite the fact that the Chevrolet Niva is presented in several modifications, the basic design of the transfer case is the same everywhere. It can be represented as a collection of independent nodes.
Drive shaft. It takes on the entire load from the main transmission and transfers it to the transfer case.
(1 - flange; 2 - oil seal; 3 - bearing thrust ring; 4 - front bearing; 5 - drive shaft; 6 - high gear; 7 - hub; 8 - clutch; 9 - low gear; 10 - bushing; 11 - rear bearing; 12 - installation ring)
Center differential. Provides the ability to rotate the front and rear drive shafts at different angular speeds.
(1 - retaining ring; 2 - spring washer; 3 - bearing mounting ring; 4 - differential housing bearings; 5 - driven gear; 6 - front differential housing; 7 - front axle drive gear; 8 - retaining ring of the pinion axis; 9 - satellite; 10 - rear differential housing; 1 1 - support washer; 12 - rear axle drive gear; 13 - satellite axis; 14 - spring washer of the satellite axis; 15 - support washer)
- Locking node. Provides a rigid connection between two shafts, at which they begin to rotate at the same angular speed.
- Downshift. Its purpose is to increase torque by reducing shaft speed.
The Niva Chevrolet transfer case can be controlled from the passenger compartment with one lever, so an element such as the transfer case drive is considered as a component.
As for the more detailed design diagram of this transmission element, it is quite complex and contains more than 40 positions in which structural and auxiliary elements can be distinguished. No deposit bonus at online casino at elslots.site
List of structural elements
- driven gear
- Differential clutch
- Differential bearings
- Drive shaft bearings
- Axle drive shafts
- Shaft seals
- Intermediate shaft bearing
- Overdrive and underdrive gears
- Intermediate shaft
- Differential housing
- Satellite axis
- Satellites
Step-by-step instructions for removing the manual transmission and gearbox on a Niva Chevrolet
- And so, first of all, we disconnect the negative terminal from the battery.
- Next we will need to disassemble the center console. I will not explain in detail how this is done, if you cannot do this yourself, then it is better for you not to continue working, but to turn to specialized services.
- We remove it and bring it to this form:
- Unscrew the exhaust pipe from the manifold and disconnect the upper oxygen sensor.
- After we have done this, we lift the car on a lift to make it more convenient for us to work. If this is not possible, then you can work from the pit.
- Next, drain the transmission oil from the gearbox and transfer case, as well as from the rear and front gearboxes.
- Here we see our transfer case, it’s all covered in oil.
- Photo of the gearbox, also covered in oil.
- Next comes a very important point: the drain plugs are all magnetized and after we unscrew them, we carefully inspect them for the presence of foreign particles.
- In our case, there are metal particles on the transfer case plug and on the rear gearbox plug. This means that there is something that has fallen apart and we continue to disassemble the car.
- Next, you need to disassemble the following parts: rear cardan, front cardan, unscrew the rubber couplings on the intermediate cardan.
- Now we remove the sensors from the gearbox and transfer case.
- We disconnect the bracket going from the gearbox to the exhaust pipe and the upper front shield going above the exhaust pipe.
- We place the transmission jack under the transfer case and unscrew the supports on one side and the other.
- Unscrew this bolt on the engine mount.
- We lower the transfer case, and now we can easily remove the intermediate cardan.
- We disconnect two terminals from the transfer case. And we let her go calmly.
- Now we can remove the intermediate shaft from the transmission. Remove the sealing ring from it.
- Next, remove the clutch slave cylinder, starter and move it to the side.
- Now unscrew the two bolts from the side of the casing.
- Then there are two bolts on the left side, one is located behind the tab of the second on the right side.
- Next we need to unscrew the rear bracket holding the gearbox.
- Now lower the gearbox and remove it.
- It is recommended to immediately check the clutch disc together with the basket.
Before disassembling the gearbox, transfer case, or any other components and parts, it is advisable to wash them thoroughly. The better you wash them, the easier it will be to work with them.
How to change the oil
If you read the regulations, it is recommended to change the oil in the transfer case every forty-five thousand kilometers. The following tools are required for replacement:
- Key for twelve
- Syringe
- Container where you can drain the waste
Once the tool is ready, we begin replacing:
- We unscrew the oil drain plug and drain the waste
- Screw the drain plug back and unscrew the filler
- Using a syringe, fill in new oil to the required level, and at this point the process can be considered complete.
Sometimes you need to replace the transfer case on a Niva Chevrolet car, and to do this you need to dismantle it, to do this you need to do the following:
- We take two keys for thirteen and seventeen, and disconnect the cardan shafts from it
- We disconnect the transfer case from the car interior, cover with handle
- We remove the cover of the lever, which is responsible for switching the drive
- For the existing box suspension, loosen the fastenings
- We disconnect all the wires from the lamp responsible for the differential lock.
- We install the support under the box, unscrew all the nuts that secure the pillow, and remove the transfer case
In order for it to fall into place, you must do all the steps in reverse order.
The transfer case is very noisy; probably every Niva owner faces this problem; this noise is transmitted into the cabin through the levers in it. To get rid of this howling, you can use two methods
- You can buy special silent Niva transfer case levers, from which they will fit, they will cost around 3,000 rubles.
- You can make it yourself and spend significantly less.
To make them yourself, you can take:
- Repair kit for lever from GAZ 31105 from five-speed gearbox
- Two levers from VAZ
- Standard lever
Using a grinder, you need to cut all the elements to the required level, and then use a welding machine to weld it all. This takes about two hours. The essence of this device is that due to the rubber and plastic bushings that are located on the gearbox lever, noise and vibration are dampened. Let's look at the whole principle using an example:
- We remove the lever
- We cut it to the size we need, as in the pictures.
- The lever that changes gears is cut one centimeter above the narrowing
- We saw the GAS lever below the thickening by one and a half centimeters
- We put the resulting elements we need together
- Then we weld the original lever and the GAS lever together
- On the resulting welded part, we put on the existing part from the gearbox
- We weld the upper part of the existing original lever as needed
- We get the design we need
- We prime and paint the resulting elements
- We cut the upper part of the rubber seals, low and high gears
If everything is done correctly, they will be practically indistinguishable from being gratifying. As a result of the actions taken, we get a softer switching on than before, vibration practically disappears, strong noise disappears, and most importantly, you can do this yourself while saving money.
Eliminate vibration with additional fasteners
Vibration in the body is the main “disease” of the Niva; it often occurs due to improper alignment of the transfer case. Most often, vibration occurs on VAZ 21213/21214 cars, since the transfer case is mounted only on two supports on the sides of the body; on the Chevrolet Niva, the transfer case is already installed on three supports.
- driveshafts are poorly secured;
- wheels are not balanced;
- there is play in the cardan crosspieces (vibration is especially affected by play in the rear driveshaft crosspieces);
- The vibration comes from the engine itself.
Vibration when starting off on a Niva can also occur for the following reasons:
- the mounting supports of the transfer case have become loose;
- The rubber on the RK supports themselves broke.
Installing the third support of the transfer case on VAZ 21213/21214 vehicles allows you to reduce the level of vibration of the transfer case; with this support it is easier to center the transfer case. The part can be purchased at auto stores or made yourself. The finished product comes with three long studs (for model 2121); to install the third support on this machine, you will need to unscrew the short studs from the transfer case housing and install new studs from the kit. We carry out repairs as follows:
- dismantle the front passenger seat in the cabin;
- remove the floor tunnel lining;
- in the cabin we move aside the carpet covering the body amplifier (in front of the handbrake lever);
- remove the transfer case (alternatively, you can simply hang it up, but removing the third support makes it easier to install);
- We attach the bracket of the new support to the body of the RC;
- we install the transfer case in place, center it in the optimal position, and fasten the side supports;
- we combine the third support with the body, drill two holes in the bottom;
- Using washers, bolts and nuts (from the kit) we attach the support to the bottom of the body.
Vibration is eliminated more effectively by installing a subframe under the transfer case. You can also make such a device yourself or buy a finished product at a car store.
In order to install the subframe, the transfer case must be removed. It is more convenient to carry out such work in a pit; we carry out repairs as follows:
- leave the car in neutral gear;
- disconnect the propeller shaft from the transfer case, it is advisable to mark the driveshaft flange and the drive shaft so that during installation, align the driveshaft according to the marks - this way, the occurrence of unnecessary vibrations is eliminated;
- dismantle the muffler mounting bracket;
- remove the gearbox traverse;
- jack up the transfer case, remove the side fastenings of the transfer case;
- We treat the places where the subframe fits to the body with Movil;
- place the subframe on the gearbox studs;
- we mark the attachment points of the subframe on the side members, drill holes, attach bolts to the body;
- we tighten all fastenings, except for the transfer case supports themselves;
- we perform alignment of the steering wheel;
- Finally tighten the transfer case supports.
It should be noted that installing an additional support or subframe on the steering wheel does not always lead to the desired effect; in some cases, vibration only increases.
Downshift.
Used to temporarily increase torque. This is necessary to reduce the rotation speed of the wheels, but give them more force. Forced downshifting is advisable on off-road conditions, when this mode eliminates slipping by distributing more force between the axles.
After turning on this mode, the torque mode is transmitted from the transmission to the drive shaft. Then it is redistributed using the center differential. There was no locking mechanism in Niva cars (VAZ 2121). In the Chevrolet Niva, it is possible to force the teeth to lock.
The transfer case allows you to operate the Chevrolet Niva in five operating modes:
- neutral position
- torque transmission in a 1:2 ratio by unlocking the differential and disabling low gear
- automatic torque distribution, for example when driving on asphalt roads. Turns on in modes with a locked differential and upshift.
- Downshift combination with lock off. Provides 1:2 ratios
- Full differential lock when low gear is engaged. This type of operation ensures rigid blocking of the axles, including the axle shafts. In this case, the torque is transmitted unevenly and allows the car to adapt to different road conditions. This mode allows you to use the car as efficiently as possible to achieve the best cross-country ability.
Using a handout
The switch pattern is printed on the lever. According to the instructions, to turn on the lowering, you need to move the lever all the way to the right and up. To lock, the lever is moved all the way to the left. There are also letter designations on the handle:
- L(low) – reduced
- N(neutral) – neutral
- H(high) – increased
Proper use of the transfer case allows you to avoid increased loads and breakdowns. You must also remember that when the differential is locked, fuel consumption increases, so you should use this mode only when necessary. Switching, as well as locking, can be used while driving.
Engaging a downshift is important when driving on a long climb or overcoming a ford. Enabling this mode on an asphalt road at high speed results in excessive load on the teeth and shafts.
Sometimes a forced unlock is necessary. Situations arise when the lock cannot be disabled even when the car is completely stopped.
The status can be seen by the icon on the dashboard. If the lock is jammed, you must engage first gear and turn off the unit. If this does not help, you need to move back and forth.
Varieties
There are several types of these elements:
- Equipped with coaxial drive shafts. This type is used on many SUVs. It gained such popularity due to the use of a single main gear for both axles.
- With a misaligned driven shaft. There is no intermediate shaft here. The advantages of this system are high efficiency and noiselessness. Also, this box has a low curb weight.
- With drive axle drive blocking. It is also installed on the Chevrolet Niva. Here it is possible to use all the torque without slipping the wheels, which is very important when driving off-road. The front axle engages only on difficult sections of the road. On asphalt surfaces, the SUV has a single-wheel drive (only the rear axle works). This allows you to reduce fuel consumption and, if necessary, increase cross-country ability (when the drive “closes”). There is also an interaxle forced locking.
Forced unlock
Sometimes it happens that the lock gets stuck - it cannot be turned off even when the car is completely stopped. The situation is quite common for the Chevrolet Niva. How to solve it? There is a sure way. To do this, engage reverse gear, accelerate a little and turn off the differential lock while driving. At a certain speed it can be easily “knocked out”. But if a similar lamp continues to light on your instrument panel, as in the photo below, the lock has not been turned off.
What to do in such a situation? It is necessary to turn on the first speed and try to turn off the unit again. Moving back and forth will solve the problem of a stuck differential. In general, it is recommended to turn on the center lock only in serious off-road conditions. At the intersection of dirt roads and sand dunes, a downshift is sufficient.
How does it work?
Its operating principle is quite simple. It consists in transmitting torque from the transmission to the drive shaft. Next, the forces are transferred to the center differential.
On old Nivas, the transfer case (Niva Chevrolet does not count) had a mechanism without locking. Now the car is equipped with a full-fledged differential with the ability to rigidly lock the teeth.
