Before unscrewing the hub nut, it is advisable to read the instructions for routine maintenance of your car. It indicates the method of fixation, the direction of the thread and other nuances.
- Changing the geometry of the nut (one side is oval). Anyone who has repeatedly unscrewed such a nut has seen that the threads gradually become unusable;
- Punching after tightening. This solution is not suitable for replaceable units, since this will damage the screw part. However, many car manufacturers fix the hub nut in this way so that it does not unscrew while driving;
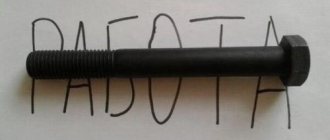
- Hairpin. The most reliable method of fixation. The nut does not unscrew on its own, and the thread does not deteriorate. For some reason, not all car designers use this simple method;
- The retainer is a “shoulder-groove”. A common method, more reliable than core punching, but detrimental to carvings. Longitudinal grooves (one or two) are made on the threaded connection of the axle shaft. The CV joint nut has the same number of collars, which bend into grooves after tightening. It is almost impossible to unscrew the nut without damaging the thread;
- A variety of fixing paints and adhesives. Not used on hub connections.
Since the connection is in unfavorable conditions (especially if the boot cap is lost), the nut does not unscrew the first time. An inexperienced driver panics, starts turning the nut in the wrong direction, uses attachments on the wrench in the form of a meter-long pipe, and as a result breaks the thread. The consequences are a forced replacement of a still-living CV joint.
How to unscrew the hub nut without ruining the threaded connection
First of all, stock up on quality tools. An ordinary wrench is not suitable for plumbing work, although many car owners stubbornly use them to repair CV joints (the size is the same, but the cost of the tool is lower). An open-end wrench can only be used to unscrew an already “undermined” nut, this is really more convenient.
For the hub (CV joint), only a union head is used. The end cap can be cast or stamped (the second option is cheaper), and exactly match the size of the nut. If you “lick” the edges using a tool with backlash, you will be working with an angle grinder, and you will have to say goodbye to the CV joint.
- Thoroughly clean the surface from corrosion and dirt. If a spline-shoulder pair is used, you need to pick out everything that is in the holes;
- Treat the joint with a penetrating compound for soured threads. For example, WD-40 liquid, or regular kerosene. You may need to "soak" the thread for several hours;
- Remove all fixing devices;
- Place the socket on the nut and try to turn it using the lever. At this stage, it is better not to use handles with ratchets, as the mechanism may be damaged;
- After “undermining”, the nut can be unscrewed with any wrench that is more convenient.
Throw away the old nut and stud. Clean the threaded connection from rust and traces of fixing compounds.
It is this method of fixation that most often leads to “licking” of the thread. VAZ drivers know what they are talking about. An inexperienced master, delighted at the easy movement of the nut, will ruin your grenade in 2-3 turns of the key.
For proper release, you need a special punch that exactly matches the size of the spline collar. You won’t find them during the day with a fire, so it’s wise to make a useful tool yourself. For example, from an old file. With its help, you can unscrew the nut while maintaining the threads on the axle shaft.
There are many ways to fix threads:
Before unscrewing the hub nut, it is advisable to read the instructions for routine maintenance of your car. It indicates the method of fixation, the direction of the thread and other nuances.
- Changing the geometry of the nut (one side is oval). Anyone who has repeatedly unscrewed such a nut has seen that the threads gradually become unusable;
- Punching after tightening. This solution is not suitable for replaceable units, since this will damage the screw part. However, many car manufacturers fix the hub nut in this way so that it does not unscrew while driving;
- Hairpin. The most reliable method of fixation. The nut does not unscrew on its own, and the thread does not deteriorate. For some reason, not all car designers use this simple method;
- The retainer is a “shoulder-groove”. A common method, more reliable than core punching, but detrimental to carvings. Longitudinal grooves (one or two) are made on the threaded connection of the axle shaft. The CV joint nut has the same number of collars, which bend into grooves after tightening. It is almost impossible to unscrew the nut without damaging the thread;
- A variety of fixing paints and adhesives. Not used on hub connections.
Since the connection is in unfavorable conditions (especially if the boot cap is lost), the nut does not unscrew the first time. An inexperienced driver panics, starts turning the nut in the wrong direction, uses attachments on the wrench in the form of a meter-long pipe, and as a result breaks the thread. The consequences are a forced replacement of a still-living CV joint.
A few tips for motorists
- It is quite easy to understand that the front wheel hub of a VAZ 2110 is faulty. While the car is moving, you will hear grinding, humming and knocking noises every now and then.
- To ensure that the wheel alignment remains normal after replacement, perform the replacement without unscrewing the alignment bolts.
- The manufacturer recommends that car owners change the components of the front wheel hub at 55,000 km.
As you have already seen, DIY repairs are easy. Such repairs may have to be done every year, because the roads in the country leave much to be desired. But self-service will cost several times less than if you turn to a service station for the service. If you prepare in advance and do all the work sequentially, taking into account each step, the replacement will not take much time. You do not risk anything, the cost of the part is not that high. But such a simple job involves many nuances that are important to consider.
Similar news
How to Remove the Battery of a Skoda Fabia 2 Video... Usually, even a novice car owner can remove the battery from a car. There are no obstacles in this matter, you just need to open the hood and unscrew a few nuts. Alas, the situation changes when we talk about removing the battery from a Skoda Fabia car. What, how to deal with this problem, we will tell you in this publication. 1st and most three...
How to Remove the Rear Light of Renault Megane 3... Selecting and replacing stops on Megane (removing the rear light) Your safety mainly depends on the proper operation of the car's lighting devices, and naturally the presence of high-quality parts in the optics. Video about how to remove the rear bumper from an AUDI 100 C4, how to remove the front seat, etc. This should not be trampled upon. Reno Megan removal Common...
Part replacement
At the first stage, the car is placed on the inspection hole, 1st gear is engaged and stops or simple bricks are placed under the wheels.
In accordance with the instructions, which indicate how to replace the front wheel bearing of a VAZ 2110, work begins:
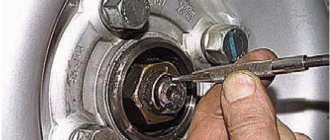
- After removing the cover from the wheel, use a wrench to unscrew the wheel nuts, which then need to be removed. To unscrew the bearing nut from the VAZ 2110 hub, use a 30mm wrench. First, use a chisel to straighten the collar on the nut. To unscrew the nut, you will need an assistant to press the brake pedal.
- Using a screwdriver, the caliper is disassembled.
- The caliper is then retracted from the steering knuckle. To prevent it from hanging on the brake hose, you need to bandage it in time.
- The brake discs are unscrewed from the hub.
Replacing the VAZ 2110 wheel bearing is carried out in 3 ways.
First replacement method
To replace the wheel bearing, proceed as follows:
- The process of removing the hub element is carried out with a puller. Its legs are inserted into special grooves made in the hub, and the retaining ring is removed. It doesn't always work out right away. Sometimes a screwdriver is used to disconnect it.
- Once the part is removed, it must be replaced with a new element. This is also done using a puller. Working with such a device is much better. This takes less time. However, with such a device you need to have some working skill.
- All reverse steps are performed in the same order.
In this case, there is no need to disassemble the steering knuckle. During operation, the camber does not suffer and does not need to be adjusted after the procedure is completed.
The disadvantage of this option is the inconvenience of operation, since the removal and pressing of the new product is carried out directly on the machine.
Second replacement method
Replacing a VAZ 2110 wheel bearing with your own hands without a puller consists of the following steps:
- In this case, after disassembling the steering knuckle, the hub is removed and sent to the workbench.
- Here the old bearing is replaced with a new one.
- Installation is performed in reverse order.
In the process of unscrewing the steering knuckle, it is necessary to correct the marks. There are 2 of them in total:
- the first one on the rack shows the position of the adjusting bolt;
- the second indicates the previous position of the fist.
Labels will be required during assembly. Only after this are the hinge bolts and the lower ball joint removed. After removing the bearing from the hub and disassembling the retaining ring, it is removed using a vice.
This method is used when planning repairs to the entire frame. After its completion, it is necessary to adjust the wheel alignment.
Third replacement method
Replacing the front wheel bearing of a VAZ 2110 in this way is one of the most difficult operations.
It consists of the following steps:
- You must shoot the entire rack.
- For further work on replacing the wheel bearing, a special vice is prepared in advance.
- In this vise, it is necessary to replace the failed bearing.
The difficulty of the job lies not only in removing the rack. The steering tip is also pulled out and the nuts securing the upper strut to the body frame are removed.
To replace the wheel bearing on a wheel, you do not need to go to a service station. If the car is used frequently. And the traffic is on bad roads, so such work is carried out frequently. In order to save money, it is better to carry out the replacement yourself, especially since the part is inexpensive, and the instructions for carrying out the work are carefully developed.
Today I had to replace the front wheel bearing, so I went to a very good friend’s house to make it more convenient, but now I can’t go to the garage, everything is melting. Before jacking up the car, we accelerated it and very easily tore off the hub bolt; it was not tightened well. After removing the wheel, unscrew the nut until it stops
Remove the brake caliper by unscrewing two bolts 17
I immediately looked at the pads: so far it’s fine, without unscrewing the brake hose we remove the caliper from the side
Then they started removing the brake disc, and here it is - the hero of the occasion
REPAIR RECOMMENDATIONS
When disassembling in the field, drivers often encounter problems.
- For example, VAZ 2108 rear wheel bearings from SKF, made in Sweden, are popular among motorists. However, sometimes they may resist removal. An original device made from a towing strap and a jack can help you with this procedure outside of the service center.
- In addition, during repairs, it is also important to pay attention to the wear of the drum brake pads and conduct a thorough diagnosis of the suspension. Sometimes it happens that beating or knocking occurs due to “tired” silent blocks.
- When tightening the wheel fastenings, the torque wrench should be set to 186-225 nm or 19-23 kgf.
Didn't find the information you are looking for? on our forum.
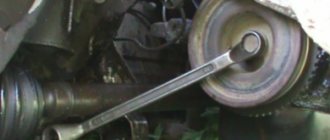
Remove the nut from the car: force method
- Lever made of pipe (length of at least one and a half meters).
- Powerful socket wrench (450 mm).
- Head of the appropriate size.
Place the head of the wrench on the hub nut, insert the wrench and place the pipe on the handle. Gradually increasing the applied effort, we unscrew the part.
As experienced car enthusiasts say, few hub nuts can resist for a long time if you use a Zilov cylinder!
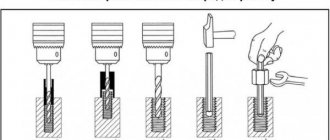
How to unscrew a broken bolt
What to do, what to use and how to unscrew it if a pin or bolt is torn off. Video tips on how to independently unscrew a broken bolt/stud in an engine or manifold. A reliable way to unscrew if the head of a bolt has been torn off Read more
What to do if the nuts do not unscrew?
Have you removed the clamps, “soaked off” the rust, bought a wrench with a 1 meter lever, but it still doesn’t work? There are proven ways to unscrew a nut without a grinder.
- Reverse rotation. Sometimes it is enough to first move the nut in the direction of tightening, and the process will begin;
- Tap the nut. Use a small hammer (preferably brass or copper) to tap the edges;
- Heat. A gas torch or blowtorch is an almost 100% guarantee of success due to the expansion of the metal. In an electrified garage you can use a hair dryer. Heat for at least 5 minutes.
Don’t panic, hit the key with a sledgehammer, or cut the hub with a grinder. Rust on the threads is not welding. The connection is still removable, it just requires a little patience.
If you have any questions, leave them in the comments below the article. We or our visitors will be happy to answer them
How to remove a hub nut from a thread - radical methods for VAZ owners
Sometimes power options are not enough, this is especially observed on cars of the VAZ family, where bearings are often adjusted. In this case, auto mechanics advise switching to radically aggressive dismantling methods:
- Break the fasteners with a chisel, hammer or nut splitter/nut splitter;
- A series of holes are drilled along the groove for locking;
- Heat the connection with a gas burner;
- Solve the issue by welding (welding a similar nut or a larger one).
It is important to know:
Before starting work, prepare new spare parts. Further operation of the removed part is impossible. If dismantling is carried out using the heating method, you will need to check the serviceability of the wheel bearings.
Causes of rear wheel bearing failure
- The bearing failed, having completely exhausted its service life (after which so-called metal fatigue occurred).
- The bearing collapsed due to sand and dirt entering it, which began to act as an abrasive material, which led to partial or complete abrasion of the bearing parts.
- One of the bearing rings cracked due to a strong impact (which occurs when the wheel hits a deep pothole at high speed).
- The nut on the hub is loosely tightened. This leads to the occurrence of play, which gradually destroys the bearing elements.
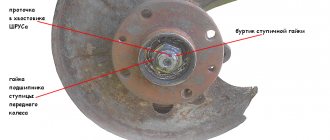
Design features of the hub nut
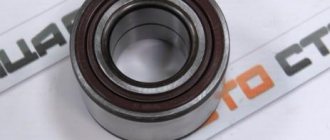
The hub nut is located in a unit whose operation occurs under conditions of high temperatures, mechanical and external influences. Therefore, alloy steel with anti-corrosion coating is used for manufacturing.
The part, in addition to the standard nut elements, has grooves. After reaching the required torque, a locking pin is inserted into them or mechanically fixed with a chisel. The outside of the nut is surrounded by 6 standard edges. We gain access to the locknut after removing the protective cap.
Signs of a bad wheel bearing
Installation
The inner surface of the fist is cleaned of dirt and lubricant (solid oil) is applied to it. The puller with the new bearing is installed in place and pressed into place. To make the process easier, it is recommended to first cool it thoroughly in the freezer.
A working unit is inserted into the fist as evenly as possible, trying to avoid distortion. After installing the bearing, put the hub back on and press it in if necessary. All other stages of work are carried out in reverse order.
The hub nut must be tightened using a torque wrench (the required force is 20 N*M).
Preparing the work site and tools
Replacing the front wheel bearing on a VAZ 2110 requires preparation of the workplace. A prerequisite is the presence of an inspection hole. This place should be well lit.
In addition, the following tools are being prepared:
- puller for removing the bearing;
spindle for punching the hub;- handle with head 30;
- set of keys, including sizes 17 and 19.
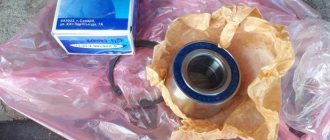
New bearings are prepared in advance.
Sequencing
- The hub nut is loosened using a 30mm socket and a wrench. After this, use a 22mm socket to slightly loosen the mounting bolts on the wheel.
- Wheel chocks are installed under the front wheels, and the car is in first gear. After this, the rear wheel with the faulty bearing is jacked up and removed.
Brake drum cover visible
Symptoms of malfunction
Replacing the VAZ 2110 wheel bearing is necessary when the following symptoms appear:
- The rotating elements gradually destroy the clamp. After this, their arrangement becomes disordered. This is accompanied by a loud squeak that can be clearly heard inside the car.
- After a long run of the car, gaps form between the supporting parts. This manifests itself in the form of vibration. Applies to the steering column and body.
- The car begins to pull to the side. The same thing happens with defective elements.