If the VAZ 2105 discharges , then one of three elements may be “to blame”: the generator, the voltage regulator, and the connections between them. Determining “who is to blame” can be very simple, even without additional devices.
In today’s article we will look at the reasons and ways to solve the problem of rapid discharge and lack of battery charge on a VAZ 2105 car.
Repair of under-hood power plant
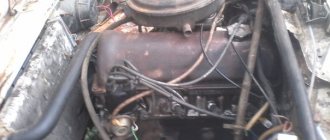
Removing the generator is a simple procedure. However, to perform it you will have to crawl under the car. In addition, it is better to remove the battery in advance, as it will interfere with unscrewing the nut securing the device to the adjustment bar.
- We roll the car into a hole or lift the right front part of the car with a jack and place bricks under it. Don't forget to put the car in gear or put the handbrake on.
- We remove the crankcase protection if it interferes.
- Slightly unscrew the nut of the lower mounting of the generator.
- We get out from under the car and loosen the nut on top that secures the unit to the adjustment bar.
- We push the generator towards the engine and remove the drive belt, first from the pump pulley, and then from the generator and crankshaft pulleys.
- We finally unscrew the nut securing the unit to the adjusting bar and remove it together with the washer.
- We climb under the bottom again, unscrew the cap of contact “30”, then disconnect the remaining wires and remember where to plug them in later. If the memory is bad, we mark everything with a marker.
- We finally unscrew the nut securing the generator from below, remove the bolt with one hand, and support the device with the other so that it does not fall.
- We pull the generator down, after tilting it.
Repairing a VAZ generator is not a very simple matter. To overhaul the unit, you need to have many special tools for disassembly and diagnostics. Therefore, it is better to entrust such an operation to specialists who have all the necessary equipment.
Without special knowledge and pullers, only replacing the generator brushes is possible. To perform this operation, you need to find contact “67” on the back cover of the unit. Directly below this contact there is a brush holder secured with just one screw, which must be unscrewed. Now we pull out the brush holder, check the condition of the brushes and the distance at which they protrude from the device. If this indicator is less than 12 mm, the brushes must be replaced.
Hello, in this article you will learn how to replace the generator on a VAZ 2101, 2102, 2103, 2104, 2105, 2106, 2107. The generator is needed to generate charging for the battery and provide voltage to all electrically dependent parts of the car. The generator does not have a specific service life; it can last 100,000 km, but it can fail even after 10,000 km. The first sign of a generator failure is a constantly draining battery (in rare cases, the cause may be in the battery itself). To check the operation of the generator, you need to use a tester to check the voltage at the battery terminals with the car running. The voltage values should be between 13.8 and 14.5 volts; if it is lower, then the generator definitely needs to be repaired or replaced with a new one. Most often, the generator can be repaired; usually the diode bridge or voltage regulator fails; replacing these parts will cost much less than buying a new generator, since its average cost in the automotive market is about 5,500 rubles. To remove the generator you will need: keys or sockets for 10, 13, 17 and 19. First of all, we remove the terminal from the battery. After this, unscrew the nut that secures the generator to the adjusting bar (depending on the type of generator, you will need a 13 or 17 socket here)
Next, move the generator so as to loosen the tension on the generator belt and remove the generator belt. Then remove the terminal from the generator
The next step is to unscrew the nut securing the positive wire using a 10mm wrench and remove the terminal
Now use a 19 mm socket to unscrew the generator mounting bolt and remove it by removing the bolt from the bracket
Installation of the generator is carried out in reverse order.
Typically, the VAZ 2106 generator must be replaced only in the most exceptional cases, and in case of most malfunctions it is simply repaired. But if this device on your car has completely failed and cannot be repaired, then it is necessary to replace it. To make replacing the VAZ 2106 generator as simple as possible, below is a list of necessary tools that will help make this operation easier:
- Keys for 17 and 19
- Heads for 10, 17 and 19
- Ratchet handles and knobs
- Extension with universal joint
Troubleshooting yourself
It’s wise to start car repairs by looking for the simplest faults, in our case mechanical damage. You should inspect the drive belt, adjust its tension, and rule out a malfunction of its brush mechanism. You can tighten the fastenings of the power wires. If this work does not bring results and the on-board network voltage on the VAZ 2114 is still low, then you can begin to disassemble the entire assembly and carry out a full diagnosis of it.
Checking the generator winding
The stages of work, as in the first case, should preferably be carried out from simple to complex:
- Check the regulator to see if it is in working condition.
- Check the voltage on a cold motor, it should be no less than 14.5 V.
- Turn off the car engine and disconnect the battery terminals.
- It is imperative to disconnect the electrical wiring from the unit to be repaired.
- Carefully remove the protective cover from the electrical contact unit.
- Remove the wiring block and regulator.
- Check the condition of the brushes and brush holder; if they are faulty, replace them with new ones.
- Make sure the regulator (tablet) is working properly. This can be done using a battery, two regular batteries (finger-type batteries) and one 12 V incandescent lamp. To determine the operating status of the regulator, it is necessary to alternately apply voltage of 12 V and 15 V. The lamp on the brushes should be lit.
- If a regulator malfunction is detected, you must buy a new one and replace it.
- Check the diode bridge. Replace the faulty spare part with a new one by removing the generator from the car.
Checking the diode bridge
- If you have minimal knowledge of an electrician and armed with a multimeter, check the functionality of all diodes (six power and three additional). To do this, you need to unscrew the nuts securing the spacer bushings, disconnect the wires and remove the horseshoe.
- Check the generator winding. If a breakdown is detected, it must be replaced.
- Disconnect the battery using the following tools: - pry bar; — keys for 13 mm and 10 mm; — 3 socket heads for 13, 17 and 19 mm. First, you should remove the wire that powers the battery, then use a 13 mm socket to unscrew the 2 bolts that secure the adjustment bracket. After this, turning the generator, you can slowly remove its mounting axis to the bracket.
- Be sure to diagnose the performance of the front bearing assembly.
Repair of voltage regulator relay on VAZ 2107
Usually the fact that the VAZ 2107 has a voltage regulator is remembered when a problem arises with charging the battery. To be completely precise in the definitions, the voltage relay comes to mind immediately as soon as it turns out that, despite the presence of charging, the battery is almost completely discharged. Let's take a closer look at why a voltage regulator is needed in a VAZ 2107 car. Without going into the intricacies of electronics, the voltage regulator is designed to regulate the voltage at the generator output depending on the engine operating mode. It is quite natural that as the speed changes, the voltage level also changes. And if it drops to 12 volts or lower, the battery stops charging.
Therefore, if you suspect a malfunction in the VAZ 2107 charging system, you must first check the voltage at the battery terminals. This can be done using a regular voltmeter or multimeter (tester). In normal mode, the voltage should be approximately 13-14 volts
If it drops below 13, you should pay attention to the relay; it may need to be replaced
Depending on the type of generator used in the car, the regulator can be internal three-level and external. The internal one is built into the generator and is usually used in VAZ 2105 and 2107 cars, while the external one is used in earlier classic models and is located in the engine compartment on the left arch.
Depending on the type of regulator, replacing it has its own characteristics. Replacing the external regulator is no problem. Using a size 8 wrench, unscrew the two fastening nuts and disconnect the wires from terminals 15 and 67. The new relay is installed in the reverse order. After checking that the wires are connected correctly to the terminals of the regulator, and that its body is in reliable contact with ground, you can start the engine and measure the voltage again to ensure that the fault has been eliminated.
The internal three-level one is somewhat more difficult to change due to limited access to the generator. But, despite this, the task is quite doable even without removing it. Replacing the regulator, as in the case of an external one, comes down to disconnecting the wires and unscrewing two mounting screws using a Phillips screwdriver. After this, the relay is removed from the generator housing. Installing a new regulator occurs in the reverse order. After assembly, the voltage level is checked.
It should be noted that the regulator is not always replaced due to its failure. Recently, more and more often, car enthusiasts have resorted to replacing the generator along with the relay from an old model to a new one. This kind of tuning becomes possible thanks to the complete interchangeability of both models. The reason that prompts car owners to take such a step is the high efficiency that distinguishes the three-level regulator from the standard one.
New type relays provide the required voltage level in automatic mode. Plus, it has a wider adjustment range than the standard one, so the battery receives an optimal charge. Under such conditions, the service life of the battery is significantly increased. In the schematic diagram of the electrical circuits of the VAZ 2107 shown below, the relay is indicated by the number 7.
What to do if the generator does not work.
If the generator does not work, then the red battery discharge light continues to light when the engine is running.
It is necessary to check whether the alternator belt is in place or not and check its tension
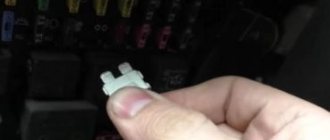
You need to check the 10th fuse
Check the voltage at the output of the wire to the voltage regulator, at point B, should be 12 Volts.
Check for the presence of positive voltage from the battery at the power output of the generator.
If there are positives at both points, but the generator does not work, you can try replacing the voltage regulator without removing the generator. This is difficult to do, and impossible on old rusty generators. You'll have to remove the generator.
If the generator is very old, it must be replaced. See generator repair
If the battery is discharged and the light does not light, then you need to check the voltage with a voltmeter. If the voltage on the battery is above 13.5 Volts, then the generator is working, but the battery is no longer suitable.
If the voltage is less than 13.5 Volts and the light does not light, then you need to check the 9th fuse, there may be an open circuit in the control light circuit, or the PC 702 relay is faulty. If you have fixed the problem with the light bulb, then you need to find the cause of the low voltage and the generator malfunction.
You need to pay attention to the voltmeter. If the voltmeter needle moves into the red zone of the scale, then the voltage has become higher than normal.
At the same time, the battery will become wet, an acidic smell will appear, the lights will burn brightly and blink. This happens if the voltage regulator has broken. You need to measure the voltage on the battery, make sure that it is more than 14.5 Volts, the regulator is definitely broken and needs to be replaced. If the regulator is in an aluminum case, then the I 112V tablet is installed in it; it should not be confused with the I 112A tablet, and even more so, with the I120 tablet, which is similar in appearance
The letters on the regulator Ya 112 In many of its analogues with other designations should be BVSh, if VVSh, then this is Ya 112A and it cannot be put.
More modern single-case regulators for G 222 generators with a brush assembly are much more reliable.
Carburetor internal combustion engine
Most classic VAZ models with a carburetor are equipped with a KSZ contact ignition system. Since 1987, cars began to be equipped with a contactless ignition system. The engine for the VAZ 2104 was created on the basis of the VAZ 2103 power unit, and accordingly, the VAZ 2103 electrical circuit was used.
Classic ignition
The KSZ includes a distributor (2), a coil (5), spark plugs (1), and connecting wires. The system also includes a capacitor (3), a relay (7), a breaker cam (4), a mounting block (6), and a switch (8).
On machines with KSZ, a distributor 30.3706-01 is installed. It is located on the left side of the cylinder block in the front part. Thanks to it, the circuit of the primary winding is interrupted and high voltage is distributed across the spark plugs in the required sequence. The distributor consists of ignition timing regulators, a high-voltage pulse distributor, and a breaker with contacts.
A B-117A with an open magnetic circuit is used as an ignition coil. It is located in the engine compartment and is attached to the left mudguard using two nuts. The device is used to convert low-voltage current into high-voltage current. The installed A17DVR spark plugs serve to ignite the fuel-air mixture in the cylinders of the power unit.
A VK347 type switch is installed, which has an anti-theft device. The anti-theft operating principle: when the key is removed from the lock in the “Parking” position, the locking rod extends, which blocks the steering shaft, entering a special groove.
Electronic ignition
The design of the contactless ignition system includes:
- distributor (distributor);
- sensor;
- switch that controls the system;
- high voltage coil;
- spark plug;
- connecting and high-voltage wires.
On VAZs with BSZ, a distributor 38.3706-01 is installed, its location coincides with the KSZ distributor. The coil consists of two windings. One is connected to the ignition switch relay, and the second is connected through a high-voltage wire to the distributor.
Using small cross-section wires, the coil and distributor are connected to a switch, which is responsible for the timely supply of a spark. The commutator converts the sensor pulses into a pulse current, which is supplied to the primary winding of the coil. The coil is also located in the engine compartment, like the KSZ coil.
The operating instructions contain an electrical diagram of the VAZ 21043 carburetor with a description of the main components included in it.
Electrical diagram of VAZ 2104
Car modifications
VAZ-2105 . The base model was produced in 1979 with a 1.29-liter carburetor engine producing 63.6 horsepower. It was equipped with a 4-speed gearbox.
VAZ-21050 . The same model of the five, but with a 5-speed gearbox.
VAZ-21051 . Modification with a VAZ-2101 carburetor engine with a volume of 1.2 liters and a power of 58.7 horsepower, a 4-speed gearbox as in the basic version.
VAZ-21053 . Modification with a VAZ-2103 engine with a volume of 1.45 liters and a power of 71.4 horsepower. It was equipped with both 4 and 5-speed gearboxes.
VAZ-21053-20 . Modification with a VAZ-2104 injection engine with distributed injection, volume 1.57 liters and 82 horsepower. The gearbox is 5-speed.
VAZ-21054 . A special modification for the needs of no less special services, such as the traffic police, the Ministry of Internal Affairs and the FSB. It was equipped with a VAZ-2106 carburetor engine with a volume of 1.57 liters and a power of 80 horsepower. In addition, an additional gas tank and battery were installed.
VAZ-21054-20. Another special modification, but with a more powerful VAZ-21067 engine with distributed injection, 82 horsepower, which meets the Euro-3 environmental standard. The gearbox is 5-speed.
VAZ-21055 . A vehicle for taxi service was produced in a small batch with a VAZ-341 diesel engine with a volume of 1.52 liters and a power of 50.3 horsepower.
VAZ-21057 . The export version of the VAZ-21053 car was produced from 1992 to 1997 for countries with left-hand traffic, respectively, the steering wheel was located on the right. The engine complied with the Euro-1 environmental standard.
VAZ-21058 . The same right-hand drive car, based on the VAZ-21050, was produced from 1982 to 1984.
Lada Nova . Export modification of the VAZ-2105, produced mainly for the German markets. VAZ-2105 engine, 4-speed gearbox. Produced from 1981 to 1997.
VAZ-21059 . Another special modification of the car was equipped with a Wankel VAZ-4132 rotary piston engine, with a volume of 1654 cm3 and a power of 140 horsepower. This car was produced in a small batch for the needs of the traffic police, the Ministry of Internal Affairs and the KGB.
VIS-2345 . Semi-frame pickup truck, which was produced from 1995 to 2006 by VAZINTERSERVIS JSC based on modifications of the VAZ-21053 and VAZ-21054.
LADA-2105-VFTS . A sports car with a forced VAZ-2106 engine, using WEBER 45 DCOE carburetors. The engine capacity was 1.6 liters and the power was 160 horsepower at 7000 rpm. It was equipped with spur-cut 4 and 5-speed gearboxes, with cam clutches. In order to reduce the weight of the car, in 1986 the standard doors were replaced with aluminum ones.
Diagnostics of a removed generator
To check the generator removed from the VAZ 21, you should use a multimeter in ohmmeter mode. The probes are pressed against terminal 30 and the body of the unit. If there are contaminants and strong oxides on the case, they should be removed first, as they can affect the readings of the device.
You need to measure the resistance of each generator unit in turn. Parts that do not have the required resistance have become unusable. Most of them can be replaced at home using a minimal set of tools. To replace, you need to buy the same parts as those originally installed in the generator.
Didn't find the information you are looking for? on our forum.
We recommend reading:
VAZ 2110 installation of an electric pump on a car
Where is the oil pressure sensor located on the VAZ 2114 - 8 valves, how to diagnose and replace
Replacing a VAZ generator with a 2110
VAZ 21 12 starter relay where is it located
How to check the thermostat on a VAZ
How to check the VAZ 2114-2115 heater motor, causes of failure and solutions
Throttle assembly VAZ 2110 8 valves
VAZ 2115 check engine light on reasons
VAZ 2104 no battery charging
The VAZ 2104 car has a voltmeter and a warning lamp on the instrument panel to monitor the battery charge.
| Instrument panel of a VAZ 2104 car. The numbers indicate: 18 - rear fog light switch; 17 — fuel reserve warning lamp; 16 — fuel level indicator; 15 — instrument cluster; 14 - voltmeter ; 13 — control lamp for turning on side lights; 12 — control lamp for turning on the direction indicators; 11 — control lamp for turning on the high beam headlights; 10 — three-position switch for electric heater fan; 9 — plugs for screws securing the instrument panel; 8 — rear window heating switch; 7 — summing counter of the distance traveled; 6 — speedometer; 5 — block of warning lamps; 4 - battery charge indicator lamp; 3 — liquid temperature indicator in the engine cooling system; 2 - warning lamp for insufficient oil pressure in the engine lubrication system; 1 — external lighting switch; |
In cases where the voltmeter is not in the green zone and the control lamp is on, this indicates that the VAZ 2104 is not charging the battery. This could be due to several reasons.
First of all, the fuse in the battery charging circuit and the reliability of its fixation in the mounting block are checked.
The second thing you need to pay attention to when troubleshooting is the alternator drive belt. The belt must not be worn, twisted and have the required tension.
The deflection of the alternator belt should normally be 10-15 mm when pressed by hand.
In addition, it is worth inspecting the generator drive pulley, which may also be worn out, and the belt will simply slide along its surface without turning the generator rotor. In such cases, both the pulley and the belt must be replaced.
Next, you need to check the output voltage from the generator, and if it is normal and shows 13.5 -14.2V, then check the wire from the generator to the battery for the integrity and reliability of its connection.
The terminals on the battery itself may be oxidized or may not have reliable contact with the battery terminals.
| When operating, the VAZ 2104 voltmeter should be in the white or green areas. Occasionally, it is necessary to check the voltage of the on-board network with independent devices in order to be confident in the readings of the built-in voltmeter. |
The oxidized terminals are cleaned (a solution of soda and water), and the unreliable contact is tightened.
Further, the reason why the VAZ 2104 does not charge the battery may be the generator brushes, which either have extreme wear or are stuck in the brush holder guides. Worn brushes are replaced and jamming is eliminated.
In addition, the slip rings may have wear and tear and the brushes cannot lie completely on the rings, so there is no reliable contact in the excitation circuit
Also, the reason for the lack of charging may be a faulty relay-regulator combined with the brush assembly. In such cases, the relay-regulator along with the brush assembly must be replaced.
The lack of charging can be affected by an interturn short circuit, a short to ground or a break in the stator winding, as well as a break in the generator excitation circuit.
In the generator, the diodes of the rectifier unit (popularly “horseshoe”) can also fail, as well as a short circuit or breakdown of one of the additional diodes.
In addition, the generator may have poor contact with the car body (ground) or unreliable contact at terminal “30”
Also read other reviews
- VAZ 2106 battery light is on
Source
Upper left part of the VAZ-2106 wiring diagram
This diagram allows you to examine the elements of the front of the machine. Here are the following:
- Side left and right turn signal (1);
- Several sidelights (2);
- External (3) and internal (4) headlight samples;
- Connected sound signal (5).
Next are the internal elements of the car's electrical wiring, which are hidden under the hood and body. These include:
- Electric motor terminals for both fans included in the cooling system of the VAZ-2106 engine (6);
- A set of sensors responsible for the timely activation of the electric motor (7);
- 2 types of relays - one is used when turning on the sound signal (8), and the other when regulating the operation of the electric motor of the cooling system (9);
- Small voltage regulator in the car (10);
- Vehicle ignition system coils (11);
- 2nd electric motor, which is responsible for the operation of the windshield washer (12);
- One of the main sensors of the VAZ-2106 - it determines the level of brake fluid in the car and promptly gives the owner a command about non-compliance with the required standards (13);
- Also marked in the center of the diagram are the ignition system distributor (14) and the motor for operating the windshield wiper (15).
This part of the circuit is completed by the following electrical equipment:
- Car spark plug set (16);
- Sensors monitoring the oil mixture pressure lamp (17) and a gearbox with an indicator of this pressure on the panel (18);
- Also shown is the connection of the sensor for the current temperature indicator in the engine coolant (19) and the engine compartment lamp of the VAZ-2106 (10).
Advice: if problems arise with the operation of the engine and specifically the chassis, first check the tire pressure in the car using the table - are all the wheels properly inflated? Then start researching your wiring problems!
Fine for driving without lights during the day
Daytime is characterized by a reduced risk of accidents, since all approaching objects are clearly visible in conditions of unlimited visibility.
However, a motorist may receive a fine in cases where the vehicle does not have lights on:
- headlights, which are used to illuminate nearby inverter elements;
- fog lights;
- daytime running.
Most modern cars already have the function of automatically turning on the light mechanisms when the power unit starts operating. This feature not only virtually eliminates the possibility of receiving a fine, but also increases the level of traffic safety.
Older car models require manual activation of the lighting equipment. Drivers do not always notice the violation in a timely manner, for which they receive unexpected fines. This is explained by the fact that in the daytime it is quite problematic to notice unlit headlights. Often, traffic police officers do this earlier than vehicle owners.
The absence of lighting when a vehicle is moving is sanctioned by the state. The prescribed penalty is prescribed in Article 12.20 of the regulatory document of the Russian Federation, regulating the features of administrative proceedings. If the lighting elements are not turned on during the day, the driver will receive a fine of 500 rubles or a warning.
Symptoms of a problem
You can determine that there are problems with electrical equipment by the following signs:
- Charger. The battery charging light flashes and goes out when the headlights are turned on. Knocks out the jumper in the voltage regulator. When the ignition is turned on, the charging indicator does not light up.
- Movement. Speed spontaneously increases when moving. Jerking when moving at low speed. Unstable idle. Loss of power during acceleration.
- Wiper. The wipers move jerkily. Windshield wipers do not turn on or do not work in rainy weather. The wipers move jerkily.
- Closures Fuse No. 9 burns out after turning on the ignition or at the start of movement. Fuse #1 blows. Fuse No. 7 burns out when the lights are turned on.
- Dashboard. When the power grid is loaded, the devices begin to display incorrect values.
- Start the engine. Doesn't turn or...
- Lighting fixtures do not work.
Basic electrical wiring faults: short circuit or break.
In the event of a short circuit, fuses, relays, devices burn out, and even a fire is possible. In the event of a break, either some node, system or device, device, etc. fails. You need to be able to understand the wiring diagram of VAZ 2103, 2104 and other models, find and fix faults (video author - MR.BORODA).
Questions from readers
And now I would like to answer questions from our readers!
The lamp does not light, the voltmeter needle remains at zero when the ignition is turned on.
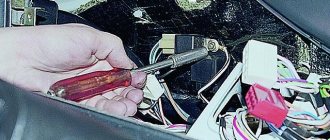
We check the wires on the generator to see if the wire has come loose from terminal “61”. If everything is normal there, you need to check whether there is a “plus” on this wire using a test lamp, an indicator screwdriver or a multimeter.
If there is a “plus” , we check the “tablet” (aka “chocolate”) and the generator. There is no “plus” - you will have to remove the instrument panel and check the lamp. Replace the burnt out one.
Let's start the engine . The control lamp should go out, the voltmeter needle goes into the green sector and is located from the middle to the right edge (photo). If everything is so, then most likely the generator is working normally .
The lamp does not light up, the voltmeter needle shows normal
Check fuse No. 10 in the mounting block. 99% of the time it will be burnt out. In this case, all other lamps on the instrument panel will also be de-energized. Replace it with the same one and test again. If the fuse burns out again, you need to look for the cause, that is, a short circuit. We check whether the wires from the generator are disconnected, whether the insulation is frayed somewhere, etc.
The lamp remains on or dims slightly
If you give it gas, it goes out at high speeds and lights up again when they decrease. The voltmeter needle is in the white sector and goes to the edge of the green when the speed increases. The generator output is faulty. The same conclusion if the lamp continues to light at any speed, and the voltmeter needle is in the white sector and even goes to red.
If the generator seems to be working, but the battery is gradually discharging, we will perform another check. We start the engine, turn on the heater fan and low beam, take the key to “10” and, loosening the negative terminal of the battery, remove it. An idling engine (about 900 rpm) should not stall. If the engine stops, put the terminal back in place and start it again. While holding the speed at 1200-1500, remove the terminal again. Has the engine stalled again? Then turn off the headlights, leave the heater fan on and repeat the test. Now the engine with the negative terminal disconnected from the battery continues to run. output works, but does not produce the required current; it needs to be repaired.
Do-it-yourself VAZ 2101 generator repair
Repairing a VAZ 2101 generator with your own hands is quite simple. All work can be divided into five stages:
- Removing the generator from the car.
- Disassembling the generator.
- Troubleshooting.
- Replacement of worn out and faulty elements with new ones.
- Generator assembly.
First stage: dismantling the generator
To dismantle the VAZ 2101 generator you will need:
- open-end wrenches for 10, 17 and 19;
- mounting blade.
Before dismantling the generator, you must disconnect the negative cable from the battery.
To remove the generator you will need to perform the following steps:
- Remove the right front wheel from the vehicle.
- Securely secure the car on a jack and additional supports.
- Climb under the car on the right side and find the generator housing.
- Loosen, but do not completely unscrew the housing fixing nut.
- Loosen, but do not completely unscrew the nut on the bracket stud.
- To loosen the V-belt, slightly move the generator housing.
- Disconnect the power cable going to the generator.
- Disconnect all wires and contact connections.
- Remove the fixing nuts, pull the generator towards you and remove it from the studs.
Video: dismantling the VAZ 2101 generator
Stage two: disassembling the generator
The removed generator should be wiped with a soft cloth, removing the main layer of dirt. To disassemble the device you will need:
- open-end and ring wrenches 19;
- extension;
- heads for 8 and 10;
- hammer.
Disassembling the VAZ 2101 generator is quite simple
The disassembly itself is carried out in the following order:
- Unscrew the four nuts on the back cover of the generator.
- The nuts securing the pulley to the body are unscrewed.
- The pulley is removed.
- The housing is divided into two parts (one will contain the stator, the other will contain the rotor).
- The winding is removed from the part with the stator.
- The shaft with bearings will be pulled out from the part with the rotor.
Further disassembly involves pressing out the bearings.
Video: disassembling the VAZ 2101 generator
https://youtube.com/watch?v=pUAgp4kTgzo
Third stage: generator troubleshooting
At the troubleshooting stage, faults of individual generator elements are identified and eliminated. Moreover, some of the work can be performed at the disassembly stage
Particular attention should be paid to:
- signs of wear on the surfaces of parts;
- the appearance of carbon deposits on wires and contacts;
- the presence of dirt and working fluids inside the generator housing;
- cracks, nicks and other mechanical damage to parts.
All damaged and worn elements must be replaced with new ones.
When troubleshooting, you do not need to pay attention to the generator housing: after several years of service, it may have an unsightly appearance, but at the same time it will protect the insides of the device well.
Stage four: generator repair
The difficulty of repairing the G-221 generator is that it is difficult to find spare parts for it. If bearings can still be purchased on the Internet, then choosing a suitable winding or rectifier will be very difficult.
Video: repair of VAZ 2101 generator
Therefore, the list of situations for repairing a VAZ 2101 generator is very limited. So, if bearings jam or brushes wear out, replacement elements can be easily found in car dealerships.
Let's summarize:
As you can see, there are many reasons why the battery does not have charge. At the same time, a number of problems when the battery does not charge are common to different cars (for example, a VAZ 2107 is not charging or the battery of a foreign car is not charging). Moreover, some of them can be easily detected and eliminated with your own hands. The main thing is to determine why the battery is not charging, after which appropriate measures are taken.
Finally, we note that even ordinary car enthusiasts usually do not have problems with cleaning the terminals and restoring the integrity of wires and contacts. If the problem is with the generator, if you do not have the skills to repair it, it is only recommended to dismantle it yourself and then transfer the generator to a specialized service for repair. This will allow you to avoid common mistakes that are made when repairing a generator with your own hands, and also obtain a guarantee for the repaired device.
Generator connection diagram for VAZ 2107
The VAZ 2107 charging scheme depends on what type of generator is used. To recharge the battery on cars such as VAZ-2107, VAZ-2104, VAZ-2105, which have a carburetor engine, you will need a G-222 type generator or its equivalent with a maximum output current of 55A. In turn, VAZ-2107 cars with an injection engine use a generator 5142.3771 or its prototype, which is called a high-energy generator, with a maximum output current of 80-90A. It is also possible to install more powerful generators with an output current of up to 100A. Absolutely all types of alternating current generators have built-in rectifier units and voltage regulators; they are usually made in the same housing with brushes or are removable and mounted on the housing itself.
The VAZ 2107 charging circuit has minor differences depending on the year of manufacture of the car. The most important difference is the presence or absence of a charge indicator lamp, which is located on the instrument panel, as well as the method of connecting it and the presence or absence of a voltmeter. Such circuits are mainly used on carburetor cars, while on cars with injection engines the circuit does not change, it is identical to those cars that were manufactured previously.
Generator set designations:
- “Plus” of the power rectifier: “+”, V, 30, V+, WAT.
- “Ground”: “-”, D-, 31, B-, M, E, GRD.
- Excitation winding output: Ш, 67, DF, F, EXC, E, FLD.
- Output for connection to the serviceability lamp: D, D+, 61, L, WL, IND.
- Phase output:
,W,R,STA.
Output of the stator winding zero point: 0, MP. Voltage regulator output for connecting it to the on-board network, usually to the “+” of the battery: B, 15, S. Voltage regulator output for powering it from the ignition switch: IG. Voltage regulator output for connecting it to the on-board computer: FR, F.
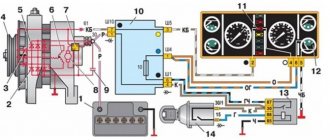
Generator circuit VAZ-2107 type 37.3701
- Accumulator battery.
- Generator.
- Voltage regulator.
- Mounting block.
- Ignition switch.
- Voltmeter.
- Battery charge indicator lamp.
When the ignition is turned on, the plus from the lock goes to fuse No. 10, and then goes to the battery charge indicator lamp relay, then goes to the contact and to the coil output. The second terminal of the coil interacts with the central terminal of the starter, where all three windings are connected. If the relay contacts close, then the control lamp lights up. When the engine starts, the generator generates current and an alternating voltage of 7V appears on the windings. Current passes through the relay coil and the armature begins to attract, and the contacts open. Generator No. 15 passes current through fuse No. 9. Similarly, the excitation winding receives power through the brush voltage generator.
Second version of the scheme
- block headlights
- side turn signal repeater
- battery
- lamp relay for monitoring battery charging
- electropneumatic valve
- carburetor microswitch
- generator
- headlight glass cleaner
- sound signal
- starter
- engine TDC indicator lamp
- engine compartment lamp
- oil pressure warning light sensor
- coolant temperature gauge sensor
- fluid level sensor in the hydraulic brake reservoir
- candles
- windshield washer pump motor
- distributor cap
- distributor
- ignition coil
- electric motor of the pump serving the headlight washers
- electronic control unit
- diagnostic block (installed on some cars)
- windshield wiper relay
- relay-interrupter for direction indicators and hazard warning lights
- wiper motor
- brake light switch
- electric motor of the heater (stove)
- additional resistance
- portable lamp socket
- reverse light switch
- Handbrake warning lamp switch
- relay and fuse box
- low beam headlight relay
- headlight high beam relay
- horn relay
- Relay for windshield wipers and headlight washers
- rear window defroster relay
- glove compartment lamp
- cigarette lighter
- dome light switches
- interior lamp
- rear window defroster switch
- hazard warning switch with warning lamp
- warning lamp block
- rear fog light warning lamp
- hand brake warning lamp
- warning lamp indicating a drop in brake fluid level
- windshield wiper and washer lever
- handbrake warning lamp relay
- horn switch
- outdoor light switch
- turn signal switch
- headlight switch lever
- egnition lock
- instrument light switch
- rear fog light switch
- instrument cluster
- warning lamp indicating insufficient oil pressure
- fuel reserve warning lamp
- fuel level indicator
- battery charging warning light
- water temperature indicator
- instrument lighting lamps
- voltmeter
- speedometer
- indicator lamp for turning on external lighting
- turn signal indicator lamp
- high beam warning lamp
- three-position heater fan switch
- rear window defroster
- fuel level and reserve indicator sensor
- rear light block
- license plate lights VAZ 2105
How does it all work?
First you need to understand how everything works. So, on the VAZ-2107, the on-board network is powered from two sources - the battery and the generator. The first provides electricity to all consumers until the power plant is started. The battery itself is a storehouse of electrical charge, which it releases when needed.
A generator is a unit that generates electricity, but for this it is necessary that it perform a mechanical action (its rotor rotates). In order for the generator to operate and power the network, it is driven from the crankshaft via a belt drive.
Everything works simply: to start the engine, the battery energy is supplied to the power electric motor - the starter, as well as the ignition system. After the power plant starts, the generator will be driven by the drive, the generated energy of which will power all devices. It will also be supplied to the battery to restore the charge spent on starting the power plant.
Recharging the battery from the generator must be carried out without fail, otherwise after several starts of the power plant, the loss of electricity in the battery will be significant (the battery runs out), and it will simply not be able to start the engine.
In order to monitor charging, a warning lamp and a voltmeter are installed on the dashboard of the VAZ-2107. Thanks to these control devices, it is possible to detect that the battery is not charging.
If the entire circuit through which the battery is recharged is in good condition, then after turning on the ignition, the charge indicator lamp lights up, but after starting the engine and entering the operating mode, it should go out, which indicates that voltage is supplied to the battery. In this case, the arrow on the voltmeter should be in the green zone, indicating that the voltage parameters correspond to the norm. But if, after starting the engine, the lamp lights up and “blinks”, while the arrow may twitch, this indicates a malfunction.
It should be immediately noted here that it often happens that the battery icon is on when the engine is running, but the voltmeter shows that charging is in progress. In general, the behavior of this system can be very different - charging is not happening, it is, but control devices show the opposite, recharging periodically disappears, but then is restored. In this case, there is a possibility of undercharging or overcharging, which are detrimental to the battery. A weak battery will eventually lead to it being completely discharged over time and making it impossible to start the car.
Breakdowns and repairs
If you suspect that the generator on the VAZ 2101 is not working, check it yourself. It's done like this.
- Start the engine.
- Open the hood.
- Pull out the choke adjustment knob, bringing the engine speed to 1200–1300 rpm.
- Remove the positive terminal from the battery. If the engine stalls, the unit is faulty.
The fact that the engine stalls indicates that it is running only on battery power. If you notice a malfunction immediately after it occurs, and your battery is freshly charged, you can drive a dozen or two kilometers until the battery loses power. This will allow you to get to your garage or the nearest service center. But don't try to go far. You may end up in the middle of the road and have to ask for a tow or call a tow truck.
The most common cause of failure of a VAZ 2101 generator is low tension in the belt that drives its rotor. The belt tension is considered normal when the deflection in the middle of the shoulder between the crankshaft pulley and the water pump pulley when pressed lightly is 10–12 mm. You can easily check this parameter yourself. It changes when the engine is not running with the application of a small force with a mounting blade. Few people measure such a deflection with a ruler. Usually everything is clear to the eye.
Adjusting the belt tension is more difficult than identifying a deviation of a parameter from the norm, but the average owner of a VAZ 2101 is quite capable. Keep in mind that you should not overtighten the belt. This can lead to failure of the bearings in which the shafts of the VAZ 2101 generator and water pump rotate.
The order of work is as follows.
- De-energize the vehicle's electrical system. Remove the negative terminal from the battery.
- Using an open-end wrench, loosen the nut securing it to the adjusting bar.
- Using the paddle as leverage, tilt the unit away from the engine.
- Achieve the required deflection in the middle of the belt shoulder between the water pump and the crankshaft.
- Secure the generator. Tighten the nut on the adjusting bar.
Often the unit fails due to excessive wear of the brushes. Through them, excitation voltage is supplied to the armature, that is, the working surface of the brush constantly rubs against the contact surface of the rotor shaft and wears out. Worn brushes must be replaced. Any car enthusiast can perform this operation with his own hands.
The procedure does not require removing the unit:
- de-energize the vehicle's electrical system; remove the terminal from the negative terminal of the battery;
- unscrew the screws securing the brush holder; disconnect it from the device;
- make sure that the length of the working part of the brushes does not exceed 12 mm;
- replace worn brushes;
- return the brush holder to its place.
The VAZ 2105 battery has boiled - what to do?
There are several reasons why batteries boil. Let's consider them in order of importance:
- Recharging the battery
- Short circuit of cans
- Sulfation of plates
- Electrical system overload
- Battery polarity reversal
If the battery boils on your car while driving, you must immediately take the following steps:
- turn off the engine;
- open the hood to provide air flow; if the battery has a jacket, remove it; Allow the battery to cool to a temperature below 40 degrees Celsius (easily determined by touching it with your hand); close the hood, start the car and drive to the nearest gas station;
- purchase distilled water and top up to the required electrolyte level;
- if the battery is maintenance-free, topping up can be done through the gas outlet;
- if the repair kit contains a multimeter, measure the voltage on the battery with the engine running; if the voltage exceeds 15 Volts, disconnect the thick wire of the generator, carefully insulating it and securing it to the nearest body element;
- Continue driving to the parking or repair site, turning off, if possible, all additional comfort devices (stove, car radio, air conditioning and others).
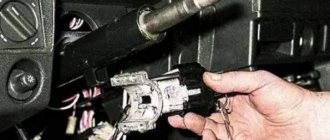
How to replace the charging relay?
Important! First, as always, we turn off the ground, remove the negative wire from the battery terminal, then remove the yellow wire going from the generator to the relay, then use a Phillips screwdriver to unscrew it; Then we take it out together with the brushes: Now we need to carry out diagnostics. To do this, we test the voltage on the brushes with a voltmeter, and we power the relay itself from the battery, “simulating” the rectified current of the generator
At the same time, we apply () to terminal “B”, to the yellow wire, and connect (-), “ground” to the other terminal. We are familiar with the signs of trouble. If you don’t have a tester, you can take a 1-3 W, 12 V light bulb. When installing a new relay, you need to press it firmly during installation, since new, unworn brushes provide more resistance.
In conclusion, let me tell you about several other reasons for the lack of charging or imitation, and also give advice:
- If you have a VAZ 2107 injector, then it is strictly not recommended to reset the battery terminal for various “checks” while the engine is running, and especially to allow strangers near the hood for this purpose. This is very harmful to electronic “brains”.
- It is advisable for those who like to “light up” to be able to say a firm “no” if you have a VAZ 2107 injector.
- On the instrument panel, the connectors are not soldered to the board, but riveted. Therefore, in some cars in the cold, while the interior is cold, there is no contact with the charging lamp. It lights up, simulating a lack of current from the generator. After the interior has warmed up, contact is restored and the lamp goes out.
- The next reason for those who like to go to the car wash in the cold. When water gets into the relay and brush assembly and freezes there, there is no charging. The solution is to heat it with any powerful hairdryer.
Checking generator operation
You can check the functionality of the generator in several ways using certain methods, for example: you can check the output current of the generator, the voltage drop on the wire that connects the current output of the generator to the battery, or check the regulated voltage.
To check, you will need a multimeter, a car battery and a lamp with soldered wires, wires for connecting between the generator and the battery, and you can also take a drill with a suitable head, since you may have to twist the rotor by the nut on the pulley.