The best improvement to the standard UAZ Hunter heater is its replacement with a more advanced and efficient heater produced by NAMI. It has more advantages than disadvantages, the main one of which is the high price. If you want to save money, then you can increase the efficiency of the standard heater with the help of some simple modifications, which will be discussed below.
Refinement and improvement of the UAZ Hunter heater design.
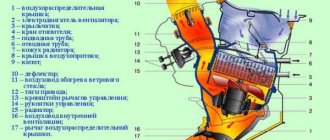
You should start by sealing the heater housing. To do this, it must be removed from the car and all corners and joints of the body parts must be sealed from the inside using automotive sealant. And then, preferably, also from the inside, cover the walls of the box with thin, 2-3 mm, sheets of automotive noise and vibration insulation. All this together will eliminate air leaks, slightly increase heat transfer and somewhat reduce the overall noise of the heater during operation of the electric motor.
The next step is to try using any available method, for example by gluing a window seal around the perimeter, to seal the lower rectangular outlet hatch of the heater housing. This is necessary in order to eliminate air leaks when the hatch cover is closed, thereby increasing the strength of the air flow that will flow through the corrugated hoses to the windshield or through the lower side air distributors.
Well, in conclusion, you need to remove or simply bend to the left the rectangular protrusion located from the inside of the heater housing and partially covering the left outlet pipe supplying air to the windshield. The general purpose and functionality of this protrusion in the design is not entirely clear, but the fact that without it the force of air supply into the left corrugated hose increases, and therefore the force of blowing the windshield on the driver’s side increases, is a fact.
Rain water leaking from the UAZ Hunter heater housing into the passenger compartment.
Despite the plastic box installed under the air intake hatch, some of the rainwater, when the hatch cover is closed, can still get into the UAZ Hunter’s interior when parked. Initially, as a result of inspection and control during the rain, it seemed that water droplets were entering the cabin somehow through the drain hose of the box.
It was then assumed that the plastic box itself was damaged. In fact, it was precisely determined that water enters the cabin through the joint of the upper internal iron heater box, which exits to the outside of the body. There it forms a small side on which the lower seal of the hatch is installed.
Rainwater flows under this seal, then goes into the gap between the protruding side of the box and the body itself. And from there it immediately gets inside the heater housing and then flows through leaks under the feet of the driver or front passenger. That is, it does not initially fall into the plastic box, but bypasses it.
Therefore, the lower rubber seal of the hatch must be removed, treated well with body sealant around the joining seam that has become visible, and then put the seal in place. No more water will flow into the cabin through the heater.
Installing a door seal on the air intake hatch cover of a UAZ Hunter.
In any case, whether a plastic box is installed on the car above the heater radiator or not, the natural entry of water and dust into the heater, and then into the passenger compartment when the air intake flap is closed, must be prevented. A plastic cover installed on top of the hatch will best cope with this task. You just need to find out in advance whether it is suitable for the UAZ Hunter with a lower windshield wiper arm or not.
If you don’t want to drill additional holes in the car body to install such an overlay, then there is a simpler and cheaper method. It consists of replacing the standard rubber seal on the air intake flap cover with a seal that is installed from the factory on the inner door opening of the UAZ Hunter, its catalog number is 3153-6107018 or 3153-6107019. But in fact, this is an ordinary door seal from VAZ 2101, 2102, 2103, 2104, 2105, 2106, 2107, which goes under the numbers 2101-6107018, 2101-6207024, 2101-6207025.
There are no particular difficulties when installing such a seal. The only thing you need to pay attention to is that during installation the cover is raised as high as possible, as far as its adjustment holes allow. Now, when closed, the air intake hatch cover is maximally sealed around the entire perimeter and water ingress into the interior is practically excluded, even during very heavy rain.
Selecting and replacing the electric heater motor of the UAZ Hunter.
As standard, the UAZ Hunter heater is equipped with an ME236 electric motor with a power of 25 Watts. Its capabilities are frankly not enough to properly draw air through the radiator. The low performance of the ME236 also greatly affects the quality of windshield blowing.
Finding a more powerful electric motor to replace the ME236 is not difficult. For example, these could be electric motors 19.3730, 191.3730, 192.3730 and 194.3730 with a power of 40 Watts, or 197.3730 with a power of 60 Watts, or 51.3730 and 511.3730 with a power of 90 Watts. The main thing is that the diameter of the output shaft of the electric motor is 8 mm, so that a standard impeller can be installed without modifications, and also that it has suitable studs or threaded holes on its body for mounting it in the heater.
In addition, it would not be superfluous to take into account the load that, during operation, this electric motor will create on the on-board network and, accordingly, the generator. Thus, the current consumption of the 90-watt electric motor 511.3730 is 15 Amperes, versus 5 Amperes for the standard ME236. Therefore, perhaps the golden mean would be to install an electric motor 197.3730 with a power of 60 Watts and a current consumption of 8 Amps.
The impeller of the electric motor of the UAZ Hunter heater and the height of its installation.
If you do not take into account global alterations, then there are no easily accessible alternatives to the standard impeller. The efficiency of the impeller is greatly influenced by the height of its installation on the electric motor shaft.
If the impeller is installed high and its blades are almost completely hidden in the diffuser, then, all other things being equal, the air flow from the heater will be hotter and, accordingly, the interior will warm up faster. And if the impeller is installed low, the efficiency of blowing the windshield will increase and, accordingly, fogging will be eliminated faster. So, here you need to select the height of its installation based on personal preferences.
Installation of a remote control drive for a UAZ Hunter heater tap.
The heater switch valve installed on the UAZ Hunter allows you to remotely regulate the supply of coolant to the heater radiator, but for some reason this possibility was not implemented by the car plant engineers.
To correct this drawback, you can independently install a heater control drive in the cabin from some VAZ or ZAZ model. More details about this in a separate article.
Tuning UAZ 469 for hunting and fishing
The UAZ 469 is in demand among motorists due to its high cross-country ability.
The technical characteristics of the car allow it to be used both in extreme conditions and for irregular trips into nature. The UAZ 459 is especially popular among hunters and fishermen. The car has a 4x4 wheel arrangement. Thanks to this, the UAZ 469 can be used for travel both on asphalt and rough terrain. This allows you to get to the fishing or hunting place, despite the weather conditions.
Modernization of the heating system for rear seats and driver's feet in VAZ cars
Laying corrugated heating ducts
As for the module for distributing air flow to the driver’s feet, front seat passenger and rear part of the cabin, this also has its own factory flaws. They are also associated with insufficient sealing of cracks. You can fight with modelin or silicone, as in the case of a torpedo, if you do not want to disturb the factory aesthetics of the parts.
It would be much simpler and more reliable to cut off the ill-fated Christmas tree that distributes air flows and use three separate 40 mm corrugated pipes for heating ducts. What do you gain in this case:
- you get reliable sealing of the channels;
- three corrugated hoses take up much less space, which greatly simplifies access to the VAZ 2110 electrical wiring system, located there (there are really a lot of wires and access to them is extremely difficult).
Corrugation gasket for heater
We also remove the partitions of the old air distribution system. We seal the hoses using polyurethane foam. It should also be taken into account that the textured internal coating of a corrugated hose can cause whistling and howling of air, so we do not make the pipelines very large.
Site about off-road vehicles, SUVs, off-road vehicles
The best improvement to the standard UAZ Hunter heater is its replacement with a more advanced and efficient heater produced by NAMI. It has more advantages than disadvantages, the main one of which is the high price. If you want to save money, then you can increase the efficiency of the standard heater with the help of some simple modifications, which will be discussed below.
Refinement and improvement of the UAZ Hunter heater design.
You should start by sealing the heater housing. To do this, it must be removed from the car and all corners and joints of the body parts must be sealed from the inside using automotive sealant. And then, preferably, also from the inside, cover the walls of the box with thin, 2-3 mm, sheets of automotive noise and vibration insulation. All this together will eliminate air leaks, slightly increase heat transfer and somewhat reduce the overall noise of the heater during operation of the electric motor.
The next step is to try using any available method, for example by gluing a window seal around the perimeter, to seal the lower rectangular outlet hatch of the heater housing. This is necessary in order to eliminate air leaks when the hatch cover is closed, thereby increasing the strength of the air flow that will flow through the corrugated hoses to the windshield or through the lower side air distributors.
Well, in conclusion, you need to remove or simply bend to the left the rectangular protrusion located from the inside of the heater housing and partially covering the left outlet pipe supplying air to the windshield. The general purpose and functionality of this protrusion in the design is not entirely clear, but the fact that without it the force of air supply into the left corrugated hose increases, and therefore the force of blowing the windshield on the driver’s side increases, is a fact.
Rain water leaking from the UAZ Hunter heater housing into the passenger compartment.
Despite the plastic box installed under the air intake hatch, some of the rainwater, when the hatch cover is closed, can still get into the UAZ Hunter’s interior when parked. Initially, as a result of inspection and control during the rain, it seemed that water droplets were entering the cabin somehow through the drain hose of the box.
It was then assumed that the plastic box itself was damaged. In fact, it was precisely determined that water enters the cabin through the joint of the upper internal iron heater box, which exits to the outside of the body. There it forms a small side on which the lower seal of the hatch is installed.
Rainwater flows under this seal, then goes into the gap between the protruding side of the box and the body itself. And from there it immediately gets inside the heater housing and then flows through leaks under the feet of the driver or front passenger. That is, it does not initially fall into the plastic box, but bypasses it.
Therefore, the lower rubber seal of the hatch must be removed, treated well with body sealant around the joining seam that has become visible, and then put the seal in place. No more water will flow into the cabin through the heater.
Installing a door seal on the air intake hatch cover of a UAZ Hunter.
In any case, whether a plastic box is installed on the car above the heater radiator or not, the natural entry of water and dust into the heater, and then into the passenger compartment when the air intake flap is closed, must be prevented. A plastic cover installed on top of the hatch will best cope with this task. You just need to find out in advance whether it is suitable for the UAZ Hunter with a lower windshield wiper arm or not.
If you don’t want to drill additional holes in the car body to install such an overlay, then there is a simpler and cheaper method. It consists of replacing the standard rubber seal on the air intake flap cover with a seal that is installed from the factory on the inner door opening of the UAZ Hunter, its catalog number is 3153-6107018 or 3153-6107019. But in fact, this is an ordinary door seal from VAZ 2101, 2102, 2103, 2104, 2105, 2106, 2107, which goes under the numbers 2101-6107018, 2101-6207024, 2101-6207025.
There are no particular difficulties when installing such a seal. The only thing you need to pay attention to is that during installation the cover is raised as high as possible, as far as its adjustment holes allow. Now, when closed, the air intake hatch cover is maximally sealed around the entire perimeter and water ingress into the interior is practically excluded, even during very heavy rain.
Selecting and replacing the electric heater motor of the UAZ Hunter.
As standard, the UAZ Hunter heater is equipped with an ME236 electric motor with a power of 25 Watts. Its capabilities are frankly not enough to properly draw air through the radiator. The low performance of the ME236 also greatly affects the quality of windshield blowing.
Finding a more powerful electric motor to replace the ME236 is not difficult. For example, these could be electric motors 19.3730, 191.3730, 192.3730 and 194.3730 with a power of 40 Watts, or 197.3730 with a power of 60 Watts, or 51.3730 and 511.3730 with a power of 90 Watts. The main thing is that the diameter of the output shaft of the electric motor is 8 mm, so that a standard impeller can be installed without modifications, and also that it has suitable studs or threaded holes on its body for mounting it in the heater.
Types of taps used
When choosing a new heater tap for a UAZ Bukhanka, many car owners have a large number of questions. Some people do not want to use the same faucets as previously used. The current analogues offered are cheap, but their quality is of the appropriate level. Practice clearly shows that faucets supposedly designed for Loafs do not serve long and reliably, quickly fail, and also cause a certain discomfort during operation. Therefore, folk craftsmen came onto the scene and came up with a not entirely standard approach to solving the pressing problem of the UAZ Bukhanka, which was related specifically to the stove tap.
Instead of car faucets, they use plumbing faucets. That is, ordinary durable taps that are sold in plumbing stores. Moreover, they work excellently, last a long time, have a more convenient handle for switching, do not turn sour so quickly and do not leak. All these qualities apply to a plumbing faucet if you initially choose a quality product and also carry out the correct installation. If you are also attracted to this option, you will need a certain set of components to work. By choosing a regular automotive faucet that is suitable for the Loaf, the installation procedure itself will not change much. At a plumbing store you will need to purchase:
- bend angle from 1/2 to 1/2;
- ball valve 1/2 to 1/2;
- 1/2 fitting with a comb for connecting a hose;
- the comb itself must fit a hose with a diameter of 18 mm (it is better to take accurate measurements in advance);
- adapter that will be screwed into the block, from 1/2 to 3/8;
- a hose with a diameter of 18 mm is long enough;
- fumka tape for better sealing.
Initially, it is recommended to buy a faucet that has a fairly long handle. This will make it much more convenient to switch modes from closed to open, and back. Buy high-quality components from trusted stores if you plan to use the new faucet on your Loaf for a long time.
More comfort
469 UAZ already from the factory had a spring front suspension and disc brakes on the front axle, but this was not enough for comfortable driving on rough roads, so the rear suspension was also made with springs. The conversion kit, specially designed for UAZ , consists of standard spare parts from the Ulyanovsk Automobile Plant: Panhard rod and trailing arms. It was only necessary to weld the brackets for their fastening and the platforms for the rear springs. At the same time, they put back disc brakes. By the way, both the springs and shock absorbers are Ironman, with their help it was possible to raise the body by seven centimeters and at the same time avoid “body lift”. I also had to work on the front axle: the original plastic pin inserts are not reliable, if you “trot” on broken roads, they usually break after a few thousand kilometers. The solution to this problem was invented a long time ago: installing bearings in pivot units. The “hubs” were replaced with manual ones from AVM.
Repair/replacement of resistor
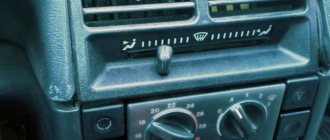
A faulty resistor may be indicated by the fan operating in one mode, when manipulations with the switch do not affect its blowing speed. To replace the resistor, you need to prepare a screwdriver with a Phillips head, fine-grain sandpaper and a multimeter. Algorithm of actions:
- disconnect the negative terminal of the battery;
- unscrew the screws that secure the right console cover;
- Use a screwdriver to unscrew the screws securing the right cover of the center console;
- you will have access to the resistor, from which you need to disconnect all the wiring and evaluate the contacts for burning. If the contact surface is oxidized, use sandpaper to clean it down to metal;
- It may well be that the resistor has lost its functionality precisely due to burning/oxidation of the contacts, so we assemble everything in the reverse order and check whether the fan will work in all normal modes;
- in case of a negative result, again remove the negative terminal, the panel cover and unscrew the screw that secures the resistor to the body;
- We remove the resistor and use a multimeter to measure the resistance at the resistor inputs and at the inputs of both windings. In the latter case, the indicator indicating the working condition of the additional elements is 0.2 Ohm. For the entire resistor, the standard resistance should be 0.8 ohms. If the multimeter readings do not match the specified values, replace the resistor with a new one, and then reassemble in the reverse order.
External tuning of UAZ
Protected, shockproof halogen headlights with variable focus from LIGHTFORCE are installed on the front part of the OJ bumper.
Below you can see the difference in the focusing of the right and left headlights - the left one is adjusted to diffuse light, the right one is collected into a beam, in the right photo the LIGHTFORCE headlights are adjusted to high beam and are combined into a beam.
For comparison, a photo from the same point and angle, with the standard low and high beams on:
In addition to the front light on the bumper, the OJ expeditionary trunk has a high beam and work light chandelier.
Sand tracks are also attached to the trunk.
After a 5-centimeter body lift and suspension lift, NOKIAN wheels with dimensions 285x75x16 were chosen, which were assembled on alloy wheels from the Korean company SWIGER.
To confidently ensure evacuation, well-proven U4x4 winches are installed in the rear and front bumpers, with a remote control and a traction force of 12,500 pounds.
After all the spare parts were assembled together, the installation of the power body kit provided by the OJ Company began, and the mounting of additional equipment on the body kit.
First, we installed power thresholds with protection for fuel tanks.
Later, a front bumper was installed, with a platform for a winch, protective grilles, and horns for quickly winding the cable. The bumper and sills are connected by removable protective arches.
Protection for steering rods and side windows were also installed; by the way, protection for the side windows (with proper fastening) serves perfectly as steps for access to the trunk.
The OJ bumper, exclusive to date, was installed at the rear, which combines: a power bumper, a platform for a winch, a gate, a platform for a hi-jack, a bracket for a removable towbar, a license plate mounting frame with illumination and a cup holder (where would we be without a cup holder, in during the halt).
As a result, having put all the components together, we got: practical, easy to drive, comfortable to the maximum extent, retaining all the positive qualities and acquiring new advantages - the good old, brutally beautiful UAZ-469 NEW from the MVT Company. (It is very interesting to compare the photos attached below with photographs of the same car at the beginning of the article.)
Below is the work order for the work performed and the cost of consumables.
At first glance, the price tag is not humane, but it was worth it! Tuning price:
Step-by-step instruction.
Replacing the old-style VAZ 2110 heater radiator.
1. Drain some of the coolant in the system into a container prepared in advance. This can be done through the expansion tank (about 1 liter will come out) or through the drain hole in the engine block (about 4 liters will come out).
2. Remove the wind pad seal, and then the pad itself (jabot): first unscrew the screw securing it under the main brake cylinder, then the 4 upper clamps of its right side, then disconnect the 2 clamps holding hoses and wires, including and the negative wire of the fan coming from the body, as well as the positive terminal, well, and as a last step, unscrew the 2 screws securing the left part of the frill, but so that the latter only moves, but does not come off.
3. Remove the windshield trim by unscrewing the 2 nuts and 5 screws.
4. Disconnect the terminal of the antifreeze level sensor in the system and remove the outlet hose from the expansion tank.
5. Disconnect the windshield washer hose. Unscrew the 4 screws in front of you and remove the windshield wipers, windshield trim, clamps (partially) of the heater housing, fan.
6. Unscrew the screws securing the cabin filter and the front part of the fan (be sure to remember the location of the four longest ones). Remove the latter along with the fan.
9. Remove the cabin filter housing, the fan (its rear part), the coolant supply, outlet and return hoses.
10. Using a little force, remove the leaking radiator. Install a new one in its place, and then return all the removed parts to the right places, only in the reverse order
In this case, pay special attention to the correct installation of the plastic housing of the stove fan - the pedal must fit into the desired groove, and also to the fact that after assembly you should not have any “extra” bolts left, since if you do not ensure a tight fit of all heating components system, your stove simply won’t work (heat)
Video (old sample).
Replacement of a new VAZ 2110 heater radiator.
1. Unscrew 1 screw in the middle of the lower end of the windshield, 2 nuts above the intake manifold and 1 nut in the left corner, near the air filter.
2. Remove the rear window washer reservoir (if equipped) and the air filter by first unscrewing the 4 screws holding the plastic cover that presses it to the heater.
3. Look through the air supply hose (it lies in the letter “G”), find a large self-tapping screw and 2 smaller screws connecting the 2 parts (the new type of heaters have just that many) of the heating radiator, and unscrew them.
4. Move the right part of the heater as far as possible to the right, and do the following with the left one: holding the left part in your left hand and the right part in your right, turn the latter slightly away from you and up. Draw the entire right side first, and then the rest.
5. Remove the right side. Remove the steam exhaust hose through the free space on the right side of the soundproofing panel.
6. Remove the iron brackets holding the 2 sides of the right side of the radiator together. Once you have access to the damper, also replace it with a new one.
7. Install everything in reverse order.
Video (new sample).
Three ways to remove a brake drum.
How to check the mass air flow sensor?
Adjusting the clutch of a VAZ 2110.
How to remove the steering wheel on a VAZ 2114?
Possible faults
First, let's look at the main malfunctions of the heating system on the UAZ 469:
- The air ducts of the device are not sealed. Because of this, there is a possibility of heat loss, and accordingly, the UAZ stove will not blow enough.
- Antifreeze leak from the radiator unit. If a breakdown occurs in the design of the device, it will need to be replaced.
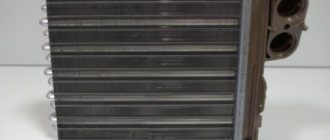
- The radiator assembly is clogged, causing air to not flow into the cabin. If possible, you can try to clean the stove radiator.
- Also, the problem of lack of air can occur if one of the air duct pipes is clogged. For example, the reason may be that leaves, grass and other debris get into the system.
- The heater valve is leaking. The problem is solved by replacing this element of the system.
- If the heater does not work at all, then the reason may lie in the failure of the electric motor or the burnout of the safety element responsible for its operation. If the electric motor or fuse breaks, these components must be replaced.
UAZ car interior
The radiator is leaking: what to do, how to find the leak and how to fix it
The cooling radiator is the main element of the engine cooling system. The operation of a cooling radiator is the active transfer of heat into the atmosphere from the heated coolant. This process is important for efficient engine operation, because The coolant, before giving off heat in the radiator, takes this heat from the heated components and parts of the engine. This was originally intended by the designers, but life makes its own adjustments to the operation of the car on the road.
A situation when the arrow on the dashboard begins to treacherously creep up, and, unfortunately, this arrow is not an indicator of the fuel level, but an indicator of the coolant temperature, modestly indicating that the car is starting to overheat. Steam is pouring out from under the hood, and a liquid stain of coolant is slowly but surely spreading on the asphalt. The radiator is leaking, what should I do?
Causes of radiator leaks in the car cooling system
Before you do anything, you need to figure out what led to this result. This may be external damage as a result of stones, or the plastic elements of the radiator may crack as a result of an impact in a minor accident. Such minor damage, as a rule, cannot be immediately identified, and problems arise from them over time. In the meantime, the driver continues to operate the car, gradually, drop by drop, losing coolant from the system.
What is the danger of antifreeze leaking from a car cooling system?
As the coolant level drops, the risk of engine overheating increases, which in turn can lead to the following problems:
Deformation of the plane of the cylinder block or cylinder head
Cylinder head gasket deformation
· Changes in the configuration of the cooling system and associated failure of system components
All of the above cases will lead to expensive repairs.
What to do if the cooling radiator is leaking
The first rule in this case is to monitor the coolant level.
In fact, periodically checking the vehicle's technical fluids before a trip is a good rule; this will help to promptly notice an emerging problem and eliminate it. Even if the cooling radiator leak is small, do not underestimate the scale of the current situation. Over time, radiator leakage will increase, and this point can be overlooked. The driver will not like the result.
Therefore, if such a situation occurs, it is necessary to have a supply of coolant or distilled water. Yes, if the loss of coolant is small, then for the first time you can use distilled water, but you need to take into account that the more distilled water gets into the system, the more we increase the freezing point of the coolant. Therefore, if it’s winter outside, you shouldn’t get carried away with distilled water, but add coolant.
What to do in case of major damage and leakage of the cooling system
If there is serious damage to the engine cooling system, repairs are inevitable; operating the vehicle in this case is extremely undesirable. And in order not to end up with engine repairs, you should move the car to a technical center using a tow truck, or, in extreme cases, on a cable.
How to seal plastic parts of a cooling system with a leak
If the design of the radiator allows, then you can use a heat-resistant sealant-adhesive, better known as cold welding. In some cases, you will need to remove the radiator from the car.
Cold welding is a special two-component sealant that may contain metal shavings. Such sealants allow you to quickly restore plastic or metal parts.
The gluing process itself is not complicated:
· Before applying the sealant, the surface must be prepared, cleaned and degreased.
· Prepare the sealant for use by mixing the two components. The components must be thoroughly mixed to obtain a homogeneous mass.
· The sealant is applied to the part.
The composition will set in 3-5 minutes, but until complete hardening it will take from an hour to a day, depending on the composition.
Is it possible to solder aluminum radiators and how to do it correctly
If a radiator leak occurs on an aluminum part, then sealing is possible.
The process is complicated, and we would recommend entrusting it to professionals, because... If the attempt fails, you will have to redo everything again. · You will need a powerful soldering iron and it must be warmed up well before work.
· The walls of the radiator will also need to be thoroughly heated.
· Clean the surface thoroughly before soldering.
· To ensure good soldering quality, it is necessary to use solder with a high tin content.
This method will require removing the radiator from the car, which means that when installing the radiator back after repair, it is advisable to completely replace the coolant.
Removing the heater motor without removing the UAZ Bukhanka stove
It should be taken into account that the cabin filter of any UAZ model needs to be replaced, since the standard one is not able to fully perform its functions.
The heating unit can only heat the front part of the SUV, so it is being replaced with more modern devices. You can insulate the UAZ 469 with your own hands. For this, auto mechanics recommend using special materials. Sealing of cracks in the body is carried out using sealants and polyurethane foam. To insulate the floor, a special insulation made of foil is used. Foam rubber is laid on this material.
Dashboard upgrade
In this way, you can insulate not only the floor, but also the side parts of the UAZ Hunter. The instrument panel of the SUV in question is non-functional.
It is made of plastic and needs some work. It should be noted that the information content of each device is at the level of the 1970s.
Using the photo, the UAZ car owner will be able to tune the dashboard with his own hands.
In some cases, the standard product is replaced with a new panel. In any case, you will need to install brighter light bulbs. To dismantle the UAZ Hunter instrument panel, you will need to remove the terminals and unscrew 3 fixing screws.
After dismantling the torpedo, the wiring harnesses are removed. If necessary, remove the instrument cluster. Installation of the panel is carried out in reverse order. To replace the instruments, you will need to remove the panel and instrument cluster.
Recommendations for choosing a cabin filter
The terminals and wires are disconnected from the terminals. The sockets and lamps are removed from the unit being replaced. Replacing a device with a lamp involves disconnecting the terminal with wires from the terminals of the corresponding sockets.
Then the bracket nut is unscrewed and the washer is removed. The bracket is dismantled. The device is removed and replaced or completed. All parts are installed in reverse order. Owners of the UAZ Hunter and other models of this SUV often replace the speedometer with their own hands. Auto mechanics advise using tweezers for this. First, remove the instrument cluster, then remove 2 nuts and brackets.
The speedometer is removed. The wiring harness block is disconnected from the terminals of this unit. The old speedometer is replaced with a new one. Installation of the part is carried out in the reverse order.
An important point in tuning a UAZ is to increase its trunk. Such modification is carried out using 2 4x2 cm profile pipes and a metal mesh.
First you need to weld the frame, for the reinforcement of which welding residues and a profile are used. A mesh is placed on top.
How to change the cabin filter Patriot
Luggage mounts are welded to the roof of the SUV. The next step involves making the frame mounts. The trunk is painted, after which fasteners and other accessories that are used for tuning the UAZ Hunter are installed. If necessary, you can install chandeliers and weld an additional ladder on the outside. It is recommended to attach the last element to the rear door. The above-described scheme for upgrading the luggage compartment is one of the possible options.
The UAZ car owner can independently create the design that he likes best. It must be taken into account that a complex design involves the use of a large number of different materials.
Contents: Popular modifications Modernization of the dashboard Increasing the trunk with your own hands.
VIDEO: instructions for replacing the heater radiator (stove) in the interior of a UAZ Patriot pickup
Stylish UAZ interior. Torpedo design.
Selection and recommendations for installation and maintenance
The most popular options for the UAZ Patriot and other modifications of the car are RIF air suspension, as well as front and rear A-ride kits. The benefits of the purchase are obvious - affordable price, high-quality components, availability of kits for all types of UAZ.
Installation requires professional participation, since during installation it is extremely important to prevent close mechanical contact of supply lines and pneumatic elements with the main parts of the suspension or braking system of the car. Improper installation may result in damage and air leakage.
It is worth checking the system for the possibility of a leak every 1000 km or when a malfunction is suspected. The diagnostic tool is a soapy water solution, which will indicate the location of the leak and determine the repair plan.
Tuning UAZ “Hunter”
In this video, they will show you how you can upgrade a car like a UAZ Hunter. Enjoy watching!
Tuning the UAZ Hunter provides the opportunity to turn the car into an original car with a unique design. Since a car of this type has a low price and a lightweight design, the owner can realize all his fantasies by changing its chassis and increasing cross-country ability.
Tuning the UAZ Hunter requires an individual approach, taking into account the vehicle's operating conditions. Basically, the factory engine is replaced with a diesel one, the original shock absorbers are changed, and the springs are replaced with longer and stiffer ones.
In addition, both levers and gaskets are replaced with those that have better quality and reliability. Tuning of this car includes repainting it under camouflage; it will not do without tinting the windows, installing hatches, winches, air collectors, and power bumpers.
The UAZ Hunter is intended for military use, as a result of which its simple appearance and high cross-country ability are fertile ground for the introduction of the most interesting, unexpected ideas.
Thus, unit tuning is required to increase performance and engine power, since the factory equipment of this model does not correspond to the capabilities. Thanks to various works to improve the appearance of the car, it is possible to emphasize the individuality of the model, and its original, unique appearance will give the owner significant status.
The owner, thanks to the change in the appearance of the car and the transformation of the interior, will feel cozier, more comfortable and confident behind the wheel of his updated car.
How to replace the VAZ-2114 heater relay with your own hands
The ignition regulator, located in the VAZ-2114 directly under the instrument panel, cannot be repaired, it can only be replaced. The work of dismantling the old part and installing a new one does not require special knowledge, so follow the step-by-step instructions offered by the specialists, and soon the installation will be successfully completed:
- Disconnect the battery from the network by removing the terminal connected to the minus.
- Using a slotted screwdriver, unscrew the 4 screws located on the steering column housing. After this, removing the component will not be difficult.
- A Phillips screwdriver will allow you to unscrew another self-tapping screw holding the lower part of the case.
- If there are no fasteners, remove the protective housing from the steering block.
- At the bottom there is a block where the harness is located along with the wiring, and the VAZ-2114 heater relay is connected to them.
- Disconnect the adjuster from the block, carefully pull it out and install a new part.
- Assemble the structure together, returning the fasteners to their original place. Check how the heater now works and whether heated air enters the car interior.
Specifications 31512
| Total information | |
| Model | UAZ 31512 |
| Body | SUV |
| Number of doors/seats | 4/7 |
| Curb/gross weight, kg | 1600/2350 |
| Maximum speed, km/h | 110 |
| Dimensions UAZ 31512, mm | |
| Length | 4025 |
| Width | 1785 |
| Height | 1990 |
| Wheelbase | 2380 |
| Front/rear track | 1445 |
| Clearance | 220 |
Additional resistor
Finding an additional resistor on the UAZ Hunter, which can also cause the stove to work poorly, is not difficult. It is installed on the steering wheel side in the engine compartment directly on the heater housing. If you have any difficulties, then find the heater motor wires and follow them. A pink and brown wire goes to the resistor. Getting to it is not very easy, but it is possible. You will need a flathead screwdriver and an 8mm wrench for this work.
- First, disconnect the negative terminal from the battery. It is not necessary to completely remove the battery;
- Remove the 2 nuts that hold the resistor terminals in place. Now throw them aside as well;
- Now unscrew 2 more screws. The resistor itself is attached directly to them and held on the body of the car’s furnace equipment;
- The resistor can be removed. The old device cannot be repaired. Mandatory replacement required.
In the case of a problematic resistor, due to which the stove on the Hunter does not work, it will not be difficult to solve everything on your own. The main thing here is to find and get to the resistor. Removing it is quite simple, and installation is carried out simply in the reverse order of dismantling work. Even a novice motorist can handle it without much difficulty.
Soundproofing UAZ
Regarding the complete elimination of noise on this car, I would like to note the following. On old, well-worn UAZ cars, soundproofing is difficult, problematic, ineffective, and, simply put, useless.
If the car is relatively new, then you won’t have to fight with rattling pieces of iron and whistling through the cracks. It will be enough to eliminate the noise made by the exhaust pipe and the engine.
main sources
Let's highlight the main sources of noise on the UAZ:
- Exhaust system (muffler and other exhaust tract elements). The source of noise is rather the most important. It is with this that we must fight first.
Note. Some experts believe that increased exhaust noise on UAZs occurs due to an incorrectly selected muffler. As a rule, it is either without a resonator, or the resonator is located after the muffler, and not before it.
- The second source of noise is the engine, which is also incorrectly and poorly adjusted. It is recommended to first start setting up and adjusting, and only then start soundproofing the engine compartment;
- The rigid suspension of the UAZ engine/gearbox system is also considered as a cause of noise. Most likely, if you install soft, but rather thick rubber, the problem can be solved;
- The heater fan in the cabin is also considered a source of noise.
Modernization of UAZ 469
Note. On the UAZ 469 the heater motor was under the hood. Consequently, the noise from it did not reach the passengers and driver sitting in the cabin. In UAZ 3151 there is only one heater air intake. So the designers had to install a motor under the stove itself.
Engine compartment
For many years, the main power unit of the UAZ 469 was the in-line 4-cylinder UMZ-451MI carburetor type. The engine capacity was 2445 cc. cm, power – 75 hp.
With this engine produced by the Ufa Motor Plant, the UAZ 469 lasted on the factory assembly line until 1985.
It was distinguished by a simple single-wire 12-volt ignition circuit, which consisted of (according to the numbering):
- rechargeable battery (AB);
- mechanical ground switch;
- electronic battery charge voltage regulator;
- alternator;
- ammeter on the instrument panel;
- ignition switch (switch);
- ignition breaker contact group;
- directly to the ignition distributor (distributor);
- capacitor built into the distributor;
- ebonite distributor cover with leads for high-voltage wires;
- ignition distributor slider;
- spark plugs;
- high voltage wires from the ignition coil;
- additional coil resistance;
- starter relay;
- directly to the high-voltage ignition coil;
- electric starter.
New modifications of the legendary SUV received more modern engines and a modified electrical circuit.
In particular, the UAZ Patriot wiring diagram includes:
- electronic fuel injection system;
- contactless ignition system;
- climate control system inside the car;
- alarm system, etc.
Main works
Installing an additional heat source
Before installing the NAMI-4 heater or another model, the old stove is dismantled. If possible, the existing heating system is modified by blowing the side windows.
For this, a tee, flexible wiring, and drills are used. Initially, you will need to make holes in the torpedo by installing side air ducts from KAMAZ or ZIL in them.
If a NAMI-4 heater is installed in a UAZ Hunter or UAZ 469 as an additional stove, then it is connected as follows:
- In parallel: motor block - electric pump - tee - ball valves - heater radiators - tee - motor pump. It is necessary to take into account that each radiator has its own heat transfer and permeability. Upon completion of the dismantling work, the passage of antifreeze is adjusted using taps through the heater. This step will allow them to blow in the same direction.
- Sequentially: motor block - electric pump - heater radiator - heater radiator - engine pump.
When carrying out tuning, you need to remember that the electric pump works more efficiently when the antifreeze puts strong pressure on it. Therefore, the first element must be installed after the motor block. For better heating, hot antifreeze should go to the top of the radiator, and the remaining liquid should come out from the bottom. This is explained by a change in the density of the substance.
Another effective method of heating the interior of the UAZ 469 is tuning the cooling system. Its operation is designed in such a way that virtually no hot cooling liquid enters the heater radiator. For this purpose, an electric additional pump is installed. Initially she understands. Screws are used instead of self-tapping screws. This tuning will help get rid of the leak.
A new structure is installed before or after the stove. The pump is fixed to the UAZ Hunter body with 2 self-tapping screws. From an electrical point of view, this device will work from the moment voltage is applied. At the same time, the valve will close the line. Auto mechanics recommend controlling a modern heating system using 2 switches:
- The 1st is responsible for turning on the valve and supplying voltage;
- The 2nd turns on the pump.
This circuit allows you to block accidental activation of the pump and closed valve. If you install a turbine from a Maza heater, you will need the help of a specialist.
Source
Sequencing
Drain the coolant by opening the plastic tap next to the generator (at the bottom of the radiator). Remove any remaining liquid using a piece of hose and a funnel. After removing the air ducts, check the condition of the holes with the heater outlets on the panel. If they are not aligned and the misalignment is more than 50%, carefully trim the interior heater. After marking all the connectors with strips of colored tape (colored felt-tip pens), remove the instrument panel. Remove the steering wheel, steering column trim, steering column switches
Carefully dismantle the heater by unscrewing the nuts and removing the wire from ground. Having previously marked, disconnect the heater connectors. With the cable release and radiator hoses removed, remove the heater by removing the 2 fan screws.
Be sure to pay attention to the condition of the rubber washers and thrust bearing
- After unscrewing the 3 bolts, carefully remove the heater core.
Remove the radiator carefully. Residual coolant may leak out.
- Prepare turbulators (plastic spirals to increase heat transfer from the radiator). Spirals should be included at the factory, but are often not.
. You can cut turbulators (swirlers) yourself. Prepare aluminum (copper) plates with a cross section of 6 mm by 1.5 mm. Clamp one edge of the plate with a drill, the opposite edge in a vice and twist it with a spiral.
Check the bottom wall of the heater for deformations, displacements, holes, integrity problems and other defects. Integrity can be determined through the hole for installing the radiator. Carefully disassemble the heater, moving the body halves apart from each other. Use a suitable screwdriver to open the latches and remove the screw under the central nozzle. Sequentially remove the levers that control the flaps. Inspect the inside surface of the heater. Glue the foam rubber if it has peeled off and stick on the bitoplast strips. Bitoplast must be glued so that the body remains as tight as possible when the dampers are moved to the extreme position. Carefully adjust the center flap. Treat all fastening points of the dampers with grease. Before connecting parts of the heater housing, treat the connector surfaces with sealant. Reassemble the rebuilt heater in reverse order. If there is deformation at the bottom ribbed wall and a gap has formed during assembly of the housing, fill it with sealant. There should be no gaps between the radiator and the stove. Strips of regular foam won't do much good. It is better to glue bitoplast strips at the points of contact between the radiator and the heater. Balance the fan impeller, wrapping wire around the fan blades if necessary. Route the wires back through the housing rubber plug. Adjust the damper stroke. All levers should be easily locked in extreme positions
Particular attention should be paid to the levers of the central and main dampers. The adjustment is mainly carried out by selecting the positions of the braid
After adjusting the dampers, work on the heater valve. Structurally, the choice of partial opening/closing of the tap is provided. Determine the position in which the tap will not close completely. Before installation, treat radiator hoses and tubes with sealant. Replace all clamps with new ones. After complete assembly, filling with antifreeze and warming up the engine, tighten the clamps again. Then, before installing the panel, glue foam and bitoplast to the inlet holes of the air ducts, making sufficiently wide holes in them. In some cases, heater maintenance may not be enough to solve all problems. The question arises, how to insulate a VAZ 2114 for the winter so that the car warms up quickly and the temperature in the cabin is as comfortable as possible? If it blows from the doors or heat escapes through technological openings, the problem can be solved by replacing the seals and thermal insulation of the car.