A feature of VAZ cars belonging to the “Classic” category, namely the VAZ-2101-2107 model, is the use of power plants that are structurally very similar. The engines of these models differ mainly in some technical characteristics. Thanks to this, many perform maintenance and repair work themselves.
For stable operation of the power unit of these cars, periodic adjustment of the valves is required. It is worth noting that this operation for VAZ “Classic” engines is performed by adjusting the gap between the valve drive lever and the camshaft cam. Since on the “Classic” this operation is performed the same way for different models, let’s consider the sequence of work using the example of one model – VAZ-2105
The adjustment can be carried out both on a cold engine and on a warm one; for this, a 0.15 or 0.20 mm probe is used, respectively.
But for more precise adjustment of the valves, work must be carried out on a cold engine.
Necessary tool
If you know the sequence of work and have the necessary tools, adjusting the VAZ-2105 valves with your own hands is not difficult. As for the tool, you will need:
- Special key for turning the crankshaft;
- Open-end and socket wrenches (for 8, 10, 13, 17);
- Flat screwdriver;
- Probe with a thickness of 0.15 mm;
- To perform the work, you will need a special wide probe, designed specifically for adjusting valves on VAZ cars.
The result of the work done
As a result of correct adjustment of the valve mechanism, engine operation stabilizes, power and traction appear again. A correctly configured gas distribution mechanism stabilizes fuel consumption, because if configured incorrectly, it increases.
If there is no excessive wear in the timing mechanism parts, then, as a rule, excessive noise in the valve cover area disappears. To keep the engine in full working order and its performance within normal limits, this operation must be performed every 10,000-15,000 km.
Signs of poor valve clearance
Before describing the adjustment process, you should understand the signs of incorrect clearance, as well as what this leads to. So, the main sign of a broken timing gap is a metallic knock at the top of the engine. Usually this knocking sound initially appears only in a certain operating mode, but over time it will be heard in all modes.
Related link:
What kind of oil to fill in the engine, gearbox and axles for the winter in a VAZ
Of course, the gap can either decrease from the nominal value or become larger. Both decreasing and increasing the gap will primarily lead to a loss of power. With a smaller gap, the lever will tighten the valve, which will significantly reduce the tightness in the cylinder and ensure a drop in compression. As a result, this can lead to burning of the valve edge and its seat.
An increased gap will affect the filling of the cylinder combustion chamber, since its opening time will be reduced, and exhaust gas removal will also be incomplete. To avoid the above problems, it is necessary that the VAZ-2105 valves be adjusted after approximately 15-20 thousand km , as well as at the first appearance of a violation of the thermal clearance.
Purpose of valves in the VAZ 2105 engine
In the VAZ 2105 engine, as in any other internal combustion engine, valves are an important element of the gas distribution mechanism. On the “five”, the power unit uses 8 valves: for each cylinder there are 2 valves, the main purpose of which is the correct distribution of gases. By means of clans, a mixture of fuel and air is supplied to the combustion chamber through the intake manifold and exhaust gases are discharged through the exhaust system. If a breakdown occurs with any valve, the operation of the gas distribution mechanism, as well as the entire engine as a whole, is disrupted.
Valves located in the cylinder head ensure the supply of the fuel-air mixture to the combustion chamber and exhaust gas removal
Procedure for checking valve clearance
Let's move on directly to the adjustment process itself. First, preparatory work is carried out, which boils down to providing access to the valve levers and camshaft. To do this, remove the air filter housing from the carburetor, the timing belt protective housing, and the valve cover from the engine.
To perform the work correctly, you need to know the procedure for adjusting the VAZ-2105 valves. Interestingly, this procedure is the same for all VAZ cars up to model 2107.
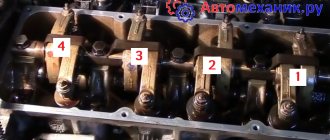
The adjustment begins with the 4th cylinder, located closest to the car interior, while the valves must be counted from the first cylinderlocated near the camshaft drive gear.
Before checking the clearance on the required valves, you need to set TDC on the 4th cylinder. To do this you need to rotate your knees. shaft clockwise until the mark on its pulley aligns with the long mark on the timing belt protective housing. After this, you need to look at the camshaft drive gear; on its inner side there is a mark and a small depression that should coincide with the cast on the cylinder head.
| Marks on the crankshaft pulley | Marks on the camshaft pulley |
Next you need to know the procedure for checking the gap.
- When setting TDC on cylinder 4, the clearances on valves 6 and 8 are checked. Next, the knee is rotated. shaft by 180 degrees, while the camshaft will turn only 90 degrees. For ease of work, the camshaft gear has marks every 90 degrees, corresponding to the TDC of a particular cylinder.
- So, turning the camshaft 90 degrees, set TDC on cylinder 2, while checking the clearance on valves 4 and 7.
- Next, another rotation of 180 degrees is made. knees shaft and aligning the next mark on the camshaft gear with the ebb on the cylinder head, while setting TDC on cylinder 1, and checking the clearance on valves 1 and 3.
- After this, another rotation of the knees is performed. shaft 180 degrees to set TDC on cylinder 3, and the clearance is measured on valves 2 and 5.
Related link:
Replacing a timing belt or chain on a VAZ 2105
Possible mistakes
If the adjustment is made correctly, extraneous clicks in the motor should disappear. If this does not happen, then something was done wrong. The most common mistake is a violation of the sequence of cylinder adjustments if the work is done with your own hands. It is necessary to set the gap on the injector valves only in the above order and in no other way, there is no need to violate the diagram. If you start with the wrong cylinder, it can completely disrupt the entire timing system, resulting in extraneous noise in the engine that will not go away. And what's more, it can get louder. There is only one way to correct this error: set cylinder 4 to top dead center in accordance with the mark and set everything up again.
Adjusting valves on a VAZ 2107 is not as difficult a task as it seems at first glance. The main thing is to follow the correct sequence of cylinders given above. In addition, you should not be too zealous when tightening the bolts on the cylinder block cover, as the threads there can easily be stripped.
Adjusting valve clearance
When measuring the gap, the feeler gauge on each valve should fit between the camshaft and the lever with a little force. If it fits very loosely or is not inserted at all, adjustments are made.
Checking the gap with a feeler gauge
To make the adjustment, the locknut is loosened, then the desired clearance is achieved by rotating the screw, after which the locknut is tightened back. By tightening the locknut, the clearance is checked again. In this way the clearance settings are made on all valves.
Do-it-yourself valve adjustment on a VAZ 2107 with an injector
Owners of VAZ 2107 cars know that these cars are available in both carburetor and injection versions. And if everything is more or less clear with the maintenance of carburetor cars, then questions still arise with the injector on the “sevens”. For example, is it possible to adjust the valves on this machine with your own hands? And if so, how can I make the adjustment correctly? We will try to answer these questions in this article.
Payment
Payment to a Sberbank VISA card The most convenient and profitable payment method for you. Payment can be made through the Sberbank Online system, through a payment terminal (Sberbank ATM), provided that you have a card from this bank. If you are not a client of this bank and you do not have a card, then you can top up your balance at any bank branch through an operator; they will accept cash payment and top up your balance. Commission from 0 to 1%
Cash on delivery (payment upon receipt) Payment for the order will be made at the post office upon receipt of the goods. For cash on delivery services, Russian Post takes an additional commission - approximately 4% of the cost of the order (parcel) upon receipt. In addition to the delivery cost, the post office will also charge you a commission for the cash on delivery service.
Cashless payment This type of payment is suitable for organizations and individual entrepreneurs. An invoice for payment is generated after placing an order. A specialist will contact you to clarify details.
Cash payment You can pay in cash directly in the store, when picking up the goods.
Main malfunctions of the VAZ 2101 timing belt
According to statistics, every fifth engine malfunction occurs in the gas distribution mechanism. Sometimes different faults have similar symptoms, so a lot of time is spent on diagnosis and repair. The following are the most common causes of timing belt failure.
- Incorrectly set thermal gap between rockers (levers, rocker arms) and camshaft cams. This results in incomplete opening or closing of the valves. During operation, the valve mechanism heats up, the metal expands, and the valve stems elongate. If the thermal gap is set incorrectly, the engine will have difficulty starting and will begin to lose power, popping noises will appear from the muffler and a knocking noise will appear in the engine area. This malfunction is eliminated by adjusting the gap or replacing the valves and camshaft if they are worn.
- Worn valve stem seals, valve stems or guide bushings. The consequence of this will be an increase in engine oil consumption and the appearance of smoke from the exhaust pipe during idling or acceleration. The malfunction is eliminated by replacing the caps, valves and repairing the cylinder head.
- Failure of the camshaft drive as a result of a weakened or broken chain, breakdown of the tensioner or chain guide, wear of the sprockets.
As a result, the valve timing will be disrupted, the valves will freeze, and the engine will stall. It will require a major overhaul with the replacement of all failed parts. Valve valves may become bent as a result of slipping or broken timing chain. - Broken or tired valve springs. The valves will not close completely and will begin to knock, and the valve timing will be disrupted. In this case, the springs should be replaced.
- Incomplete closure of valves due to burning of the working chamfers of the valve plates, the formation of deposits from low-quality engine oil and fuel. The consequences will be similar to those described in point 1 - repair and replacement of the valves will be required.
- Wear of bearings and camshaft cams. As a result, the valve timing will be disrupted, the power and throttle response of the engine will decrease, a knock will appear in the timing belt, and it will become impossible to adjust the thermal clearance of the valves. The problem is solved by replacing worn elements.
After eliminating any of the malfunctions of the VAZ 2101 engine, it will be necessary to adjust the gap between the rockers and the camshaft cams.
Springs
Basic data for checking the outer valve spring
Lever spring check diagram
A – free size; B – dimension under load
1. Make sure there are no cracks on the springs and whether the elasticity of the springs has decreased, for which check the deformation of the springs under load (Fig. Basic data for checking the outer valve spring, Fig. Basic data for checking the internal valve spring, Fig. Diagram for checking the lever spring ).
2. For lever springs (see Fig. Lever spring check diagram) size A (spring in a free state) should be 35 mm, and size B under load 51–73.5 N (5.2–7.5 kgf) - 43 mm.
Valve lid
The valve cover covers and seals the timing belt, preventing grease from camshaft, valves and other parts from leaking out. In addition, new engine oil is poured through its neck when replacing. Therefore, a sealing gasket is installed between the valve cover and the cylinder head, which is changed every time after repair or adjustment of the valves.
The valve cover gasket must be replaced after each valve adjustment.
Before replacing it, you should thoroughly wipe the surfaces of the cylinder head and cover to remove any remaining engine oil. Then the gasket is put on the cylinder head studs and pressed with the lid. It is necessary that the gasket fits exactly into the grooves of the cover. After this, the fastening nuts are tightened in a strictly defined sequence.
When tightening the valve cover nuts, do not use too much force as this may damage the cover surface and gasket.
Video: eliminating an oil leak from under the valve cover of a VAZ 2101–07
Replacing and repairing valves on a VAZ 2101 is quite labor-intensive work and requires certain skills. However, having a set of necessary tools and consistently following the requirements of the instructions of specialists, even an inexperienced car enthusiast can do it.
Why do you need a guide bushing?
The guide bushing can quite rightly be considered the main element on which the resource and proper operation of the “seat - valve plate” tandem depends. The material from which the part is made and its design itself are primarily aimed at working under conditions of high speeds of the valve stem fixed in it, constant high-temperature loads and the almost complete absence of lubrication in the valve-bushing pair.
Causes and consequences of deformation
The described conditions lead to the fact that during engine operation, the valve guide bushing also wears out, which is why, over time, its alignment with the valve stem may be disrupted. Subsequently, the part breaks even more and the valve begins to “walk” and does not fit tightly to its seat, and this, in turn, leads to the chamfer of the seat breaking over time. As a consequence, you can get a burnout of the valve and have to replace the seat.
Appearance of bronze guide bushings for VAZ 2108–2109 models
Also, due to the “walking” of the valve in a broken guide, the oil seals can quickly become unusable. They simply will not be able to hold oil with increased angular displacement of the valve stem. The result will be oil getting into the engine, and if you also take into account that more oil will pass through the broken bushing than usual, then the situation will not be pleasant. Carbon deposits on valves and other parts around the combustion chamber will increase, the level of harmful exhaust emissions will increase, and you may end up with a prematurely failed catalytic converter. And simply replacing the valve stem seals is not enough, as the problem will soon return again.
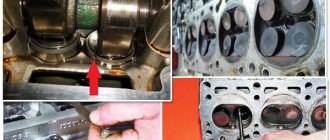
Why you shouldn't neglect checking
When repairing an engine, it is better to pay special attention to its head. Often it is this part of the engine that is to blame for the fact that the level of compression in the cylinders is far from the desired
When repairing cylinder heads, motorists sometimes limit themselves to only grinding the valves to their seats, believing that there is nothing particularly wearable in all-metal bushings. At the same time, checking how large the gap between the part and its valve is will be completely worthwhile. When the obtained clearance figures go beyond those recommended by the car manufacturer, then no amount of grinding in the valves or replacing the valve stem seals will protect against problems in the future.
Materials used to make bushings
For the manufacture of bushings, materials with good wear resistance and thermal conductivity are used. Among these you can find:
- special cast iron alloys;
- bronze;
- brass;
- metal ceramics.
In terms of thermal conductivity and cost, brass, along with bronze, are among the leaders, so the vast majority of bushings are made from alloys of these metals.
Nuances to consider
Most bushings have a special support collar on the outside, designed to ensure proper fixation of the part vertically in the cylinder head. If the part is smooth, then installation is carried out using a special mandrel.
For intake valves, the guide bushings should not protrude so as not to increase the aerodynamic drag of the intake channel. Exhaust valve bushings are designed to “hide” the valve stem as much as possible to protect the latter from high temperatures and better heat dissipation.
Appearance and location of the valve guide in the cylinder head
We recommend: How to properly bleed the brakes on a VAZ-2114?
The manufacturing precision of the bushings is very high. This is necessary to obtain the most accurate alignment and the best fit of the valve plate and seat during engine operation. The outside of the body of the part that is to be pressed into the cylinder head must be processed as cleanly as possible; there should be no scratches or marks on it. This ensures optimal heat removal from this accessory to the block head.
How to determine if the valve is tightly seated on the seat?
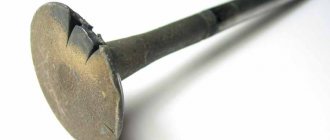
If you have removed the head, be sure to pay attention to the valves; at first glance, it may seem that the valves are good, but there is one sure sign that the valve definitely needs to be changed or ground in. Valves can be of different colors, white, brown, black, etc. This is normal, it all depends on the carburetor settings and engine oil consumption. But if the valve has different shades as shown in the photo below, this is a sure sign that the valve is poorly ground to the seat. This valve must be ground in or replaced with a new one, but it must be ground in.
Photo. Valve showing signs of burnout.
The valve in the photo can still be ground in, but if there is a blue tint, it is better to replace such a valve with a new one.
Springs
Basic data for checking the outer valve spring
Lever spring check diagram
A – free size; B – dimension under load
1. Make sure there are no cracks on the springs and whether the elasticity of the springs has decreased, for which check the deformation of the springs under load (Fig. Basic data for checking the outer valve spring, Fig. Basic data for checking the internal valve spring, Fig. Diagram for checking the lever spring ).
2. For lever springs (see Fig. Lever spring check diagram) size A (spring in a free state) should be 35 mm, and size B under load 51–73.5 N (5.2–7.5 kgf) - 43 mm.
Manufacturing
standard and modified “umbrella” valves are made according to my drawings and under my control. The main point: due to the complexity of the valve shape (umbrella), it is virtually impossible to make identical valves by hand. Therefore, the product is made on CNC in small batches. CNC masters have a concept - working on one sharpening point. During operation, the cutter becomes dull and “sits”, then it needs to be corrected. Empirically, the optimal number of valves was found, which is cut “on one sharpening”, then either the tool is straightened, or another cutter is installed. Pricing taking into account the equipment and the machine operator’s salary is appropriate.