- ➡️ Diagnostics of the outboard bearing on a VAZ 2107
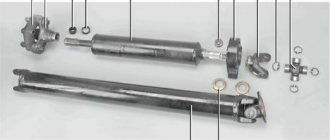
- ➡️ Driveshaft device for VAZ 2101-2107
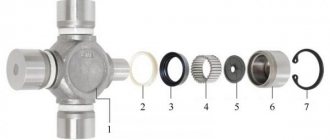
- ➡️ Dismantling the cardan and replacing the bearing
- ➡️ Replacing the outboard bearing with a new one
- ➡️ Assembling the cardan and reinstalling the shaft
- ➡️ Bearing selection: numbers, sizes, prices
- ➡️Recommendations for repairs + useful videos
The VAZ 2107 suspension bearing serves as a support for the driveshaft of rear-wheel drive vehicles, such as the VAZ 2101-2107 (including the injector). The cardan itself is designed to transmit torque from the gearbox to the rear axle gearbox, which in turn transmits torque to the wheels. The shaft is an important element of the car’s “propulsion”, so replacing the outboard bearing on a VAZ 2107 is required as soon as signs of support failure appear.
If you delay repairs, you risk further consequences, since the cardan will become unbalanced, it will jam, and a faulty cardan will cause damage to adjacent transmission units.
This material provides detailed instructions on how to correctly change the outboard bearing of a VAZ 2107 propeller shaft, how to check it, determine its malfunction, and choose a manufacturer based on price and quality.
Replacing the suspension bearing on a VAZ-2106, 2107
The driveshaft is one of the main elements of all-wheel drive and rear-wheel drive vehicles. Its main purpose is to transmit rotation from the vehicle’s gearbox to the rear axle gearbox. It is thanks to this connecting link that the machine is set in motion. But for greater reliability, the cardan must rotate in one plane, be suspended and firmly held in place. In this case, the main task of fixation is taken on by the suspension bearing.
Features and signs of replacement
The service life of an outboard bearing largely depends on the conditions in which the vehicle is operated. Frequent trips on our roads and in off-road conditions primarily break the rubber band. But you can recognize the problem in a timely manner. To do this, you need to pay attention to the following symptoms:
— strong impacts are heard on the bottom during a sharp start from first speed;
— strong vibration appears while the car is moving;
- There is a strong hum when driving at high speed.
If at least one of the symptoms appears, we can talk about the need to replace the outboard bearing. You cannot delay this work. Otherwise, the driveshaft becomes completely uncontrollable, which can lead to damage to the gearbox and serious failure of the driveshaft.
Features of replacing the suspension bearing on a VAZ-2106, 2107
When you first suspect that the outboard bearing is failing, be sure to conduct a visual inspection of the unit. If there is obvious damage, play or knocking, replacement is necessary. The main thing here is to take your time. Your task is to buy a reliable and, most importantly, high-quality replacement. It is better to give preference to original parts that will serve you for some time.
Before making a replacement, be sure to ensure that the remaining components are in good working order - the crosspiece and the elastic coupling. Otherwise, while working, you will have to be distracted and buy additional equipment. Consider one more important point. If you are doing this kind of work for the first time, then it is better to buy a spare cross. This recommendation is easy to explain. To replace the outboard bearing, you will definitely have to remove the crosspiece, and without some experience it can easily be damaged or any of the parts lost.
Before starting work, be sure to make marks with a chisel or paint on all connecting parts of the cardan. In this case, you will not have to carry out additional balancing after assembling the structure. If you assemble the unit incorrectly, then increased noise during movement and vibration will bother you for a long time.
So, the work consists of several stages:
- Stage one - dismantling the cardan. For this:
— drive the car into the inspection hole (you can work on an overpass) and fix its position with the help of shoes;
— remove the spring tensioning the handbrake cable;
— place symbols (“flags”) at the junction of the flange and cardan (we have already mentioned the importance of this work above);
- tighten four nuts (a wrench of “13” will do). Please note that the cardan will rotate, so it is better to fix it with a screwdriver;
— remove one edge of the propeller shaft and lower it down a little;
— make a mark fixing the position of the coupling and flange;
— unbend four special “antennae” designed for fixation (they are located on the seal holder);
— move the cage (it will go along with the seal) towards the driveshaft;
— remove the safety bar (this can be done with a key set to “13”);
— support the propeller shaft, unscrew the two nuts and remove the outboard bearing plate (it is fixed on the body);
— pull the cardan shaft out of the coupling.
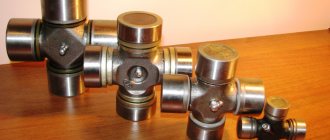
- Stage two - removing the cross:
- as in the previous case, make marks at the junctions of the nodes, mark the relative position of the forks and shafts so as not to confuse anything;
— remove the retaining rings;
— place a special puller on the crosspiece and squeeze out the needle bearing. Please note that the bearing will not come out completely, but only 20-30% of its height;
- squeeze out the next one in a similar way;
- knock both bearings out of the fork;
— separate the fork and the cross.
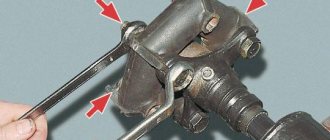
- Stage three - replacing the outboard bearing:
— unscrew the nut on the cardan fork (a key with a “27” will do);
— place the puller on the fork and screw the bolt in a little to create the proper tension. If the fork still does not give in, you can work a little with a hammer (without fanaticism). So, step by step, push the fork out of the slots;
— twist the mounting bolts securing the outboard bearing;
- press the knot against the corners. Next, using a special spacer and a hammer, knock the bearing out of its place;
- replace and put everything back in reverse order.
- Stage four - collecting the cross:
— place the puller in another place and squeeze out the second pair of bearings;
— install seals and plugs;
— treat the crosspiece bearing with lubricant (it is advisable to use Fiol);
- insert the cross into place;
- press the bearing into the fork to such an extent that you can install the retaining ring;
- install the “lock”. Now turn the cross over and perform a similar manipulation with the second bearing. In this case, the first bearing should rest tightly against its restrictive ring. If you did everything correctly, you can easily put on the fixing ring on the other side. If problems arise, you can help the “fixer” with a hammer (again, don’t be too zealous);
— measure the distance between the bearing and the retaining ring. Normal – 10-40 microns;
— lubricate the splines (you can use CV joint-4 or Fiol-2U);
— install everything in place, bend the locking “tendrils”.
Conclusion
Replacing the outboard bearing will not cause you any difficulties. The main thing is to approach the work carefully, purchase high-quality parts and prepare the tools in advance. Good luck.
Signs of a faulty VAZ 2107 suspension bearing and how to check the driveshaft yourself
The first signs of malfunction and wear of the VAZ 2107 (PP) suspension bearing are vibration and knocking of the cardan when the car begins to move. After accelerating the car, the knocking gradually disappears, turning into vibration and noise. If there were no problems with balancing the axle before, but knocking suddenly appeared, then it is necessary to immediately diagnose the PP.
Diagnosis is performed in the following order:
- Place the car on an overpass, lift or pit;
- Locate the driveshaft under the car;
- Check the play of the PP by moving the part by hand in the axial direction - free movement is not allowed;
- Rotate the cardan and listen to how the bearing works - vibration, rolling, grinding, knocking are not allowed;
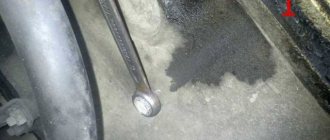
- Inspect the product body, including the tightness of the bearing seals - lubricant leakage is not allowed;
- Make sure that the outboard bearing and bracket are not loose;
- The presented videos show how the VAZ 2101-2107 suspension bearing (injector) hums, as well as how to determine if the intermediate support is faulty.
Video: “How an outboard bearing hums”
Video: “How to check the universal joint support”
Suspended bearing for the VAZ 2107 propeller shaft: dimensions, prices, how to choose, which one to buy
The design of the intermediate support for the propeller shaft VAZ 2101 - VAZ 2107 consists of a closed-type, lubricated, single-row radial ball bearing, which is located inside a housing made of metal and rubber. The ball bearing is secured with a retaining ring. The PCB body has fasteners in the form of a bracket with holes.
- according to GOST 6-180605;
- according to ISO 62305.2RS;
- Factory (serial or catalog) number of the VAZ 2107 suspension support: 2105-2202078.
The VAZ 2107 suspension bearing for replacement, the prices of which are presented in the table , is selected based on the recommendations of experienced auto mechanics and service station workers.
Below is a list of preferred manufacturers to purchase parts from. To the question “How much does a suspension bearing for a VAZ 2107 cost?” This table will answer in detail. Pay attention to the photographs of the original repair kits presented in the list.
Replacing the suspension bearing and universal joint in VAZ cars
Despite the abundance of foreign-made cars, a considerable number of car enthusiasts are owners of the familiar Zhiguli cars. One can argue for a long time about the positive and negative qualities of this brand, but many will unite in matters of repair - this is not the most difficult process, but it also requires skill. Let's take a closer look at all the intricacies of repairing the driveshaft crosspiece, as well as the outboard bearing for VAZ-2101, VAZ-2102, VAZ-2104, VAZ-2105, VAZ-2106, VAZ-2107.
Purchasing spare parts that will be used during repairs is a very important point. For an outboard bearing that you plan to purchase, an important factor will be the smoothness of its movement, as well as the degree of elasticity of the rubber. Various failures and “clinging” when checking its operation only indicate that it is better to put such a bearing aside - it will not work. The rubber used in the suspension bearing must be sufficiently elastic and soft. If it is very rigid, then by installing a driveshaft with such an outboard bearing, the driver will encounter body vibration when driving. This is caused by the transmission of vibration from the driveshaft. In addition, such tires will require replacement very quickly. It is best to purchase a VAZ crosspiece from the manufacturer. It is also important to buy retaining rings, since old ones can very quickly break or become damaged, which will require repairs to be carried out again.
As for the set of tools that need to be used when repairing the driveshaft crosspiece on a VAZ-2101, VAZ-2102, VAZ-2104, VAZ-2105, VAZ-2106, VAZ-2107, it includes:
open-end wrenches (for 12 and 13)
· socket wrench (13 and 27)
· aluminum (or copper, if necessary) hammer attachment
In the event that it is necessary to replace the driveshaft outboard bearing, a shrink puller and the old flexible coupling flange are added to the tool kit.
Initially, you should understand that bearing replacement is best done on an overpass, or in a garage above a pit. In the latter case, for greater simplicity and convenience in unscrewing the nuts attached to the rear axle shank, one wheel is lifted using a jack.
The first point is to remove the VAZ driveshaft. To do this, use a 13mm wrench to unscrew 2 bolts that secure the suspension bearing to the transverse support. Then unscrew the nuts securing the propeller shaft to the rear axle shank. It is best to change the mounting locations. Often these fastening nuts are too difficult to unscrew and are cut with a chisel. Therefore, it is better to initially stock up on a set of nuts to replace broken ones.
The working process
We strongly recommend that before replacing a part, you apply special installation marks to ensure correct reassembly.
First of all, we remove the cardan itself with a 13 mm wrench. To do this, you only need to remove two ordinary bolts of the outboard bearing attached to the transverse support. Now you can tighten the nuts that secure the cardan to the shank.
Always tap the assembly through the special pad before installing the crosspieces. Let's tell you a little secret: to easily remove the necessary parts (especially on a car with high mileage), moisten them generously with kerosene. Remove the rings. The cardan should now be suspended.
We beat off the bowl of the cross with a hammer, turn the cardan itself and remove it. We do the same with the other bowl.
Clean all the universal joint lugs and ring seats. There should be no dirt, much less rust.
The installation of crosspieces in any car begins with the fact that you need to remove the bowls from it and tuck it into the eyes.
Having moved the new part, we put the bowl in place and carefully tap it with a hammer until the hole for the retaining ring is visible. We install it and turn the cardan.
We do the same with the second bowl. The steps must be very precise because the bowl is very fragile.
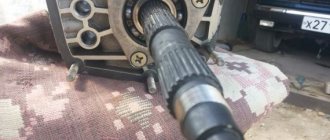
Let's take care of the bearing. After dismantling the crosspiece, insert the end of the universal joint spline into the “coupling” flange. On the other hand, remove the nut from the fork securing the cardan to the front shaft. Use a puller to pull off the articulated fork and remove the old part from the shaft.
That's it, the replacement of the necessary spare parts for the VAZ 2107 is completed, and you can reassemble it.
Replacing the suspension bearing on a VAZ 2101-VAZ 2107
Welcome! Bearings - they come in two types, the first type is sliding bearings, and the second type is rolling bearings, which are most often found in all components and assemblies; in general, bearings play a very important role if they are used in any mechanisms, and the outboard bearing plays a significant role when the driveshaft is operating, if it is worn out and the rubber is hard as a rock, then large vibrations will appear in the body, which will occur both during driving and when the car is running, and of course, if the car is heavily loaded or if it even had a slightly lower ground clearance, then the suspension bearing plays a very important role in this and if it is damaged, then be prepared for the fact that even with the slightest drop in the car’s suspension, the cardan will begin to hit the body.
Note! To replace this bearing on a car, you will need quite a few tools, the most important thing is to stock up on: Wrenches, spanners and the same kind of wrenches, if you have a wrench with spanner heads in your arsenal, then take that too, and you will also need a soft metal hammer, kerosene or something like that, in addition special. You will need pliers with which you will have to remove the retaining rings of the cups of the crosses, as well as an inspection hole, a universal puller and Cobra-type pliers!
Summary:
Where is the outboard bearing located? The suspension bearing is located in the very central part of the propeller shaft (see photo below), and it is secured with a cross member to the car body (It would be more correct: the cross member is screwed to the body with nuts, and the bearing is already attached to the cross member using two central bolts) so that To remove this bearing, you will have to take care of the propeller shaft (It must be removed, otherwise you will not replace this bearing), and then, armed with a puller, the bearing can be easily pressed off the shaft on which it is located and replaced.
When should an outboard bearing be replaced? The bearing consists of the following elements: Firstly, the rolling bearing itself, and secondly, from the rubber part that fits this bearing, so over time the rubber hardens and due to the fact that it has become rough, all vibrations when rotating the driveshaft simply will not occur dampened by this rubber, because of this, problems will appear such as excessive vibration in the body and the crosspieces may fail earlier, so even when buying a new bearing, pay attention to this rubber, it must be elastic, otherwise buy a bearing in any other place or from another manufacturer, as for the bearing itself, over time it develops play and it can start to jam (When buying a new one, also take this into account, even the slightest play or jamming is not acceptable), if play appears, then heavy shocks will occur on the body when starting the car or after changing gears, and of course vibrations, as for jamming, this can only be seen by removing the bearing or just crawl under the car and rotate the driveshaft, there should be no snagging in the bearing area , otherwise it is changed to a new one.
Preparing tools
Replacing a car suspension cardan bearing is quite possible without the assistance of car service employees.
The main thing is to carefully review the book, which describes how to repair and operate a specific vehicle. You also need to own the right tools and have a lift or overpass at your disposal. You may need a vinegar solution or a special liquid to decarbonize the fastening bolts if they have become rusty. In principle, changing the outboard bearing of a VAZ-2107 or VAZ-2106 cardan will not differ much from replacing the same component on a Ford or Toyota. The scheme is similar everywhere, with some differences, but not dramatic ones.
To replace the bearing you will need two open-end wrenches for 12 and 13 mm, a hammer, a metal attachment, and at the same time pliers, thanks to which you can remove the locking rings. We must not forget about the special bearing puller, without which such a process simply cannot be carried out.
Car owners may have a question: can an outboard bearing be repaired? Yes it is possible. But here there are 2 options - either the bearing housing is disassembled for lubrication, or the bearing itself is replaced. In the second case, this is more appropriate, but only if it is not difficult for the car owner. In particular, for Toyota the following scenario is possible - the price of a new spare part costs 1500-6000 rubles, and a simple bearing of the same size costs 100-300 rubles. You can save money here.
Anyone who is disassembling a structure for the first time can follow the following recommendation: it is important to remember what is being unscrewed from where, what is being removed from where, the bolts and nuts should be placed in a jar or box. If they do not unscrew, then you need to soak them with a special liquid, otherwise you can either tear off the threads or completely break off the bolts.
How to replace the suspension bearing on a VAZ 2101-VAZ 2107?
1. At the beginning, you will definitely need to remove the propeller shaft from the car, so that it will be much more convenient to work with the outboard one (How to remove, read “in this article”), after this is completed, in the central part, separate the two forks of the propeller shaft from each other and put one part in one direction, and the other part in the other (see points 2 and 3 “here”), this is where the main work is completed and if you have a special one. puller, then finishing the final part will not be difficult for you.
2. Now that everything is removed, unscrew but not completely (leave it right at the tip) the central nut that secures the suspension on the shaft, then take a puller and, using it, as shown in the small photo, press out one of the forks (the one behind which the suspension located) and unscrew the nut completely and remove the fork.
Note! Pay attention to the small photo above, a hammer is used there, it will need to be used if the fork does not want to be removed (Rusted and the like), a couple of blows with a hammer (the puller will need help) and consider that the fork has been removed from the shaft!
3. And finally, unscrew the two bolts (They are located next to each other) that secure the cross member to the intermediate support and then remove it (see photo 1), then prop the intermediate support together with the bearing on two corners or something like this and through the head, knock the bearing off the intermediate shaft (see photo 2), in this case the outboard bearing assembly has been removed from the shaft. If you change just one bearing (it’s better to replace the entire assembly), then you will need to separate it from the rest of the part, it It is held in place with the help of a locking ring (Remove the mud deflectors before doing this) which needs to be hooked onto a special one. a device for removing retaining rings (see photo 3), and after this is done, use a suitable sized head to knock out the bearing (see photo 4) and install the new one in the reverse order.
Note! If you cannot remove the suspension by knocking it out, then in this case it will need to be cut, an angle grinder will help you, but only if you decide to do this, be careful not to damage the shaft and by the way, in this case you will no longer be able to replace the bearing separately ( Only suspended assembled)!
4. The suspension is installed in the reverse order, new bearings very rarely put a good amount of lubricant, usually they put a little bit and that’s it, this is such a saving, if you don’t want to constantly climb into the car, then we recommend that you add additional lubricant to the bearing, which It’s better to add lubricant at your own discretion, because people add very different lubricants to bearings and some like one type and others like another, so to avoid disagreements, add lubricant at your own discretion and by the way, watch the video below for clarity, in It, of course, does not show a suspension bearing, but exactly the same rolling bearing, where to add lubricant, watch in this video.
Checking technical condition
Check the technical condition of the parts included in the axle shaft kit and make sure that:
– the ball bearing is not worn out or damaged; if the axial clearance in it exceeds 0.7 mm, replace the bearing;
– the locking ring and bearing have not received any displacement relative to the original fit; if the inner ring of the bearing rotates relative to the seat of the axle shaft, replace the locking ring;
– the bearing mounting plate and the oil deflector are not damaged;
– the axle shaft is not deformed and the seating surfaces are not damaged; The runout of the axle shaft, measured at the centers on the journal under the oil seal, should not exceed 0.08 mm.
Before installing into the centers, thoroughly clean the centering holes on the axle shaft from dirt and rust.
If wear or damage to parts installed on the axle shaft is detected, replace them with new ones, following the rules below and using special tools.
Eliminate slight bending of the axle shaft by straightening.
After straightening the axle shaft, the runout of the flange end, measured at the centers, should not exceed 0.05 mm.
If the runout of the flange end is more than specified, but not more than 0.08 mm, then it is allowed to groove it to eliminate the end runout.
Reducing the thickness of the flange due to its groove is allowed by no more than 0.2 mm.
Elastic coupling for driveshaft VAZ 2107
The driveshaft of the VAZ 2107 consists of two parts (front and rear), connected to each other by a articulated coupling (cross). This design allows you to avoid loads on the shaft while driving, when the body and chassis of the car begin to “play.”
The end of the rear shaft is connected to the axle gearbox, and the end of the front shaft is connected to the gearbox shaft. The connection to the gearbox is made through an elastic coupling, which is a kind of buffer for leveling shock and dynamic loads on the driveshaft and gearbox shaft.
Flexible coupling location
The elastic coupling is located in the lower front part of the car on the rear side of the gearbox. You can see it if you remove the engine protection and climb under the car. The coupling is easily recognizable due to its hexagonal shape.
Coupling design
The basis of the coupling is a cushion made of especially durable rubber. Along its circumference there are six steel bushings fused into rubber, through which the bolts connecting the cardan flanges and the gearbox secondary shaft pass. The coupling kit also includes a special tightening clamp, which is put on it during installation or dismantling.
Diagnostics of elastic coupling faults
The coupling may fail as a result of:
- wear of metal bushings;
- body wear;
- rupture of the body.
In each of these cases, the malfunction will manifest itself in the form of body vibration and extraneous sounds coming from the gearbox.
The condition of the coupling can only be checked by inspecting it and assessing the size of the play between the flanges of the gearbox and cardan shafts. This is done as follows.
- The car is driven onto an overpass or inspection hole;
- The engine protection is removed;
- The coupling body is inspected and the condition of the bolted connection is assessed.
- By loosening the cardan, the presence or absence of play is determined.
If signs of wear or mechanical damage are found on the coupling body (the body is partially or completely torn), the part must be replaced. A slight play (provided the body is intact) is eliminated by tightening the nuts of the connecting bolts. If the play is large, the elastic coupling will have to be replaced with a new one.
Criteria for choosing a new coupling
Driveshaft couplings for the VAZ 2107 in Russia are produced under catalog numbers 2101–2202120 and 2101–2202120Р. The retail price of the part, depending on the manufacturer, ranges from 400 to 600 rubles.
Table: technical characteristics of the elastic coupling of the VAZ 2107 driveshaft
Rear axle device
The design of the rear axle of the VAZ 2101 consists of two main elements: a beam and a gearbox. These two nodes are combined into one mechanism, but they perform different functions.
The bridge consists of two main components: a beam and a gearbox
What is a beam
The beam is a structure of two stockings (casings) rigidly connected by welding. Flanges are welded into the ends of each of them, designed to accommodate semi-axial oil seals and bearings. The ends of the flanges have four holes for installing brake shields, oil deflectors and plates that press the bearings.
The middle part of the rear beam has an extension in which the gearbox is located. In front of this extension there is an opening closed by the crankcase.
The rear beam consists of two interconnected hollow stockings
Half shafts
The machine's axle shafts are installed in stockings. At the inner ends of each of them there are splines with which they are connected to the semi-axial gears of the gearbox. Their uniform rotation is ensured by ball bearings. The outer ends are equipped with flanges for mounting the brake drums and rear wheels.
Axle shafts transmit torque from the gearbox to the wheels
Gearbox
The gearbox design consists of a main gear and a differential. The role of the device is to evenly distribute and redirect the force from the driveshaft to the axle shafts.
The gearbox design includes the main gear and differential
main gear
The main transmission mechanism includes two bevel gears: drive and driven. They are equipped with spiral teeth that ensure they are connected at right angles. Such a connection is called hypoid. This design of the main gear can significantly improve the grinding and running-in process of gears. In addition, maximum noiselessness is achieved during gear operation.
The main transmission gears of the VAZ 2101 have a certain number of teeth. The drive has 10, and the driven has 43. The ratio of the number of their teeth determines the gear ratio (43:10 = 4.3).
The main gear consists of drive and driven gears
The driving and driven gears are selected in pairs on special machines in the factory. For this reason, they are also sold in pairs. In case of gearbox repair, replacement of gears is allowed only as a set.
Differential
The center differential is necessary to ensure that the wheels of the vehicle rotate at different speeds depending on the load on them. The rear wheels of a car do not travel the same distance when turning or overcoming obstacles in the form of holes, potholes, or ledges. And if they were rigidly connected to the gearbox, this would lead to constant slippage, causing rapid tire wear, additional stress on transmission parts, and loss of contact with the road surface. The listed problems are solved using a differential. It makes the wheels independent of each other, thereby allowing the car to freely turn or overcome various obstacles.
The differential allows the rear wheels to rotate at different speeds when the car overcomes obstacles
The differential consists of two side gears, two satellite gears, adjusting washers and a cast iron box that acts as a housing. The axle shafts fit into the axle gears with their splines. The latter rest on the internal surfaces of the box using adjusting washers of a certain thickness. They do not contact each other directly, but through satellites that do not have a rigid fixation inside the box. While the car is moving, they move freely around their axis, but are limited by the surface of the driven gear, which prevents the axis of the satellites from moving from the mounting sockets.
The differential housing with the mechanism is installed inside the gearbox on roller bearings pressed onto the housing support journals.
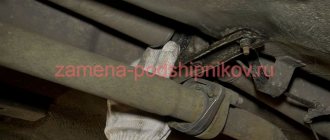
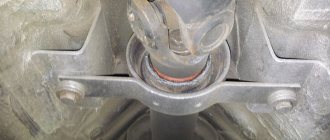
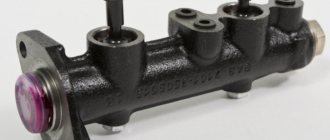
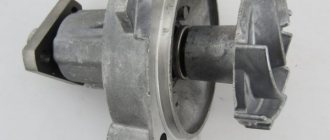
Suspension bearing for propeller shaft VAZ 2107
The suspension bearing (or idler bearing) is designed to ensure uniform rotation of the driveshaft while driving. In addition, it is an additional point for attaching the cardan and is included in the design of the intermediate (suspended) support. In fact, it itself is a support, since it comes complete with a bracket, with which it is attached to the bottom of the car through a transverse bracket.
Outboard bearing location
The bearing is installed in front of the spider at the end of the front of the driveshaft. It can be seen from the inspection hole in the axial recess of the bottom behind the exhaust pipe at its junction.
Hanging bearing design
The hanger bearing is an ordinary closed type ball bearing. It consists of an inner and outer race and seven steel balls. For mounting on the bearing housing there is a steel bracket with holes for bolts.
Diagnosis of outboard bearing faults
The causes of outboard bearing failure are usually wear or mechanical damage. The service life of the bearing is about 150 thousand km. However, exposure to moisture, dirt, as well as stress caused by poor road conditions can significantly reduce it.
Signs of bearing wear are:
- slight vibration;
- hum emanating from the place where the cardan is “suspension”;
- shaft play.
It is quite difficult to accurately diagnose bearing failure; this will require dismantling the driveshaft.
Outboard bearing selection criteria
Suspension bearings for the VAZ 2107 in Russia are produced under catalog numbers 2101–2202080 and 2105–2202078. The requirements of GOST 6–180605 apply to them. Imported analogues must comply with the requirements of ISO 62305.2RS. If there are no such markings on the packaging of a new part, it is most likely a fake, and it is better not to purchase it. The average retail price of a VAZ 2107 suspension bearing is 450–500 rubles. When choosing a manufacturer, it is better to give preference to the Vologda Bearing Plant. Bearings produced at VPP are considered to be of the highest quality and most durable.
Table: technical characteristics of the VAZ 2107 suspension bearing
Signs of breakdown
The main signals that an outboard bearing has failed and needs repair or replacement are:
- A sharp blow to the body, which in some cases can be felt by a person through the car seat;
- A characteristic hum that increases with increasing speed;
- Creaking or “squeaking” of the bearing, which may disappear and appear under certain conditions;
- Vibration when the damper rubber detaches from the race or bearing.
It often happens that a newly installed outboard bearing fails after just a few thousand kilometers. This is usually due to unqualified replacement of a spare part. Incorrect reassembly of the cardan or an error in the selection of bearings leads to rapid failure. The reason for the frequent failure of the outboard bearing may be due to wear of the outboard bearing kit.
Replacing the VAZ 2107 driveshaft coupling
The coupling is replaced on an overpass, a lift or from an inspection pit. Tools you will need:
- two 13mm wrenches;
- two 19mm wrenches;
- head or key 27;
- set of heads;
- pliers;
- chisel;
- hammer;
- slotted screwdriver;
- awl;
- steel beard;
- round nose pliers with thin curved ends;
- vice with workbench;
- special puller for bearings (preferably);
- CV joint type grease.
To replace the coupling, you must perform the following steps:
- Find the parking brake cable equalizer under the car. Use pliers to remove the front cable spring.
Video: replacing the elastic coupling of a VAZ 2107
Repair of contact distributor
It is better to repair the distributor-distributor or diagnose it after first removing the device from the engine. Firstly, it will be much more convenient, and secondly, you will have the opportunity to assess the general condition of the distributor.
Dismantling the VAZ 2101 breaker-distributor
To remove the distributor from the engine, you will need two wrenches: 7 and 13 mm. The order of dismantling work is as follows:
- Disconnect the negative terminal from the battery.
- We find a distributor. It is located on the left side of the power plant cylinder block.
- Using your hand, carefully remove the high-voltage wires from the contacts of the cover.
- Disconnect the rubber tube from the vacuum regulator reservoir.
- Using a 7 mm wrench, unscrew the nut that secures the low-voltage wire terminal.
- Using a 13 mm wrench, loosen the nut holding the breaker-distributor.
- We remove the distributor from its mounting hole along with the sealing ring that acts as an oil seal.
- We wipe the lower part of the shaft with a clean rag, removing traces of oil from it.
Disassembly of the distributor, troubleshooting and replacement of failed components
At this stage we will need the following tools and materials:
- hammer;
- thin punch or awl;
- 7mm wrench;
- slotted screwdriver;
- fine sandpaper;
- multimeter;
- medical syringe for 20 cc (optional);
- anti-rust liquid (WD-40 or equivalent);
- pencil and sheet of paper (to make a list of parts that will need to be replaced).
The procedure for disassembling and repairing the distributor is as follows:
Disconnect the device cover from the body. To do this, you need to bend the two metal latches by hand or using a screwdriver. We inspect the cover outside and inside. There should be no cracks or chips on it.
We pay special attention to the condition of the electrodes. If minor traces of burning are found, remove them with sandpaper.
If the contacts are severely burnt, or the cover has mechanical damage, we add it to the list of replacement parts.
We evaluate the condition of the runner. If it shows signs of wear, we add it to the list as well. Otherwise, clean the slider with sandpaper. Turn on the multimeter and switch it to ohmmeter mode (up to 20 kOhm). We measure the resistance value of the slider resistor. If it goes beyond 4–6 kOhm, we add the resistor to the list of future purchases.
Using a screwdriver, unscrew the two screws securing the slider. Let's take it off.
We inspect the weights of the centrifugal regulator mechanism. We check the condition of the springs by moving the weights in different directions. Under no circumstances should the springs be stretched or dangling. If they are hanging out, we make a corresponding entry in our list.
Using a hammer and a thin drift (you can use an awl), we knock out the pin that secures the shaft coupling. We remove the coupling.
We inspect the splines of the distributor shaft. If signs of wear or mechanical damage are detected, the shaft definitely needs to be replaced, so we “take a pencil” to that too. Using a 7 mm wrench, loosen the nut securing the condenser wire. Disconnect the wire. Unscrew the screw that secures the capacitor. Let's take it off.
We carry out diagnostics of the vacuum regulator UOZ. To do this, disconnect the second end of the hose that comes from the “vacuum manifold” from the carburetor fitting. We again put one of the ends of the hose on the fitting of the vacuum regulator reservoir. We place the other end on the tip of the syringe and, by pulling out its piston, we create a vacuum in the hose and reservoir. If you don’t have a syringe at hand, you can create a vacuum with your mouth, after first clearing the end of the hose of dirt. When creating a vacuum, the movable plate of the distributor must rotate. If this does not happen, most likely the membrane in the reservoir has failed. In this case, we add the tank to our list.
Remove the thrust lock washer from the axle. Disconnect the rod.
Unscrew the tank mounting screws (2 pcs.) with a flat screwdriver.
Disconnect the tank.
Unscrew the nuts (2 pcs.) securing the breaker contacts. To do this, we use a 7 mm wrench and a screwdriver, which we use to hold the screws on the back side. We dismantle the contacts. We inspect them and assess their condition. If they are badly burnt, we add the contacts to the list.
Using a slotted screwdriver, unscrew the screws that secure the plate. Let's take it off.
We remove the movable plate assembly with the bearing from the housing.
We check the bearing for play and jamming by shaking and turning the inner ring. If these defects are identified, we prepare it for replacement. We purchase parts according to our list. We assemble the distributor in the reverse order, replacing the failed elements with new ones. There is no need to install the cover and slider yet, since we will still have to set the gap between the contacts.
Replacing the suspension bearing VAZ 2107
To replace the propeller shaft outboard bearing, you must:
- Disconnect the handbrake cable and remove the driveshaft in accordance with paragraphs. 1–13 instructions for replacing the flexible coupling.
- Using round-nose pliers, remove the retaining rings of the crosspiece needle bearings.
Video: replacing the suspension bearing on a VAZ 2107
Balancing the driveshaft VAZ 2107
After disassembling and replacing any element, the driveshaft must be balanced. This is done on a special stand, so for balancing it is easier to contact the nearest car service center. The balancing itself consists of measuring and eliminating the imbalance on the three shaft supports. Its permissible value at a shaft rotation speed of 5500 rpm should not be more than 1.62 N*mm. The imbalance is eliminated by welding small weights (metal plates) onto the surface of the front driveshaft.
If vibration appears after repairing the driveshaft, you can try to balance it yourself. Naturally, there can be no talk of any accuracy here, and the balancing itself will be only temporary. This is done as follows.
- Drive the car onto a viewing hole or overpass.
- Inspect the driveshaft.
- Conventionally divide the front universal joint into four sectors (if you imagine it in cross-section).
- Find a small weight weighing 30-50g and attach it to the front of the shaft using tape or tape.
- Drive along a flat section of road, paying attention to your choices.
- If the vibration does not disappear or increases, move the weight to another sector and repeat the checking process.
When the load is in its place, the vibration should stop, unless, of course, it is caused by an imbalance of the shaft.