Many myths and legends have developed around such a necessary procedure as adjusting the valves on the VAZ 2109, 2114 and 2108. At first, carburetor ones then became injection ones, but the design of the gas distribution mechanism did not change. Until the 2011 release, even the thermal gaps remained the same. Only with the advent of the light ShPG did the gaps become a little larger. The seats are metal-ceramic, and the pistons are light. The frequency of valve adjustment remains the same at 30,000 km.
On a new car, it is necessary to adjust the valves in the first 3,000 km, then at 15,000 and every 30,000 km. If you do not adhere to periodicity, the valves may burn out and the seats in the head may sag. In addition, traction is lost and fuel consumption increases. Thermal clearances on vases 2108, 21083, 2109, 21099, 2110, 21102, 2111, 21114, 2112, 2113, 2114, 2115, 1113, 11113, 2170, 2190, Priora, Granta (with engine 1118 3), should be like this:
- Graduation 0.35;
- Inlet 0.20 mm.
Thermal clearances on new modifications since 2011 for VAZ 8 valve Lada Granta, Kalina 2, Priora, with engine 21116
- Graduation 0.4 mm;
- Inlet 0.25 mm.
Why do you need to adjust valves?
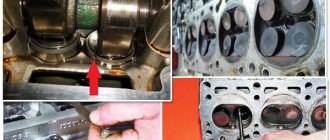
With mileage, the metal valve stem tends to stretch and contract. The seats in the cylinder head sag, which is why the thermal gap changes. And it is physically needed of a certain value due to the design features of the engine. The consequences of untimely adjustment are not reversible. A clamped valve during operation of an eight-valve engine loses its seal, and the avalanche flow after ignition burns its edges and the cylinder head seat, which is recessed into the body of the head. This type of repair is expensive and does not come with a warranty. It is better to regulate in time, especially since the cost of tuning an 8-valve engine at 600 - 800 rubles per 30,000 km is not so significant.
With correctly adjusted clearances, the car will drive freely, without loss of traction, consuming less fuel. Under no circumstances should you adjust it to hot. Just cool the engine to 30-40 degrees. Otherwise, you can make a mistake and jam the valves.
There are times when the valves have been adjusted, but the knock remains. The reason may not be gaps. On a cold engine, piston skirts and cups and pushers in the body of the head can knock. There can be many reasons, so don’t rush to conclusions, but check everything carefully. There is a special device - a stethoscope, with which you can easily listen to engine noise.
Difficulties in diagnosis
There is an opinion that if a valve burns out, symptoms and problems will be hidden in the ignition system. Very often, car mechanics, who still have little work experience, first of all begin diagnosing and repairing the ignition.
In the process of such repairs, the distributor cover is replaced, high-voltage wires and spark plugs are replaced. The ignition angle is also set - of course, there is no result and there will not be one. The engine has worked and will continue to work. The car mechanic will continue to look for the problem, not knowing the true cause of the problem. Even those mechanics who guessed that the problem lies in the engine see signs of burnt valves only after removing the cylinder head.
Adjustment procedure
The procedure for adjusting the valves on all modifications of the 8-valve vase is the same. There are differences only in injection Grant cars, Kalina 2 with a Grant engine. They have a lightweight piston group and metal-ceramic seats. In this regard, the gaps differ upward by 0.05 mm. Knowing the order and adjustment scheme, you can adjust the valves yourself. The downside is the lack of a set of washers for adjustment. It’s expensive to go to the market to buy them every time, and it’s also expensive to buy the entire range.
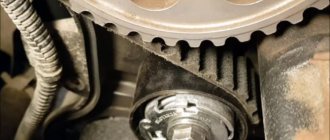
Here is a detailed diagram of valve adjustment for VAZ 2108, 2109, 2114, 2115
- First you need to cool the engine. You can use an additional cooling fan from any VAZ car. Place it on top so that the airflow is towards the internal combustion engine and turn on the 12 V power supply;
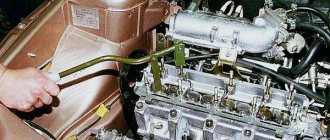
- When adjusting 8 valve engines (11186, 11113 oka, 1118, 1111) with a mechanical throttle assembly, unscrew the throttle cable from the intake manifold receiver;
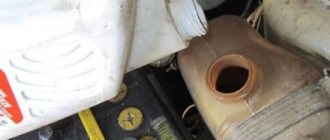
- Disassemble the valve cover, timing belt side casing. Disconnect the large and small breather hose going to the throttle body pipe;
- Pump out the oil near the valve cups using a syringe or bulb. It is most convenient to use a regular medical syringe with a white silicone hose at the end;
- Install a device for adjustment - a rack for pressing the valve, also called a ruler;
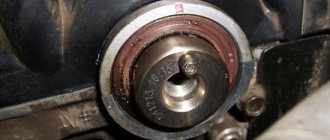
- Set the first adjustment position. Turn the camshaft clockwise to the mark and tighten 2-3 teeth. For cars with a lightweight piston group (Granta, Kalina 2, Priora), turn strictly by the crankshaft. If you turn the camshaft, the timing belt may slip, and if this is not noticed and the engine is driven, the valves may bend;
- Adjust in the following sequence: 1 outlet and 3 inlet valves;
- Rotate the camshaft 90 degrees. Adjust 5 outlet and 2 inlet valves;
- Rotate 90 degrees. Adjust 8 exhaust and 6 inlet ports;
- We make the last turn by 90 degrees and adjust the 4th exhaust and 7th inlet valves;
- Reassemble in reverse order. We install a new gasket under the valve cover to prevent oil from leaking out.
- On carburetor engines, everything is done in a similar order. First you need to unscrew the filter housing and the suction cable. The frequency is the same as on the injector 30,000 km.
On engines with 16 valves, adjustment is not required, since thermal clearances are selected automatically using hydraulic compensators.
Checking the gaps is also required after repairing the cylinder head. Especially after replacing the guides. When replacing bushings, the seats are countersunk with a special tool and deliberately recessed into the head. Accordingly, you need to follow the sequence, set the optimal gaps and repeat after 1000 km.
Adjusting the 8kL engine for gas increases the mileage between adjustments. If the engine is not intended to operate on gas equipment, the seats and valves will quickly burn out, and in order to somehow extend the service life, the clearances should be made a little larger than standard. Usually they do +0.05 mm. If the gap is not set, that is, does not expand, then the saddle is sunk a decent distance into the head. In this case, you need to measure how much the gap needs to be increased, disassemble the cylinder head and file the end of the valve. The second option would be to replace the seat or the cylinder head itself.
Preparation for repair
Before starting work you must:
- Place the car on a level surface and allow the engine to cool to 20 degrees.
- Remove the valve cover and the plastic cover that covers the timing belt. Everything under the lid must be thoroughly wiped clean of oil.
- The camshaft must be carefully examined; if there is excessive wear, scoring, or cavities, it must be replaced.
- To make the crankshaft rotate more easily, you need to unscrew all the spark plugs.
After all these steps, you should align the mark on the camshaft gear with the casting on the cylinder head. In this case, you will set the first cylinder to the position corresponding to the top dead center. Please note that the crankshaft pulley must be rotated clockwise. But it's better to do things a little differently. Raise the left side of the car so that the front wheel hangs down. Engage fifth gear and rotate the wheel until the marks align.
Using chalk or a marker, you need to apply another mark on the camshaft gear. It should be opposite the one that already exists. This will make the work much easier.
Adjustment table according to factory instructions
| car brand | Inlet | Release |
| Priora 21116 | 0,25 | 0,4 |
| Kalina 2 21116 | ||
| Lada Granta 21116 | ||
| grant 2190 | 0,2 | 0,35 |
| Priora 2170 | ||
| 21114 | ||
| 21102 | ||
| 21099 | ||
| 21093 | ||
| 21083 | ||
| 11186 | ||
| 11183 | ||
| 2190 | ||
| 2115 | ||
| 2114 | ||
| 2113 | ||
| 2112 | ||
| 2111 | ||
| 2110 | ||
| 2109 | ||
| 2108 | ||
| VAZ 99 | ||
| VAZ 083 | ||
| 1118 | ||
| 11113 oka | ||
| 1111 oka |
Brief description of the procedure
Nowadays, any modern car, except electric ones, has an internal combustion engine with a gas distribution mechanism. A lot of parameters depend on the proper operation of this system. And they include fuel consumption, engine response, environmental characteristics and other equally important indicators. The normal function of the gas distribution mechanism is ensured by the correct adjustment of the gaps between the valve and its pusher.
If the gap is too large, the camshaft cam will hit the pusher plate with force, and all this will lead to serious damage to engine components and mechanisms. In addition, the valve will not fully open when needed, thereby blocking the movement of exhaust gases or the fuel-air mixture, depending on the type of valve. Intakes are responsible for the supply of fuel, exhausts are responsible for exhaust gases directed to the exhaust manifold.
Operating principle of the valve mechanism
On the contrary, if the valve is tightly clamped, then mechanical damage to engine parts will be less than if the gap is too large. But the engine operation itself will be much worse. It is for good engine performance that it is necessary to carefully adjust the valves on VAZ cars. This procedure is carried out in several ways. The first is that the pusher is moved under the influence of the nut on the rod. The second is the selection of gasket washers of the required thickness. The third is automatic, regulated by engine oil pressure into hydraulic compensators.
What is needed for adjustment
As already noted above, you can adjust the thermal clearances of the valves on the vase with your own hands. To do this you need a set of washers, some fixtures and tools. You can make a homemade rail, but it is more cost-effective to buy a ready-made fork for setting gaps at the car market.
Heels for adjustment will be needed in the range from 3.40 to 4.05 mm if the guides in the cylinder head have not been changed. If, however, repairs were carried out, or the car runs on gas, you will have to purchase washers in the range of 2.50 mm for the exhaust valves. Intake valves, as a rule, remain at the same clearance; the seats on them do not flush.
Thus, in this article we briefly examined the procedure for adjusting valves on VAZ cars with front-wheel drive. The consequences of untimely tuning and driving on gas were also touched upon.
The process of adjusting valves on a VAZ 2115 with an injector engine
On VAZ 2115 cars, the thermal clearance is adjusted using specially adapted washers, which are folded between the camshaft knuckle and the end of the valve stem. Directly, valve adjustment on a VAZ 2115 car is carried out with the engine idling. The process of adjusting valves is not something complicated, but if you have never dealt with car repairs, then it is naturally better to contact a car service center.
Before you move on to adjusting the thermal gap, you need to take care of special devices and tools. In addition to the standard set of keys, it is necessary to prepare a set of special pliers to measure the size of the thermal gap, as well as a special device for recessing the valve pushers. Naturally, you can initially purchase a set of washers for adjustment, but then after completing the adjustment process you will be left with a certain number of washers that you may no longer need at all. Therefore, it is best to first take some measurements, and only after that purchase the necessary washers.
So, the algorithm for adjusting the valves on a VAZ 2115 car:
Remove the cylinder head cover or, as it is often simply called, the valve cover. To perform this step, remove the air filter, disconnect the pipe that is attached to the valve cover, but before that, first loosen its clamp
After this, disconnect the throttle valve control mechanism from the valve cover and carefully remove the cylinder head cover; Unscrew the spark plugs; Remove the front plastic cover protecting the gas distribution system; Rotate the car engine crankshaft clockwise until the mark on the timing pulley aligns with the mark on the rear cover. The crankshaft can only be turned using a wrench using the bolts securing the generator pulley.
If you accidentally missed the mark, turn the car engine a few more revolutions; After the marks have come together, rotate the crankshaft a few more teeth of the gas distribution system; Measure the thermal clearance of the exhaust valve of the first cylinder and the intake valve of the third cylinder. For exhaust valves, according to the standard, it is about 0.2 millimeters, and for exhaust valves, 0.4 millimeters; If the thermal clearances do not match the standard, then you need to lower the cylinder piston to the lowest position and, using a special device, remove the installed washer; We measure the size of the required washer; to do this, subtract the value of the recommended gap from the value of the thermal gap, and then add the thickness of the washer used to the resulting value; Measure the thermal clearance value for each valve in turn, with each crankshaft turn half a turn; Install washers of suitable thickness and repeat the measurements again.
The valve adjustment process must be carried out after traveling thirty thousand kilometers, but if the car engine is functioning normally, then it is better not to carry it out.
You may also like.
- carfrance.ru
- carfrance.ru
- www.drive2.ru
- autodont.ru
What does the price depend on?
Motorists who need engine overhaul of a VAZ-2114 are faced with different prices for such a service.
The cost depends on the influence of factors:
- Engine capacity.
- The prestige of the service company, its pricing policy.
- Urgency.
- Scope of work.
- Difficulty of repair.
- The need for a specialist to visit.
- Cost of spare parts.
- Equipment used.
- Automotive technician qualification level.
The more work is required to restore the engine of a VAZ-2114 car, the more expensive the service of a specialist will cost. You will have to pay extra for urgency and a specialist visit.
Groove on top
To call them plug-free is not literary, but in a “garage” way - they will immediately understand you and appreciate your technical potential! This name comes from a simple trick - the piston does not meet the valve with the help of a special groove on top - that is, the valve DOESN'T fit into the piston, that's the name.
However, if you tell it technically and literary correctly, it turns out that there are several grooves in the upper part of the piston. Their number can be different - from 2 to 4 pieces. It is thanks to these grooves that these two engine elements do not meet. That is, the correct name is a piston with grooves.