Repair manual for VAZ 2110, 2112, 2111 (Lada 110)
4.22.
Cylinder head parts: 1 – cylinder head; 2 – intake camshaft; 3 – oil seal; 4 – exhaust camshaft; 5 – camshaft bearing housing; 6, 8 – sealing rings; 7 – guide pipe; 9 – block head cover; 10 – bracket for fastening the wiring harness; 11 – plugs; A – distinctive belt of the intake camshaft. Head 1 (Fig. 4.22) of the cylinder block is common to four cylinders, cast from aluminum alloy, with tent-shaped combustion chambers. The inlet and outlet channels are located on different sides of the block head. The valves are arranged in a V-shape in two rows: inlet on one side, exhaust on the other.
Sintered valve seats and brass valve guides are pressed into the head. The inner diameter of the guide bushings is (7±0.015) mm, the outer diameter (for bushings supplied as spare parts) is 12.079–12.090 mm and 12.279–12.290 mm (bushing increased by 0.2 mm).
The valves are similar in design to engine valves mod. 2110, but have a smaller diameter of plates and rods. The intake valve has a disc diameter of 29 mm, and the exhaust valve has a disc diameter of 25.5 mm. The diameter of the intake valve stem is (6.975±0.007) mm, the exhaust valve is (6.965±0.007) mm.
One spring is installed on each valve. The length of the spring in the free state is 38.19 mm, under load (240±9.6) N [(24.5±0.98) kgf] should be 32 mm, and under load (550±27.5) N [( 56.1±2.8) kgf] – 24 mm.
The valves are driven by camshaft cams through cylindrical hydraulic pushers located in the guide holes of the cylinder head along the axis of the valve holes. Hydraulic tappets automatically eliminate the clearance in the valve mechanism, and therefore, when servicing the vehicle, there is no need to check and adjust the clearance in the valve mechanism.
4.23. Suspension of the power unit with engine mod. 2112: 1 – bracket on the right side member of the body; 2 – lower limiter of the pillow; 3 – right support cushion; 4 – upper limiter of the pillow; 5 – pillow fastening nut; 6 – spacer washer; 7 – support fastening nut; 8 – right support bracket; 9 – rear support rod; 10 – rear support bracket; 11 – left support cushion; 12 – nut with washer; 13 – left support bracket; 14 – front support bracket; 15 – front support rod
Oil for the operation of hydraulic tappets is supplied from the lubrication system through a vertical channel in the cylinder block to a channel in the cylinder head near the 5th mounting bolt (see Fig. 4.23), and then through the upper channels made on the lower plane of the bearing housing. Oil is supplied through the same channels to lubricate the camshaft journals. A check ball valve is located in the vertical channel of the cylinder head, which prevents oil from draining from the upper channels after stopping the engine.
The valves are driven by two camshafts: intake and exhaust. The shafts are cast from cast iron and are equipped with five bearing journals, which rotate in slots made in the cylinder head and in one common camshaft bearing housing. To increase wear resistance, the working surfaces of the cams and the neck under the oil seal are bleached. To distinguish the intake camshaft from the exhaust camshaft, a distinctive belt A is made on the intake shaft near the first support.
The shafts are kept from axial movements by thrust collars located on both sides of the front support. The front ends of the camshafts are sealed with self-clamping rubber seals. The rear holes, located along the axis of the shafts in the cylinder head and bearing housing, are closed with rubberized cap plugs.
Checking the technical condition and repairing the cylinder head are similar to those described for the engine mod. 2110.
You will need: a device for compressing valve springs, a device for pressing out and a mandrel for pressing in valve stem seals, a 10mm socket wrench, a 10mm hexagon, a screwdriver, tweezers.
1. Remove the cylinder head from the engine (see “Removing the cylinder head on a vehicle”).
2. Unscrew the coolant temperature gauge sensor from the rear end of the cylinder head.
3. Unscrew the warning lamp sensor for emergency oil pressure drop from the camshaft bearing housing.
4. Unscrew the two mounting bolts and remove the fuel pipe bracket.
5. Remove the spark plug guide pipes from the holes in the cylinder head and camshaft bearing housing.
6. Remove sixteen bolts securing the camshaft bearing housing.
7. . and remove the housing.
8. Remove the plugs from the rear end of the block head.
9. Remove the camshafts from the cylinder head supports and remove the oil seals from their front ends.
10. Remove the valve lifters from the holes in the cylinder head.
11. Remove the crackers from the spring retainers by compressing the valve springs with a tool.
12. Remove the springs with plates.
13. Turn the cylinder head over and remove the valves from its underside.
14. Remove the oil seals from the guide bushings.
15. . and spring support washers.
16. Before assembly, clean the cylinder head and bearing housings from any remaining old sealant, dirt and oil.
17. Install the spring support washers.
18. Lubricate the valves, hydraulic tappet holes, valve guide holes and new oil seals with engine oil (old caps cannot be used).
19. Using a mandrel, press the caps onto the guide bushings.
20. Insert the valves into the guide bushings, install the springs and spring plates.
21. Compressing the springs with a tool, install the valve cotters.
22. Insert valve lifters into the holes of the cylinder head.
23. Lubricate the camshaft bearing journals and cams with engine oil and place them in the cylinder head supports.
24. On the surface of the cylinder head mating with the camshaft bearing housing, apply Loctite-574 type sealant in the form of a 2 mm diameter bead, as shown in the photograph.
25. Install the bearing housing and tighten its mounting bolts evenly in a cross pattern, starting from the middle supports.
26. Press in new camshaft oil seals with a mandrel (you can use a head from a tool kit or a piece of pipe of a suitable diameter as a mandrel), after lubricating them with engine oil.
Do-it-yourself repair of the cylinder head (cylinder head) on a 16-valve VAZ-2112
Cars of the VAZ-2112 family were produced with one of two 16-valve engines - 21124 and 21120. The displacement of these engines is different, and only one part called the “cylinder head” is used - it is designated by the numbers 2112-1003011. There are rumors that the cylinder head from the 21120 engine does not fit the 24th engine, but a reverse replacement is possible. However, there is only one article in the spare parts catalog, and it is suitable for two motors at once. Next we consider what actions to repair the VAZ-2112 cylinder head you can perform yourself. We will only talk about 16-valve engines.
An example of dismantling is shown in the video. Let's see.
Is it possible to drive with a broken cylinder head gasket?
Car owners often ask whether it is possible to drive with a broken cylinder head gasket. It is not always possible to immediately fix the problem, for example, when the malfunction occurs on the road or far from a service station.
Experts say that it is impossible to travel in such a situation. This is especially true if antifreeze gets into the oil or vice versa. The only way out is to move only in tow. If you ignore this requirement and drive even 200-300 km, the engine may need to be overhauled.
In a situation where oil and antifreeze do not mix, driving a short distance is allowed. Here we are talking about minor damage, but it is necessary to monitor the engine temperature and coolant level. After all, if the gasket is punctured from the inside, then there is a high risk of damage to the valves and pistons as a result of antifreeze getting into the cylinders.
Dismantling the cylinder head
First of all, to get to the cylinder head, you need to remove the cylinder head cover. For different 16-valve engines, this operation is different, and the cover part numbers also look different: 2112-1003260 (-10) and 21124-1003260.
Engine cover VAZ-21124 (1.6 l)
You will also need to remove the timing belt - there are no differences between different engines.
Let's look at how the exhaust manifold can be detached from the cylinder head. On engine 21120:
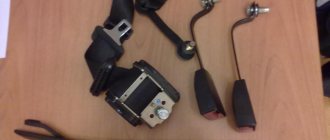
- Remove the exhaust pipe of the muffler: unscrew two nuts 1 (key “13”), remove the clamping bar, unscrew six nuts 2 (key “14”) and dismantle, not forgetting to turn off the oxygen sensor. The photo shows three of the six nuts.
Elements of the exhaust pipe
Everything important is under the screen
Now we will talk about engine 21124:
- Disable both oxygen sensors. We unscrew the three nuts securing the protective screen (with a 10mm wrench) and disassemble the bracket by unscrewing the four nuts with a 13mm wrench.
How to disassemble the mounting bracket
Operation with additional muffler
Here we believed that the VUT hose was disconnected from the intake module. Finally, the spark plugs are unscrewed on any of the engines (a “16” tubular wrench).
The tightening torques for the mounting screws are given in another text. In general, on VAZ-2112 hatchbacks, cylinder head repairs begin by replacing the “extended” screws with new ones. The length should be 95mm or less.
The order of unscrewing (left) and tightening the mounting screws
Necessary parts and tools for repair
Troubleshooting the cylinder head begins with the purchase of original parts and various consumables, the list of which is as follows:
- Fuel intake system valve 8 pcs. (art. 21120-1007010).
- Exhaust gas valve 8 pcs. (art. 21120-1007012).
- Set of hydraulic compensators 16 pcs. (art. 21120-1007300).
- Gaskets for valve cover, cylinder head, intake manifold, exhaust manifold (all come as a set art. 21120-1002064-86).
- Bolts securing the cylinder head to the engine crankcase (art. 21120-1003271-018).
- Timing belt (art. 2112-1006040-02RU), timing tension roller (art. KT100507/100513), drive belt for mounted units (art. BP638).
- Engine oil and oil filter.
- Cooling system fluid.
Installation of valves on a VAZ 2112 is carried out using a standard set of tools, as well as several specialized types of keys:
standard set of spanners from 8 to 24 mm; socket sockets in a set from 8 to 27 mm; end internal hexagons; mechanical valve retaining ring remover (depressurizer); torque wrench for tightening the cylinder head and camshaft bolts; paste for grinding valves (set for rough and fine grinding); metalworking cloth gloves to protect hands while working.
The work of replacing 16 valves on a VAZ 2112, the price of which as of this fall is about 50 thousand rubles at AvtoVAZ dealerships (or approximately 35-40 thousand rubles at ordinary car repair shops), is not a very complicated process. You can carry out the work yourself, for which it is enough to purchase the above-described spare parts and the necessary tools.
Cleaning valve channels
To remove any valve, you will need to remove the camshaft. All screws on the bearing housing must be unscrewed evenly and tightened with a force of 10 N*m. The hydraulic compensator can be removed with a magnet, and then the valve is desiccated by compressing the spring with a puller (see photo).
How to remove the valve
There may be carbon deposits in the valve channels. It is cleared:
- Flat screwdriver;
- Sanding felt.
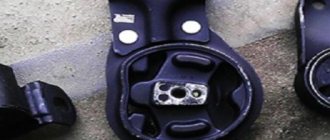
Grinding is carried out as follows: a rubber pipe is placed on the valve, a paste with diamond chips is applied (one drop), then the valve is pressed into the channel and scrolled. It will also be possible to change the valve stem seals (2112-1007026). You can’t do this without a special puller.
Cap puller
On any car, including the VAZ-2112, cylinder head repair comes down to cleaning and checking, as well as correcting geometry defects. In the latter case we are talking about milling. The presence of cracks and chips is a reason for replacement, not repair.
A small photo report
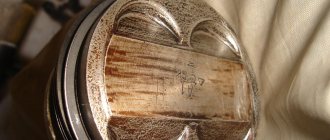
A burnt valve is immediately visible.
One valve burned out in cylinder 2
Carbon deposits were found in each valve channel.
Carbon layer in the cylinder head channels
Repair : cleaning all channels, replacing the valve with lapping. Direct repair of the VAZ 2112 cylinder head will require several operations that require some special equipment. Of course, this is not possible at home, and car enthusiasts simply replace worn parts. Next, we will consider the process of repairing the block head, as well as some of the nuances associated with this work.
Stages of block head repair
Before proceeding directly to the cylinder head repair process, it is worth noting that the head must be completely disassembled and all the necessary spare parts purchased. Let's consider the process of complete overhaul of the cylinder head.
Washing and crimping
The process of washing automobile spare parts with hot kerosene
In order to wash the head, it must be completely disassembled, that is, all parts that can be easily removed must be dismantled. For a complete wash you need 12 liters of hot kerosene. At car services, this is done using a sprayer that supplies liquid under pressure. This way, all the dirt and remaining metal shavings are washed away. The washing is carried out until the cylinder head is completely clean.
The process of crimping the cylinder head
Crimping is a process in which the integrity of a part is checked. Pressure testing can be carried out in two ways, which are basically similar. The first is to close all the cracks and fill the part with water. If there is water leaking or leaking somewhere, then the integrity has been compromised and repairs are necessary. The second method is to close all the cracks and immerse the head in an aqueous solution. It will be immediately obvious where the part is depressurized. If the integrity of the head is damaged, it must be restored.
Conclusion
Thus, a major overhaul of the cylinder head of the 16-valve VAZ 2112 engine is being carried out. This process at a car service center will take 1-2 days, but in his garage a car enthusiast can spend much more time, since the lack of tools will affect him. Thus, it is recommended to carry out cylinder head repairs at car repair shops, where everything will be done much faster and with better quality. Of course, this will hit your pocket, since high-quality and major repairs of this part will cost on average about 7,000-10,000 rubles. along with spare parts.
Removal
1. Drain the coolant from the engine (see “Coolant - replacement”).
If disassembling the cylinder head is not required
(for example, to replace the cylinder head gasket), it should be removed as an assembly with the camshafts, bearing housing, fuel rail, oil pressure and camshaft position sensors.
4. Disconnect the upper mounting rod of the power unit from the cylinder head bracket (see “Upper mounting rod of engines 2112 and 21124 (16v)”).
13 mm socket wrench
Unscrew the three nuts securing the rod bracket.
6. Remove the bracket from the studs.
8. 10 mm
Unscrew the bolt securing the ground wire tip and disconnect it from the block head.
9. 13 mm
Unscrew the nut securing the tip of the negative terminal wire of the battery and remove the tip from the stud.
10. To avoid damaging the sensor connectors, disconnect the wires from the coolant temperature sensors of the engine management system (see “Coolant temperature sensor - check and replacement”) and from the temperature indicator (see “Coolant temperature sensor - check and replacement” ), as well as from the camshaft position sensor, if we remove the cylinder head assembly (see “Camshaft position sensor - check and replacement”).
13 mm socket wrench
Unscrew the two nuts securing the thermostat housing.
12. Remove the thermostat housing from the cylinder head studs and, without disconnecting the hoses, move it to the side.
13. Remove the sealing gasket.
10mm hex wrench
unscrew the ten bolts securing the head to the cylinder block in the specified sequence.
Sequence of loosening the head bolts
15. Remove the head from the cylinder block assembly.
. or with the camshafts removed.
16. Remove the cylinder head gasket.
17. In order not to lose it, we remove the two guide bushings from their seats in the cylinder block.
Gasket replacement process
In order to make the replacement faster and more convenient, you will need a pit, overpass or lift. As practice shows, such conveniences are not always at hand and you have to suffer in the garage. Let's consider the step-by-step process of replacing the cylinder head gasket:
- We remove the “minus terminal” from the battery.
Removing the battery terminal for repair
- To replace the gasket, it is necessary to clear the head channels of coolant, so we drain it into a previously prepared container.
- Relieve pressure in the fuel system.
We relieve pressure in the fuel system through a special valve.
- Approaching the engine from below, it is necessary to dismantle the exhaust pipe.
After unscrewing the mounting bolts, disconnect the exhaust manifold and exhaust pipe - The next step is to dismantle the thermostat.
- Since it is necessary to replace the gasket itself, we will not disassemble the head and dismantle it together with the camshafts.
When everything is disconnected, we dismantle the cylinder head - The cylinder head is removed together with the fuel rail.
- Disconnect the camshaft and engine oil sensors.
- We are dismantling the timing belt.
Removing the timing belt - Now, you need to fix the camshafts, and then remove the pulleys so that they do not interfere.
Fixing the camshafts from turning so as not to disturb the valve timing - We dismantle the cooling sensor.
- Remove the valve cover. To do this, you need to unscrew the mounting bolts. During assembly, the bolts must be tightened in a certain order and with a certain torque.
- Now you can lift the cylinder head.
- We remove the remaining gasket material from the surface of the block and cylinder head.
- Install a new gasket on the head surface. If the gasket material has a red edge, then there is no need to use sealant, but if it is not there, then the gasket must be lubricated with graphite grease and sealant must be applied along the contour.
- We put the block head in place and tighten the screws in the sequence following the diagram.
- The rest of the assembly is carried out in reverse order.
Now the gasket has been replaced and you can continue to use the car.
Selecting a cylinder head gasket
Before you start choosing a head gasket based on the catalog number, you need to consider what types of gasket materials there are. Let's look at the main types of cylinder head gaskets:
- Asbestos . The main advantage: minimal shrinkage and excellent recoverability.
- Metal . These are some of the most reliable and high-quality consumables.
- Non-asbestos . Used as repair kits. Main advantages: elasticity, heat resistance, elasticity.
Metal cylinder head gasket
So, now you can consider the original gasket, as well as the substitutes that are used. Basically, all manufacturers label gaskets according to the original.
2112-1003020 is the original and analogue catalog number of the cylinder head gasket for the VAZ-2112. Also, the manufacturer Ajusa (10144200) produces a range of gaskets for the 2112 model.
Reasons for failure
There are not many reasons why the cylinder head gasket failed, but every car owner must know them. So, let's look at the main ones:
- Wear . Each element of the car has its own service life, and therefore wear of the part is simply inevitable.
- Deflection or deformation of the cylinder head can lead to gasket breakdown or hot antifreeze getting onto its surface.
- Boiling your car can cause the gasket to fail.
Signs of replacement
To correctly diagnose and identify faults, it is necessary to diagnose correctly.
White steam from the exhaust is a reason to think!
Let's consider the main direct and indirect signs that the cylinder head gasket has worn out and requires replacement:
- White steam starts coming out of the exhaust;
- Traces of coolant or engine oil leakage appear at the cylinder head joints;
- Traces of oil appear in the coolant;
- An impressive amount of lubricant accumulates in the pan;
- Foam forms around the filler cap.
Now all the issues have been considered, the reasons, signs and method of replacing the cylinder head gasket have been established.
Installation
1. Wash the cylinder head from dirt and deposits with kerosene or diesel fuel.
2. Remove any remaining oil and coolant from the threaded holes of the cylinder block (under the cylinder head bolts).
3. We clean the mating surfaces of the head and cylinder block from the remains of the old gasket, and degrease the surfaces with a solvent.
Warning! Always use a new gasket when installing the cylinder head. Oil contact with the gasket surface is unacceptable.
4. Install the head guide bushings into the seats of the cylinder block. We place the gasket on the cylinder block, and the guide bushings should fit into the corresponding holes in the gasket.
5. Install the head on the cylinder block. By slightly moving the head from side to side, we ensure that the guide bushings fit into the corresponding recesses of the head.
Warning! Reuse of cylinder head bolts is only permitted if their length does not exceed 100 mm
6. Using a caliper or a bench ruler, measure the length of the bolts. Bolts longer than 100 mm are replaced.
7. Before installation, dip the threaded part of the bolts into engine oil and let the oil drain, waiting for about half an hour.
8. Install the head mounting bolts into the holes of the head. Using a torque wrench, tighten the head mounting bolts in three steps - first with a torque of 20 Nm (2 kgfm), then turn the bolts by 90° and then turn the bolts again by 90°. In this case, we follow the order indicated in the photo.
Head bolt tightening sequence
We perform further engine assembly in reverse order.
Installation and dismantling procedure
The part called the cylinder head is attached to the cylinder block with 10 screws. They are unscrewed with a 10mm socket wrench. The procedure for dismantling the cylinder head is shown in the first photo.
Reversal sequence (1-10)
The standard screw length is 93 mm. If the screw has been pulled out to at least 95 mm, it is replaced with a new one (AvtoVAZ requirement).
During installation, a different scheme is used (photo 2). Each screw is lubricated with machine oil, otherwise the efforts will be reduced to nothing.
The order of tightening the head is indicated in this photo
Tightening torque for cylinder head cover bolts
For VAZ-2112, the cylinder head tightening torque is standardized:
- First pass – the force is 20 N*m;
- Each screw is turned 90 degrees to the right;
- Wait 20 minutes, then turn the screws another 90 degrees.
At first the effort is very small. But at “step 3” it will be difficult to cope with the work. Use the lever.
Why are guide bushings needed?
Before installing the cylinder head, perform the following steps: clean the threaded holes, as well as all holes for the bushings (photo 1). Each bushing is installed in place, and only then a gasket is placed on top.
Everything is ready to install the cylinder head
Metal parts adjacent to the gasket must be degreased. We looked at the cylinder head tightening diagram, but the cylinder head itself must be installed correctly:
- We place the cylinder head on the cylinder block;
- By moving the part in different directions, we ensure that the bushings fit into the recesses.
After “step 2” the screws can be tightened.
Sealant
No sealing compounds are used when installing the gasket! Solidol, CIATIM and other lubricants are not even needed. The main thing is that the metal must be degreased. And the cylinder head gasket must be new.
Hi all.
Last fall I noticed drops of oil in cylinder 4 and leaks around the entire perimeter of the valve cover.
I've been through the winter and it's time to fix the problem. I change everything together as usual. What we need:
1) Anaerobic sealant “Locktite” 20 ml - 150r2) Camshaft oil seal BRT (cat. number 21080-1005034-00) 2 pcs. - 240r per pair 3) Camshaft plugs 2 pieces (cat. number 21120-1003290-00) - 100r pair4) Crankcase ventilation pipes for engine 21126 (21126-1014240-00 (E-gas) - thin long, 21124-1014058-00 upper small, 21120-1014056-00) lower large - 3 pieces - 250r set5) Filter “ Knecht” KL23of - 150r6) Carburetor cleaner - 150r7) Intake manifold and throttle gaskets - 150r set BRT8) Oil dipstick seal (cat number 21120-1009078-00) - 30r9) Torque wrench
I don’t see any point in describing the entire process of disassembling the valve cover. There are plenty of manuals, I’ll only focus on the moments that cause difficulties
Remove the decorative cover
We remove all wires, ventilation hoses, and throttle. The receiver is secured with 2 bolts and 3 nuts. The nuts with the left bolt unscrew easily, you can crawl up. But there is a problem with the right bolt; the generator does not work.
I have a car with air conditioning, the pipes are in the way. There are two bolts near the gene; we remove them (the bolts are visible in the photo). When you remove the intake manifold, you need to bend the tubes, don’t be afraid to bend them, there are rubber inserts. Remove the generator belt, unscrew the top fastening and carefully move the gene towards the radiator with a pry bar.
Many motorists have heard that it is necessary to correctly tighten the threaded connections on the 16-valve VAZ-2112 engine, but they have never done it themselves. Thus, the tightening torque is determined by the manufacturer and is indicated in the service repair manuals.
Video about installing camshafts and split gears on a 16 valve engine
Removing the cylinder head (cylinder head) on a VAZ-2112 16 valves with your own hands
The main symptoms that you will have to dismantle the cylinder head will be an oil leak, which is observed at the junction of the “head” with the cylinder block, or when it has mechanical damage and simply needs to be replaced. Also, similar work is provided to you when you find traces of an emulsion mixture of antifreeze and oil on the cap of the expansion tank, which will indicate the presence of oil in the cooling system.
Video with disassembling and removing the cylinder head on a VAZ-2112 - everything is simple, do it yourself:
The work of removing the cylinder head on a VAZ-2112 can be done with your own hands, you just need to follow our instructions.
Tool for the job
Before proceeding directly with the replacement, you need to collect all the necessary tools and materials:
- A set of keys of various diameters “10”, “13”, “17”, “21”.
- Screwdriver.
- Pliers.
- New coolant.
- Container for coolant.
- Clean rags.
- New consumables (depending on the purpose of the work being performed - approx.).
- Anti-recoil shoes.
For ease of work, it is best to use an inspection hole or a lift.
Removing the cylinder head on a VAZ-2112 - work procedure
Before you begin, make sure that the vehicle is on a level surface, the handbrake is on, and the wheel chocks are placed under the rear wheels.
Attention! Work must be carried out only on a cold engine.
- First of all, disconnect the negative terminal from the battery.
- In a pre-prepared container, drain the antifreeze through the drain hole on the heater radiator.
- Using a “10” wrench, unscrew the four bolts securing the decorative engine casing.
Mounting points for the decorative cover of the 124 motor. Editor's car in the photo!
We disconnect each wire from the spark plug in turn.
Pay attention to the amount of traces of corrosion
Idle speed sensor close up on an editorial VAZ-2112
Pull out the cable according to the arrows.
We remove the receiver to the side (it will be either steel or plastic. For example, on a 124 engine the receiver is made of plastic). The photo shows engine 21120
Using two wrenches, unscrew the fuel line
Place the loosened bolts in a safe place.
Inspect the hose for damage and replace if necessary.
Please note that there is coolant in the thermostat, so do not get scalded.
The location of the bolts is indicated by a marker.
The next step you will need to remove the timing belt. You can read about how to carry out this work correctly in this article. Timing belt tension is discussed here.
- When the belt is removed, it is necessary to remove 2 camshaft pulleys. To prevent them from turning, we hold them, unscrew the fastening bolts, and then the pulleys themselves can be removed. (Don’t forget to remove the keys on the grooves of the shanks on the shafts - approx.).
Carefully remove the dismantled pulleys to the side.
The bolts are marked with a red marker.
Unscrew it as indicated by the arrows.
The cylinder head has been removed and cleaned.
Main signs for dismantling the cylinder head
The manufacturer did not provide any regulations for replacing auxiliary parts of the cylinder head, but there are some signs that will still require dismantling it.
- Presence of mechanical traces on the cylinder head.
- The presence of engine oil or antifreeze leaks at the junction of the cylinder head with the block.
- If white steam comes from the exhaust pipe , this will mean that antifreeze has got into the cylinders and there is no way to do this without removing the cylinder head.
- Emulsion foam on the expansion tank cap indicates exhaust gases entering the cooling system.
- in the coolant - this indicates that the system is not tight.
- on the engine oil dipstick , which tells us that there are traces of antifreeze (antifreeze) in the oil. The work will require removal of the cylinder head.
How to find out if the cylinder head gasket is blown
The greatest difficulty for many car owners is to determine that the cylinder head gasket is the cause of the problem.
To check, follow these steps:
Start the engine and inspect it
Pay attention to the presence of smoke from the gap between the head and the cylinder block itself. During operation there should be no ringing or other suspicious noises that have not previously been observed. Inspect the expansion tank of the cooling system, the container for filling the lubricant and the radiator cap for the appearance of a reddish emulsion
If the lubricant gets into the antifreeze, traces of the emulsion can be seen on the cap of the expansion tank and radiator tank. Check compression in different cylinders. Its sharp decrease may indicate a broken gasket; also read why different compression occurs in the cylinders. Start the engine, let it run and look at the condition of the exhaust gases. The appearance of thick white smoke often indicates damage to the element in question. Pay attention to the smell of smoke. If you use antifreeze in the cooling system, it will be slightly sweet. Check the fluid level in the expansion tank. Its decrease indicates a problem. Measure the engine oil level. If antifreeze gets into the lubrication system, you may notice a rise in the level above the MAX mark. Open the radiator/expansion tank cap and check the coolant for gas emissions. For diagnostics, you can use a rubber glove or bag (we will discuss this in detail later).
Additionally, pay attention to the signs of a broken gasket, which were mentioned at the beginning of the article.