If the car suddenly stops starting, the reason may be a breakdown of the VAZ 2110, 2111, 2112 starter solenoid relay. In order to check its serviceability, you can use the following method. First of all, you need to remove the relay. Quite often this is difficult to do without removing the starter itself, since the fasteners become sour and are inconvenient to work with.
Replacing the starter relay
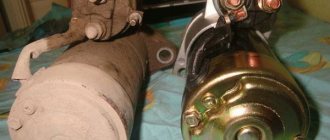
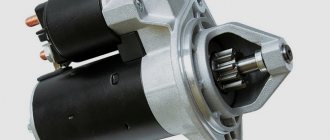
In order to remove the starter, you need to drive onto an overpass or inspection hole and remove the negative terminal from the battery. If a crankcase guard or mudguard is installed, they will also have to be removed. At the bottom of the starter, which is visible from under the bottom, there is a nut that needs to be unscrewed. Then, from the engine compartment side, you need to remove the terminals that are located on the solenoid relay, and one nut that secures the starter itself. Now it can be removed. Next you need to disconnect the solenoid relay from the starter. In different starter models, it is attached in its own way - with two or three bolts. At the same time, it is important not to lose the spring, which can jump out if you disconnect the relay carelessly. It is also worth making sure that the core remains in place - in the starter housing. After the relay is disconnected, you can start checking it.
When replacing the relay on a VAZ 2110, 2111, 2112, it is worth carrying out preventive maintenance on the starter itself. To do this, you need to unscrew the back cover, having previously cleaned it of dirt, and check the brushes and Bendix fork for wear. If you see that the brushes or fork will soon have to be changed, it is better to do it right away so as not to have to crawl under the car and remove the starter once again.
Video of replacing the solenoid relay on a VAZ 2110.
VAZ 2110 - replacing the starter retractor relay
The most common reason why the car starter does not work is a malfunction of the solenoid relay. You can drive your car and not suspect anything, but at one fine moment the car will stop starting, you will need to call friends and start it with a push. To be armed and know the features of the starter, today we will tell you how to replace the solenoid relay on a VAZ 2110 with your own hands.
Symptoms of a malfunction can be different, for example, the relay clicks, but the starter itself does not turn, or it happens that when you turn the ignition key there are no signs of life. To quickly troubleshoot a problem, you need to have the following tools available:
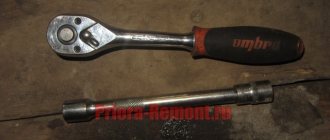
- flat screwdriver; - head 8; - ratchet.
Let us remind you that in the previous article we told you how to replace ball joints on a VAZ 2110 with your own hands. Considering the quality of parts today, replacement is required almost every 5-6 months, so I recommend bookmarking the instructions.
Replacing the starter solenoid relay with your own hands
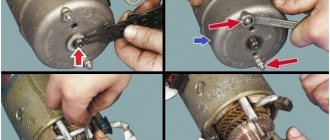
1. You can unscrew and replace the relay without removing the starter from the car, but it is better to do all this with the device removed from the car. When this is done, you need to unscrew the nut securing the terminal to the stud, as is clearly shown in the photo above.
2. Then carefully remove the terminal and move it and the wire a little to the side.
3. Now on the back side of the starter you need to unscrew two bolts using a regular flat-head screwdriver. All this is clearly demonstrated in the picture.
4. Now, without experiencing any difficulties, you can remove the relay by gently pulling it back. If it does not come off, then you need to lift it slightly so that it disengages from the anchor.
5. If it was removed separately from the spring, then it can be removed later along with the anchor.
Device Features
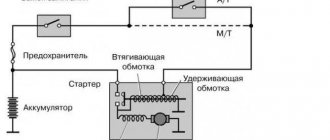
Before you think about how to disassemble the starter solenoid relay, you need to become familiar with the operating principle of this system. To begin with, it is worth understanding that the device runs on battery power. On the other hand, the device is capable of creating a parallel magnetic field, which affects the armature. The return spring is then compressed, which drives the bendix. At the end it connects to the splines that are on the flywheel.
The principle of operation of the element is based on the subsequent closure of the corresponding contacts. At the same time, due to the action of the magnetic field, the armature of the coil is constantly located inside.
When the engine is started, access to power is limited. At the same time, the spring begins to return to its original position, and the bendix disengages. If you are interested in more detail about the operation of the starter solenoid relay, the video on our page will help you figure it all out.
Video on how to repair the starter retractor relay with your own hands:
How should VAZ 2112 retractors work?
Efficiently operating mechanisms that retract the VAZ 2112 are the key to a quick start in any weather conditions. That is why the driver needs to regularly carry out preventive inspections of the unit. A serviceable VAZ starter solenoid relay does not make any extraneous sounds.
If, when trying to turn the key in the ignition switch, the driver hears a series of clicks or creaks, this indicates that they need to start looking for a breakdown. The sooner this happens, the greater the likelihood of not being left without a vehicle for a long time.
Signs of relay failure and their causes
The relay fails due to mechanical wear and jamming, burning of contacts, breaks in current-carrying circuits. The following indicates a malfunction of this unit:
- when trying to start the engine, the starter spins without turning the engine crankshaft;
- an attempt to start the engine is accompanied by a characteristic click without rotation of the starter, or the starter does not develop the speed required for starting;
- After the engine starts running, the starter does not turn off and again operates with a characteristic high-pitched sound.
Reasons for starter relay failure:
- breaking the current transmission circuits to the pull-in and holding windings;
- the return spring has weakened;
- burnt contacts;
- the winding is damaged;
- destruction of the hull.
Monitoring the technical condition of the mechanism
The driver must know how to check the starter solenoid relay himself. Attention should be paid to the appearance of a characteristic sound: when the key is turned, a click appears in the ignition switch. Further attempts to start the car end in a series of clicks and jerks. Signs such as these indicate the need for the following check:
- bridge the 2 copper contacts located on the back cover of the relay;
- the movement that appears will indicate a malfunction of the retractor mechanism;
- at the time of testing, it is necessary to exercise maximum caution, because the solenoid relays rotate at high speed;
- An additional method of control will be to connect the positive connector of the retractor mechanism to the “+” of the battery;
- the second wire connects the ground of the starter and the battery;
- If the retracting mechanisms are working properly, then at the moment the circuit closes, a sharp click is heard.
This is interesting: Test drive Suzuki Wagon R
Further actions of the car owner depend on the nature of the detected malfunction. If the device runs too fast or slow, we are talking about mechanical wear of its individual elements. Retractor mechanisms often fail due to a short circuit. Charred contacts are expressed in a series of clicks, complemented by slow operation of the mechanism.
Planned or emergency replacement of the starter relay is associated with monitoring the technical condition of the starter itself. For preventive purposes, the bolts securing its rear wall are removed. If necessary, the device is freed from accumulated traces of contamination. At the next stage, the Bendix fork and brushes 2112 are checked for physical wear. If any are found, replacement is made.
There is no point in postponing this procedure until later. With further operation there is a high risk of damaging the traction relay. After this, all elements are returned to their place. The rear cover of the starter is closed, and the immediate repair of the starter solenoid relay begins.
Checking with the starter removed using a multimeter
This test of the solenoid relay allows you to very accurately perform internal diagnostics and determine the condition of the windings and contacts. Dismantling the starter, depending on the make of the car, is carried out in various ways. For VAZ 2110, this procedure is carried out from below from the pit. Before unscrewing the fasteners, remove the wires (it is better to mark the terminals so as not to confuse them during assembly); you may need to remove the crankcase protection.
To begin with, voltage is applied from the battery to the body and terminals of the relay; operation is accompanied by a characteristic click and visible movement of the rod. Further checks are carried out using a multimeter, which is switched to resistance measurement mode and the range of 200 Ohms is selected.
Video: Checking the starter removed from the car
First, check the serviceability of the retractor and retention coils. To do this, one of the probes is connected to ground, the second touches the contacts in succession. The device readings are 2 ohms. Deviation of the device readings from the specified value is a sign of a break or short circuit. To check the power contacts, remove the core from the relay body and remove the return spring, after which the core is inserted back. The core rod is pressed against the table with a certain force and the resistance between the contacts is replaced. The resistance is approximately 1.5 ohms.
Restoration of technical condition
Due to physical wear, external influences or manufacturing defects, the starter solenoid relay may need to be replaced. It is not recommended to delay this, otherwise the list of car components requiring repair will expand significantly. To carry out restoration work, an overpass or inspection hole will be required. The first is located in the GSK or at the service station, and the second is present in many garages.
Before you begin troubleshooting, you must remove the negative terminal. If the car has a mudguard or crankcase protection, then they must also be removed. The further procedure is as follows:
- Unscrew the nut located under the bottom of the starter;
- remove the terminals located on the VAZ 2110 starter solenoid relay;
- unscrew the starter mounting nut;
- disconnect the relay directly from the starter;
- when unscrewing the fastening nuts, it is necessary to hold the spring with utmost care;
- After removal, the core is checked - it must remain in the starter housing 2110.
Once the required part is in hand, it is inspected. A wire with a length of 30 to 40 cm will help with this. A direct connection is created between the “negative” terminal of the battery and the exhaust relay. You must make sure that the negative terminal is connected to the corresponding one on the battery. A similar check is carried out with the “positive” terminal.
When power is applied, the retractor element must react immediately.
The gear moves out with a characteristic click. The car owner’s further actions depend on what he sees.
If the power supply to the VAZ 2112 starter actuates the relay, then the problem must be looked for in other components and assemblies.
Otherwise, the solenoid relay must be replaced immediately. At this stage, novice car owners make a common mistake - they forget about the need to check the VAZ 2112 starter relay before replacing it. The procedure is similar to that described above.
The speed at which the engine turns on depends on the efficiency of the small-sized part. In this regard, it is recommended to regularly carry out preventive inspections of this element of the car.
Diagnostics without removing the starter using a multimeter
To do this, use a multimeter (tester) to first sequentially measure the voltage at the terminals of the battery, disconnected from the vehicle’s on-board network. It is approximately 12.7 V. If the device readings are less than 12 V, the battery is considered to be severely discharged and is not suitable for further testing.
Next, restore the normal connection of the wires and measure the voltage at the battery terminals and relay contacts. Compared to the previous case, it changes by no more than 0.1 V and will be equal at both control points. Turn the key to the start position. The voltage at the relay contacts should not fall below 12 V. Otherwise, the connecting wires are most likely faulty; it is possible that one or more contacts in the current flow circuit have burnt out.
Lada 2110 “AGRESSOR” › Logbook › Repair of solenoid relay contacts VAZ 2110
Hi all! I haven’t written anything in the logbook for a long time. And there were no breakdowns. But a week ago I drove up to the store and turned off the car. And after 10 minutes, when turning the ignition key, the car showed no signs of life. A minute of confusion, and I try again, again zero. I went through all the possible breakdowns in my head. I opened the hood, closed the two retractor bolts with a screwdriver, the result was zero. I immediately realized that the starter had come to an end. I had to push it to start it. I drove it into the garage. I removed the starter. I started to unscrew the nut from the 2nd retractor bolt, from which the + goes to the starter. And either the thread is Chinese or I’m a handyman :). As a result, the nut came off with a piece of the stud.
Then I removed the retractor and began disassembling it. I unscrewed 2 bolts. And he began to unsolder the ends from the coil. (When you unsolder, do not pull too hard)
This is the view, without the contact group.
But the contact group itself has become in poor condition over time.
I found contacts from other retractors and chose those marked with a rectangle.
I would like to note right away that if you don’t find the contacts from the retractor, you can buy copper bolts for 6 or 8 at any auto store. I decided to put the bolt at 8 instead of 6. I clamped the body of the contact group and drilled a hole at 8. (Drill with drills incrementally, and not immediately
The next step was to make the shape of the contact, and grind it down a little on top since it was thicker.
He clamped it in a cleat and began to grind it down. I decided to also replace the second contact, since it was also in poor condition.
The finished look of the contacts sits in their places like a glove, I immediately secured them at the back with nuts.
I also decided to clean the contact plate.
I started putting it back together.
I decided to drill through the tin with a small drill so that the wires from the coil could simply be inserted into the holes and then soldered with tin.
Don't forget to put on the rubber seal.
Then I tightened the bolts of the contact group and soldered the coil contacts.
This is interesting: Design and adjustment of the OKA 11113 carburetor
As you can see, everything can be done with minimal repair costs, rather than buying a new solenoid relay for 1000 rubles.
P/S. Please do not write that it is easier to buy a new retractor, etc. It’s more interesting for me to repair it myself than to immediately go and buy a new part!
How it works
Plus, when the contacts on the traction winding are closed, the starter motor is supplied with power from the battery. The contacts are washed out, the blocking is activated, due to which the retractor winding is “cut out”.
The retractor is controlled directly from the ignition switch. Plus it plays the role of starter protection. The fact that the relay will require an impressive amount of current leads to gradual wear of the contacts in the contact group.
This can be noticed by the unclear start of the power unit; periodically the starter may not operate or may rotate the engine slowly. You can solve this problem on your own.
Replacement
In fact, it is theoretically possible to repair the relay. But in reality this is rarely justified in terms of financial and time costs.
A much simpler and more rational solution is replacement. The procedure will not take much time, but the unit will definitely work properly and reliably. It is unknown what the result of the repair will be.
If the relay is incorrectly repaired, this can lead to blocking the start of the power unit. The cost of repairing such a problem is much higher than buying a new high-quality relay.
Replacing and installing a new solenoid relay will not be a problem, since the procedure is performed in the reverse order of disassembly.
Proceed with caution, keeping an eye on each item you take apart and put back together. Clean some contacts, if necessary, tighten loose fasteners. Whatever one may say, as the car is used, it shakes violently and vibrates, which leads to the banal loosening of nuts and bolts. What's most interesting is that this often leads to a whole range of problems. Therefore, make sure that each individual fastener is securely fastened.
Examination
First, it is recommended to perform a check. Now we will tell you how to check the starter solenoid relay on a VAZ 2110.
- We get to the starter itself.
- To the left and slightly below the battery, directly next to the gearbox, is the starter we are looking for.
- The starter and relay, as you remember, are located in a common housing with two terminals. Be sure to ensure that these terminals do not short out.
- Check the voltage limit on the solenoid relay. The maximum value is not higher than 8V.
- Make sure that the temperature at activation does not exceed 25 degrees Celsius. If the number is higher, then don't expect the starter and his defense to perform effectively.
- Some breakdowns are determined visually, so inspect every centimeter of the device in detail and disassemble it.
Repair
After checking the condition of the relay, you can try to repair it, if the price of a new one does not suit you, and you just want to understand the device:
- The device has only three terminals to which wires are connected
- The first terminal is made thinner; the control wire coming from the ignition switch is connected to it
- When you turn the key in the lock, the contacts close and voltage is supplied to the relay windings
- The remaining two terminals have a rough design and are designed for the passage of high current.
- The first is connected to the battery, the second is connected to the starter motor
- The most common malfunction is clogging or burning of nickel contacts
- It is easy to disassemble the relay, and you can overcome simple malfunctions yourself
- Unscrew the bolts and remove the nut and washer from the relay terminal
- Then you should solder the winding leads using a regular soldering iron.
- Please note that there is a gasket under the cover in the housing; it must be handled very carefully, because it is easy to damage
- This gasket serves to protect the relay from dust and moisture.
- Using a screwdriver, remove the contact plate with the rod from the housing
- Carefully inspect the condition of the nickels on the cover, as well as the contact plate
- If you find carbon deposits, you need to use fine sandpaper to rub the nickels until they shine
- If the nickels are heavily worn, it is better to buy a new relay than solder the nickels
Dismantling
The dismantling process cannot be called difficult; even a beginner can handle it. Just follow the given instructions.
- Disconnect the negative cable from the battery.
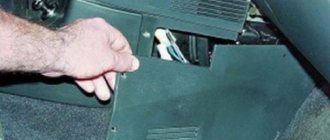
- Remove the air filter.
- Disconnect the set of wires that go to the retractor.
- Remove the nut responsible for securing the tip of the power wire. To do this you will need a 13 key.
- Now it is the turn to dismantle the nuts that hold the starter. Here you need a larger key - 15 millimeters. But if the top one unscrews without any problems, then it will not be easy to get to the bottom one. But it will have to be done.
- Remove the starter.
- Remove the nut of the lower terminal of the solenoid relay and disconnect the wiring.
- Unscrew the relay mounting bolts using a size 8 wrench and remove it completely.
Typical breakdowns
Now let’s figure out how to check the starter solenoid relay on a VAZ 2110. It must be carefully inspected after dismantling.
This unit is characterized by certain breakdowns, which we will talk about.
- The fastening is loose or the nuts responsible for fastening the wire end are completely loose. Everything is simple here, as you understand. You just need to tighten the fasteners.
- Oxidation has formed on the windings, connections or wiring. If everything is not too serious, you can simply clean the contacts. In case of serious oxidation, it is better to replace them with new ones.
- The power supply circuit has breaks. Again, you don’t need to come up with anything fancy, just replace the chain.
- The armature exhibits idle operation or slow operation. Just replace the armature and that's it, problem solved.
- Check the short circuit of the turns of the two windings using an ohmmeter.
Starter mounting diagram and its key features
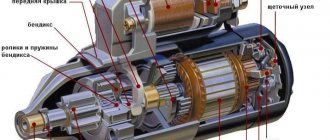
On the Samara, the starter was fixed with three nuts, but on the VAZ 2112 only two are used to secure it. The mechanism body is made of steel, its back and front covers are attached to each other using pins. The Bendix starter gear is covered with a half-cap of the front cover. There is another half cap on the gearbox.
The mechanism is geared, so it has two shafts. On one, the bendix working gear moves; it is called the drive shaft. The second is the armature shaft. Two shafts require four bushings in the design. Naturally, this reduces (and quite significantly) the system’s time between failures.
But on the other hand, a large number of bushings removes the load from the motor of the DC mechanism.
The starter for the “twelve” has rather “modest” geometric dimensions and at the same time produces high speeds very effectively. Its motor is brushed, four-pole, powered by powerful permanent magnets that are attached directly to the body of the device. The starter weighs about four kilograms, at idle it receives about 80 amperes of current, in operating mode - about 375 amperes.