Many owners, at the first malfunction of the starter, change the entire unit, without understanding the causes of the breakdown itself. But in most cases, the reasons for failure are as follows:
- Failure of the solenoid relay - purchased and replaced separately
- Brush wear
- Burning dimes on the retractor relay
Each of the problems listed above can be solved much cheaper than buying a new starter for a Priora. Therefore, first you should contact a specialist who will tell you exactly what the reason is and answer whether it can be repaired or not!
If repair is no longer possible, which is extremely rare, then a replacement must be made. To do this you will need the following tool:
- 13 mm head
- extension
- ratchet or wrench
What does it consist of?
The starter is an electrical machine with a fairly large power consumption.
When starting, it receives power from the battery and is the main consumer that can quickly discharge it. The starter has a common design with a brush-type DC motor.
Its main parts are: stator, rotor, brush holder and brushes, bendix, solenoid relay.
All of them are involved in the operation of the starter and the failure of one element will lead to its complete stop.
Starter circuit for VAZ 2110, 2111, 2112
Starters of type 57.3708 were installed on VAZ-2110 cars and had the following technical characteristics:
- Rated power 1.55 kW
- Current consumption at maximum power no more than 375 Amperes
- Current consumption in the inhibited state is no more than 700 Amperes
- Current consumption in idle mode no more than 80 Amperes
The connection diagram for the starter for the ten is shown above, here is its explanation:
- battery
- generator
- the starter itself
- egnition lock
| 1 – drive shaft; | 20 – contact bolts; |
| 2 – front cover bushing; | 21 – output of “positive” brushes; |
| 3 – restrictive ring; | 22 – bracket; |
| 4 – gear with the inner ring of the overrunning clutch; | 23 – brush holder; |
| 5 – overrunning clutch roller; | 24 – “positive” brush; |
| 6 – drive shaft support with liner; | 25 – armature shaft; |
| 7 – planetary gear axis; | 26 – tie rod; |
| 8 – gasket; | 27 – back cover with bushing; |
| 9 – lever bracket; | 28 – collector; |
| 10 – drive lever; | 29 – body; |
| 11 – front cover; | 30 – permanent magnet; |
| 12 – relay anchor; | 31 – armature core; |
| 13 – holding winding; | 32 – armature shaft support with liner; |
| 14 – retractor winding; | 33 – planetary gear; |
| 15 – traction relay; | 34 – central (drive) gear; |
| 16 – traction relay rod; | 35 – carrier; |
| 17 – traction relay core; | 36 – gear with internal teeth; |
| 18 – contact plate; | 37 – layering ring; |
| 19 – traction relay cover; | 38 – hub with the outer ring of the overrunning clutch. |
Useful tips when using the Lada Priora starter
In order to avoid many starter malfunctions, follow a number of simple rules when operating it: – when starting the engine, turn on the starter for no more than 10–15 s and again after 20–30 s. Continuous operation of the starter for a long time can lead to overheating. If after three attempts the engine does not start, then you should check and eliminate faults in the engine power supply system or in the ignition system;
– after starting the engine, immediately turn off the starter, since prolonged rotation of the drive gear with the flywheel can damage the starter freewheel;
– it is not allowed to move the car using the starter, as this causes significant overload and damage.
Causes of starter malfunction VAZ 2170 2171 2172 Priora
Causes of starter malfunction VAZ 2170 2171 2172 Priora
Ways to eliminate the causes of starter malfunction VAZ 2170 2171 2172 Priora
External signs of a malfunction of the VAZ 2170 2171 2172 Priora starter
Battery is faulty or discharged
Replace, charge the battery
When the ignition is turned on, the starter armature does not rotate, the retractor relay does not operate
Terminals and tips are oxidized
Clean, stretch contacts, lubricate with grease containing copper dust
When the ignition is turned on, the starter armature does not rotate, the retractor relay does not operate
Interturn short circuit, short circuit to ground, break in the traction relay winding
When the ignition is turned on, the starter armature does not rotate, the retractor relay does not operate
Open circuit starter traction relay
Check the wires, connections, check the wire from contact 50 of the starter to the ignition switch
When the ignition is turned on, the starter armature does not rotate, the retractor relay does not operate
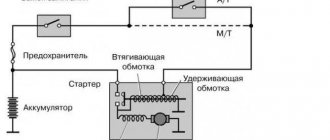
Solenoid relay design
To understand how to identify a malfunction, you first need to understand the design and operating principle of the retractor relay, as well as the starter relay, since they are located in the same housing.
So, there is a housing, inside of which two coils are installed - retracting and holding.
On the one hand, the body is covered with an ebonite or plastic cover. Three terminals for connecting wiring are installed on the outside of this cover.
One of the terminals is intended for connecting the “positive” wire from the battery, the second is for supplying electricity to the starter motor, and the third is for connecting the relay to the ignition switch.
On the inside of the cover there are two contact plates of the “positive” terminals.
Schematic diagram.
Inside the housing with the coils there is an armature, spring-loaded on one side, and a starter relay rod.
On the outside of the armature there is an eyelet, with which it engages with the Bendix fork and gear.
Principle of operation
- When you turn the ignition key, voltage appears on the coil of the solenoid relay, which attracts the core.
- The core pulls the bendix out of the starter housing and engages it with the flywheel.
- As soon as the bendix engages the flywheel, a short circuit occurs, voltage is applied to the brush holder and causes the starter rotor to rotate.
- The rotor begins to rotate the bendix through the gearbox, thereby rotating the engine crankshaft and starting it.
- As soon as the engine starts, you release the ignition key, the voltage disappears on all elements of the starter and the retractor, under the influence of the return spring, disengages the bendix from the flywheel.
Possible causes of failure
The starter overrunning clutch consists of a small number of parts, so there can be several causes of breakdowns. The inner rollers wear out most often. Reducing the diameter of these parts makes it impossible to reliably engage the moving elements. Sometimes, flat surfaces can form on the rollers, which also interfere with the normal operation of the clutch.
All working surfaces that engage are subject to wear over time. Such malfunctions of the starter bendix are natural, but if they are present, the part cannot be restored.
Basic faults
The starter has several basic faults that occur quite often.
- Battery;
- Solenoid relay;
- Brushes;
- Bendix;
- Rotor and stator windings;
If the starter does not rotate or clicks appear when you turn the ignition key, then the battery is most likely discharged. If the battery is charged, you should check the condition of the marks on it. Poor contact or oxide on the stamps will interfere with starting the car, since the starter requires a large current to rotate the engine, and weakening the contact of the stamps or their oxidation will increase the resistance, which will make it impossible to start the internal combustion engine.
Replacing a starter on a Prior
Welcome! The starter spins the engine of the car and it starts after that, if the starter fails, then you will only have to push the car, which is very inconvenient and not every situation will allow you to do this, so this unit is one of the main elements of the car engine, without which it would be very difficult to it will be hard.
Note! To replace the starter, you will need to take: Spanner wrenches (They are most convenient to use) or wrenches, if you don’t have spanners in your tools; in addition to this, you will also need screwdrivers and pliers!
Summary:
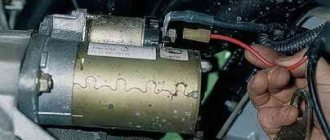
Where is the starter located? It is located in the engine compartment and enters the clutch housing and is secured to it with nuts, since the clutch is located where the gearbox is (And this is at the bottom), then accordingly you will need to look for the starter there, you can see its more detailed location in two photographs which are located just below:
When should you replace the starter? When the starter fails, the car stops starting or starts, but does so with great difficulty, the symptoms are as follows: Repeated activation of the starter (It will either catch or not), a common symptom, the starter will spin (You can hear it doing this), but the engine will not it starts at the same time (the starter spins at idle), you can also hear increased noise when the starter is running, and all these symptoms do not mean that the starter needs to be replaced, for example, if we take the first symptom:
1. The starter either works or doesn’t - often this reason is a poorly charged battery, try to charge it and perhaps this problem will go away, if charging the battery did not lead to anything, then in this case, either look at the starter traction relay (It may come to unusable), or inspect all the wiring, if traces of oxidation, corrosion, etc. are found on it, then in this case, clean the wiring (It has poor contact) and perhaps everything will return to normal.
2. Now let’s look at the second symptom - the starter turns, but the engine itself doesn’t even move, it’s very easy to understand, and to be 100% convinced of this, it will be enough to engage any gear and start starting the car, if the car doesn’t jerk and the starter doesn’t. spinning, then the whole reason is in it and it will either need to be changed or repaired (In this case, most likely the starter freewheel is dead, besides it, the flywheel crown may also be worn off or the starter drive has died, the first and third parts cannot be replaced very easy, but still possible; if there is a problem with the crown, then the flywheel will need to be removed and the crown replaced with a new one).
What is a starter relay
The mechanism is designed to supply power to the electric starter motor. At this moment, charge is transferred from the battery. Simultaneously with the supply of energy, it performs the function of pushing out the bendix, while the element engages the flywheel.
The starter relay on the VAZ-2112 determines whether the main mechanism will start and the engine will fire or not. If suddenly this device fails and does not turn on, you need to diagnose and repair it.
To do this, you should study the detailed operating instructions and find out where the starter relay is located on the VAZ-2112.
Device
The part looks like a small square box with four connectors. It consists of an armature in a housing containing an electromagnet with a winding. Its operation is ensured by electrical contacts and return springs.
The electromagnet is represented by two independent coils with holding and retracting independent parts. The first of the devices is docked with the housing and connected to the control input. The retractor coil goes to the control terminal and communicates with the starter motor.
Principle of operation
The relay is necessary to start the engine system, so it was built into the fuel pump. When power is applied to a contact communicating with the control, electromagnetic induction appears inside the coil. This occurs under the influence of current, through this process a magnetic field is created. The attraction of the armature contributes to the compression of the return spring.
At the same time, the bendix is pushed out, which connects the engine and starter using a flywheel. The positive terminal supplies power to the pull-in winding. In this case, the contacts are closed to each other.
At this time, the armature is located inside the coil, in which the magnetic field ceases to be generated. When the power plant starts, the power is turned off, and the armature is sent to its original position using the return force. The contacts open.
During this process, the bendix stops interacting with the flywheel.
Structural features
Drivers call a device such as a starter a starter, as it helps to start the car. It is practically no different from similar mechanisms.
However, if you need to purchase a starter relay for a VAZ-2112, then you need to remove the part from the car and take the store with you. This element differs from similar ones in size.
You can purchase a device from the VAZ-2111 or 2110 models, as it is completely identical.
On the twelfth model of the Zhiguli, the installed starter is of modest size. However, this small device is very functional. The technical documentation describes how the structure of the mechanism differs and where the VAZ-2112 starter relay is located. In the photo you can see the main and additional blocks.
These cars were equipped with injection power units with 16 valves. To prevent electrical current fluctuations, a relay is used.
When the electrical circuit is turned on, this device passes current, gradually equalizing the voltage to a value of 80-340 amperes. This scatter of indicators is explained by the fact that the relay produces the first parameter in a resting state, and the second in operating mode.
As soon as the vehicle stops, this circuit opens and the circuit shuts down.
Where is the VAZ-2112 starter relay located?
In order to diagnose or repair this mechanism, you need to find a small cover at the bottom of the torpedo. There is a special button for fixing, which folds down.
You can study the diagram attached to the instruction manual. It is marked there where the VAZ-2112 starter relay for 16 valves is located. If you are going to remove or replace this element, you need to carry out the repair and then install all the spare parts in the reverse order.
It is recommended to use the instructions from this block.
Looking at the VAZ-2112 starter relay in the photo, you can see that additional safety devices were installed on top of the block. They were intended to protect a specific group of devices. However, the default starter relay is on the right side second in line when viewed from above.
How to check device operation
When any devices on the car stop working, the driver should first check the serviceability of the fuses or the relay circuit. After a complete diagnosis has been carried out, it will be possible to draw a conclusion about what exactly has become faulty and how to fix the problem. Diagnostics are performed in the following order:
- Take two small wires 35-45 cm long and connect them to the battery
- Directly connect the wire coming from the negative terminal of the battery to the relay, taking into account the polarity. Do the same with the wire that comes from the terminal with a positive charge.
- After connecting the VAZ-2112 starter relay, make sure that the relay has retracted the core, and a characteristic click should be heard
- If retraction does not occur, then the relay is faulty.
- short circuit of the negative terminal;
- clogged contacts
- malfunction of the armature on the solenoid relay;
- winding burnout;
- broken wiring.
When the diagnosis has been completely carried out and the cause of the breakdown has been identified, you need to replace the old relay. In this case, it is recommended to inspect the starter and perform its maintenance for preventive purposes.
To do this, unscrew the back cover after all the dirt has been cleaned from it. Then the condition of the Bendix brushes and forks is determined.
Experts advise inspecting the starter regularly so that it does not fail somewhere along the way.
Causes of breakdowns
The most important reason for the malfunction of the VAZ-2112 starter relay is the burnout of the contact plates located inside. Other breakdowns that also often occur in this mechanism include:
Article and price
Below is a table with the article number and cost of the original starter and its analogues.
| Factory models | |||
| Manufacturer | Power, kWt) | vendor code | Price (Rubles) |
| AvtoVAZ | 1,4 | 21100370801002 | Up to 4000 |
| AvtoVAZ | 1,8 | 5702370815 | Up to 4100 |
| Good analogues of factory models | |||
| Lauber | 1,4 | 221182 | Up to 6200 |
| Bosch | 1,4 | 986023780 | Up to 7300 |
| Bosch | 1,8 | 1108203 | Up to 11000 |
| Motorherz | 1,8 | STB1182WA | Up to 4800 |
Replacement
Work on removing and installing the starter can be carried out without a higher education as a mechanic. Using the step-by-step instructions below, anyone who has ever held a key in their hands can cope with the task.
Necessary tool
- Phillips and flat head screwdriver
- Ratchet, extension and socket for “13mm” and “15mm”
- Open-end wrench for “10mm” and “13mm”
- Penetrating lubricant (WD-40)
- And the desire to repair your own car with your own hands.
Step-by-step replacement instructions
Work can be carried out both from the inspection hole and from above. We will consider the option of doing the work from above, as it is simpler and more convenient. And not everyone has an inspection hole.
- First of all, disconnect the negative terminal of the battery and remove the air filter housing along with the mass air flow sensor.
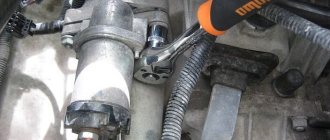
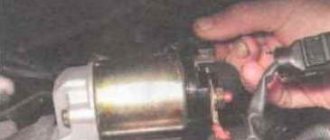
- Then, on the solenoid relay, use a 13mm open-end wrench to unscrew the power wire and remove the “mother” chip from the relay (marked with red arrows in the picture).
- Using a ratchet with a 13mm socket and an extension, unscrew the two starter mounting nuts. Below and above.
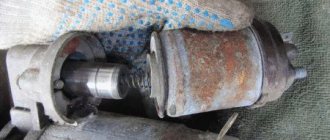
- Next, we remove the starter from the engine compartment and inspect it.
- We install it in the reverse order and check its functionality by test running the car.
Replacement from under the bottom of the car is similar to the instructions outlined above, but only to carry out work from an inspection hole or overpass it is necessary to remove the engine crankcase protection.
Required Tools
In order to carry out repairs yourself and replace the starter on a VAZ 2112, you need the tools from the table below.
Table - Tools required to replace the front strut
| Name | Note |
| open-end wrench | "at 13" |
| Spanner | "at 13" |
| Head | "at 15" |
| Ratchet | With extension |
| Rags and wire brush | To clean dirt |
| Penetrating lubricant | For example, WD-40 |
How to replace the starter on a VAZ 2170-VAZ 2172?
Removal: The starter belongs to the electrical part of the car, therefore, during any work with it, you need to de-energize the battery by removing the minus terminal from it (How to remove the terminal, read the article: “Replacing the battery on a car”, point one), after this has been done operation, remove the air filter housing, as it prevents access to the starter (How to remove the housing is described in the article entitled: “Replacing the air filter housing on a VAZ”) and proceed to unscrew the nut (Indicated by the red arrow), securing the wire terminals and disconnect the terminals, then disconnect the wire block (Indicated by a blue arrow) from the terminal that is present on the starter and unscrew the two nuts securing the starter to the clutch housing, one of these nuts is indicated by a yellow arrow in the photo below for clarity:
Installation: Installation of a new electrical element is carried out in the reverse order of removal, the wires are connected exactly to the same places where they were.
Additional video clip: An interesting video is located just below, it tells what advantages a new starter installed from another company gave, and you can clearly determine this even from the video clip.
Source
Instructions for removing and installing the starter:
1. First of all, disconnect the wire from the battery at the “–” terminal.
2. Dismantle the crankcase on the engine.
3. Next, from the top of the engine compartment you need to unscrew one nut that holds the starter mount.
4. The wire must be disconnected from the traction relay terminal at the bottom of the machine.
5. Unscrew one nut from the contact bolt of the traction relay and disconnect the wire.
6. The starter is secured from below with one nut, which should also be unscrewed.
7. Now calmly remove it and do the repairs. A new or repaired starter should be installed in the same way as it was removed, only in the reverse order.