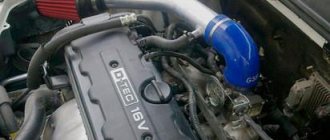
Engine performance depends on the quality and quantity of the fuel-air mixture, which is prepared by a special device - a carburetor. The carburetor creates the mixture and distributes it evenly to the cylinders. There are different ways to mix the fuel mixture with the air flow. For example, there are float carburetors and membrane-needle carburetors. Carburetors of the VAZ family, produced by the Dimitrovograd Plant (DAAZ), are classified as the first type - float-type.
Correct adjustment of the VAZ 2107 carburetor is, first of all, about the engine in working condition and fuel economy.
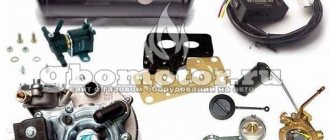
Basic design of DAAZ parts for classic VAZ models
The operation of any automobile internal combustion engine directly depends on the quality and quantity of the mixture of fuel and air. This very mixture is prepared directly by the carburetor. In addition, this device evenly distributes the mixture throughout the combustion chambers.
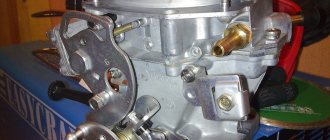
The carburetor (VAZ 2107 DAAZ) consists of several main parts. This is a diffuser, a throttle valve, as well as a jet and a float chamber.
Signs of carburetor problems
Dust, contaminants and foreign particles that enter the carburetor with fuel and air settle on the internal walls of the channels, of which there are many in the design of the unit, which leads to malfunction. The carburetor design includes a number of components, the components of which wear out and become damaged over time, which affects its performance. Signs indicating a carburetor malfunction:
- Difficulty starting the engine;
- Decrease in acceleration dynamics;
- Jerks, failures during acceleration;
- Unstable idle speed;
- Unauthorized stop of the engine;
These signs are also given by other engine systems (the same ignition system), but if the carburetor has not been serviced for a long time, then the reason for poor engine performance lies in this unit.
Device types
If the car has an old engine, then such cars are equipped with DAAZ 2107 - 1107010 carburetors. With new engines and a vacuum corrector, a new model or modification is used. This is the DAAZ 2107 1107010-20 model.
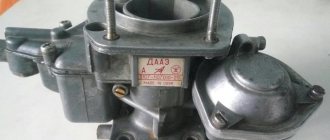
These products are produced at the Dmitrovgrad Automotive Units Plant. This company has been producing various equipment for classic VAZ models for many years. DAAZ 2107 (carburetor) has earned special trust among drivers as being quite reliable.
Carburetor Types
Before you begin adjusting the carburetor, determine what type of carburetor is installed on the engine. It's quite easy to do this:
- If there is a vacuum corrector on the ignition, this means that you have the latest type of engine 2106 or VAZ 2103, and a carburetor modification 2107 - 1107010-20.
- If your VAZ 2107 car has a six engine, but no vacuum corrector is installed, then this modification of the carburetor is 2107-1107010-10.
Carburetor components that need to be adjusted:
Before adjusting the carburetor, you need to determine the main signs of its malfunction. Since this engine unit is responsible for the vehicle’s acceleration dynamics and fuel consumption, these include the following:
- difficulty starting the engine, long “shots”;
- sluggish car acceleration;
- all kinds of “jerking”, “jerking”, “failures” when pressing the gas pedal;
- increased gasoline consumption.
So, if your seven has the corresponding signs, you need to start adjusting it.
Attention! It is better to make adjustments with the carburetor removed. When adjusting the VAZ 2107 carburetor, do not use woolen or fleecy fabrics, and do not clean the jets with a wire, just blow them out.
First of all, the float system is adjusted, it’s more convenient.
Complex and high-precision device
A carburetor is a complex device consisting of many different components. But the complete device is necessary only for those who professionally configure and adjust these devices.
However, despite all the difficulties and a large number of details, let’s take a closer look at how this device works.
So, what kind of device does the DAAZ 2107 1107010 carburetor have? This device consists of a float chamber into which fuel flows in limited quantities. The access to gasoline is closed by a needle valve, as well as a float, which in appearance resembles a barrel. Gasoline is mixed in a special mixing chamber. The carburetor also consists of a throttle valve as well as an air valve. In addition to them, the device also includes jets. The fuel is atomized through a sprayer. One of the important components of a carburetor is diffusers. They work like nozzles and create an air flow configuration.
Why do I adjust the carburetor myself?
Self-adjustments save money and time. There are types of work that cannot be done with your own hands without special equipment. But I am capable of servicing a carburetor, which does not have a complex design.
Therefore, I am happy to do this process myself, without outside help. After correct adjustment, there is a feeling of pride and satisfaction for the result obtained. My car runs like a clock, which is nice.
Source ru.megasos.com prosedan.ru vipwash.ru mylada.net make-1.ru
DAAZ 2107 carburetor: operating principle
When fuel enters the float chamber, the volume of fuel is regulated by the float. If it floats up, the needle mechanism will block the access of gasoline to the chamber. So, the camera in this case resembles a toilet cistern. Everything is the same here. But fuel is not supplied immediately. First it will go through a special filter to clean it.
Next, the device supplies flammable liquid to the first and second fuel chambers. The DAAZ 2107 carburetor (device) provides for the presence of main fuel jets through which fuel passes.
In addition to gasoline, air is supplied to the chambers through air jets, which has previously been cleaned in air filters. The air then forms a mixture with gasoline using special tubes and wells. Thus, a so-called emulsion is obtained.
But that is not all. Before entering the combustion chambers through a spray, the mixture passes through an econostat. Here the mixture undergoes additional enrichment.
Next, using sprayers, the mixture enters the diffusers. This is where the final preparation of the mixture takes place. The carburetor of the VAZ 2107 car (DAAZ produced by DAAZ) is designed in such a way that fuel droplets in the diffusers are drawn into a high-speed air flow. Thus, the air-fuel mixture enters the center of the mixing chamber.
The gas pedal on VAZ cars regulates the position of the throttle valve, which is designed to supply the mixture directly to the engine cylinders.
What else is special about the DAAZ 2107 carburetor? Its design includes idle jets. In this mode, the mixture is taken only from the first fuel chamber. The principle and scheme of operation of the fuel chambers activates the second chamber only when the engine reaches operating temperatures. Camera II also turns on if you need to quickly gain momentum and high speed.
Carburetor 2107 malfunctions, diagnosis and repair
As you know, the carburetor must be cleaned periodically. It is advisable to perform cleaning every 20-25 thousand km. It is necessary to clean the internal channels, as well as the metering elements of the carburetor. In the case when the engine is unstable, the carburetor needs to be tuned and adjusted in parallel, that is, the composition and quantity of the mixture is adjusted.
At the same time, you should not immediately try to correct the situation with screws of quantity and quality. Carburetor adjustment is done only after it has been cleaned and/or repaired. You should also check the ignition system and spark plugs, the quality of the fuel pump, and assess the condition of the engine itself.
If all systems are normal, signs of carburetor malfunctions are as follows:
- the engine starts and stalls when cold;
- no idle speed, you have to apply gas;
- dips occur during sudden acceleration;
- the spark plugs are flooded, there is black carbon on the spark plugs, black smoke is coming out of the exhaust pipe;
- increased fuel consumption, loss of traction and power;
These symptoms can appear either individually or in combination. In this case, the car almost always loses traction and consumes a lot of fuel, since you have to press hard on the gas. Black exhaust indicates an over-rich mixture being prepared by the carburetor. Driving with such a mixture “kills” the CPG, so the carburetor needs to be repaired.
To repair and adjust the Ozone carburetor, you need screwdrivers (flat and cross), pliers with thin jaws, open-end wrenches 6 and 13 mm, thin sticks (toothpicks) and clean rags. An aerosol for cleaning the carburetor (carbicleaner), a mixture of diesel fuel and solvent (White spirit) is well suited for washing. You also need to separately purchase new cardboard gaskets, etc.
At the same time, it is better not to take carburetor repair kits (especially cheap ones), since the jets there are often not calibrated. In fact, the factory jets are simply dirty and require cleaning, not replacement. It is also good to have a compressor that presses air at 6 or better yet 8 bar.
- So, if the engine does not start or often stalls, you need to check the starter membrane on the cover. The membrane needs to be changed, and the o-ring may also fail.
If the engine starts only with the gas pedal pressed, this indicates that there is not enough fuel in the float chamber. The fuel pump may also be problematic.
The engine starts with difficulty when hot, the smell of gasoline is heard, and there is a popping noise in the air filter housing. This indicates a high fuel level in the float chamber, there is a lot of gasoline in the inlet, the spark plugs are flooded.
In this case, the starting device may often not work due to the fact that the cable has come off. Even with the choke extended, the engine “chokes” because the air damper does not work or does not completely close the chamber.
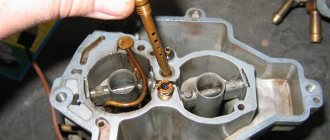
To check the fuel level in the float chamber, remove the air filter and the top cover of the carburetor, and also disconnect the gasoline hose. Next, you need to turn the element over with the float up and measure the distance to the plane of the cover. Normally it should be 6.5 mm, while the float stroke length is 7.5 mm. To adjust the necessary parameters, you need to bend the brass tabs (limiters).
The needle shut-off valve, which is located on the bottom plane of the lid, can also be problematic. The valve is connected to the float blade. If otherwise, the float is set normally, but the gasoline level is high, then the culprit is the needle valve.
To check this, just shake the pipe, removing the fuel, then turn the cap with the float up and draw air from the fitting with your mouth. If the valve is sealed, air cannot be drawn in.
- Now let's look at the idle problem. To adjust, use a flat-head screwdriver to unscrew the idle air system fuel nozzle on the right in the middle part. Next you need to blow it out and put it back. If this does not solve the problem, you need to remove the air filter and cover.
Next, on the platform of the middle part, you need to find two bronze bushings, which are pressed into the channels. These are the air jets of the idle system and the transition system. They also need to be cleaned with a toothpick and blown out.
If these actions do not produce results, then the fuel nozzle must be unscrewed and the cleaner must be poured into the hole. After 10 minutes, blow out the channel with air from the compressor.
We also note that in the DAAZ 2107 - 20 carburetor the cause of the problem may be the electric valve, which is located instead of the jet. To solve the problem, the jet in the valve is removed and a wire is connected. After this, you need to turn on the ignition and bring the body to ground. A sign of a problem with the valve is that the stem does not retract.
In order for XX to appear in the event of a valve malfunction, you can remove the inner rod with the needle, then insert the jet and put everything back in order. This will allow the fuel supply hole to remain open, regardless of whether the valve is working or not. The idle speed should return to normal.
In a situation where all the above actions do not help, you will need to clean the channel in the block where the throttle valves are located. To do this, you need to remove the quantity screw and the flange by unscrewing a couple of bolts. Next, the cleaner is poured into the cavity. Afterwards assembly is done in reverse order. In this case, there is no need to rotate the screw for adjusting the amount of mixture inside the flange at the bottom.
Acceleration failures and loss of power: VAZ 2107 carburetor adjustment and repair
To understand the reason, the air filter housing is removed, after which you need to jerk the primary throttle rod with a sharp movement. At the same time, you need to monitor the sprayer in the chamber. Normally there should be a long stream, directed and powerful. If there is no pressure, then the accelerator pump needs to be repaired.
First, place a clean rag under the diaphragm flange on the right wall of the float chamber. Next, the four screws that hold the cover and lever are loosened and removed. Then you need to carefully remove the part (make sure that the springs do not get caught). Fuel from the chamber will begin to flow onto the placed rag.
After unscrewing the accelerator pump cover, you need to remove the membrane and make sure that it is intact. If defects are visible, the membrane requires replacement. You also need to remove the top part of the carburetor, after which the screw of the spray nozzle is unscrewed with a flat-head screwdriver. The hole needs to be blown out and cleaned. By the way, the pump nozzle itself is attached with a screw to the upper plane of the middle part.
In the case when the sprayer works normally, but the stream is short, this indicates that the ball check valve (located on the side of the float chamber) has failed. Use a thin (flat) screwdriver to unscrew the plug screw, then move the ball in the well. This can be done with an awl. Then a cleaner is supplied into the hole, and contaminants are blown out with air.
Let us also add that if the dips are not strong, this is often the result of the fact that the jets of the transition system are clogged. Also clean these elements (unscrew the screw from the back of the case and blow out the holes). The screw holding the adapter system nozzle is located on the right side of the wall of the middle part of the device.
Let's move on. If ENGINE power has dropped, this usually indicates that the unit is low on fuel. The reason may be:
- low level of gasoline in the float chamber, and clogging of the mesh filter at the inlet to the carburetor. The mesh is located in a nut, which is located on the lower plane of the cover;
- dirt in the main fuel jets, as well as failure of the large membrane, which is responsible for opening the throttle of the second chamber of the carburetor.
To clean the mesh, just unscrew the nut under the gas line fitting with an open-end wrench. Then you can remove the filter and temporarily plug the hole with a clean rag to prevent fuel from leaking.
Please note that the main fuel jets are installed at the bottom of the gasoline chamber (at the bottom). To gain access to them you need to remove the top part. It is important not to confuse the elements when reassembling them. Follow the markings, the marking of the primary chamber jet is 112, and the secondary one is 150. This means that the parts are not the same. And note again that the air jets are located on the flange of the middle block.
Another point is that the vacuum drive diaphragm may be worn out. To determine, remove the cover (unscrew three screws). Now you can check the rubber membrane. Special attention is paid to the O-ring in the hole on the flange. To replace parts, you must first disconnect the rod from the secondary throttle shaft.
Also, insufficient supply of the working mixture may be due to the fact that the emulsion tubes are dirty. To check, the main air jets on the upper flange of the middle part are turned out, the tubes are removed from the wells (use tweezers or a paper clip).
By the way, unlike fuel jets, air jets can be installed in any order, since on the DAAZ 2107 they are all the same and are marked 150. Only the DAAZ 2107–10 differs in that the primary chamber jet has a larger hole (marked 190).
Adjusting the DAAZ 2107 carburetor: high gasoline consumption
In the case when the spark plugs are flooded and the exhaust is black, then you need to start the internal combustion engine, warm it up and let it run at idle. Then, using a thin (flat) screwdriver, you need to lightly tighten the mixture quality screw, while counting the revolutions.
When the screw is fully tightened but the engine continues to run, this indicates that gasoline is being drawn through the main diffuser. If this is not the case, then you should check the gasoline level in the float chamber.
At the initial stage, the carburetor does not need to be disassembled. It is enough to first start unscrewing all the jets, as well as the adjusting screws, then pour the cleaner into the channels. Afterwards, you need to blow everything out with compressed air, then put the removed parts back and screw the quality screw back to the position in which it was originally.
If this does not give anything, then the carburetor needs to be removed. The vacuum and gasoline pipes are disconnected, the choke cable and the gas pedal rod are disconnected. After using key 13, the nuts are unscrewed, the carburetor is removed from the manifold and disassembled into three main parts (upper, lower, middle).
At the same time, the vacuum drive is removed, as well as the rods that connect the suction pump to the throttle assembly. By the way, the throttle valves should tightly close the chambers. This can be checked by looking at the bottom block in the light. If cracks are visible, the dampers will need to be replaced.
You will also need to remove the membranes, jets, and emulsion tubes. First, all channels need to be washed with a cleaner, and then filled with diesel fuel. Afterwards it is necessary to blow it with a compressor for thorough drying.
An even higher fuel consumption may occur if the settings of the damper support screws are incorrect. In fact, in this case the throttle opens a little, fuel is drawn in through the cracks.
Once everything has been cleaned and inspected, the bottom flange of the middle section should be trimmed before reassembly begins. Often during operation the flange bends due to high temperatures. To solve the problem, you need to grind it in with a grinding stone. The final step is to reassemble the carburetor, and the cardboard gaskets must be replaced.
Differences in modifications
As you know, the latest models of VAZ 2107 and other versions are equipped with a new carburetor DAAZ 2107 1107010 20. Let's see what the difference is between this modification and the old carburetor 1107010.
According to information received from AvtoVAZ specialists, these two modifications are based on the same model. Here the fundamental difference between them is the economizer for forced idling. Model 1107010 has EPHH, and the new modification is not equipped with this unit.
Although the DAAZ 2107 20 carburetor was not equipped with an economizer, it is equipped with a special nozzle for supplying fuel. The difference is that here the idle speed is controlled by a solenoid shut-off valve. So, if the ignition is turned off, the fuel supply is cut off.
Setting the carburetor choke
How much trouble does incorrect carburetor choke adjustment bring to drivers, especially in winter. In some cars, you pull the choke all the way, but the engine does not hold speed, you have to hold the gas pedal until it warms up. For others, on the contrary, you pull the choke to the end, and the engine screams like crazy, although during warm-up such high engine speeds are unnecessary.
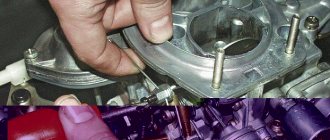
The whole point is that the lever for forced opening of the carburetor throttle valve is incorrectly adjusted when the choke is pulled.
All this is easy to fix; in the photo above the arrow shows the thrust for forced opening of the throttle valve at the moment the choke is pulled out. If the engine does not hold speed, then it is possible that the rod is on the lower hole of the throttle lever; the photo shows two holes for the throttle rod. Move the rod into the upper hole of the lever.
If the engine is spinning very quickly on the choke, then use pliers to slightly bend the rod shown by the arrow; it bends easily without removing it from the carburetor; if the engine speed is low, straighten this rod. In this way, you can easily adjust the desired engine speed when starting on choke.
Setting the choke engine speed in a VAZ 2108 carburetor is even simpler; the photo above shows boot 3; by tightening it, the choke engine speed will increase, and unscrewing it will decrease.
I hope that after reading this article, you can easily adjust the carburetor on your car yourself.
Basic faults
In order to make adjustments, you need to know several typical faults. Since this unit is responsible for dynamic characteristics, breakdowns include:
- Problems starting the engine, engine sneezing.
- Jerks, jerking, frequent failures on the accelerator pedal.
- Lack of overclocking options.
- Increased fuel consumption.
So, if while operating your car you were able to detect one or more faults from this list, then the part needs repair.
You need to know that the maximum adjustment of the DAAZ 2107 1107010 carburetor is possible only with the unit removed. The process does not involve cleaning this device with lint or woolen rags. You also won’t need any wires to clean the jets.
When making adjustments yourself, you must first remove the cover from the assembly. Then you can proceed to adjusting the float chamber. It's comfortable.
Adjusting the float chamber
The float has free movement. The stroke size should be between 6.5 mm on one side and 14 mm on the other side. The stroke is adjusted using a special template.
If your chamber has a smaller distance, you will need to bend the needle valve tongue slightly.
Now you can adjust the operation of the needle valve. When the float rises, less fuel flows. If the throttle valve opens, the fuel consumption is higher and the float moves down. To adjust the float on the other side, you need to move the float back as far as possible and use the same template to check this parameter. If the distance is not 14 mm, then the fastening stop should be bent.
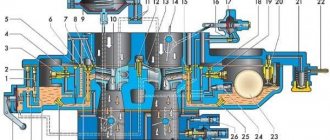
↑ Carburetor control drive diagram 2107-1107010
1 — air damper control rod handle; 2 and 17 - seals; 3 — air damper drive rod; 4 and 14 — return springs; 5 — return spring fastening screw; 6 — transverse thrust; 7 — intermediate lever; 8 — longitudinal thrust; 9 — rod fastening bracket; 10 — bracket for mounting the roller; 11 and 13 — levers; 12 - roller; 15 — lock washer; 16 — throttle valve control pedal.
Setting up the launcher
Adjustment includes the process of adjusting the starting device. For older devices, it operates at a frequency of 1500 rpm. If you examine the DAAZ 2107 (carburetor for the “seven”) from the other side, you can see a special channel. If you remove the assembly and inspect it from behind, you can see the air supply channel.
To adjust, you first need to remove it. Then you need to turn the lever so that the air damper is completely closed. Next, you should turn the device over, and then measure the gaps between the damper and the wall. For our carburetor, the gap should be 0.85 mm. To adjust the gap to the required size, it is necessary to bend the drive rod.
Next you need to adjust the gap A. You can find it between the wall of the channel and the edge of the damper below. So, you need to close the damper and recess the starter rod. As a result, it will open, and the gap should be from 5 to 5.4 mm. To adjust, you need to turn the adjusting screw with a screwdriver.
Setting up idle speed
First, you should make sure that the ignition adjustment is correct. The engine must be at operating temperatures. To adjust, you need to rotate the fuel mixture quality adjusting screw until the engine speed reaches maximum.
Next, you need to rotate the fuel quantity screw counterclockwise. An even higher speed should be achieved.
Now it’s worth turning the quality screw to add a little more speed.
The point of these operations is to ensure that the quality of the mixture is minimal, and the idle speed is from 850 to 900. These are the most optimal values for carburetor engines of cars of the “Classics” family. You should not make revolutions more or less than this value, as they will be considered unstable and will entail increased wear of the crankshaft parts.
We looked at several possible adjustment methods that you can do yourself. But if you are not confident in your actions, it is better to entrust your DAAZ 2107 (carburetor from the “seven”) to a specialist who is well versed in them.
The engine in a car is the most important unit. However, it will not start without a working carburetor. Even a slight inaccuracy in the adjustment of this device will be enough for the driver to experience serious problems. But many troubles can be eliminated on your own, without resorting to the expensive services of mechanics from a car service center. Repairing a DAAZ carburetor is quite feasible in a garage.
Freddy-V8 › Blog › Carburetor adjustment Ozone 2105 and 2107 (modified 07/19/2018)
08/16/2015
Hello everyone!
This post will provide recommendations for setting up the Ozone 2105 and 2107 carburetor for normal operation. The overall success of carburetor tuning lies in the identified serviceability of the associated engine systems. These systems include spark plugs, ignition coil, distributor contacts or hall sensor and switch, phases and clearances in the gas distribution mechanism. The carburetor itself must be technically in good working order. If there is a blockage in the carburetor channels or another factor affecting its proper operation, then it is not recommended to proceed with adjustments. Our tuning example includes a completely washed and blown carburetor, but with incorrect settings of the jets, positions of the adjusting screws and float.
Adjusting the float
Remove the top carburetor cover and place it in a horizontal position with the float up. Measure the gap between the float and the carburetor gasket. The gap should be 4.5 mm. Place the carburetor cover in a horizontal position with the float down.
Measure the gap between the float and the carburetor gasket. The gap should be 12.5 mm. The float stroke should be 8 mm. The distance from the gasket to the bottom edge of the float should not be greater than the depth of the float chamber. The float must not touch the bottom of the float chamber. Adjustment of the float stroke is carried out by its two stops by bending them. Setting the initial position of the throttle valve 1 of the chamber
Screw in the throttle stop screw until the screw begins to touch the throttle stop lever.
After touching the screw, turn the screw 90 degrees clockwise. When tested against light, a thin ring of light should be visible. Setting the initial position of the throttle valve 2.
Screw in the throttle stop screw until the screw begins to touch the throttle stop lever.
After touching the screw, turn the screw 0.5 - 1 degree clockwise so that the screw supports the damper lever, but does not open it. The groove for the screwdriver on the screw must be aligned with the mark on the screw seat. When checking for light, the light ring should not be visible. Adjusting the fuel quantity screw
Adjusting the additional air supply screw
Adjusting the EPHH valve
The EPHH valve must be screwed into the mounting hole until the EPHH nozzle touches the limiter.
This moment can be determined by lubricating the rubber ring with oil and observing the contact of the ring with the mounting hole. The valve must not be overtightened. An overtightened valve may become faulty. Adjusting the carburetor with the engine running
Start the engine.
Adjust the operating speed of the crankshaft using the quantity screw and increase it by 200-400 rpm. Set the position of the throttle valve of the first chamber with the stop screw, by turning the screw 90 degrees counterclockwise, so that the engine does not stall, but runs at a minimum number of revolutions. The groove for the screwdriver on the screw must be aligned with the mark on the screw seat. Adjust the number of revolutions with the quantity screw to 800-850 rpm. Setting the idle speed without instruments
- Use the quantity screw to set the idle speed to 850 rpm.
— Use the quality screw to set the maximum speed to XX. — Use the quantity screw to raise the speed by 100-120 rpm. — Use the quality screw to lower the speed to 850 rpm. By adjusting, you achieve smooth engine operation without shaking or popping in the muffler. Setting the idle speed using the IKS-1 device (instructions for the device)
Start the engine, set the mirror in a position convenient for observation, and use the quantity screw to set the minimum stable engine crankshaft speed. Using a mirror, observe the flame in the cylinder, the color of which depends on the composition of the working mixture. - Slowly turn out the mixture screw until a bright orange flame appears, indicating an overly rich mixture. — Slowly screw in the mixture quality screw until the orange flame disappears and a bright blue flame appears, indicating a normal mixture composition that ensures the best engine performance. — Turn the mixture quality screw another 1/2+1/4 turn and complete the adjustment. To avoid failure of the IKS-1 spark plug, it is forbidden to run the engine at high idle speeds (more than 1200 rpm).
After all the carburetor adjustments, the car should drive without dips or blockages throughout the entire crankshaft speed range, providing maximum power from a healthy engine.
To more accurately adjust the CO level, use the table
09/10/2017
Adjusting the suction damper drive.
07/19/2018
My settings of the OZON-2105 carburetor
All settings are in question, since replacing the UN spout gives a faster access to the maximum speed on the ground. — GTZH 1k — 135. — GVZH 1k — 170. — GTZH 2k — 150. — GVZH 2k — 150. — Spout UN — 5.0. — ZHKH 1k — 6.0. - quantity screw - length 2cm (2 turns). — quality screw — 1 turn (deflection of the screw in any direction reduces the speed). - extra screw air supply - tightened. - float gap - 4.5mm (fuel level above the step). — according to the ICS, fuel combustion is normal (blue flame). — OZ — 8-10 degrees. — spark plug gap — 1mm.
If the carburetor settings provide faster acceleration to 100 km/h, then after that the acceleration drops significantly, almost to zero. If the settings provide stable acceleration after 100 km/h, then acceleration from a standstill turns out to be slower. Apparently, as long as there is no strong air resistance, the fuel burns more efficiently, but with an increase in drag, the fuel burns very poorly, because the carburetor begins to overflow.
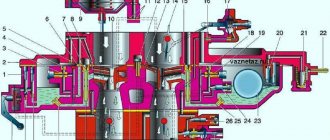
DAAZ 2107 carburetor design
The DAAZ 2107 carburetor is installed on a VAZ 2107 car. The diagram below gives an idea of its structure.
Design of the DAAZ 2107 carburetor for VAZ 2107 and VAZ 2105 cars
Previously, such a carburetor was installed on the VAZ 2105. The purpose of this unit is to mix gasoline and air in a certain proportion. The resulting mixture is then fed into the combustion chambers of the engine.
The main elements of the DAAZ 2107 carburetor are listed below:
- econostat;
- accelerator pump;
- fuel level support system;
- idle speed support system;
- engine starting system;
- jets for air and fuel;
- fuel-air mixture atomizer.
How to remove, install, replace a carburetor
For repairs and maintenance, the carburetor must be dismantled. To work, you will need a set of tools (pliers, open-end wrenches, screwdrivers) and a suitable room. Work is carried out on a cold engine. In short, first you need to disconnect everything connected to the carburetor, and only then remove it. The video below clearly shows the procedure for removing a VAZ 2107 carburetor.
Sequencing:
- Loosen the clamp on the corrugated pipe for the warm air intake, remove the pipe;
- Unscrew the air filter housing fasteners and remove it;
- Remove the suction cable: unscrew the bolt and screw that secure its shell, then loosen the cable itself;
- Remove the hose for removing crankcase gases from the fitting;
- Disable the idle economizer control: remove the wires from the microswitches;
- Disconnect the vacuum ignition timing regulator tube (remove it from the fitting);
- Pull the tube off the economizer;
- Remove the return spring;
- Loosen the clamps securing the fuel hoses, remove the hoses;
- Unscrew the 4 carburetor mounting nuts;
- Remove the carburetor from the studs.
Carburetor replacement is needed less frequently than repair. You can find any spare parts for this device on sale. After adjustment, cleaning and repair, the carburetor can be put back.
The carburetor is installed in the reverse order: first it is placed on the studs, then screwed to the body, and then all communications that were removed are connected to it.
Symptoms of a device malfunction
Carburetor failure can look different. The most common situations in which the driver should pay attention to the condition of this unit:
- The car engine does not start even after several attempts. There may be two reasons for this: either there is no fuel-air mixture in the float chamber, or the proportions of this mixture are incorrect and it cannot ignite in time;
- the engine stalls at idle or its operation is unstable. The most common reason for this is a clogged nozzle. In addition, interruptions in the operation of the motor may occur due to damage to any o-ring or hose. Finally, such malfunctions can be caused by a malfunctioning solenoid valve in the carburetor;
- Engine idle speed is too high. This malfunction may occur due to incorrect carburetor adjustment or due to loose air dampers. It also occurs due to too high pressure in the float chamber, resulting from oxygen entering through damaged hoses or sealing joints.
Solex carburetor VAZ2107, how to adjust the float system with your own hands
To adjust the float chamber, you must perform the following actions:
- We check the position of the float and pay attention to the shape of the mounting bracket - if it is deformed, it needs to be aligned. This is quite important, since otherwise the float will not sink into the chamber normally.
- We adjust with the needle valve closed. It is necessary to open the float chamber cover and move it to the side. Next, carefully pull the tongue of the bracket. You should ensure that there is a distance of six or seven millimeters between the float and the cover gasket. After immersion, the distance should be approximately one or two millimeters. If it is significantly larger, the needle must be replaced.
- When the needle valve is open, the distance between the float and the needle should be about fifteen millimeters.
It is worth noting that it is not necessary to remove the carburetor from the engine to perform these steps.
How to adjust the carburetor
As a rule, after removal, all parts of the carburetor are thoroughly cleaned of dirt and deposits. Let's look at the main stages of cleaning.
Cleaning the jets
Jets are thin channels in the carburetor through which air and fuel are supplied. Mechanical cleaning of these channels is strictly prohibited, so the jets can only be cleaned with compressed air. To purge the channels, motorists use a tire pump. As a rule, this is enough.
Electric car pump, which is convenient for cleaning the jets in the DAAZ 2107 carburetor
But if the carburetor is very dirty, place it in a container with kerosene for half an hour. After soaking in kerosene, even the most stubborn stains are easily removed.
Cleaning the float chamber
The best tool for cleaning the carburetor float chamber is a rubber medical bulb, with the help of which all remaining fuel, along with accumulated contaminants, is carefully pulled out of the chamber. Do not wipe the float chamber with fluffy materials, as fluff may get into the jets.
It is convenient to clean the float chamber of the DAAZ 2107 carburetor with a rubber bulb
Flushing the throttle valve
The throttle valves in DAAZ 2107 carburetors are cleaned using various cleaning compounds purchased at auto stores (most often this product is WD40 liquid).
The damper itself and all adjacent structural elements are washed with liquid: small channels, valves, etc. And the crankcase ventilation channel should also be washed.
Video: cleaning the throttle valve on a VAZ 2107
Disassembling and cleaning the unit
Considering that the amount of impurities in our gasoline is simply off scale, cleaning the VAZ 2107 carburetor turns into a necessary procedure. It can be carried out without dismantling and disassembling, or it can be done with complete disassembly of the device.
Cleaning without dismantling, video.
Many car owners periodically treat the carburetor with special cleaning agents (carbocleaners). These aerosols do a good job of removing deposits in gaps, unless, of course, they are perennial “growths.”
- The engine must be turned off and cool before starting work;
- Remove the air filter housing;
- Using a wrench, unscrew the idle speed solenoid valve on the carburetor;
- Use a carb cleaner to treat the carburetor: external surfaces, jet channels (through a thin tube), chambers, air dampers, etc., as far as you can get;
- Leave for 10 minutes for the aerosol to dissolve deposits;
- Run the engine for a couple of minutes. A stream of gasoline will wash away the residue;
- If necessary, repeat the procedure, first waiting until the engine cools down.
If such cleaning does not produce results after twice use, the carburetor will have to be removed and cleaned “like an adult”, with disassembly.
Cleaning with removal, video.
How to remove the carburetor is already clear. Now the sequence of its disassembly:
- Remove the top cover by unscrewing the five mounting screws;
- Unscrew the jets and remove the emulsion tubes;
- Remove the accelerator pump nozzle - unscrew it, pry it off with a screwdriver and remove it;
- Remove the seal located under the valve;
- Remove the diffusers from the chambers using pliers or carefully knock them out with the handle of a screwdriver;
- Unscrew and remove the accelerator pump screw;
- Unscrew the adapter system nozzle holder and remove the nozzle itself;
- Unscrew and remove the idle fuel jet;
- Remove the accelerator pump cover: unscrew the 4 screws in the corners, remove the cover and the pump itself (diaphragm, pusher, spring);
- Remove the return spring from the pneumatic drive lever, then the rod clamp, after which remove the spring from the throttle valve drive lever;
- Remove the pneumatic drive by unscrewing the fasteners;
- Unscrew the 2 screws that secure the lower part of the carburetor to the body, remove the lower part; Remove the economizer and economizer microswitch with bracket;
- Unscrew the screws for adjusting the quantity and quality of the mixture.
This completes the disassembly of the carburetor. After this, you can start cleaning. The parts and body of the carburetor, including the jets, can be washed with kerosene, the seats of the jets and the jets themselves can be blown out with a compressor. It is advisable not to clean the jets with wire; it can damage the holes and then the jet will have to be replaced.
When the layers are washed off the metal, you can inspect it for corrosion, wear and defects. All parts that show signs of wear must be replaced with new ones. The carburetor is assembled in the reverse order, then adjustments are made and you can put it in place.
Self-adjustment of the carburetor
As a rule, when setting up a DAAZ 2107 carburetor, car enthusiasts adjust fuel consumption and idle speed. Let's look at these stages.
Idle speed adjustment steps
Setting up the carburetor in this mode is easy:
- A carburetor with a properly adjusted idle speed allows the car engine to operate stably even with very low CO levels. To do this, the car engine warms up for 10 minutes. After this, the fuel quality screw in the carburetor is turned out as much as possible.
Fuel quality and quantity screws in the DAAZ 2107 carburetor
Rules for adjusting fuel consumption
To change fuel consumption, you need to adjust its level in the carburetor float chamber.
- First, the top cover is removed from the carburetor.
Before starting the adjustment, remove the top cover from the DAAZ 2107 carburetor
Needle valve of a DAAZ 2107 carburetor with an adjusting tongue marked with the letter A
Measuring the maximum opening distance of the needle valve on the DAAZ 2107 carburetor
The opening of the DAAZ 2107 needle valve is regulated by a special stop on the float bracket
So, even a novice car enthusiast can remove the carburetor. Certain difficulties may arise only at the stage of adjusting this device, but they are also quite surmountable. All you need to do is follow the above instructions exactly.
Essentially carburetor adjustments
[blok9] All carburetors are supplied from the factory perfectly adjusted on special stands. A calibration fluid is used, so the new device in its original packaging should not have the smell of gasoline or other traces of installation in its original place. The need to individually adjust the carburetor arises during operation.
- For preventive purposes, when it is necessary to compensate for the natural loss of factory calibrations.
- After repairing the carburetor, when the adjustments are likely to be violated.
- If there is a need for fine tuning of the engine by its user to improve the performance characteristics of the vehicle.
- When tuning, when it is important to improve certain qualities, often deliberately to the detriment of others.
It should be remembered that it is easy to violate the original settings, but restoring them without the appropriate equipment is difficult. Do-it-yourself carburetor adjustment should be a reversible process.
What changes with adjustments
Each carburetor system is responsible for its own mode of operation, so by changing its settings you can, in principle, not affect all the others. There are exceptions, so when starting work, figuring out how to adjust the carburetor, you need to study the mutual influence of the systems, clearly understanding the areas of their possible intersection. For example, many systems use a basic adjustment of the fuel level in the float chamber, so it is impossible to influence one thing in this way.
In addition, the basic settings are a compromise. So, by enriching the mixture in some mode, you can increase the dynamic characteristics, but at the same time the overall efficiency of the car will inevitably drop. And if you exceed a reasonable limit, it is easy to get the opposite effect, when a mixture that is too rich will burn so poorly that the power will decrease along with the savings. There is no need to talk about environmental friendliness in such cases.
All about the VAZ-2107 carburetor
Stable, smooth and economical operation of any gasoline engine can only be achieved if it is provided with a perfectly balanced mixture of air and gasoline. Fuel injection systems were installed on the “Seven” only in the last years of its production. And before that, the VAZ-2107 carburetor was “out of competition”, it prepared, almost without any electronics, according to the “recipe” built into it, gasoline-air power for engines of the entire “VAZ” line. Dosage systems in devices around the world were used in a variety of ways. On the carburetors of VAZ cars, one was chosen in which a float is used to maintain a constant level. Let's look at its design and operation using the example of the DAAZ 2107-1107010 “Ozone” .
The carburetor is a “harmonious orchestra” of different systems
In a musical orchestra, the playing of a variety of instruments merges into beautiful music, and in the same way in a carburetor, the “music” of the operation of all systems merges into the “song” of the engine in all possible modes of its operation. Let's consider the main components in which these systems are hidden. Cover, brass float, needle valve, air damper (choke).
Carburetor float chamber cover
Carburetor body, float chamber, diffusers of the first and second chambers.
Carburetor body, float chamber, main elements
Throttle body, damper actuators.
Throttle body
Adjusting screws, accelerator pump
How does it work?
The fuel level must be constant
Gasoline is supplied to the inlet, which is a brass fitting. It is filtered by a mesh and poured into the float chamber. A light float made of thin brass floats up and, through a lever, plugs the valve hole with a needle. That's it, the level has been reached, gasoline no longer flows. And when gasoline leaves through the nozzles, the float falls down, the needle moves away from the valve and the “action” is repeated. So gasoline stays at the same level, no matter how much we “gas.”
Preparing a “delicious” mixture
A running motor “sucks” air into itself. Rushing after it, gasoline flows in a thin stream through the jets of the VAZ-2107 carburetor and enters tubes with holes - emulsion tubes . Air also gets into them. Having mixed with each other, they turn into a “foamy mass” - an emulsion.
Emulsion making process
This substance, a “semi-finished product” of the full mixture, spreads through the channels and feeds the idle system and the main dosing system .
Small diffuser of the main dosing system
How does the Ozone carburetor work?
Without understanding the principle of operation of the dosing device, it is impossible to carry out serious repairs and adjustments. The maximum is to adjust the fuel level in the chamber, clean the mesh and the CXX jet screwed into the outside of the housing. To eliminate deeper problems, it is worth studying the algorithm of the unit’s operation, starting with a cold start of the engine.
- The driver pulls the trigger handle all the way, the upper flap completely closes the air flow into the primary chamber. At the same time, the first throttle opens slightly.
- When the starter rotates, the pistons draw in pure gasoline without adding air - the engine starts.
- Under the influence of vacuum, the membrane slightly opens the upper damper, clearing the way for air. The air-fuel mixture begins to be supplied to the cylinders, otherwise the engine will stall due to over-enrichment.
- As the car warms up, the driver presses down the choke handle, the throttle closes and fuel begins to flow into the manifold from the idle hole (located under the throttle valve).
Immediately after starting the engine, the membrane pulls back the damper and opens a gap for air to pass through
When the engine and carburetor are fully operational, a cold engine starts without pressing the gas pedal. After turning on the ignition, the idle speed solenoid valve is activated, opening a hole in the fuel nozzle.
At idle, the air-fuel mixture enters the manifold through the channels and CXX jets, the main throttles are tightly closed. Quality and quantity adjusting screws are built into these ducts. When the main throttles open and the main metering system comes into operation, the position of the screws does not matter - the combustible mixture is supplied to the engine directly through the chambers.
At idle speed, the fuel mixture enters the manifold through the lower hole located under the throttle
To start driving, the driver selects a gear and presses the accelerator pedal. The fuel supply pattern changes.
- The primary throttle valve opens. Due to the vacuum, air and gasoline are sucked through the main jets, mixed in the emulsion tube and sent to the diffuser, and from there to the manifold. The idle system operates in parallel.
- With a further increase in crankshaft speed, the vacuum in the receiving manifold increases. Through a separate channel, the vacuum is transmitted to a large rubber membrane, which, through traction, opens the second throttle.
- To prevent failures when the secondary damper opens, part of the fuel mixture is supplied to the chamber through a separate channel of the transition system.
- For dynamic acceleration, the driver sharply presses the gas pedal. The accelerator pump is activated - the thrust acts on the diaphragm, which pushes gasoline to the nozzle of the sprayer. It produces a powerful jet inside the primary chamber.
After opening the throttle, the fuel mixture enters the manifold through the main diffuser
When the pedal is pressed to the floor and both throttles are fully open, the engine is additionally fed with fuel through the econostat tube. It draws fuel directly from the float chamber.