Owners of Lada Priora have to periodically deal with malfunctions of power windows (ESP). In some cases, the problem lies in some small detail that can be easily fixed with your own hands; in other cases, you will have to contact a service center to repair the ESP. We decided to look into the main reasons why power windows do not work.
What does the functional diagram of window regulators look like?
Window regulators in the Lada Priora may be faulty if there are defects in the operation of the relay or the fuse is blown. Then the window lifters jam on the rear doors or on the side of the seat located on the right. It is also considered incorrect operation of devices when the glass moves jerkily. This option is present in the Lada Priora of the first years of production. A little later, the shortcomings were corrected, and those who purchased the car in the first rows have to tinker with it themselves.
By the way, according to experts, it is not necessary to start replacing the control unit. Simple testing will help determine the real reason:
- See if the lock that controls how the power window control unit works in the Lada Priora is functioning correctly. If the lock is acting up, you need to check the plus or minus on the wire.
- It would be a good idea to check the condition of the fuse. To do this, connect the adjustment bulb to the body of the Lada Priora and see how the windows move in different directions. The same actions are carried out with a positively charged wire, and then with wiring numbers 1, 5, 11, 13. If the light always lights up, the fault is not in the unit. Most likely, some wire has been crushed or the electric drive has failed.
Overview of General Concepts
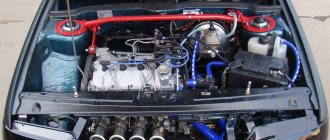
Installing rear power windows on a Priora is clearly not within the capabilities of every driver who decides to install it themselves or replace a failed device with their own hands. Before installing these devices in a car, you need to have at least approximate knowledge of the operating procedure and the principle of operation of the device itself.
EPS type
New Lada: Test drive of the updated Lada Granta, briefly about the main thing
In some configurations of the Lada Priora, factory rear ESPs are installed, which does not eliminate the need for knowledge about their design. Replacing a window regulator is a problem that comes up unexpectedly, so it's best to be prepared for it in advance.
As some car owners have found out, in order to install power windows, you need to be able to understand electrical wiring and have a lot of patience. In particular, in the 2008 Priora, it was discovered that the rear door wiring was not completely routed, which seriously complicates the work. In addition, the operation of standard ESPs with the ignition off is impossible, even if you insert a jumper into the desired relay.
There are many sets of rear lifts on sale that are compatible with the VAZ-2110, Granta and Priora. The cost of the kit can reach 3,500 rubles, depending on the type of design and manufacturer. Installation of equipment at the service will cost approximately the same amount. Many VAZ 2170 Priora owners sooner or later face the problem of failure of standard power windows. There are two common reasons:
- Broken cable.
- Electric drive failure.
The work of standard window closers also causes criticism, due to which the car is often left wide open. They also resort to replacing them quite often.
How to identify a malfunction
To determine the malfunction, follow the instructions:
- Connect the light bulb located under the door trim with the wiring coming from the electric drive. If the last one is broken, the light is on, which means the problem is in the wire.
- If the operation of the power window control unit leaves much to be desired, the main reason is the contact of the wire with the box or another wire.
If a breakdown in the Lada Priora needs to be repaired with your own hands, without having special tools, first rule out the possibility of a wiring break or short circuit that falls on the ground of the wire responsible for controlling and powering the door structure module unit near the driver’s seat.
Master class on installing door closers
- First, remove 2 nuts on the door trim near the driver.
- Then we lift the plastic clips and free the car threshold from the lining.
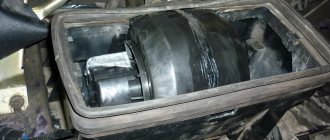
- Carefully remove the noise and temperature insulating materials and get to the power window connector shown in the figure. Be sure to ensure that all openings in the car, on the side of the body, are closed.
- Next, you need to disconnect the existing connector and install the connector of our new device.
This is all that needs to be done to install the power window closer on the Lada Priora. Now you don’t have to worry that when you turn off the ignition in your car, the window glass will remain down. The closer will do his job.
And that is not all! If you want to leave the car ventilated while closing it, the power window closer function can be disabled.
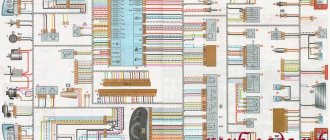
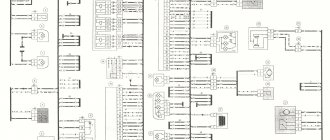
Wiring diagram of power windows Lada Priora
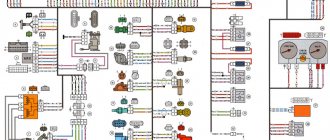
Left front door wiring harness diagram : 1 - block to the rear wiring harness; 2 - to the speaker; 3 — window lift electric motor; 4 — switch block; 5 — door lock; 6 — rear view mirror;
Wiring harness diagram for the right front door : 1 - block to the rear wiring harness; 2 - to the speaker; 3 — electric window lift motor; 4 — switch block; 5 — door lock; 6 — rear view mirror; 7 — block to the rear wiring harness;
Flashing the immobilizer
As a rule, Priora is equipped with a standard APS-6 immobilizer. This, as already said, is an optional procedure, but if the budget does not allow you to invest in a security system, you will inevitably have to deal with all this electronic “stuffing”. In addition to the power windows, the immobilizer controls several other systems of the car, even the rear lights. But the main problem is precisely that in the Priora car the immobilizer is structurally combined with the glass unit controller.
Priora lends itself well to tuning. A solution was also found for the immobilizer. During learning, the immobilizer writes its code to a non-volatile area of the ECU memory, which is stored in a disabled state. To disable the immobilizer, you need to clear this memory cell in the ECU.
To do this, you need to disconnect the original wiring connector from the immobilizer. Next, you need to determine the type of ECU. The flashing method will depend on this. If it is a Bosch M1.5.4, you need to open it and install a specially prepared chip with a program for cleaning the ECU EEPROM in place of the standard one and turn on the ignition for a few seconds. For some ECUs, you need to download special programmers from the Internet.
You can order flashing from specialists at reasonable prices
By the way, the Priora immobilizer itself is often prone to malfunctions, and therefore you need to interfere with its operation with extreme caution. On some types of ECUs, you cannot do without desoldering the chip and you cannot completely erase the EEPROM
We end here. Good luck!
Procedure when the window regulator does not work
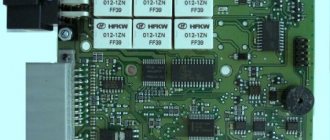
The design of the Priora's window regulators differs from the usual ones, which use a relay and a window regulator fuse. AvtoVAZ made the glass control using an electrical package control controller (TSBKE), which is located near the ECU.
1. Check the TsBKE fuse in the mounting block (F31, 30A).
2. Remove the door trim and check the voltage at the power window motor terminals using a multimeter or a 12V test lamp.
If there is no voltage, then check the serviceability:
- window control unit (buttons in doors)
- wiring (connector connection)
- electrical package control unit, which is located above the ECU unit (more on this below)
If current flows to the electric motor, but the glass does not move, then we check:
- malfunction of the window lift motor (for example, the drive motor brushes are stuck/sticking, the plastic gear in the gearbox is worn out)
- The window lift cable is frayed
- glass is jammed (distorted)
The most common problems with power windows are:
- Faulty double-glazed window control unit (GCU)
- Window lift motor malfunction
- Skewed, broken power window cable
- Poor contact
You watched
A new photo report on the installation of FORWARD electric windows in the rear doors of the Lada Priora was prepared by our buyer - Alexander Vyacheslavovich Aleksashin from Moscow, as part of participation in our promotion.
I finally got to the back doors of my swallow to replace the old window regulators with new FORWARD brands, which I purchased from the Steklopodem online store. RF.
Since I was already experienced in installation matters, I stocked up on clips for the inner plastic of the door, gauze tape and a set of keys.
Let's disassemble the door. Unlike the front door, the rear door is even easier to disassemble: - unscrew one self-tapping screw in the area of the door opening handle; - unscrew the two hexagons in the area of the window lift button; - unscrew the lock locking latch; - and that’s all.
Next, unclip the power window button, disconnect the plug and remove the plastic door trim.
We fix the glass with gauze tape and disconnect the power terminal of the window lift motor.
We move on to the window lift mechanism itself, which is secured with 4 bolts, unscrew them and unscrew the 2 bolts that connect the glass frame and the window lift carriage.
Next, with a little difficulty, we remove the window lift mechanism; here it is a little more difficult to get it out of the door than from the front.
We install a “FORWARD” rack and pinion lift, which fits through the door very easily and simply, just like the front ones.
We connect the motor power plug and check its operation.
We install the window lifter mechanism in the standard holes. You can say they get up on their own.
We secure the mechanism with 2 bolts securing the glass and tighten the remaining 2 nuts of the mechanism itself.
Once again we check the operation of the window regulator, while securing the glass to the rack and pinion mechanism.
We put the door trim plastic back in place, replacing the damaged clips, and with “light, smooth movements” we secure it by screwing back the self-tapping screw and two hexagons.
Everyone's collected! Everything works great, better than the standard mechanism 500 times!
I am delighted with the FORWARD window lifters. The whole process of work took about 40 minutes for two doors.
Once again we thank Alexander for preparing the photo report and, as part of our promotion, we are transferring the promised prize to his mobile phone account.
You can buy FORWARD electric windows for LADA Priora (rear doors) in our online store
Schematic electrical diagrams, connecting devices and pinouts of connectors
Electric windows (ESP) are convenient devices for controlling the side windows of a car, which are controlled by a special button and make it possible to lower or raise the side windows without rotating the previously used handles. This option is provided only in some modifications of the VAZ car, but nothing prevents you from purchasing a ready-made unit and installing it yourself.
The most preferred are rack-type ESPs, so as an example we will describe the process of their installation.
The connection diagram for the window regulator on a VAZ-2110 car is as follows:
- remove the negative terminal from the car battery to stop the supply of voltage to the on-board power supply network;
- we take the wires that come standard with rack-and-pinion window lifts and make a kind of harness out of them that makes connection easy;
- remove the car mounting block, which will require unscrewing the self-tapping screw that secures the special latch;
- turn the block over and carefully install block Ш1 of the pre-prepared wiring harness into the corresponding connector;
- dismantle the door trim;
- we pull the wires to the electric window drive. To do this, you will need to carefully pass them through the holes in the door itself and the body pillar on the desired side.
After this, buttons or keys are installed that will be used to control the power windows. Depending on your desire, they can be attached either to the door trim of a VAZ-2110 car, or to an existing control panel. In the first case, you will need to use an additional wire, which will allow you to equip the key backlight.
Checking the electrical package control unit (CBKE)
The difficulty in determining the cause of an ESP malfunction lies in the fact that a pair of wires (X1-4 or X1-6) coming from the TsBKE are multifunctional. That is, one wire can change polarity depending on the function (mirror control, power supply, central locking control).
Wiring diagram of power windows of Lada Priora
[click on diagram to enlarge]
The search for the problem should begin by checking the correct operation of the door lock, inside which the lift has stopped working. If the lock also refuses to work, you need to check whether there is a minus or power from the glass unit control module, connector X1, pin 4 and (or) 6, depending on the malfunction of the board. Connect the warning lamp to the car body while simultaneously pressing any button on the power window. Repeat the operation again, but with the positive wire. Make sure that pins 1, 13, 5 and 11 are working correctly. If the control lamp lights up in all cases, it means there are no problems with the operation of the control unit. Most likely, there is a problem in the electric drive, or a break in the wiring. After removing the casing, connect the control ramp between the two wires that go to the electric drive. If the lamp starts to light when the up/down button is turned on, this means that there is a problem with the electric drive. Otherwise, you are dealing with a broken wire.
Compared to the passenger windows, the driver's window uses a slightly different scheme. This is due to the fact that the driver can control all modules in the cabin at once. Without using diagnostic equipment, the driver can check the short or continuity to ground of the wire that supplies the signal, as well as power to the driver's door module.
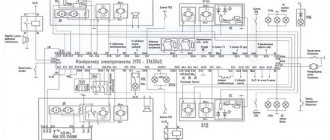
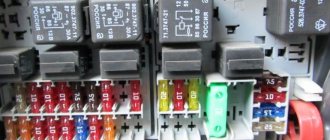
In a Priora car, the relays in this block have the following tasks:
K1 – turning on the electric radiator fan of the engine cooling system K2 – turning on the heated rear window K3 – starting the starter
K4 – additional relay K5 – reserve K6 – activation of the windshield washer and wiper;
K7 – turning on the high beam headlights; K8 – turn on the sound signal; K9 – alarm signal activation; K10-12 – reserve;
In the question of how to remove the fuse box, Priora does not require contacting service. The process of replacing it is not difficult. To begin with, remove the terminal and de-energize the unit. Otherwise, a short circuit may occur during dismantling.
This rule also applies to other blocks. Next, unscrew the bolt holding the block in place. Then you need to release the block from holding the latches. Next we remove the fuses and relays. Then comes the turn of the wire terminals included in the block.
For convenience, it is better to mark all the wires and their locations. Any mistake and sad consequences cannot be avoided. Using these simple tips, questions related to how to remove the fuse box on a Priora will not cause you any difficulties.
A variety of seemingly complex breakdowns in the electrical equipment of your car can be hidden simply under the cover of the fuse box. These include stuck or non-operating relays, blown fuses or tracks. We recommend starting any work to eliminate breakdowns in the Priora’s electrical system from here.
The Priora mounting block is located in the instrument panel on the left driver's side at the bottom and is closed with a lid - in the photo its location is highlighted with a blue frame: