Design and types of window lifters
Kalina front window lift
Window regulators are a device designed to raise or lower car windows.
At the moment, there are a huge number of options for these devices, but the design, despite the differences in component parts for different models, is similar, it includes:
- grooves that hold the glass by the side edges
- so-called “rails” that ensure the movement of glass
- Seal and damper, glass movement limiters in the up and down direction.
A window regulator of any design consists of two main elements:
- drive unit
- lifting mechanism - transmitting vibrations of the drive movement to the glass, and thereby ensuring its movement.
The drive is divided into two types:
- Mechanical, known to us from Soviet cars, where in order to lower or raise the window, you need to turn the window lifter handle.
- Electric, typical of modern cars, where to move the glass you just need to press the window button. The electric drive consists of a reversible electric motor with a worm-type gearbox.
In addition, window regulators differ depending on the mechanism of glass movement:
- rack and pinion
- cable
- lever
Each option has its pros and cons and technical features. All these device options have one thing in common: one day they fail; this problem especially often occurs in a model that is so popular today as the Lada Kalina.
There can be dozens of reasons why power windows malfunction, but the most common are the following:
- The commutator brushes of the electric motor, which is responsible for the glass movement process, freeze. This happens, as a rule, due to overheating of fragile graphite brushes, unstable to sudden temperature fluctuations, and this factor starts a chain reaction: overheating of the brushes begins to melt the nest, which is made of plastic in all Kalinas, and not of the best quality. For this reason, the brushes lose mobility, and the device can only be brought into working condition using a hammer. At the initial stage of the breakdown, it is enough to give a good knock or two on the door trim , but after a couple of weeks, this method stops working, and then you will have to disassemble the window regulator to repair it.
- Another cause of failure, typical of the Lada Kalina, as well as many other VAZ models, is the ill-conceived electrical circuit. The contacts cannot withstand the load placed on them, there is no unloading relay, which is why all the window regulators fail at once, and then it is necessary to repair not only the window regulators themselves, but also the remote control.
When it is impossible or too problematic to repair the device, it is more advisable to replace it with a new one. are suitable for the Lada Kalina :
- electric window lifter Garnet VAZ – 530 rub.
- electric window regulator Ningbo – RUB 1,699
- electric window lift AUTO-GEO – RUB 3,300.
Of course, the price is directly related to quality, but if the budget is limited, then the domestic option is not bad.
Now let's talk about how to install window regulators yourself.
Removing the power windows
Let's start with the front mechanisms
Before proceeding with repairs, it is necessary to dismantle the defective device. But in order to remove the window regulator, you will first have to remove the door trim.
So, for work we need:
- key for 10
- molar tape.
Now let's get down to business.
- The first step is to lift the glass all the way and secure it at the highest point with tape.
- Then, using a wrench, remove the two bolts that hold the glass in place (1 in the picture). Also, you need to unscrew the bolt of the inner handle of the lock.
- The next step is to disconnect the device motor and wires (2 in the figure).
- We unscrew all the nuts on the device (there are 11 of them in total) and remove the window regulator (2 in the figure).
The front window lifters have been removed, let's proceed to dismantling the rear ones (if the problem lies in them too).
Here we need:
- two keys, 10 and 8
- masking tape.
- Just as in the case of the front window lifters, raise the glass all the way and secure it with tape.
- Using a size 8 wrench, unscrew the three nuts securing the mechanism.
- Take a 10mm wrench and remove 2 bolts and 3 nuts.
- Now it will be easy to pull the device out through the hole at the bottom of the rear door.
Dismantling has been completed. Carefully examine the condition of the device; if it cannot be repaired, replace it with a new one.
Photo report on replacing the electric window regulator
So, first of all you need to do the following:
- Remove door trim
- Unscrew the bolts securing the door glass (two on each side)
To ensure that the glass is fixed and does not fall, you should not remove the sealing rubber bands, and you can also additionally lock it in the upper position (or at least with tape, the main thing is that it holds tightly).
After this, disconnect the power plug for the window motor, as shown in the photo below, by pressing the latch slightly up.
Now, using a 10mm socket, you need to unscrew the 11 nuts securing the window regulator trapezoid to the door body.
When you unscrew the last nuts, hold the entire assembly so that it does not dangle inside the door.
Then we push the pins inside and carefully remove the trapezoid assembly with the motor from the door hole. First, we tilt its right side, as shown in the photo below:
We carefully pull it out of the door, and then carry out further actions in the same way with the second bar and the motor.
Now the entire structure has been removed from the car and is as follows.
Replacing the motor
In order to replace the motor itself, first unscrew the three studs:
And after that, you need to use a flat-head screwdriver to unscrew the 4 fastening screws, which are clearly visible below.
Next, we carefully lift the motor with the cover so that the coil does not “unravel” and the cable remains wound, otherwise you can then struggle for a long time with threading it into place.
At first, the coil may remain on the motor, but then we carefully pry it off and install it in its place.
Now you can put the new motor in place by putting it on the reel and placing the housing until it is completely aligned with the housing on the trapezoid.
We can say that we close this entire structure until both parts are tightly connected, and tighten the fastening screws into place. After this, you can install in the reverse order. The price of a new motor assembled with a window lift trapezoid for Kalina is about 1,800 rubles for the original part. Everything can be purchased individually for half the price of the set.
Novel. My comment will most likely no longer be relevant for you, but I want to share the victory I won today, and maybe it will save someone a lot of nerves
Installation
As you can already guess, installing the window regulator is carried out in exactly the reverse order of dismantling it; the only thing is that you first need to treat the guide of the device with lubricant.
The installation procedure for the front lifts is as follows:
- We fasten the new device with nuts (11 pieces);
- We connect the wires and the motor;
- We find the bolt securing the inner handle of the lock and tighten it, using a key, tighten the glass fasteners.
- We remove the now unnecessary tape and check the work.
You need to look at how the window opens and closes, whether there are any distortions, whether all the screws are tightened well. If a mistake was made, what to do, you will have to repeat the work again. If everything goes well, you can praise yourself for a job well done.
The rear window lifters are installed in the same way, in the reverse order.
- Through the niche at the bottom of the back door, we put the device in place of the old one.
- Using a 10mm wrench, tighten the bolts and nuts.
- Using a size 8 wrench, secure the mechanism with three nuts.
- We remove the tape.
We check the quality of work
As you can see, this work is not at all difficult, it can be done independently, saving a lot of money on a car service, which will charge you a tidy sum for it.
In addition, since we had to remove the door trim, we can also carry out sound insulation, which in the Lada Kalina is also not at the highest level.
At the end, a small bonus on how to make the power windows work without the ignition.
We wish you a good journey and good luck!
Sometimes, owners of Lada Kalina are faced with a problem when the power windows do not work. One or both may not work at once. But how to find out the reason why this happens? In fact, there are not many reasons and they are quite easy to eliminate.
Toyota Avensis › Logbook › Repair of the power window lock button
Hello to all users of such a wonderful car, tobish drivers VENIKOV! I haven’t been on DRIVE2 for long, but I’ve had the car for more than a year. There haven’t been any big problems yet, but there are certainly some small things. After reading various useful things on the site, I decided to dig into something myself. This was the introduction. Now let's get to the problem. When you bought AVIC you didn’t notice everything right away. Once I tried to block the power windows, but they still worked. And my little prankster is growing up. I can't reach the button yet, but soon my hands will reach it. So I decided to climb in and see what can be done with the button and how it works. First, I went online to see how the door trim is removed. It turned out that there is no need to remove it; the control unit is removed separately.
Pull out the block and disconnect the connector
We remove the top panel and get the block itself. Next, to get to the button, we disassemble the block itself.
Here I started looking for the reason why the button does not lock. And I realized that I needed to take it apart further. The button is spring-loaded and held in place by two latches.
I had to tinker to get the button out without breaking the latch. Having received what I was looking for, I understood the principle of fixation. This is similar to fixing the refill of a disposable ballpoint pen for advertising purposes.
Here is the reason: the pin broke off. Apparently someone pressed the button very hard. Then I puzzled for a long time about what could be done. Is it really necessary to shell out a large amount of money on the assembled unit because of a small pin? Somehow it’s not ice. Well, I tried to restore the bar. I apologize that there are no photos of the broken bar, but here is the restored one.
Be sure to lubricate this strip and channels. I took a little bit of lubricant from each button with a needle. Well, I put everything back together in reverse order.
To be honest, I didn’t expect the button to work correctly. It's a collective farm after all. But after developing it, the fixation worked, not every time, but it’s better than buying a new block.
Reasons for failure
The window regulator consists of mechanics and electrics, and therefore the reasons must be sought in these parts. Let's look at where the problem may lie:
- A fuse has blown or a relay has broken.
The relay can be replaced with a jumper as in the photo. But remember that this is a temporary option, be sure to change the relay in case of breakdown - There is a breakdown in the wires or the chip has come off.
Tap to the left of the button, then try pressing the button. If it works, then the contact between the wire and the button is to blame. - Problems with the power window control unit.
- Mechanical failure within the part itself.
All these reasons can lead to the fact that one or both window regulators may not work.
Troubleshooting Methods
So, when the window regulator stops working, it is necessary to find and eliminate the cause. Let's look at the whole process and steps step by step:
- The first thing you need to pay attention to is the fuse . In the block it is marked as F5. You need to take it out and look. If it burns out, it should be replaced with the same one with the appropriate marking.
- If the fuse is intact, then the problem is in the power supply and you need to look for a broken wire problem . We take out the fuse and use a tester to check whether there is voltage in the on-board circuit. To do this, you need to insert the probes into the sockets and see if there is power supply. If not, then you should check the wires, relays, and control unit.
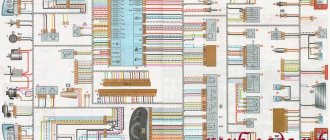
Let's look at the diagram for switching on power windows on the Lada Kalina
Diagram (click to enlarge)
The decoding of the notation looks like this:
1 — mounting block;
2 — ignition switch;
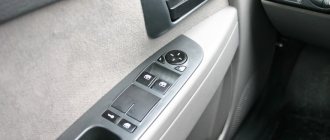
3 — power window switch for the right front door;
4 — power window switch for the right rear door;
5 — gear motor for the power window of the right front door;
6 — gear motor for the electric window of the right rear door;
7 — gear motor for the electric window of the left rear door;
8 — gear motor for the electric window of the left front door;
9 — left rear door power window switch;
10 — left front door power window switch;
11 — relay for turning on electric windows;
A - to power supplies;
B - to the instrument lighting switch;
C - the order of conditional numbering of plugs in the power window blocks.
Is it the motor or the mechanics that is at fault?
If everything in the electrical part is functional, then it is necessary to look for the cause in the mechanical part. To do this, you will have to dismantle and diagnose the window regulator. Let's look at how to remove this node:
- We dismantle the door card.
Door card removed - Unscrew the screws securing the window regulator and carefully, holding the glass, remove the part.
It is worth inspecting the removed window regulator for damage.
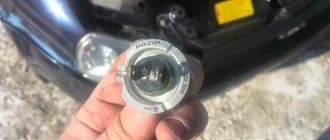
Removing the window motor
The most common malfunction is wear of the roller teeth or breakage of the traction cable. These parts need to be replaced, but often the entire mechanical part of the window regulator is replaced.
Diagnostics of the window lifter trapezoid
Video: How to Remove the Window Lifter Button Kalina
How to remove and connect the power button. example LADA Kalina / Priora
It is not difficult to repair the power button on a Kalina, Priora or Grant. And no serious financial costs are required, since the price of the “native” passenger door button is only 150 rubles. The cost of the control unit on the driver's door is about 600 rubles.
To remove the button on the passenger door or control unit, you do not need to remove the door trim or trim. You don't have to look for screws to loosen them as they don't.
- It is enough to carefully select the button or block using a flat-head screwdriver and simply pull it out of the seat. To avoid accidentally scratching the case, it is recommended to wrap the screwdriver in a thin cloth.
- You will then need to disconnect the wiring terminals to completely free the power window control module. Next, you need to securely connect the terminals to the new button and replace it.
How to fix Windows power button lock on Prior
If the window power buttons work once or are seized , but there is no way to buy a new control unit now, you can solve the problem as follows:
- Remove the control unit. To do this, carefully attach 6 plastic clips to the body of the decorative case;
- Let's take the block apart. To do this, you also need to disconnect 6 clamps on the body of the unit itself;
- Remove the control panel, cleaning it from dirt;
- Remove the buttons themselves by carefully bending the side fasteners with a screwdriver;
- We remove all dirt and products from the paths using alcohol and cotton;
- Lubricate the working part of the button with silicone grease (this is optional, but the button will move smoother);
- I'm putting everything back together.
Replacing a window regulator for Renault Logan and Megan
You can also change the power window button block on Renault Logan, Megan cars.
conclusions
Thus, it can be seen that the reasons for the malfunction of the window regulator are quite simple to eliminate. If you find the reason, you can easily repair the unit yourself. On the Lada Kalina there are only a few reasons why the window regulator fails.
Depending on the choice of configuration, the car can be equipped with two (only on the front doors) or four power windows. They often fail, which causes significant inconvenience to the owner of a domestic car. Most often, the window regulator on the driver's side stops working, a little less often on the rear doors. But in any case, they need to be repaired. In some cases, the owner of a Lada Kalina can deal with power window faults (ESP) himself, while in others, car mechanics will help. Let's look at the main reasons for the breakdown and what to do about it.
Why do power windows fail on Lada Kalina?
The device consists of two parts - kinematics and electric drive (12 volt motor with gearbox). Accordingly, the breakdown may be mechanical or electrical.
There are several reasons why the window regulator does not work:
- Sticking motor commutator brushes. They set the side windows of the car in motion. The mechanism of failure is as follows: when the engine is running, the brushes heat up and stick to the plastic socket in which they are located. They wear out and no longer reach the collector.
- Due to the increased load on the driver's control center, it stops working correctly. This is due to the lack of a load-shedding relay.
- In the cold season, Lada Kalina is susceptible to wet glass freezing to the marigolds. An attempt to open it may result in shearing of the teeth of the plastic gear of the gearbox.
- Button failure. This reason is identified immediately; additional diagnostics of Kalina are not required.
- If all the window regulators fail at once, then the problem is in the fuse. It is located under the hood, or more precisely, in the mounting block.
If the window lifters are not working due to fuse problems, then it is worth finding out where the short circuit occurred.
Replacing gears
If the window regulator willingly goes down but refuses to go up, then the gears will need to be replaced. The first operation is to dismantle the upholstery along with the switch block. Next, unscrew the three nuts that hold the gear motor.
Then unscrew the nuts securing the mechanism and the bolts securing the glass, not forgetting to disconnect the block. Next, the gearbox itself is removed, the screws are unscrewed and the cover is removed. Using a screwdriver, the gear is removed, and its housing must be thoroughly cleaned. The bearing, as well as the worm, should also be thoroughly lubricated. Then everything is put together in reverse order.
If the window regulator does not work (Kalina hatchback is no exception), then after such a replacement it will definitely work, because the gear is one of the typical reasons for the mechanism to fail.
If all these measures do not help, then the entire mechanism is changed completely along with the motor. Dismantling is not so difficult, the main thing is to buy a high-quality mechanism. Spare parts sold may differ from those installed at the factory.
How to identify and eliminate electrical problems
If you don’t want or have the opportunity to take the Lada Kalina to a car service center, you can diagnose the problem yourself. Checking the breakdown of the ESP should be carried out in the following order (inspection of devices):
- fuse;
- wire integrity;
- relay;
- Control block.
First you need to check the fuse. It is located in the mounting block and needs to be removed and inspected. If the fuse is blown, it should be replaced with a device with the same marking.
If everything is fine with it, then check the wire for integrity. To do this, you need to remove the fuse and check if there is voltage in the on-board circuit. This is done using a special tester: probes are inserted into the sockets and show whether there is power supply. If it is not there, then check the relay and control unit. If everything is in order here, then it’s a matter of mechanics. Again you will need to diagnose the window regulator.
Check the fuse
Another common cause of problems with the operation of the window lift system is related to the heavy load experienced by the contacts on the common window lift control panel. Since AvtoVAZ specialists did not provide a discharge relay in the electrical circuit, the remote control is unable to withstand these loads. As a result, both the front and rear power windows fail. In this case, the owner will have to fix problems in the remote control.
If the window regulators refuse to perform their functions on all sides at once, then it is recommended to check the integrity of the 30 A fuse. You should look for it under the hood, in the mounting block. If this element is burned out, then a dark place will be visible where there was a short circuit. It would also be a good idea to check the condition of the wire insulation. In this case, you need to look especially carefully at the wires at the transition points from the body to the doors.
Mechanical problems
The car owner will have to dismantle the ESP for diagnostics. You can remove it quickly and without much effort using the instructions:
- remove the door card;
- remove the window regulator;
- inspect it for damage;
- remove the motor.
Most often, the malfunction is associated with wear on the roller teeth or a broken traction cable. They will need to be replaced, but it is better to change the entire mechanical part of the device.
If the ESP functions but poorly, for example, it rises jerkily, using additional physical force, then you can try replacing the gear and cleaning the housing from dirt.
The reason why the window lifter does not work on a Lada Kalina car is quite possible to diagnose and correct on your own.
Today, Lada Kalina is one of the most popular modern domestically produced cars. But like any Russian cars, this model has a number of vulnerabilities, in particular, we are talking about electric windows. In this article we will talk about how to install the window lift button and the device itself on the Lada Kalina, as well as what malfunctions are typical for this unit.
VAZ (lada) Kalina i 2004 - 2022
The power window button stopped responding to lowering, both on the driver's and passenger's sides. Right front door. That is, the glass goes up, but there is no reaction when it goes down.
I tried swapping the two top right relays in the fuse box. What else can you see?
- Rear window rolls down tightly, Kalina – 3 answers
- Turn signals do not blink constantly in Kalina - 2 answers
- The car does not start, the relay clicks, VAZ Kalina – 2 answers
- Where is the ground terminal for the power windows and central locking located in Kalina? – 1 answer
- The window regulator does not work on Kalina - 1 answer
Most likely a wiring break. Remove the door trim and disconnect the glass window chip. and check the power supply and mass for lowering. Maybe the motor itself is to blame. But most likely the break is either in the corrugation between the door and the counter. Or even lower, maybe in the threshold, there is ESP wiring. Search
You can replace the button on the right door. It’s better to first check whether the lowering voltage comes from the left button to the right, whether it passes through the right button.
The funny thing is that you end up disassembling and reassembling the engine and that’s it. It feels like when closing the window, an impact occurs and the shaft gradually disengages. I suffered with both the right and left doors.
It is easy to check the serviceability of the button without disassembling the door. With the engine turned off, you press the button and if it is working properly, the light in the instrument panel will dim slightly.
- Are the DTOs the same in Lada Kalina? – 1 answer
- Heater radiator leaking in Lada Kalina - 2 answers
- What adapter for Lada Kalina diagnostics? – 1 answer
- No speed readings on Lada Kalina - 1 answer
- Speedometer does not work in Lada Kalina - 2 answers
- What pressure should be in pirelli 185/60 R14 82H tires? – 2 answers
- Error P0172 in Lada Kalina - 3 answers
- Lada Kalina does not gain momentum - 2 answers
- Lada Kalina heater radiator is leaking - 3 answers
- Is it possible to install a rear beam on Kalina from 2109 or 2110? – 1 answer
The window regulator does not work on Kalina
The car does not start, the relay clicks, VAZ Kalina
New Lada: Brake pads for Lada Kalina: selection of new parts, step-by-step instructions for self-replacement and how to determine the degree of wear
Rear window rolls down tightly, Kalina
Where is the ground terminal for the power windows and central locking located in Kalina?
Design and types of window lifters
So, what is the SP device on Kalina:
- grooves designed to fix the glass itself;
- rails that allow it to move up and down;
- sealing elements, damper, and motion limiters;
- drive mechanism;
- a lifting device that ensures the transmission of vibrations of the movement of the drive element to the glass.
Connection diagram for SP on Kalina
Depending on the drive, SPs are divided into mechanical or “meat grinders”, in which the glass is lifted by turning the handle, and also electric. In the latter, the system is controlled using a button. This electrical circuit is based on a motor with a gearbox.
In addition, joint ventures are divided among themselves and according to the type of device used that sets the glass in motion. They can be rack and pinion, cable or lever. Each of these types has its own advantages and disadvantages.
Common faults
There are many reasons why the window regulator on Kalina does not work and why the device needs to be replaced, but we will look at the main ones:
- The electric motor brushes are stuck, usually as a result of overheating of the brush elements themselves, which, as a rule, are not resistant to sudden temperature changes. Accordingly, as a result of heating the brushes, the plastic socket may melt. This will also cause the brushes themselves to lose mobility. If the malfunction has just begun to appear, you can knock on the plastic door lining several times to restore the unit’s functionality. However, over time, this method will no longer be able to produce the required result, so intervention in the design of the joint venture will be inevitable.
- The cause of the malfunction, which may require replacement of the joint venture, can also be the ill-conceived electrical circuit installed at production. The contacts themselves are not able to withstand the necessary load that is placed on them. The SP system may fail due to the fact that the electrical circuit is not supplemented with a unloading relay. So in the event of a breakdown, it often happens that the car owner has to repair not only the power windows, but also the control panel itself.
As practice shows, in most cases, repairing a unit is either completely impossible, or can be done, but with great difficulty. Accordingly, the best option would be to install a new joint venture (video author - Emilien Ok).
Mechanical defects
What can interfere with the proper operation of an electric motor? It is recommended to inspect the drive panel.
If the glass begins to respond to pressing the button only after knocking on the door, it means that the panel is stuck. To fix this, dismantle the casing, as well as the rotor, and clean these parts with sandpaper.
If, when pressing the button, the driver hears a characteristic growl, but the windows do not move, it means that the plastic gear of the gearbox is badly worn. Repair is not possible here - only replacement.
Another reason why the window regulator (Kalina station wagon is no exception) does not work is moisture getting inside the door and oxidation of the moving systems. As a result of oxidation, the mechanisms jam.
If a very loud noise is heard while the glass is moving, then the gearbox bearing needs to be replaced. If the glass twitches when you try to close the window, it means it is warped or foreign objects have gotten into the roller.
It also happens that the mechanism does not work even after replacing the electric motor. Then the problem is hidden in the cable. It should be replaced. For a Lada Kalina car, the replacement price will be approximately 300-400 rubles, since this cable is not sold separately.
Removal instructions
The device will be dismantled starting from the front windows. Before making repairs, you need to remove the defective unit, but first you need to dismantle the door trim.
Detailed instructions for dismantling the joint venture:
- First of all, you need to lift the glass all the way and fix it at the highest point with tape. It will be a right or left window regulator, it doesn’t matter.
- After this, using a 10mm wrench, you need to unscrew the two bolts that secure the glass itself. In addition, you will need to unscrew the screw on the inner handle of the lock.
- Then you need to disconnect the system motor and wiring from the power circuit.
- Unscrew the nuts on the mechanism, there are eleven in total, and dismantle the joint venture.
- Now let's move on to the rear joints. In this case, the dismantling procedure is almost identical - first, the glass must be lifted up all the way and fixed.
- Using a size 8 wrench, you need to unscrew the three nuts securing the assembly. Then, using a 10mm wrench, unscrew two screws and three more nuts. After completing these steps, you can dismantle the unit through the corresponding hole in the bottom of the door. Having removed the joint venture, you need to assess its condition. If the problem can be solved without replacing the mechanism, then repair the device; if the malfunction is “lethal”, for example, the window lift motor or gear has failed, then installation of a new mechanism will be required.
1. Secure the glass with tape. 2. Unscrew the bolts and remove the motor. 3. Remove the screws on the rear door.
The main aspects of repairing and replacing power windows on a VAZ 2105-2106 with your own hands
The VAZ 2106 window lifter has a reliable design, but, like any mechanism, it can fail. The article discusses typical malfunctions of power windows on the “classic” and provides instructions for removal and installation.
- The mechanical window lifter on the VAZ 2106 has a simple design and consists of a control handle, a glass lift transmission system, a cable and three rollers.
- Many drivers install electric windows instead of classic ones.
- They come in two types:
- Cable. The design includes an electric motor with a drum on which the cable is wound, and a gearbox. The upper drum is connected to a conventional window lifter using a spline. With its help the cable is activated.
- Rack and pinion. They use the principle of a steering rack in a car.
To install the electric mechanism, you need to purchase a kit consisting of wires, fasteners, backlit control keys, a decorative plug, and installation instructions (the author of the video is VALENTIN VERNIGORA).
Common faults and solutions
Over time, the window lifting mechanism becomes unusable - it is impossible to raise or lower the glass.
There may be several reasons for a device malfunction:
- cable break;
- foreign objects entering the mechanism;
- gearbox wear.
There is no point in repairing window regulators, since their cost is low; it is easier to buy a new device and replace it.
Device assembly diagram
Electric lifts may have the following faults:
- All power windows do not work: the fuse is blown, there is no connection to ground, the wiring is broken. The repair consists of replacing fuses, restoring ground connections and electrical circuits.
- The lift on one of the doors does not work. The switch is faulty, the reverse current relay is broken, the electric motor is broken, the wiring is broken, the connector is disconnected. Faulty parts should be replaced, the wiring restored, the connector connected.
Removal instructions
To complete the work you will need the following tools:
- Phillips and flathead screwdrivers;
- a set of keys;
- knob;
- extension.
The removal procedure consists of the following steps:
- First of all, you need to remove the casing.
- Next, the glass is lowered as far as possible. Use a Phillips screwdriver to unscrew the bolt holding the clamp.
- After unscrewing the bolt, lower the clamp down.
- Then on the left side of the door, just loosen the roller nut using a wrench.
- The cable is now free and can be removed from the roller.
- Next, unscrew the three nuts holding the window regulator.
- When unscrewing the third bolt, the mechanism should be held from the inside.
- When the window lifting mechanism is free, move it to the side.
- After unscrewing the last nut, you can remove the window regulator from the door.
Next, repair or replacement is carried out. The rear mechanism is installed in the same way.
Installation Features
Installation of a new or repaired window lifter is carried out in the reverse order of removal.
Photo gallery “Installing a window lifter”
1. Installation kit 2. The process of unscrewing the screw and retracting the cable 3. Installation locations for the rollers
To install a power window, follow these steps:
- Dismantle the door, remove the door trim. Next, the electric window lifter is installed using self-tapping screws.
- After installation, you need to check the sliding of the glass.
- Connection to the vehicle's electrical network should be made according to the electrical diagram.
- Next, the door is installed on the car.
- A control button is mounted on the toolbar.
After installation, the electric window lifter must be checked for functionality. You can install a heated rear window.
Loading …
Video “How to change window regulators on a VAZ”
This video demonstrates how to replace a window lifter on a VAZ (car video - Pavel Pavek).
Was this article helpful? The article was useful. Please share the information with your friends.
Installation Features
As for installation, it is carried out in the reverse order of removal:
- First, the new mechanism is secured with eleven nuts.
- Then the wiring and electric motor are connected.
- After this, find the screw that secures the inner handle of the lock and tighten it completely.
- At the final stage of installation of the front joint ventures, the adhesive tape is removed.
- Next, through the hole in the rear door, a new window regulator is installed instead of the old one.
- Using a 10 mm wrench, you need to tighten all the corresponding screws and nuts. Use an 8mm wrench to tighten the nuts that secure the assembly. The tape is removed.
After completing the installation, you need to check how correctly the window opens and closes, whether there are any distortions and whether the mechanism as a whole is securely fixed. If mistakes are made, the problem must be corrected immediately so that it does not catch you at the most inopportune moment.
Sorry, there are no surveys available at this time.