Stove VAZ 2110 perhaps the most problematic and capricious mechanism in the entire car design. You cannot do without a stove or a faulty interior heater radiator on a VAZ 2110, given our cold climate. If in the summer a non-working stove may not bother you, then with the onset of the cold season it often turns out that the stove on the VAZ-2110 is blowing cold air. Today we will try to talk in great detail about the design, repair and replacement of the heater on the “ten”. For clarity, we will supplement the text with photographs and videos.
Let’s say right away that the design of the heating system on the “ten” is fundamentally different from what was on the old VAZ models. The most important feature and difference of the interior heater is that the VAZ 2110 heater radiator and its fan are located not in the cabin, but in the engine compartment. This design has its advantages, for example, to replace the heater radiator or stove fan, you do not need to completely disassemble the front panel (dashboard).
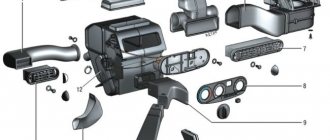
Another important difference is the electronic control of climate processes in the cabin. For this purpose, the VAZ 2110 is equipped with a so-called automatic heater control system (AHC). Photo of the SAUO block below.
By the way, the SAUO unit on “tens” of different years of production varies. Since 1996, 4 types of SAUO controller have been produced. It is worth taking this into account when purchasing a unit as a spare part. It is this device that controls the temperature in the cabin and the operation of the fan. You can set the temperature from 16 to 28 degrees.
But how does this miracle device work? On the ceiling of the “tens” cabin there is a temperature sensor or a ceiling air sensor with a built-in (very small) fan for air circulation. It is this sensor that sends information about the actual temperature in the cabin, and the SAUO unit gives a command to the micro gearmotor (MMR), which in turn opens or closes the main damper, which is responsible for the access of hot air to the cabin. When the temperature in the cabin changes, the ceiling sensor gives a new signal, the micro-gear motor is activated, turning the damper, closing or opening the access of hot air to the cabin. This way the set temperature is automatically maintained. Next is a photo of the VAZ 2110 heater air duct diagram .
VAZ 2110 heater blows cold, why?
Many owners of “ten” complain that at some point the stove constantly blows cold air and no amount of turning the handles of the automatic heater control system can save the situation. There can be a lot of problems and malfunctions. For example, the ACS controller itself is faulty, the ceiling sensor or micro-geared motor is faulty and simply does not open or close the damper. Another reason is the air (air lock) in the heater radiator, which is simply not capable of heating the air passing through it. Below is a schematic representation of the VAZ 2110 heater device .
Heater dampers VAZ 2110
Often the cause of poor performance of the “tens” heater is the damper of the VAZ 2110 heater . The damper may not close tightly or open poorly. The heater flap itself is made of plastic, which can become warped and perform poorly over time. Many car owners buy a metal damper and change it themselves. How to check the functionality and evaluate the condition of the heater damper? Everything is quite simple, remove the central air duct deflector and there you have it - a damper! Let's look at the photo.
Next, carefully inspect the damper, turn on the stove, turn the controls on the ACS unit and see if the damper works at all. How does it move, does it fit tightly. If she does not respond to commands, then the problem may not be her at all. For one thing, you can see if the lever for redirecting the air flow from the glass to the feet works.
Heater fan VAZ 2110
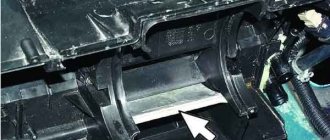
It is quite simple to determine the performance of a stove fan by looking at the noise. If the fan motor burns out, then it naturally will no longer work. However, before rushing to change the stove fan, you need to make sure that the fuse has not blown. As we already wrote above, the fan of the VAZ 2110 stove is located not in the cabin, but in the engine compartment. To get to it, you will need to remove a special apron that separates the engine compartment from the heater housing, vacuum brake booster and windshield wiper mechanism. The actual photo is below for clarity.
So we got to the stove fan, removing the apron and heater casing. By the way, next to you you will see the cabin filter, in the housing a little to the left. It needs to be pulled out and cleaned. If no one has changed the filter before you, over many years of operation it is seriously clogged with debris and interferes with the normal circulation of air, which is sucked into the cabin of the VAZ 2110.
Heater radiator VAZ 2110
The radiator of the “tens” heater is located in the same place as the fan, that is, under the hood (see photo above). To remove it, you must first remove the fan from the heater casing. If you notice a strange smell in the cabin, lift the floor mats; if there are puddles of antifreeze or antifreeze, then the radiator of the VAZ 2110 heater is leaking. Although the clamps may no longer hold... in any case, you will have to disassemble and find out the cause of the leak. Next, we offer a couple of videos demonstrating the process of disassembling, removing the apron, stove fan, cabin filter and heater radiator.
Other parameters of VAZ 2110:
| General parameters of VAZ 2110 batteries | |||
| General view General view of batteries | L (mm) Length (L): | ||
VAZ 2110 battery length for different years of manufacture.
Data are presented in millimeters.
| B (mm) Width (B): Width of VAZ 2110 battery for different years of manufacture. Data are presented in millimeters. | H (mm) Height (H): The height of the VAZ 2110 battery for different years of manufacture. Data are presented in millimeters. | ||
| (General form) | from 241 (mm) to 246 (mm) | from 174 (mm) to 175 (mm) | from 188 (mm) to 190 (mm) |
| VAZ 2110 battery size tables | ||||||
| Year (Modification) | D+ (mm) VAZ 2110 battery size tables | |||||
Disclaimer: Although the data represents official manufacturer figures, the information above is for reference only and is not guaranteed to be completely accurate.
Add a comment Cancel reply
You must be logged in to post a comment.
Many car owners, for unknown reasons, ignore the flow of droplets from the radiator until the last moment. But if it's just drops at first, the problem gets worse over time. It is no secret that a radiator without coolant, and in your case this most likely means antifreeze, will not be able to work.
Heater radiator
Not paying attention to radiator problems ultimately leads to repairs. You will be lucky if you manage to repair the unit. If not, then the only solution is to replace the heater radiator with a VAZ 2110.
We will consider the issue of replacing the unit in our material today.
Product added to bookmarks!
- Description
- Reviews
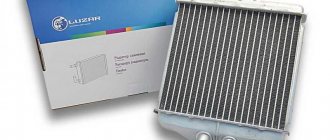
Three-row aluminum radiator (high performance).
APPLICABILITY: VAZ 2110, 2111, 2112 with injection engine.
Advantages: The efficiency of the radiator is much higher than standard. Excellent for installation on turbocharged engines and VAZ.
Radiator size:
615x340x67 mm.
Core dimensions: 560x305x60 mm.
The outlets for the cooling system hoses are located on one side, diameter 32 mm
.
Can be installed* on VAZ 2108, 2109, 21099, VAZ 2113, 2114, 2115, VAZ 2170, 2171, 2172 (Lada Priora).
*Precise adjustment of the radiator will be required (modification of the front radiator frame).
What to install?
Brand Pekar
Heating radiators used for the VAZ 2110 are usually divided into two types:
Until the fall of 2003, old radiators were installed on the “tenth” model, and then cars with new units began to be offered. There is practically no difference between them, but the repair differs in approach and complexity.
In addition to the standard aluminum radiator, a copper analogue is perfect for the VAZ 2110. This unit has fewer fins, but is characterized by more efficient heat transfer. This will make the stove work much better. The only drawback of a copper radiator is its cost. Ideal for installation on a VAZ 2110, a double-row copper radiator marked 2110-8101060 will cost you up to 2,000 rubles.
If you don’t want to spend that kind of money, but want to get an effective device with high quality indicators, then choose the DAAZ model. This radiator is made of aluminum, works well, and the price does not exceed 1000 rubles.
Design of heating radiators from LUZAR
LUZAR heating radiators are available in three types:
- Tubular-plate, prefabricated, aluminum. It consists of aluminum plates through which aluminum tubes pass, inside which coolant runs. The tanks on such radiators are made of plastic. Heater radiators of this type are used for heating small-sized salons due to limited heat transfer; have the best rigidity and light weight, as well as the lowest price.
- Tubular-tape, non-assembled (brazed), aluminum. The corrugated aluminum tape in such a radiator is located between aluminum flat-oval tubes. Radiator tanks of this type can be made of either plastic or metal. The design of non-assembled (brazed) aluminum devices is the most universal, allowing the creation of heat exchangers with any specified characteristics. Aluminum stove radiators are light in weight and relatively high rigidity, as well as at optimal prices.
- Tubular-tape, non-assembled (soldered), copper-brass. The design is very close to type 2 - between the copper flat-oval tubes there are copper strips folded in the form of an “accordion”. At the same time, the tanks on such heating radiators are made of brass - in order to increase the overall rigidity of the structure. Copper heating radiators - due to the high specific heat capacity of copper - have excellent heat transfer rates. However, due to the high softness of copper, heating radiators made of this metal are forced to have a narrow tube and a large interval (step) between the tubes, which imposes serious limitations on maximum efficiency. Also, copper heater radiators have the highest cost and the lowest rigidity to torsion, fracture and internal pressure. In this regard, copper heater radiators are “outdated” and are gradually falling out of use.
LUZAR: time-tested and road-tested
LUZAR radiators have been awarded the “Radiator of the Year” award several times. For several reasons:
- Our products are not inferior to the original ones in quality and durability.
- Often it is our products that are “original”.
- We provide a warranty of 2 years or 125,000 kilometers.
- We check each model for leaks, and several models of each batch for corrosion and vibration resistance.
- You can buy stove radiators in all possible ways (more details in the “Where to buy?” section)
- We answer all customer questions openly and quickly
What do you need for work?
First of all, you will need a new heater radiator. The choice is presented in a fairly wide range, so decide for yourself here.
As for tools and materials, be sure to check the condition of the system pipes. It is possible that they are also damaged, so they will have to be replaced.
Buy a set of clamps. In general, you will need three of them, but it is better to take a reserve just in case. Moreover, this “just in case” happens to every second person who changes a stove radiator with their own hands.
Tools include a short Phillips screwdriver and tweezers . The latter will help you install the latches.
Removing the heater radiator
Your first priority is to get rid of the antifreeze. It is better to drain the coolant into a clean container if you filled it recently and it is in good condition. This will allow you to refill it later.
- Relieve pressure by opening the expansion tank cap. Just let the car cool down before doing this.
- Next, behind the ignition module, find the plug that needs to be unscrewed.
- You should have about 4 liters of coolant coming out of the hole. Therefore, prepare a container of appropriate size.
- Or you can drain through the expansion tank. Although this option is not particularly convenient.
After draining the coolant, you can begin further dismantling the radiator. But here the procedure depends on what kind of unit we are dealing with - a new or old model.
Let's consider both options separately.
Old stove
The radiator is removed from the engine compartment. This is done as follows:
- Remove the rubber frill seal;
- Under the brake master cylinder, locate the fasteners that hold the frill in place. Unscrew it;
- Now remove the screws that hold the right side of the frill in place. There should be four of them in total;
- Disconnect the two small clamps on the frill. They hold wires and hoses;
- The positive terminal and negative wire are disconnected from the fan;
- Move the left side of the frill forward a little, but you don’t need to remove it completely. All you need to do is unscrew a couple of fasteners;
- Remove the wind cover;
- If there is a coolant level sensor terminal, disconnect it;
- Remove the steam exhaust hose from the expansion tank.
Removing the thermal insulation
Next, you need to remove some elements one by one. Proceed strictly in the specified sequence.
- Windshield washer hose.
- Wipers.
- Windshield trim. Heater housing clamps.
- Front part of the heater with fan.
- Cabin filter.
- The second part of the case is the fan.
- All hoses (steam outlet, return and supply).
- Radiator housing.
If your existing radiator is made of copper, the presence of a leak does not indicate a mandatory replacement. It can be soldered. Only this question is better to entrust to a specialist. Even if you pay more money, the decision will be competent and correct
So we figured out how to remove the heater radiator on an old-style VAZ 2110. When installing a new unit or a repaired old one, make sure that the pedal of the plastic housing from the fan fits into the groove. If this is not done, the gearbox will not be able to change the position of the damper. Consequently, there will be no heat inside the cabin.
In addition, it is better to replace this plastic pedal with an aluminum one. Not expensive, easy, but reliable and durable.
New stove
If you are dealing with a new type of stove, there are some nuances regarding fixing the heater to the body.
To remove the unit, you will need to dismantle several elements. Namely:
- There are screws at the bottom of the windshield, the middle one can be unscrewed;
- Also unscrewed is a pair of nuts that you will find slightly above the intake manifold;
- The nut located to the left of the filter must be removed;
- If there is a reservoir with washer fluid for the rear window, then it and the air filter are removed.
The new generation heater is distinguished by the fact that the design is detachable. This is quite easy to do to be able to replace the heater radiator.
VAZ 2110 battery sizes
The overall dimensions of batteries for 2110 depend on the country of manufacture of the car and the year of manufacture of the car.
General battery sizes:
- Length (L): from 241 (mm) to 246 (mm);
- Width (B): from 174 (mm) to 175 (mm);
- Height (H): from 188 (mm) to 190 (mm).
A standard car battery has the shape of a parallelepiped, so the overall dimensions for the device are length (L), width (B) and height (H).
Notes:
When choosing a battery for a car, the following are taken into account: the overall dimensions of the device, the location of the terminals on it and their polarity, the type and size of the battery terminals.
The parameters of the battery depend on their size, that is, an increase in the capacity of the device is associated with an increase in its size, therefore the site for installing the battery of small cars with a small engine capacity is always smaller than that of large cars with powerful engines.
Important: the battery sizes are standardized, but the number of standard sizes is large; choosing a battery with the required dimensions guarantees the possibility of correctly securing the battery with a standard mount and installing it in a standard place.
Other names:
Until 2014, the VAZ 2110 model was assembled under license from AvtoVAZ vehicle kits at the Bogdan Corporation automobile plant under the Bogdan-2110 brand.
Subtleties of the model range:
The model is equipped with an electronic engine control system, a diagnostic unit (on-board computer), power steering, electric windows, and a new body painting technology is used.
Years of production Years of production: 1995-2007.
Brake replacement procedure
Man has always strived to minimize his own labor, to solve a problem with a minimum number of movements. The impetus for the development of technology is a very interesting factor - our laziness.
Removed the brake cylinder
It was laziness that largely led to the emergence of an original method of replacing the heater radiator on a VAZ 2110. In this case, the heater does not have to be removed. The entire job will take more or less experienced car owners an hour, but a beginner may need a little more.
The work is carried out as follows.
- Drain the coolant using the remote control heating pipe.
- Disconnect all pipes and remove the expansion tank.
- Disassemble the frill.
- Remove the brake pedal, grabbing the VUT at the same time, to gain access to the radiator.
- We take out the old radiator from there and install a new one in its place.
- Assembly is performed in reverse order.
- Return the coolant.
- With such a procedure, it would not be amiss to replace the cabin filter at the same time.
As you can see, the process is quite simple and original, not requiring excessive effort or professional skills. Any car owner can cope with such a task.
Regardless of which radiator you choose, try to carry out each stage of its replacement as competently and carefully as possible. To be fair, let’s add that the copper unit is better than DAAZ. And the money spent on it is largely worth it. Of course, if you are not going to sell the car right away, but plan to use your own VAZ 2110 for several years to come.
We replace the VAZ 2110 stove radiator with our own hands
Before you replace a leaking or possibly clogged radiator, you need to choose a new one. Here you have space, it is quite possible that you will want a copper, DAAZ or Priorovsky one. But try to decide for yourself, look at reviews of different models on the forums, and only then buy.
Pay attention to the condition of the pipes; it is quite possible that they also need replacement.
You will need more clamps, try not to limit yourself to the three recommended, as you know, a supply will not hurt. First of all, you need to drain the antifreeze.
Radiator VAZ-2110: Tips for selection, repair and operation
Therefore, let’s try to figure out which unit is best to choose for the engine and for the stove so that it lasts long and reliably. Such a high-quality device will help in the operation of the cooling system in particular, and the entire car in general. Most often, repair of this device is required due to its leakage. This is affected by corrosion and, of course, the quality of the materials used in its manufacture.
Auto repair school Articles, tips and tricks on do-it-yourself car repair and maintenance
But, before that, it wouldn’t hurt to carry out one simple check: warm up the engine to operating temperature, check the upper and lower heater pipes with your hand in the engine compartment (they should be the same temperature), turn the “heat-cold” knob all the way to the right, turn it on heater fan. If, in the first 10-20 seconds, the air flow was hot or comfortably warm, and after that its temperature began to noticeably decrease to “room temperature,” then you can safely prepare to work on replacing the stove radiator.
Reasons for failure of the cooling radiator
As a rule, the main reasons for the failure of the cooling radiator are:
- mechanical damage;
- vibration;
- corrosion.
Often flying stones damage the radiator, jamming its thin “honeycombs”. Also, vibration loads cause cracks to appear in different parts of the radiator.
To increase the service life of the radiator, it is necessary to monitor the cleanliness and serviceability of the cooling system. It is recommended to periodically flush the entire system, regularly change antifreeze, do not pour ordinary untreated water from the water supply into the system, and also clean the radiator externally from dirt, dust and fluff.
Why does the stove blow cold air in a VAZ-2110?
And with the onset of cold weather, the issue of uninterrupted operation of the heating system becomes very relevant. Let's look at the malfunctions that most often arise when operating the heating system of the VAZ 2110. If the system works poorly or not well enough, perhaps it’s all about the amount of coolant. Check the expansion tank. on which there are corresponding marks, as well as a corresponding indicator on the system unit. If they show insufficient quantity, add fluid to the system. Sometimes after topping up, its level drops again over time.
Instructions for replacing the stove (heater) radiator on a VAZ 2110
Preparation for replacement is the same in both cases, so this item can be combined. The first thing you need to do is find out which heater radiator is installed in your car.
To do this, you need to open your passport or call the seller from whom you purchased the car. Next, you should go to the market for a new part (old or new), and with it purchase 5-6 clamps. In this work we will need a shaped screwdriver.
Lada 2110 Mmirage › Logbook › Cooling systems for front-wheel drive VAZs
So, hello! Influenced by the ongoing debate about which configuration of the engine cooling system (ECS) is better, I decided to compile a small FAQ about what circuits are available on the front end, why they are better or worse, and you can decide what to assemble for yourself. All information was found on the Internet in the public domain and I do not claim copyright.
Let's start with the fact that cooling systems (hereinafter - CO) come with an “upper” and “lower” thermostat.
In a system with a “lower” thermostat, the thermostat is installed in front of the water pump; the coolant cooled in the radiator, as well as uncooled liquid directly from the engine water jacket, enters the thermostat. In this case, the thermostat ensures that the coolant temperature at the engine inlet is maintained at a constant temperature by mixing cooled and uncooled coolant in the required proportions. In an “overhead” thermostat system, the thermostat is installed at the engine outlet and, based on the measured coolant temperature at the engine outlet, the thermostat sets the required ratio of coolant flow into the radiator to cool it and bypass the radiator to supply it directly to the water pump, thus stabilizing the temperature at the engine output.
All VAZ 2101, 2108, 2112, 21126, 1118, 2121, 2123 engines in all Ladas (except Granta) have CO with a “lower” thermostat. Granta, most foreign cars, Volga, GAZelle, UAZ with ZMZ and UMZ engines, almost all Soviet trucks and buses have CO with an “upper” thermostat. In principle, the differences are small - let's go over the main machines.
1) VAZ 2101 (and all the classics). Thermostat with 3 fittings (2 inputs, 1 output) - CO is incredibly simple - the engine heats the coolant, it goes from the head through the radiator, or directly to the pump (from where the thermostat will receive it). The coolant inlet and outlet is at the 1st cylinder, the stove is fed from the 4th cylinder and is discharged into the pump bypassing the thermostat. With the transition to an electric cooling fan, the thermal conditions improved slightly. The plug with the CO pressure control valves is located in the radiator, the expansion tank (RB) is “external” (since it is located after the valves).
2) VAZ 2108. SO 2101 has evolved - the RB has become flow-through and is part of a closed loop. The pressure control valves moved to the RB cover. The coolant flows “through” the engine - the outlet is at the 4th cylinder, the inlet to the pump is at the 1st, due to this the temperature difference in the engine has decreased (more uniform heating). Otherwise, everything is the same - the output of the stove and carburetor heating goes to the pump, bypassing the “thermos”.
3) VAZ 2110-12. CO 2108 is developing - the thermostat has become frameless, heating is no longer the carburetor, but the throttle valve; the 2110 heater no longer has a tap (although the 09 gets along just fine without it), so the flow through the stove to the pump has become constant; The ECU sees the engine temperature and decides when to turn on the cooling fan. The heater radiator received a steam removal hose - the air locks disappeared. With the installation of a new thermostat housing (6 pipes), we got rid of the current tee.
Here and below: cars with an electronic throttle valve do not have throttle heating (and therefore hoses and fittings too)))
4) VAZ 2170. The Priora without air conditioning is completely similar to the VAZ 2112. There are no differences. But the Priora with air conditioning has lost the steam exhaust hoses from the heater radiator (both Panasonic and Halla) (I haven’t found any clear diagrams yet). Air pockets occur during the first filling of coolant, but are relatively easy to remove.
Conclusion: the same “ten”)).
5) Viburnum. The only differences from 2111 that I found were the changed shape of the thermostat housing and the RB connection point was moved from the small circuit to the return of the large circuit. The heater radiator without a steam outlet and the very tight layout brings surprises - Kalina often gets airborne with CO.
6) Grant. The thermostat is “upper” - the radiator is completely closed when cold, only the heater remains from the small circuit. The heater and cooling radiators are single-pass - there is less flow resistance, which means the coolant flows faster and air is removed quickly. On the plus side: the engine warms up a little faster, warm air starts coming out of the stove earlier, there are no “extra” hoses. Cons: CO inertia is slightly longer and the operating temperature is usually slightly lower compared to the “lower” thermos.
These were all stock systems, and here are some optimal modifications to these systems.
How to remake the stove on a VAZ 2110
The central corrugation from the vacuum cleaner (the inside is smooth, with a diameter of 40 mm, and the other two are ordinary ribbed inside, also 40 mm in diameter) Important: The diameter of the corrugation should not be less than 40 mm, and if the corrugation is long, then it must be smooth inside, otherwise there will be a whistle. In frost below -20, a problem arose: it is impossible to make air flow in all directions simultaneously. And then either your feet freeze or the side windows freeze.
Did you buy a new heater core, but after installing it, you began to notice that the heater doesn’t heat up like before? The fact is that the heat transfer of the old (factory) stove radiator was better, and the new stove radiator (even if it was from a “trusted” company) most likely turned out to be a fake. Do you know how to determine which heater radiator is better right in the store, without installing it in the car?
On the Internet you can find various tests and reviews of radiators that will tell you which manufacturer you should pay attention to when purchasing. But as practice shows, all these tests are in vain, because when buying a stove radiator from a well-known company, you risk in 50% of cases that you will buy a fake, which naturally will not meet your expectations. Therefore, it is important to be able to correctly distinguish the original from the fake, especially when it is cold winter outside.
So, in order to distinguish an original stove radiator from a fake, you should pay attention to its cost. Usually the price of a good, high-quality heater radiator is within 750 rubles. If its cost is much lower, then you should think about it. Remember, the miser pays twice!
Ask the seller for a certificate and packaging (if the stove radiator is without it). Of course, it is impossible for an untrained buyer to distinguish original packaging from counterfeit packaging, but the lack of a certificate or radiator box is another reason to find a stove radiator elsewhere.
Now about how to choose a stove radiator according to the honeycomb. A good heater core should have honeycombs that are very close to each other. In other words, the smaller the distance between cells, the better. Also try to press a little on the honeycombs with your finger; if, after a little effort, the radiator honeycombs begin to sag - this is a bad sign.
About heater radiator fluid swirlers. Coolant turbulators or swirlers are plastic spirals that increase heat transfer from the radiator when the engine is running at low speeds. As Gennady Krivutsky, leading test engineer of the General Development Department of AvtoVAZ JSC, states: the absence of turbulators in the radiator reduces the efficiency of the heater by 27% at idle, by 17% when driving at a speed of 50.60 km/h, by 5% - at engine speed 5000 rpm. Thus, swirlers serve to increase the heat exchange of antifreeze with the radiator. If there are no swirlers, then the antifreeze “flies” through the radiator without having time to transfer heat, and as a result, the heater in the cabin blows cold air.
How to check if there are swirlers in the heater radiator? Just shake the radiator and hear something rattling inside – that means they are there. However, sometimes the “noodles” (as swirlers are called differently) will not rattle due to the peculiarities of its composition, in which case its presence will have to be determined visually. You are unlikely to be allowed to disassemble the radiator in a store, so we try to shine a flashlight inside the radiator; the swirl rings should be clearly visible.
The set of methods described will allow you to distinguish the original “hot” stove radiator from a fake, but you cannot be 100% sure of the quality of the product. There are known cases when the turbulators inside the radiator are spaced at intervals, or they are not the full length. If you come across such an “under-swirled” radiator, or there are no swirlers at all, do not rush to throw it away, because... There is an opportunity to modify the stove radiator with your own hands! To do this, it is enough to cut aluminum or copper strips 1-1.5 mm thick and 5-6 mm wide (select according to the diameter of the tubes), clamp one end into the drill chuck, fix the other and carefully curl it.
Instructions for replacing the stove (heater) radiator on a VAZ 2110
Old-style heater radiator in a VAZ 2110 car.
If the radiator (heater) begins to leak, then the only way out is to replace it with a new one. A leak can also occur due to insufficient tension in the hoses. In any case, to find out the reason why coolant is leaving the system, we need to get to the radiator. The first thing you need to figure out is what kind of heater is in your VAZ 2110. There are two options:
- New sample radiator. Stamped for VAZ 2110, produced after September 2003.
- Old style radiator. This option is for cars manufactured before September 2003.
The procedure for disassembling and replacing differs, depending on the version of the heater heater installed in your VAZ 2110. Although the difference is small, the article includes two versions of the instructions - for the new and old model, respectively.
A complete set for replacing the radiator and related elements. For example, a cabin filter.
The heater's task is to forcibly remove heat from the parts of the power plant and then transfer it to the surrounding air. This function creates a balance - the car engine does not overheat or overcool. Inside the radiator is a coolant called antifreeze. In the CIS countries it is customary to call it antifreeze. The difference lies in the manufacturer; in the CIS the liquid is called antifreeze, and the foreign product is called antifreeze.
Brand name – LRh – Luzar Radiator heater
Heating radiators (also known as heater radiators, also known as heater radiators) are heat exchangers that use the heat generated by the engine to heat the vehicle interior. They allow you to maintain a comfortable temperature and prevent the car windows from fogging up.
For reference: different names of this node have equal rights of use. For example, “heating radiator” and “stove” come from the function of this heat exchanger, “heater radiator” and “stove radiator” - from the installation . . more details
Preparatory work
Preparation for replacement is the same in both cases, so this item can be combined. The first thing you need to do is find out which heater radiator is installed in your car. To do this, you need to open your passport or call the seller from whom you purchased the car. Next, you should go to the market for a new part (old or new), and with it purchase 5-6 clamps. In this work we will need a shaped screwdriver. It's also worth taking tweezers: to get to the radiator, you will need to deal with hard-to-reach latches.
Explanation of the instructions for draining the coolant.
Coolant drain
Some of the coolant can be drained directly from the engine block. Unscrew the cap from the expansion tank. This must be done so that the compression inside the tank decreases. Prepare a container for antifreeze. Now we remove the plug located immediately behind the ignition module, which can also be removed for convenience. After this, all the liquid should drain into the prepared container. Now you can proceed to dismantling.
Instructions for installing a new heater
New sample
The “new” radiator has the following fastenings: a nut near the filter, a screw on the lower end of the windshield and two nuts located above the intake manifold. If your car has a heated glass system, you need to remove the expansion tank. The stove filter also needs to be removed and replaced if necessary. We remove it by unscrewing 4 screws, and then take out the filter. Now replacing the radiator of the VAZ 2110 stove:
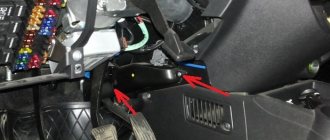
The arrows indicate the fasteners that need to be removed to access the radiator.
- The new model heater is not one piece - it is assembled from two halves. They are connected using three self-tapping screws. Two screws can be found on the front side of the heater radiator, and the third is under the hose that goes to the heater fan. Finding the hose is not difficult - it is L-shaped.
The location of the radiator is under the hood of the car.
The fasteners have been removed, let's move on. Problems may arise when dismantling the heater, so you need to stop here. To remove the left part, we need to firmly grasp it with our left hand, and with our right hand, respectively, the right half. Now press on the heater and lift both parts up. The right side is easier to remove - you just need to pull it to the right with force.
The right side of the stove radiator. It needs to be disassembled into 2 more parts.
Disassembled right side of the radiator. The parts are fastened to each other using steel brackets.
For reference: there should be about 4 liters of liquid. Inspect the antifreeze: if it is relatively clear, then it can be refilled into the new heater radiator.
Improvement by replacing the fan
Since the radiator in a VAZ gives off a sufficient amount of heat, poor interior heating is associated with deficiencies in the fan. Simply put, there is not enough air to heat the entire interior of the car.
To solve this problem, it is worth replacing your fan, which is too small and not productive, with a better fan - from a VAZ-2108 or VAZ-2109, which have a higher rotation speed.
Refinement of the VAZ-2101 stove is carried out in several steps.
Step-by-step instruction
- In the cabin, we remove the shell of the lower part of the heating, where the fan is located.
- We remove, in fact, the fan, which we will no longer need.
- If you install a part from a figure eight, you need to cut the ridge that supplies air to the floor of the car.
- We remove the fan with two blades, since a fan with five blades will work instead.
- Don’t forget to check the new fan before installation - connect it and see if the blades move and there is air flow.
- We fix the new device instead of the old one and securely fasten the entire structure.
- Along with the fan, it is worth reinstalling the resistor, buttons and regulators - we also take them from the figure eight. This must be done, since due to the difference in currents the elements will quickly become unusable.