The VAZ 2107 stove creates and maintains a comfortable air temperature in the cabin and prevents the windows from fogging in cold and humid weather.
It consists of:
- heater;
- fan;
- control unit.
Outside air enters the casing of the air intake chamber located in the engine compartment under the windshield through an opening in the hood. It is then sent to the heater, where most of the moisture it contains condenses. However, until the radiator is completely warmed up, slightly humid air will enter the cabin.
The heater radiator is heated by coolant coming from the cooling system. The temperature is regulated by a special tap that partially blocks the flow of hot coolant going into the heating system. The more heated liquid enters the heater radiator, the warmer it will be in the car. The position of the tap is changed by a regulator from inside the cabin using a flexible rod.
Air enters the cabin using a heater fan, the rotation speed of which is regulated by a special resistor. When the vehicle is moving at high speed, the heating system can operate without the fan turned on. The air flow entering under the hood creates increased pressure in the air intake box and forces warm air into the cabin.
The heating system of the VAZ 2107 is quite simple (warm air flows are indicated in orange, cold air flows in blue)
Through an air duct system, heated air is directed to different parts of the cabin, as well as to the windshield and side windows, preventing them from fogging in cold and humid weather.
The operation of the stove is controlled using several knobs on the instrument panel. The upper handle regulates the position of the heater tap (the extreme left position is the valve is completely closed, the extreme right is fully open). Using the middle handle, the position of the air supply cover is changed. By turning it to the right and left, the intensity of the warm air supply increases and decreases accordingly. The lower handle regulates the dampers of the heated window ducts. In the right position, the air flow is directed to the side windows, in the left position - to the windshield.
Through the air duct system, heated air is directed to different parts of the cabin, as well as to the windshield and side windows
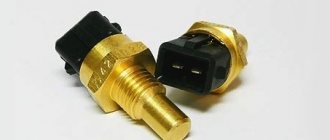
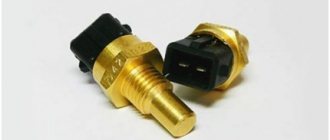
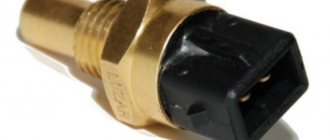
VAZ coolant temperature sensor
The coolant temperature sensor allows you to find out the current temperature of the antifreeze located in the car's cylinder head. This sensor is sometimes called the “engine temperature sensor”, but this is incorrect. In certain parts of the engine, the temperature may differ significantly from the coolant temperature.
If the sensor fails, which creates certain problems for the operation of the injection engine: emissions of harmful substances and fuel consumption increase. The fact is that data on engine temperature is received not only by the indicator on the dashboard, but also by the electronic control unit. Depending on the temperature, the optimal composition of the mixture supplied to the cylinders is established. A cold engine needs a richer mixture, a hot one needs a leaner mixture. Also, when the engine is cold, higher idle speeds are maintained. If the sensor is faulty, the ECU will receive incorrect information about the temperature; accordingly, an over-rich mixture will enter the warmed-up engine, making the exhaust more “dirty.”
New VAZ 2107 models are equipped with injection engines, so a faulty sensor needs immediate replacement.
Diagnostics
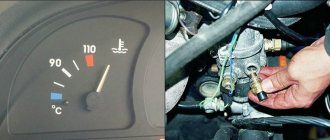
You can check the fan switch sensor by measuring the resistance under different temperature conditions. To do this, use a tester (multimeter) in ohmmeter mode and measure the resistance of the spare part. It should decrease in proportion to the heating of the coolant, as already mentioned, the higher the heating, the lower the resistance.
The resistance can be checked without removing it from the car; to do this, just remove the chip and take measurements on the contacts of the part and warm up the engine by monitoring its heating using the instrument on the panel. See the table with approximate values for the dependence of resistance on temperature below.
Before installing a new controller, you can check the change in resistance in a container of heated water.
You can check the electric motor by applying voltage from the battery, the blue wire is “+”, blue and black or just black is “-“.
It happens that the fan starts at unusually high temperature values, this indicates its malfunction.
If during the check it turns out that the electric motor, fuse, sensor are all working properly, in this case you need to check the serviceability of the relay. It happens that the contacts simply burn out. In the photo below
The fan relay on the VAZ 2107 injector is located on an additional unit under the “glove compartment” (see photo) it is on the leftmost number 23-3787.
Fan relay VAZ 2107 (injector)
If you have nothing to replace this relay with, you can repair it. The contact is attached to the plate and to restore its functionality it is enough to tighten the contact. For this:
- disassemble the relay;
- bend the top stop of the plate;
- lift the plate with the contact for easy access;
- press the contact;
- putting it back together.
It should be noted that over time the breakdown is repeated, verified.
Product delivery options
Note! Below are the shipping methods available specifically for this product. Payment options may vary depending on the shipping method. Detailed information can be found on the “Delivery and Payment” page.
Parcel by Russian Post
Available payment methods:
- Cash on delivery (payment upon receipt)
- Using cards Sberbank, VTB, Post Bank, Tinkoff
- Yandex money
- QIWI
- ROBOKASSA
Shipping throughout Russia. Delivery time is from 5 to 12 days.
Parcel by Russian Post 1st class
Available payment methods:
- Cash on delivery (payment upon receipt)
- Using cards Sberbank, VTB, Post Bank, Tinkoff
- Yandex money
- QIWI
- ROBOKASSA
Shipping throughout Russia. Delivery time is from 2 to 5 days. More expensive than regular delivery by Russian Post, approximately 50%. Parcel weight up to 2.5 kg
Express Parcel EMS
Available payment methods:
- Cash on delivery (payment upon receipt)
- Using cards Sberbank, VTB, Post Bank, Tinkoff
- Yandex money
- QIWI
- ROBOKASSA
Shipping throughout Russia. Delivery time is from 3 to 7 days. More expensive than regular delivery by Russian Post, approximately 100%.
Transport companies
Available payment methods:
- Using cards Sberbank, VTB, Post Bank, Tinkoff
- Yandex money
- QIWI
- ROBOKASSA
Delivery is possible to any locality where there is a representative office of the transport company. Delivery time is from 2 to 10 days. Sending large parcels is approximately 50% more profitable than by Russian Post.
Pickup from our warehouse
Available payment methods:
- Cash upon receipt
- Credit, installments
- Using cards Sberbank, VTB, Post Bank, Tinkoff
- Yandex money
- QIWI
- ROBOKASSA
For carburetor systems
There are still many VAZ 2107 cars in use on the roads with a carburetor supply of the fuel mixture. As in the injector, engine cooling occurs thanks to the radiator and fan, only the process is regulated by a fan sensor.
Location and principle of operation
On older cars, additional cooling begins when the antifreeze reaches a certain temperature, usually 92 °C (there are differences for individual sensors). Carburetor systems are equipped with 2 coolant sensors - one to regulate fan operation, and the second sends readings to the driver’s instrument panel.
The sensor that turns on the fan is located on the bottom of the radiator panel, on the right side. To see it, you need to lift the hood and on the back you can see a “nut” with wiring. Usually these are modifications of the TM-108.
The principle of operation is to change the volume of the working fluid of the sensor when the temperature of its working fluid fluctuates. Inside the thick-walled steel housing is a working mixture covered with a flexible plate attached to a pusher that connects the contacts when the sensor is triggered.
In the steel case, the sensor heats up evenly, the working fluid expands and the contacts are connected, the fan is activated.
There are several modifications of the devices - TM108; TM108-10; 661.3710. The first is designed for operating temperatures: 92–99 °C (contact activation and disconnection). The second is designed for colder operating conditions: 87–92 °C. These sensors operate in a circuit with an additional relay and can withstand a current of 1 A. If a relay contact is not provided and the fan is connected directly to the sensor, then the latest 16 A model is used.
What to do if the carburetor freezes in winter?
The switch is in the Cold position when the partition inside the filter is open and the carburetor takes air from the street. This position is used in summer. The Hot position closes the access of air from the outside and opens it for the intake of hot air from the manifold. This position is used in winter and prevents ice from forming in the carburetor components described above. The intermediate position partially opens the partition and air is taken in both from the collector and from the street. Optimal position for the spring-autumn period. The OZONE 2107 carburetor air filter has a manual thermal switch. In some models from foreign manufacturers, the supply of hot air is automatically regulated. I will be pleased if you express your opinion about this post.
How to check readings
It is worth recalling once again that the temperature sensor is a kind of thermal resistor that changes its resistance depending on the temperature of the coolant or the cylinder head. Any thermistor decreases its resistance as the engine temperature increases. Resistance ratings for many sensors can vary markedly. This is due to the difference in engine types and cooling systems, so such figures must be looked for in reference literature.
An ohmmeter is used to check the sensor. As an example, we can take the most common temperature sensor, which has a standard of 290 Ohms at an engine temperature of 75 degrees Celsius. To do this, the car is heated to the required temperature, and a measuring device is connected to the terminals of the device. If the readings deviate greatly from the normalized values, it means that the sensor is in a faulty state. In this case, it will need to be replaced. Only minor errors of 1-2 Ohms are allowed in the operation of the device.
This is perhaps the most common method of checking the engine temperature sensor. In the same way, you can check a new, just purchased sensor before installing it on a car. You can heat the water to 75 degrees (controlled with a thermometer) and lower the working part of the device there. Afterwards, attach measuring probes to the contacts. Try to make sure that water does not get into the measurement area, otherwise the test result will not be correct, or even completely damage the new sensor.
FakeHeader
Comments 21
I'll take note! I’ve been eyeing this place for a long time, but I liked your implementation
The option with the original radiator is ok. After installing the radiator 21045.1301.012 you will have to come up with something else...
I have almost a native one (Luzar sport).
You can also make a hole in the sleeve
I removed the original corrugation and left the original one with holes. I left after the repair exactly in the rain))) So my baptism of fire was over! And the intake was dry, although I was driving in a dense stream, the rain was pouring normally (not downpour), there were puddles but not deep.
I also stood like that (approximately), it was of no use, now there’s a tattered piece there
You can also make a hole in the sleeve
So if you do it at your own peril and risk) and the effect, together with the split gear on the stock camshaft, is noticeable!
Well, maybe the effect is mainly from the gear - from the adjusted phases...
By the way, the car became less dull in the heat, or rather it doesn’t get dull on the gas; it reacts cheerfully!
in hot weather it always stalls until it warms up, even with the corrugation outside...
DIY replacement instructions
To replace the sensor, do the following:
- First, open the hood and disconnect the battery.
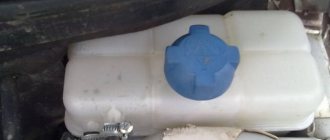
- Remove the coolant expansion tank cap and unscrew the cap from the radiator unit. This will prevent the formation of high pressure in the system.
- Next, place a container under the radiator assembly - the antifreeze will pour into it after removal. Turn off the tap and wait until the liquid drains.
- When these steps are completed, you will need to disconnect the wiring connector from the device. Next, using a 30mm wrench, you will need to unscrew the sensor and remove it from its seat. When dismantling, do not lose the steel seal, and before further installation it will be necessary to treat the installation site with sealant. It is important that the sealant itself is high-temperature - treating the seat with it will prevent leakage of consumables.
- When the device is installed, it is necessary to reinstall the plug on the radiator assembly. Further assembly is carried out in the reverse order - first you need to fill in the coolant, then connect the battery terminal.
- To diagnose the performance of the device, you need to start the power unit and warm it up to operating temperature so that the fan turns on.
Photo gallery “Changing the sensor ourselves”
Bottom line
As you can see, replacing the coolant sensor on a VAZ 2114, VAZ 2106 or VAZ 21124 does not differ enough to describe each model separately.
The difference in engine types - carburetor (injection of the fuel mixture due to the difference in pressure) or injection (nozzles through which fuel is injected into the combustion chamber) - is not fundamental - the DTOZh works the same everywhere and also fails according to the same scenario.
There is no need to be afraid of breakdowns, even if you are a novice car enthusiast. Domestic cars are designed so intuitively that even someone who has spent less than a year behind the wheel can cope with replacing the sensor.
Temperature sensor VAZ 2107 Injector Where is it located
Replacing the antifreeze sensor on a VAZ 2101-VAZ 2107
Welcome! Antifreeze sensor. this allows you to know the temperature of the coolant in your car's engine and you will know it by looking at the dashboard, of course, at the separate indicator bar that shows the temperature of the coolant itself, which people also call this gauge. The “engine temperature scale”, unfortunately, turns out to be different, because the sensor only reads the heating of the fluid itself, and not the entire engine; unfortunately, over the years, such a sensor burns out in the case of an injection-type car, it begins to emit much more harmful substances into the atmosphere, and fuel consumption also increases, why will consumption increase, and you emitted more harmful substances into the atmosphere, you ask?
What is the difference?
Is there a fundamental difference between different Lada car models when it comes to the operation of DTOZH?
It would be useful to note that there is an unspoken division of vase models into groups, thanks to which it is possible to carry out repair work on one car, relying on the instructions for another. This may not apply to all systems, but regarding this topic it works quite well and does not harm either the car or its owner.
The first group is the VAZ 2101 and the following models up to the VAZ 2107. The coolant temperature sensor on the VAZ 2106 is located in the cylinder head (cylinder head), like all cars of the model range listed above. Accordingly, the signs of breakdown, diagnostic and replacement methods will be similar for them.
What should you pay attention to if the coolant temperature sensor of a VAZ 2107 fails? First of all, this is the inability to start the engine in any weather, as well as poor idling, uncharacteristic exhaust color and excessive fuel consumption. How to replace a temperature sensor on a VAZ 2106? First of all, you need to cool the engine and drain the coolant.
Then remove the terminals from the battery and remove the protective casing, after which the wires are disconnected from the detector, it unscrews itself and a new one is put in its place. Reverse assembly manipulations are carried out and the engine is started in order to check the proper operation of the system.
How to replace a temperature sensor on a VAZ 2106? First of all, it is necessary to cool the engine and drain the coolant. Then remove the terminals from the battery and remove the protective casing, after which the wires are disconnected from the detector, it unscrews itself and a new one is put in its place. Reverse assembly manipulations are carried out and the engine is started in order to check the proper operation of the system.
- The second group is VAZ 21099, VAZ 2108 and VAZ 2109. Despite the apparent difference, the main nuances when working with DTOZh remain the same in the case of these car models. Moreover, no matter whether the VAZ 2109 is an injector or a carburetor, the signs of a device failure will be absolutely the same as the basic principles of replacing it.
- The third group is the VAZ 2110 injector/carburetor and the following VAZ 2111 and VAZ 2112. Regardless of the type of engine and its features (8 valves or 16 valves), the system still gives a signal if the DTOZh fails, it also fails, when the sensor is faulty and wastes fuel to the same extent where it is not so necessary, if the system is deceived by incorrect data. Replacing the coolant temperature sensor of a VAZ 2110 is possible on your own if you only have a key of the required size.
- The fourth and last group on the list is the so-called Samara - 2 series, which includes the VAZ 2113, VAZ 2114 and VAZ 2115. A distinctive feature of this model range is the presence of two temperature sensors - DTOZH and a coolant indicator sensor. The fact that there are two of them in no way complicates replacing a broken device, it only forces the owner to be a little more careful when diagnosing a malfunction.
Instructions for removing and replacing the power supply with your own hands
To replace the DTOZH, you need to do the following:
- Open the hood and find the controller. Disconnect the terminals with wires from the battery.
- Antifreeze should be drained from the power unit cylinder block. The liquid is drained until its level is below the sensor installation location.
- Next, you will need to slide the protective cap on the connector and also disconnect the wire connected to the sensor.
- Using a 21mm wrench, you need to unscrew the device and pull it out of the seat. It is more convenient to use a spark plug wrench or socket for this purpose.
- Dismantle the device and replace it with a new one; further assembly is performed in the reverse order.