Grant stove radiator
The location of the heater radiator on the Grant is not convenient for replacing it. To remove the radiator without damaging it, you will have to dismantle the dashboard, which can take a lot of time and labor due to a trivial problem that can be solved in an hour in other cars.
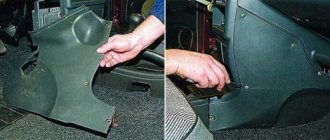
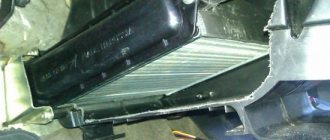
The radiator is located under the dashboard in its central part at the driver’s feet. Its pipes are hidden behind the decorative side panel trim. This location of the radiator makes it a little difficult to access it when replacing it, but if you use the correct replacement instructions, then removing and installing the radiator yourself will not be difficult.
Troubleshooting methods
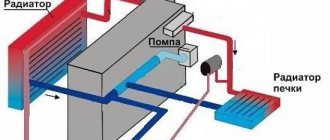
Heating the car interior directly depends on the proper functioning of the engine cooling system, since the air entering inside is heated when passing through the radiator of the Lada Granta stove. It is necessary to check the coolant level in the expansion tank: a decrease in the amount of antifreeze leads to impaired circulation and insufficient heat exchange. This result may also be due to a leak in the valve on the expansion tank plug.
Insufficient heating occurs due to a malfunction of the thermostat or pump in the engine cooling system. The cause of unsatisfactory performance is sometimes an air lock in the heating system. To eliminate it, with the engine warm, remove the heating hose from the throttle valve assembly. Then you need to create excess pressure in the expansion tank - unscrew the cap and blow into it. In this case, coolant containing air bubbles will flow from the removed hose. Similar actions must be performed with the second hose. This operation should be carried out with great care: antifreeze on a warm engine has a temperature of about 90°C, and when removing the hoses you can burn your hands.
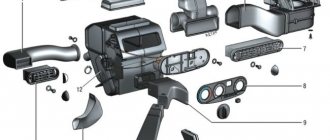
The stove stops heating due to a malfunction of the gear motor that controls the damper that regulates the air temperature. Replacing the VAZ 2190 heater gearmotor can be done with your own hands, however, this is a rather labor-intensive procedure that requires professional experience. The part is located under the hood of the car, and to remove it you will need to dismantle the seals, frill, wiper arms and trapezoid. When replacing a nano gearmotor, it is recommended to check its performance by applying voltage to the corresponding terminals from the battery.
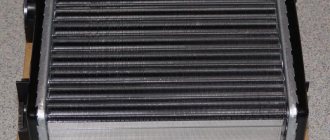
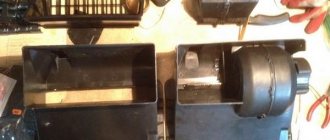
Important elements of the stove design are the heater radiator and the fan that supplies air to it. The heat exchanger must not be dirty, otherwise it must be replaced or repaired.
How to identify a clogged radiator
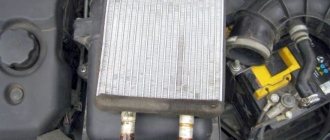
Checking the radiator is a fairly simple task that anyone can do. To do this, you need to check the circulation of fluid through the radiator. If the circulation is normal, then both radiator tubes will be hot, but if the inlet tube is hot and the outlet tube is cold, this indicates that the radiator is clogged from the inside.
A clogged radiator can be washed or, at best, replaced with a new one.
Reviews
| № | Positive |
| 1. | Vladimir: Six months have passed since we bought the car, and there have been no breakdowns in such a short time. The fan refused to start several times, the reason turned out to be a bad fuse contact. |
| 2. | Vasily: I have been actively using the machine for two years, there are no particular complaints, all units are working as normal. Breakdowns happen, like everyone else, but they are minor and can be easily fixed on your own. |
| 3. | Gennady: after two months of the machine being idle, the stove heater began to supply little air. I disassembled it myself, cleaned it, works properly. My recommendations to car enthusiasts: don’t be afraid to repair them yourself. |
| 4. | Kirill: I think that Granta is put together with high quality, the price is affordable for a family with an average income. Provided timely maintenance, no problems arise. |
| 5. | Ivan: after buying the car, I immediately drained the factory antifreeze and bought good imported antifreeze. Now I don’t know any grief, the stove works like a charm. |
| 6. | Dmitry: there were minor defects, I fixed them myself, but they were insignificant and did not affect the performance of the machine. |
| 7. | Igor: I’m happy with the car, there are no major comments, as for domestic transport it’s very good. |
| Negative | |
| 1. | Victor: Over the two years of active use of the car, I contacted the service station several times under warranty. The fan malfunctioned, then the stove heater. Decided to renovate and sell. Renault Logan is several times better than its domestic counterpart. |
| 2. | Vladlen: I’m dissatisfied with Grant’s purchase, I’ve already regretted wasting money several times. The car is not worth the investment. |
| 3. | Gennady: a year and a half since purchasing the car, constant investments, purchase of consumables, repairs at service stations. |
Conclusion The stove heating system of the Lada Granta is completely copied from the Lada Kalina. There are no complaints about the equipment, everything works properly. In order for the mechanism to serve for a long time, it is necessary to systematically carry out inspection and prevention.
Types of Grant stove radiators
There are two types of radiators: with soldered pipes (factory radiator) and with removable ones.
Factory radiator with permanent pipes
The manufacturer produces radiators with non-removable pipes, that is, in order to dismantle it without removing the entire panel of the car, it is necessary to saw off the pipes coming from the radiator.
It is best to purchase a heater core from Datsun On-Do. The dimensions of the Datsun radiator are no different from the Grant one, with the exception of removable pipes, which will greatly reduce the pain during installation.
Review of Manufacturer Prices
Heater parameters: weight 0.5 kg, length 155 x width 167 x height 20 mm.
| Name/article | Price, rub.) |
| Heater radiator 2190-8101060 | From 2400 |
| 21900-8101060-00 | —/— |
| 21900-8101060-10 | —/— |
| 27140-5PA0A | —/— |
| LUZAR aluminum LRh 0190b | From 2100 – 2200 |
| LUZAR LRaC 0190 | —/— |
| LUZAR 482768 | —/— |
| LUZAR 353287 | —/— |
| AvtoVAZ OJSC 429612 | From 2300 |
| with air conditioning for automatic transmission LUZAR 367792 | From 2400 |
| AvtoVAZ OJSC 348402 | —/— |
| LUZAR 466443 | —/— |
Step-by-step replacement process
It is necessary to remove the battery, the air filter box by pulling it out from the rubber dampers and remove the intake corrugation. You will need this to access the thermostat.
We drain the antifreeze from the cooling radiator by unscrewing the plug in the lower right part of the radiator. To drain, you will need a container of at least 10 liters.
Attention: It is necessary to drain the coolant when the engine is cold to avoid burns.
Remove the connector from the electronic accelerator pedal and unscrew the pedal from the car body using a 10mm socket wrench. Then remove the pedal from the studs.
Unscrew the screws securing the radiator cap with a 6 mm wrench and remove it.
We remove the radiator pipes and lower them down so that the remaining antifreeze drains.
Now you need to press down the brake pedal; to do this, remove the cotter pin that secures the pedal and press on it when we remove the radiator.
If the radiator is not dismountable, that is, the pipes are not removable, they must be sawed off with a hacksaw. If the pipes are removed, they must be removed and pulled out of the holes in the engine shield.
After removing the pipes, you can pull out the radiator by pressing the brake pedal down.
We install the new radiator in the same way, pressing down the brake pedal, first removing the pipes from the radiator and installing them after the radiator is placed in its seat.
If the radiator is not prefabricated, then the pipes can be sawed off and the connection can be made on the hoses.
Rules for using a standard heating system
The car's operating manual outlines the basic principles of operation of the ventilation, air conditioning and interior heating systems. To quickly warm up, you need to switch the damper to the air recirculation position and the fan speed to the “maximum” position. In this case, the car windows must be closed. You should not drive in this mode for a long time, as this can lead to fogging of the windows.
The main reason for the accumulation of condensation is the difference in temperature inside and outside and high humidity. To prevent the windows from fogging up, you need to warm them up by pointing the heater deflectors at them and dry the air by turning on the air conditioning. However, when the vehicle is driven under heavy loads (for example, on long climbs) with the air conditioning turned on, the engine may overheat, so in such conditions it is necessary to monitor its temperature. Condensation is usually the result of luggage blocking the vents.
Incorrect operation of the ventilation and heating system may be caused by a malfunction of the temperature sensor located in the interior lamp. It is not recommended to drive with the windows open in hot weather with the air conditioning running.
The vehicle's ventilation, air conditioning and heating system creates conditions for normal and comfortable driving in any climate zone. AvtoVAZ engineers developed and implemented a simple and reliable heating concept for the Lada Granta model. But for the system to operate effectively, certain rules must be followed, which will help avoid unexpected breakdowns.
A simple way to replace the heater radiator on Lada Granta, Kalina
If you decide to replace the heater radiator on a Grant or Kalina according to the factory instructions (for Granta - TI 3100.25100.20554, for Kalina - 3100.25100.20469), then you will have to remove the instrument panel (dashboard). However, the owners found an easier way to replace the stove radiator.
Attention! The Lada Granta FL uses a new heater radiator. It is oversized and has removable tubes.
About the conventions
Let us remember that the practical Lada Granta model went into production back in 2011. This modern car is full of new modifications of complex instruments and electronic devices. All this aims to provide the driver with maximum driving comfort. Today VAZ produces the Lada Granta in three versions in terms of equipment:
The first two options have the same wiring diagram, but in the “Lux” it is different. It's a shame that the factory operating instructions for the car do not contain this wiring diagram. However, do not rush to get upset, because such an album with the entire list of schemes can be purchased in the market network of auto goods.
Electrical cabling involves the presence of a large number of bundles. The wiring diagram has symbols and serial numbers, each of which is assigned to a strictly specific pantograph. These consumers in the diagram are switched into the general network via conventional lines. To increase clarity, the developers used different colors for the lines. Next, the wires are assembled into bundles, which are connected to electrical units using special connectors.
The first number in the wire marking indicates the plug, connector or terminal to which this cable is connected. The number present behind the fraction sign indicates its correspondence to the contact number of the pantograph.
The reader can familiarize himself with the operating principle of a particular electronic unit on his own. If the defects are minor, then they do not create difficulties during the repair or replacement process. But the situation changes when a complex component fails, which implies the need to turn to electricians. To understand the situation with a malfunction of a specific pantograph, the owner of a LADA Granta does not need to remember all the details and details of the layout drawing, but it will be enough to know the location of the device and the features of the wiring leading to it.
Information about techniques that allow you to quickly replace a fuse or relay that has become unusable will also be useful. The Lada Granta mounting block provides backup fuses and relays of the same nature. Safety elements are necessary to protect circuits from current overloads, which lead not only to failure of the device, but also protect the circuit from short circuits, which pose a risk of subsequent fire. In such a situation, the fuse-link heats up, after which its element burns out, thereby cutting off the power supply to the pantograph. Fuses may only be replaced with analogues set to the same maximum current. Neglecting this important rule can also cause breakdowns and fires.
Trick when replacing the heater radiator on Lada Kalina 1
1. Unscrew the screws securing the clamps of the heater radiator pipes in the engine compartment.
2. Unfasten the brake pedal.
3. Remove the gas pedal. Remove three nuts. To unscrew one of them, you will need to remove the tin plate.
4. The pedal does not allow you to pull out the heater core. To do this, we make a hole in the stove body so that the radiator can be moved back.
5. Install a new heater radiator. We close the hole using a soldering iron and sealant.
The process is also shown in the video:
How did you change the heater radiator on Lada Granta and Kalina?
Share on social networks:
Found an error? Select it and press Ctrl+Enter..
Before you start
Before removing and disassembling the stove, you need to purchase new spare parts. The radiator must be from the Lada Granta. You will learn how to disassemble the heater in this article; however, it is advisable to have some experience. It is worth noting that the cost of a radiator for this car is twice as high as a regular one, for example, the one that comes with Kalina. Also, get a canister of antifreeze and a tube of sealant. Naturally, it is better for the replacement to be carried out by professionals in a specialized workshop, but if you decide to work on your own, invite a friend with you. The whole process will take you approximately 3-4 hours.
Why did it happen
Removing the heater fan Renault Logan video
Perhaps the automatic requests do not belong to you, but to another user accessing the network from the same IP address as you. You need to enter the characters into the form once, after which we will remember you and be able to distinguish you from other users exiting from this IP. In this case, the page with the captcha will not bother you for quite a long time.
You may have add-ons installed in your browser that can make automatic search requests. In this case, we recommend that you disable them.
It is also possible that your computer is infected with a virus program that is using it to collect information. Maybe you should check your system for viruses.
If you have any problems or would like our support team, please use the feedback form.
Adviсe
Antifreeze leaked into the cabin
To prevent problems with the heater core, you need to carefully monitor it. For example, from the first days of buying a car, periodically look under the car to see if there are dark spots there. And in the engine compartment it would be a good idea to observe the condition of the cooling system hoses. If you notice traces of antifreeze in any of these places, you need to immediately seek help, or carry out repairs yourself.
If possible, the hoses for connecting the heater radiator should be replaced with new ones, having coated the connection points with sealant. But some do not agree with this opinion. After all, sealant from the hose can get inside the cooling system and cause damage to the pump. As a result, the timing belt will break and the valves will meet the pistons.