Signs that your car's heating system radiator requires replacement:
- high consumption of coolant (antifreeze or antifreeze) in the vehicle cooling system (antifreeze or antifreeze);
- The heating of the car interior does not work;
- traces of a coolant leak on the asphalt under the heater radiator or leaks in the hoses supplying fluid to the heater;
- the smell of antifreeze in the cabin;
- greasy deposits on car windows, their fogging.
In these cases, first of all, check the tightness of the system hose clamps. Perhaps they are the cause of the leaks.
And now about how to replace the VAZ-2112 heater radiator with 16 valves of different types
Replacing the interior heater radiator of VAZ 2110, 2111, 2112 with your own hands
If the air in the car slowly warms up during the cold season, then you may well think that the heater is malfunctioning.
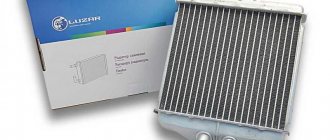
Also signs of problems will be the smell of antifreeze in the cabin, increased consumption of antifreeze itself, and possible leaks under the heater radiator. In such cases, we recommend buying a new interior heater radiator for VAZ 2110, 2111, 2112 and replacing it yourself. No fundamental knowledge of auto mechanics is required. All you need is a Phillips screwdriver, a set of keys, your desire and time. Follow the instructions below.
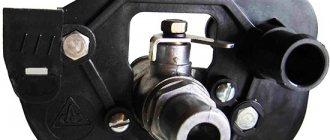
Radiator replacement tool
Replacing some parts in a car yourself requires a certain skill. In the case of a VAZ car, you can replace the radiator without experience. Following the replacement instructions step by step will allow you to complete all the work without any problems. The main thing to consider before starting work is the availability of tools.
In order to deal with this problem as quickly as possible and carry out repairs with minimal labor costs, it is advisable to have the following list of tools on hand:
- Ratchet handles large and small.
- The head is 13 deep and 10 similar.
- Extension.
- A regular length screwdriver with a Phillips blade.
- Short screwdrivers: flat and Phillips.
- Magnetic handle.
The fastest way to replace the heater radiator on VAZ-2110, VAZ-2111, VAZ-2112 cars
The main reasons for replacing the heater radiator are : a leak in the heater core and a decrease (or complete absence) of heat transfer from the radiator. With the first reason everything is clear and understandable. The loss of antifreeze from the expansion tank and traces of its (antifreeze) appearance under the car are difficult to miss. Plus, on top of that, the smell of antifreeze will appear in the car interior. And the diagnosis suggests itself - the heater radiator is leaking. But with the second reason, everything is not so quick and clear. Since a decrease in the temperature of the air entering the car interior through the heater can occur for several reasons - insufficient coolant level in the car system, a faulty thermostat, an air lock in the cooling system, a problem with the regulator or heater flap control motor and, finally, a clogged radiator stoves _ Therefore, before blaming the heater radiator for poor interior heating, you must first check and make sure that the entire cooling/heating system is working (check the antifreeze level in the tank, check the thermostat, make sure the unit and the heater damper control motor are in good condition).
New cooling system
The sequence of your actions in this case is as follows:
- First of all, for safety reasons, disconnect the negative terminal of the battery. We drain the cooled antifreeze or antifreeze, first opening the expander cap. To drain the liquid you will need a container with a volume of 4-5 liters.
- Now, after unscrewing the two nuts, remove the wipers from the car.
- Then we dismantle the released protective plastic cover under the windshield, which is secured with 2 nuts and 4 self-tapping screws.
- To access the stove, remove the frill of the car by unscrewing 5 self-tapping screws, 1 screw and 2 nuts located at the bottom, in the middle of the frill, in the area of the steering rack.
- In order to remove the stove, remove the yellow cross brace, if any, as well as the curved bellows of the air filter.
- We pull the chokes off the radiator pipes.
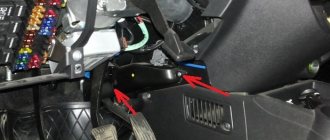
- Then disconnect all electrical wires from the stove terminals.
- At the steering rack, unscrew 2 nuts that secure the heater, 1 nut securing the heater to the body.
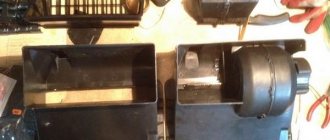
- We unscrew the 3 screws connecting the two halves of the stove.
- We take it out by swinging the right side of the stove, first moving it to the right.
- The radiator in the removed half of the stove is secured with 3 screws. We take it out and replace it with a new one, not forgetting to put on the foam seal. We check the operation of the fan and, if necessary, repair it or replace it with a new one.
- Before installing the assembly, it is advisable to rinse the coolant supply hoses with running water.
- Assembly is carried out in reverse order.
Procedure for replacing heater pipes
Work should be carried out when the car engine has cooled down, as the coolant will need to be drained.
Preparing tools
Before you begin work, you need to prepare the necessary tools:
- screwdriver for plus;
- ratchet;
- extension;
- heads 13.8 and 7.
Dismantling faulty pipes
First you need to remove the air pipe that goes to the throttle valve (if it’s a carburetor, then the air filter).
Remove the windshield wiper blades. To do this, you need to unscrew the two 13 nuts and pull them up.
Remove the boot. Unscrew the five fastening screws, move the top part and pull it up.
Remove the frill. Unscrew the side fastenings of the frill, shown in step 2, and the four clamping screws, then simply lift it and put it aside.
Remove the stove casing. The stove casing consists of two parts. To begin, remove the left side of the casing - unscrew two screws and remove three clips, disconnect and remove through the left side. After this, you can begin to dismantle the right part of the casing - unscrew the four screws and the ground wire, disconnect the chip with the wires and snap off the two tin brackets on top, then remove it in the same way as the first part - through the left side.
First part
Second part
Remove the damper. To remove the damper, you need to lower it in the car, this will be in a hot air stream, then unscrew the two fastening screws and remove it.
Drain the coolant. First you need to unscrew the filler plug, then open the tap on the radiator and unscrew the drain plug on the cylinder block.
Radiator valve
Cork on the block
Remove the stove pipes. First, unscrew the clamps securing them and pull them - if they don’t come off, try to turn them.
After dismantling the old pipes, you can begin installing new ones.
Installation of new pipes
Experts recommend changing the clamps when replacing pipes on a VAZ 2110-2112.
- New pipes are installed, which perform drainage and supply functions.
- The remaining parts and assemblies must be put into place in reverse order.
- After installing and filling the system with coolant, it is important to check the tightness of all connections - if leaks are noticeable, then it is worth tightening them.
The process of replacing the stove pipes on a VAZ 2110-2112 with an 8- and 16-valve engine is approximately the same. Therefore, this instruction is suitable for cars with a new and old type engine.
Main aspects of the operation of the heating system of the VAZ 2112 16 valves: how to change the heater radiator?
As you know, the purpose of the heating system is to provide more comfortable driving. In cold weather, operating a car with a faulty heater will be virtually impossible, since the heater simply will not be able to warm up the interior. What is the heating system of the VAZ 2112 16 valves, what malfunctions are typical for it and how to replace the radiator - detailed instructions are presented below.
In VAZ 2112 cars, supply and exhaust ventilation is used. In this case, the air flow enters through special holes located in the windshield trims.
The air itself can be supplied either forcefully, under the influence of the heater fan, or arbitrarily. The air flow exits from the passenger compartment through the gaps that exist between the door panels, as well as at their ends.
Special valves are built into these openings that allow air flow to the outside and also delay its entry inside, which improves thermal insulation in the cabin.
- A radiator device is used to heat the air flow; this unit sets the required temperature, as a result of which the air is heated.
- Main elements of the heating system:
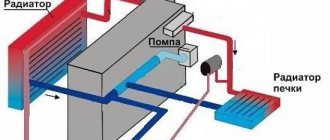
- The radiator itself. It is installed in a plastic casing and is located horizontally under the control panel.
- The design itself includes two rows of aluminum hoses, on which two plastic tanks are installed. There are two fittings on the left tank - through one, drainage is carried out, and through the second, antifreeze enters the system.
- Dampers are used to regulate the volume of incoming air. If these elements are installed in extreme positions, then air flow will not flow into the cabin.
- Another feature is that, unlike other VAZ models, the 2112 does not have a heater valve designed to shut off the flow of antifreeze. Accordingly, when the engines are running, the radiator unit is constantly heated, which facilitates prompt heating of the interior. Thanks to a significant reduction in joints, the tightness of the system is greatly improved.
Possible heater malfunctions and ways to eliminate them
What symptoms can you use to identify a malfunctioning heating system:
- antifreeze consumption has increased, the volume of liquid in the expansion tank is constantly reduced;
- the interior of the vehicle practically does not warm up;
- traces of antifreeze leakage began to appear under the bottom of the car, in the area where the radiator assembly was installed or the location of the pipes, and traces of refrigerant may also appear in the passenger compartment;
- greasy marks began to appear on the inner sides of the glass, the glass itself began to sweat a lot;
- the smell of refrigerant in the car interior (the author of the video is the channel In Sandro’s Garage).
For what reasons does the VAZ 2112 stove not work:
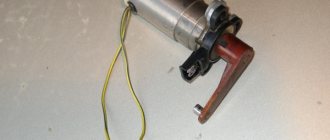
- One of the most common problems is the failure of the radiator; there are two ways to solve the problem - either repairing the radiator device or replacing it. Repair is relevant if the damage to the device is not serious and its case can be soldered. But often the repair does not produce results, so the unit has to be replaced.
- Failure of the gearmotor, that is, the stove itself. As for fixing the problem, here you need to act in accordance with the malfunction. If possible, then, of course, you should try to repair the motor itself, but usually it is replaced.
- Antifreeze has run out. This problem is usually caused by a leak. A leak can occur through the radiator assembly, thermostat, or damaged pipes. If the radiator and thermostat are intact, then you need to check the condition of the hoses and especially their connections. If the pipes are cracked and show signs of damage, they must be replaced.
- Thermostat failure. For this reason, although the liquid will partially circulate through the system, the stove will not be able to heat the interior. If the thermostat is not working, the device is usually replaced.
- The heater control unit does not work, in particular, we are talking about the module located on the center console. If the control model refuses to work, the stove simply will not be able to receive signals about activation, shutdown and mode switching. If the problem lies in the unit, then it will need to be replaced, but often such malfunctions are caused by damage to the electrical circuit or poor contact of the device with the system.
Criteria for choosing a stove radiator
As for the choice, before purchasing you should find out exactly what type of stove is installed in your car - old or new. Depending on this, the choice of radiator device is made (the author of the video is the MegaMeyhem channel).
Instructions for replacing the stove radiator
Due to the fact that the “two-piece” can be equipped with an old or new model radiator unit, the procedure for replacing the device may differ. We will consider each option separately.
So, how to replace the stove radiator in new-style systems:
- First you will need to turn off the ignition and disconnect the battery. Open the expansion tank cap, then place a reservoir with a capacity of about 4-5 liters under the drain hole and drain the coolant. If there is sediment in the antifreeze, then it would be better to change the consumables.
- Next, unscrew the nuts and remove the wiper blades.
- Having done this, you need to remove the plastic trim, which is located under the windshield; it is fixed with two nuts, as well as four self-tapping screws.
- To gain access to the heating device, it is necessary to dismantle the frill, unscrew five self-tapping screws, two nuts and another screw, which are located below, in the area of the steering rack, and also in the middle of the frill.
- To dismantle the heater, you will need to remove the cross brace, if installed. Of course, there may be no spacer. You should also remove the air filter bellows and throttles from the hoses of the radiator assembly.
- Next, the wiring should be disconnected from the heater terminals.
- After this, you should unscrew two nuts from the steering rack, which secure the heater, as well as one nut that secures the device to the body.
- Having done this, you should unscrew three more screws, with the help of which the two halves of the heater are connected. After this, you can remove and, by rocking, disconnect the right part of the heater from the left.
- The radiator assembly itself is located in the dismantled half; it is fixed with three bolts. We remove this device and install a new one in its place; of course, a foam rubber seal should also be installed. Then the operation of the fan is checked; if necessary, the device should also be changed. Before assembly, you need to flush the pipes through which the refrigerant flows. Assembly is carried out in reverse order.
Important subtleties
- When installing a plastic flap, sometimes you have to grind and adjust the flap into place so that it moves freely. It is also allowed to do a little extra work near the aluminum damper.
- After installing the damper, you should set it by hand to the cold air supply position. In this position, the heater radiator will be covered with a damper.
- Move the temperature sensor to the MIN position and turn on the ignition. The sensor will begin to rotate and take the correct position. This will make it easier for you to insert it into place, since the damper and gearbox will be in the MIN position.
- Buy a double for the washer hose, as this will simplify the installation and removal of the wind cover in the future.
As you can see, there is nothing difficult in removing the heater core if you know what to do.
Video:
Video: