Adjusting the throttle cable on VAZ 2110, VAZ 2111, VAZ 2112
Welcome! The throttle cable stretches out over time and requires adjustment, otherwise the operation of the car engine is disrupted, basically the power of the car drops, because when the cable is pulled out, it stops fully opening the throttle and thus the car starts to drive worse, but in some cases disturbances in idle speed appear (it becomes higher or unstable operation appears), but this is usually either due to incorrect adjustment of the cable, or it simply jams and does not return back.
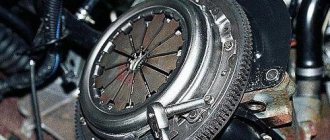
Note! What tools are needed to carry out the work of adjusting the throttle cable on a car: Firstly, you will need wrenches and secondly a screwdriver, besides these tools you can also stock up on a rag and a second person (Assistant) will come in handy!
Summary:
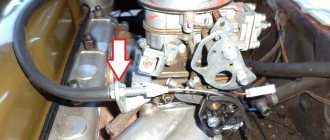
Where is the throttle cable located? On injection cars, it passes at the very top, through the intake manifold (This is on a 16-valve car) and thus goes into the cabin to the gas pedal, on 8-valve cars, it’s a little different, there the cable passes through the cylinder head (Cylinder Head) and it also goes into the car interior and is connected to the gas pedal. On both engines, finding this cable will not be a problem; for clarity, it is indicated in the photo below by an arrow, which shows a car of the tenth family, with a 16-valve injection engine.
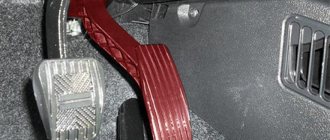
When do you need to adjust the throttle cable? Adjustment is carried out in cases where the cable is replaced with a new one (When installing a new cable, that is), as well as after removing the throttle assembly from the car, the cable again needs adjustment (This is when you put the throttle assembly in place), and after other operations connections with which the cable was affected and its adjustment, in addition, as we said earlier, after a certain time the cable is pulled out (It depends on the quality of the cable, there are also cables that even after a very long time they do not pull out), and when the cable is pulled out, the throttle the damper cannot open completely (When the pedal is fully recessed) and therefore the power of the car drops, this is very easy to check, to check you will need an assistant who will sit in the car and press the gas pedal (If there is no assistant, then press the pedal to the floor with a stick or brick ), everything is checked as follows, first remove the air pipe (It is attached to the clamps, and these screws tighten the clamps, both screws that tighten the clamps are indicated by red arrows, you loosen them and then remove the air pipe, but you do not remove it completely you can, because the crankcase ventilation hose is still attached to it in the middle, it can be disconnected in the same way by loosening the screw of the clamp that secures it, by the way it is indicated by a green arrow) and when it is removed, press the gas pedal fully (all the way , let an assistant do this) and see if the throttle valve has fully opened (see. small photo), if completely, then everything is fine and there is no need to adjust anything, by the way, when the pedal is released, the damper should be completely closed, if it is not completely closed, then adjust the cable (the damper is allowed to be slightly open, even this most likely you won’t see it, this is necessary so that the damper itself does not touch the body and jamming does not occur when it is opened).
Note! On 16 valve cars there is still a screen on top of the engine, if it bothers you (By the way, without removing it, you will not be able to adjust the cable), then remove it, how to do this, read the article: “Replacing the engine screen on 16 valve cars”!
Why is it stupid? Basic faults
There are not many reasons for the effect when the 16-valve engine on the VAZ-2112 16 valves stalls. Of course, you will have to tinker a little in order to find the true reason in one case or another, but otherwise there is a direct road to a car service center. For those who have decided to repair their car themselves, this information will be useful.
So, let's look at the main reasons for this effect:
We clean the sensor from dirt and dismantle it.
The main reasons are considered, and you can move on to solving these problems.
How to adjust the throttle cable on a VAZ 2110-VAZ 2112?
Note! A lot of engines were installed on cars of the tenth family, ranging from carburetor 1.5 to injection 16 valve engines. Let us immediately warn you that carburetor engines from the Samara family were installed on dozens, and we already have information on adjusting all the valves on carburetor Samaras and it is posted in two article, the first is called: “Adjusting the throttle valves”, the second: “Adjusting the air damper”, so if you have a carburetor, then go straight to them, because in this article we are talking only about injection cars and we will not touch on carburetor cars!
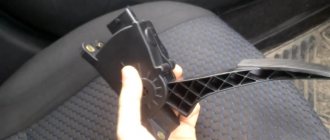
1) Let’s write briefly because there is nothing complicated in the adjustment, and there are not many nuances, in general, let’s start with the throttle valve closed (This is when the gas pedal is released and nothing presses on it), so if it is not completely closed, then the adjustment it can be done using a cable, but it is not always possible to adjust the position of the closed damper with a cable, so the adjusting screw comes into play, which is located on the throttle assembly itself (see photo 1), you will either need to tighten it, or, on the contrary, loosen it a little, thereby achieving a completely closed damper (And it shouldn’t jam yet, keep this in mind), but you need to be careful with this screw, if you tighten it too much, the car will simply stall or won’t start at all, and if you unscrew it too much, the idle speed will increase, fuel consumption will be the same and the throttle will be slightly open, but the easiest way is to adjust it by speed, for example, on a warm engine, your idle used to be 800 rpm, you will need to start the car, warm it up in the same way and adjust this screw so that again there were 800 revolutions on the tachometer needle as before, we’re done with adjusting the damper, proceed to adjusting the cable on 8 valve cars, look for the place where the cable connects to the bracket (see. photo 2), once you have found it, take two wrenches and rotate the adjusting nuts (Nut 1 and 2) with them, adjust the cable as you need (It is allowed to sag a little, do not tighten the cable too much), 16 valve cars are also adjusted in the same way , there a metal plate is pulled out with pliers or by hand (see photo 3) and after which the cable is adjusted by moving it (To the back and to the front, see photo 4), as soon as the tension suits you (Remember, do not overtighten it ) the plate is inserted into its place and the adjustment is complete; at the end, check whether the throttle valve opens completely when the pedal is pressed all the way and whether it closes.
Note! Let's say a few words about the adjusting screw, the most important thing is not to confuse it with any other screws (For example, with screws A, by the way, they cannot be turned out at all), it stands on the side, for clarity, in the photo below it is indicated by an arrow with the letter B!
Additional video: Using the example of a Renault Logan car, look at how the cable is adjusted, it applies to 16 valve cars; on dozens with a 124 engine, this adjustment is done almost exactly the same way.
Note! And regarding 8-valve machines, see the cable adjustment a little lower; by the way, it also applies to some 16-valve machines (If the intake manifold is not plastic, but aluminum)!
Source
A little theory: scheme of work
To solve the existing problem, you must understand the essence of the interaction between the vehicle generator and the power source (battery).
While driving, the battery is in constant charging mode with a voltage of 13.6-14.2 Volts. As engine speed increases, the voltage at the generator output increases. But this is unacceptable.
To limit the voltage, a small relay regulator is inserted into the rotor excitation circuit. Its task is to reduce the current to a normal level (even with a significant increase in the speed).
The result is maintaining the battery charge voltage at a stable level. If the battery light is on, this indicates a lack of charging from the generator.
How does the scheme work? After turning on the ignition, voltage through fuse No. 10 (for VAZ-2107) is supplied to the battery charge indicator lamp.
Next, the “+12V” voltage passes through the diode, the built-in relay-regulator (we mentioned it above), the brush, the slip ring and the winding.
- Poor charging for VAZ 2107 carburetor
As soon as the rotor speed increases, the phase voltage also increases. As a result, the voltage at the terminals of the battery warning light is equalized and it goes out. At the same time, the battery is charging.
When the gas pedal sticks
Hello everyone, dear subscribers, as well as random guests of my channel! Today I would like to talk about how to get rid of a sticky accelerator pedal.
Attention, this article is relevant for cars with a cable-operated throttle valve!
When the car's mileage approaches 100-120 thousand kilometers, minor troubles begin to appear. One of these troubles is a stuck gas cable: the pedal is pressed tightly and moves jerkily. Usually in such cases the throttle cable is changed, but if you are not happy with this scenario, you can try lubricating the throttle cable. This is exactly what I will talk about in this article.
Diagnostics and repair
As for transmission repair, it is very important to first carry out a correct diagnosis of a possible malfunction of the unit, try to determine why the gearbox makes a howling noise without removing the unit. Usually the box does not howl in all modes, but at some speeds
If a howl accompanies movement in 1st, 2nd, 3rd gears, then this usually indicates problems with the bearing connecting the primary and secondary shafts, or more precisely, its wear. The only solution is to replace it. But there is a small nuance - if the bearing is a needle bearing without a cage, then simply replacing the needles may not help. This will require replacement of the shafts. And this is already a serious repair.
It is also possible that there may be a howling noise when the working pair of gears located on the primary and secondary shafts of these gears wear out. Or due to poor quality factory processing and installation after repair. One of the characteristic features of gear wear is howling under load and its reduction in the absence of traction. A worn bearing will make noise regardless of whether there is a load or not. But you can determine the exact reasons only by disassembling the gearbox and showing it to a specialist if the repair is done by yourself.
If there is a whine in 5th gear, the first thing that needs to be done is to check and add oil to the unit if necessary, as discussed earlier. But if this does not help, then most likely the fifth gear gear needs to be replaced. This is determined by opening the box. Preliminarily, by the sound at high speed, you can determine the cause - if there is an outright whine, the gear is worn out; if there is a squeaking sound over 100 km/h, it is most likely the bearing.
If the gearbox of front-wheel drive cars howls in all gears, then there is a high probability of wear on the input shaft bearing. But replacing it often does not lead to a positive result, so changing it in the presence of minor howling is not recommended.
Or maybe it's not a box at all?
When diagnosing a gearbox, be sure to carefully consider the fact that if there is a constantly increasing howl in all gears, it may not be only the gearbox that is to blame for the origin of the sounds. On models with a classic drive, the source of the howl may be the rear axle gearbox, which has a bevel hypoid gear. If the gear teeth are worn out or there is significant play in the bearings, a howl will accompany all driving modes. Similar symptoms also accompany an all-wheel drive vehicle when the front axle malfunctions. The sound will come from the center of the cabin and be observed under load.
Adjusting the throttle cable of a VAZ 2110
The throttle cable (gas cable) is the connecting link between the gas pedal and the throttle; when you press the pedal, you do not act on the cable, which in turn opens/closes the throttle valve. This way you regulate the flow of fuel to the cylinders, as well as the engine speed and vehicle speed.
A poor (untimely, delayed) response to pressing the gas pedal is most often a sign of problems with the throttle cable. The problem may lie in the fact that the throttle cable is incorrectly adjusted, its tension has weakened, in addition, the throttle cable may have stretched or completely failed and requires immediate replacement. If, when pressing the gas pedal, you feel resistance similar to friction, or pressing the pedal has become hard and not smooth, you need to lubricate the cable.
In this article I will talk about how to adjust the throttle cable, as well as how to lubricate the gas cable on a Lada Priora at home.
Attention! Before adjusting the throttle cable, make sure that the tight movement is not due to the carpet or other obstructions that may interfere with the free movement of the gas pedal. Very often, because of this banal “breakdown,” drivers make a lot of unnecessary movements and dismantle the engine almost to the ground in search of the reasons for the lack of engine power. As a result, it turns out that the new mat is simply bent or slipped somewhere and the pedal moves only half its travel.
Gearbox 2109 buzzes
Moderator: Kolya Taran
Gearbox 2109 buzzes
inok » Oct 18, 2014 08:14 pm
I’m not very good in boxes, but I won’t write my thoughts so as not to confuse)
Tell me something like this. It hums at 3-4, turn it off, you can still hear a little hum. The speed drops and the hum disappears. When coasting, the hum still happens, up to a certain speed. When you release the gas, it also disappears a little, I add gas and hum. At 1-2 it doesn’t buzz, I think because of the low speed. And it also happens sometimes, you turn off the gear, and there is a slight noise in the gearbox, as if something is moving there (don’t mention the balls in your pockets), the gears are noisy, you can hear it on the lever. The wheel bearings are not humming. Oil is higher than normal.
Re: Gearbox 2109 buzzing
nikeshox » Oct 18, 2014 8:31 pm
Re: Gearbox 2109 buzzing
wlad2606 » Oct 18, 2014 09:34 pm
Re: Gearbox 2109 buzzing
by leopold » Oct 18, 2014 09:38 pm
Re: Gearbox 2109 buzzing
inok » 19 Oct 2014, 02:15
An additive, well, it’s not an option. 10 tons of km, but I can’t drive that much in a year, I’ll sell it. But now I need it. I can disassemble the box, but what’s there to change, I don’t know.
The additive would work after 100 km, but so on.
Re: Gearbox 2109 buzzing
IlyaD43 » Oct 19, 2014, 10:05 am
Re: Gearbox 2109 buzzing
by leopold » Oct 19, 2014 6:28 pm
Re: Gearbox 2109 buzzing
IlyaD43 » Oct 19, 2014, 6:58 pm
Well, I’m not saying that the problem will be solved. You can try and we’ll see.
My Nexia sales started buzzing at 50)))
Re: Gearbox 2109 buzzing
by leopold » Oct 19, 2014 7:02 pm
Re: Gearbox 2109 buzzing
inok » Oct 20, 2014 11:53 am
I specifically wrote about oil in the first one, I knew that there would be such proposals. I changed the bearings, and it’s not expensive, where did you get the idea?
Now I’ll tell you my thoughts, otherwise you’re all off topic here)))
The differ -for this there is a hum when coasting and in gear.
In general, I think the problem is in the differential bearings.
Everyone expected that there would be such assumptions, but... I would like to hear from an expert on boxes
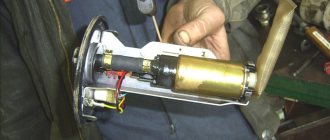
Lubricating the throttle cable on a Priora at home
To work you will need:
- Flat screwdriver;
- Pliers;
- A syringe and a few drops of motor oil or WD-40.
1. First you need to turn off the engine and let it cool.
2. Next, you need to open the hood and remove the decorative engine cover.
3. To remove the throttle cable, you need to remove it from the plastic bracket; to do this, pull the cable casing towards you and, pushing the rubber ring up, remove the cable.
4. Now you need to disconnect the cable from the throttle valve drive. To do this, remove the U-shaped metal bracket from the throttle actuator by prying off one edge using a flathead screwdriver.
5. We remove the cable from the hook, overcoming the force of the spring.
6. Now that nothing is in the way, you can begin to lubricate the throttle valve actuator; to do this, you need to slide the transparent cap and generously lubricate the cable with a few drops of engine oil or WD-40 penetrating fluid. In the case of oil, prepare a syringe.
Try to pour oil into the housing, then move the housing to lubricate the cable along its entire length. Repeat the procedure several times until the cable is completely lubricated.
Next, put the protective cap back in place and reinstall the cable to the place of further service.
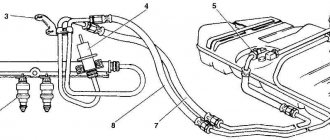
Purpose
The task of the breather in a car design is to connect the engine sub-piston space with the atmosphere. Additionally, the breather is installed in the valve cover of the block head.
During operation of the power plant, the movement of components, mechanisms, and lubricant leads to an increase in pressure inside the crankcase and under the cover. In addition, crankcase gases accumulate in the sub-piston space, which also increases the pressure.
Piston rings are not able to ensure complete tightness of the combustion chamber, so some of the working gases break through and enter the sub-piston space.
The operation of the motor is accompanied by temperature changes, which causes condensation to form inside. The accumulation of moisture inside the motor is unacceptable, since it is the main cause of corrosion.
A mixture of working gases that have broken into the crankcase, moisture, and oil particles that are mixed in contact with the lubricant are called crankcase gases. An increase in pressure inside the crankcase is usually accompanied by a deterioration in engine performance, since gases create additional resistance to components and mechanisms.
How to adjust the throttle cable of a Lada Priora?
- The adjustment is carried out using a clamping bracket, which we previously removed. This bracket is a tensioner for the casing in which the cable moves.
- Remove the bracket and tighten the throttle cable so that it sags about 1-2 mm near the throttle drive.
- Now you need to install the fixing bracket into place in the casing. Make sure that the cable is tensioned optimally and that the throttle valve is not open when the gas pedal is at zero position. A cable that is too tight will cause the idle speed to be constantly elevated. Squeeze the gas pedal several times and check how everything works.
- Start the engine and make sure the throttle cable is adjusted correctly and the idle speed is normal.
NOTE Adjustment of the throttle valve drive is shown on the VAZ 21124 (1.6i) engine. Features of adjusting the throttle valve drive on the VAZ 2112 (1.5i) engine are indicated in the text.
RECOMMENDATION It is necessary to adjust the throttle valve drive after replacing the drive cable, after removing and installing the throttle assembly, and also after performing work related to dismantling the intake module. Throttle actuator adjustment may be necessary if the vehicle's engine may not be able to produce maximum power due to the throttle valve not being fully opened.
An assistant will be required to perform the adjustment work. Adjustment sequence
1. We prepare the car for work (see paragraph 2a Preparing the car for maintenance and repair).
2. Remove the decorative trim of the engine (see Decorative trim of the engine - removal and installation). 3. After loosening the three clamps, remove the air supply hose to the throttle valve. 4. We control the position of the throttle valve: with the gas pedal pressed (all the way to the floor), the valve should be completely open... 5. The position of the closed throttle valve is adjusted with a stop screw, rotating it with a slotted screwdriver with a thin blade.
The throttle valve should close completely without sticking. WARNING When adjusting the open throttle valve, do not overtighten the cable, as this may damage the drive elements.
6. On the VAZ 2112 (1.5i) injection engine:
Using two 13 mm wrenches, rotating the adjusting nuts (1 and 2), we adjust the cable tension (small sagging of the cable is allowed in the area between the throttle valve drive sector and the end of the casing).
On the VAZ 21124 (l.6i) injection engine:
a) Use pliers to remove the locking plate of the cable sheath.
useful tips for motorists
Throttle valve VAZ 2110 – replacement, adjustment, modification +Video | TuningKod
According to statistics, one of the main problems of VAZ 2110 owners is frequent breakdowns of the throttle valve. Even with careful operation of the car, such an important part has to be modified or completely changed. Fortunately, doing this yourself is not as difficult as it might seem at first glance.
- Modification of the VAZ throttle by shifting the ventilation circuit
- Flushing the throttle "tens"
- Replacing the throttle valve on a VAZ 2110
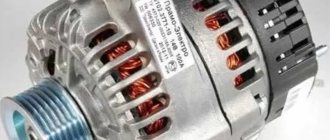
Reasons why the battery charging light is on
In fact, there are many reasons why the battery light comes on and does not go out. These include:
- Loosening of the belt tension on the generator, its wear or damage; fuse blown or deterioration of contact quality in the connectors of the mounting block;
- breakdown of the relay regulator, diode bridge, additional diodes;
- the appearance of a break in the generator excitation circuit;
- decreased quality of contact at the battery terminals or generator output;
- generator brush wear;
- lack of high-quality contact of the ground wire.
What to do if the battery charging light is on?
First of all, get out of the car and, with the engine running, measure the voltage at the battery terminals (do not remove the clamps under any circumstances).
Correction of a factory miscalculation
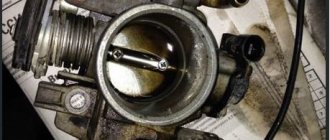
It is quite common for a throttle assembly to come out of the factory with something that cannot even be called a defect, but can still be attributed to design errors. In theory, air should flow into the space behind the throttle, for which a channel of approximately 2.5 mm is specially made.
But the whole problem is that this channel was pressed against the wall of the receiver, thus blocking the possibility of air flow. A slight modification of the throttle assembly can help in this case.
Bored channel for air flow in the throttle
To do this, just take a file and use it to make a small groove in the indicated place. 2 - 3 mm will be enough. But before doing this, it is necessary to remove the throttle.
On a VAZ 2110, the throttle assembly is removed in the following sequence:
- Disconnect the connectors of the sensor that regulates the position of the throttle valve, its drive cable and the XX regulator;
- We partially drain the coolant;
- Next is the removal of the air hose located on the body of the mass air flow sensor. Why do you just need to loosen the clamp;
- We also loosen the clamps: where the throttle pipe is attached to the air hose; where the hose of the 2nd crankcase exhaust circuit is attached to the cylinder head cover pipe. We remove the connected hoses - the air and 2nd crankcase ventilation circuits;
- Having loosened the clamp, remove the hose of the 1st crankcase gas exhaust circuit from the throttle assembly fitting;
- Having loosened the clamps, we remove the hoses supplying and discharging coolant;
- You will need a wrench with a 13mm head, with which you need to unscrew the nuts securing the throttle assembly to the receiver on a VAZ 2110;
- It is now possible to remove the throttle assembly from the studs;
- It remains to remove the sealing gasket and, if your VAZ 2110 has a system that traps gasoline vapors, disconnect the hose for purging the adsorber.
Even if the purpose of removing the throttle was to modify it, still do not forget that for stable operation it also needs periodic cleaning. To be honest, there is nothing complicated in this procedure, but it will help the engine run better, which is quite important.
For cleaning you will need:
- short and long screwdrivers;
- toothbrush (soft, or just old);
- cotton buds;
- cleaning agent;
- rubber or cotton gloves.
For cleaning to give the desired result, it must be carried out very carefully. First, you can go through all the cavities with a toothbrush, at the same time cleaning the idle speed control (it must also be removed). Further, more delicate, cleaning is done with cotton swabs. Pay special attention to the area where the throttle valve is located and the place where the XX regulator fits.
Please note that cleaning the crankcase ventilation duct with conventional means is not possible, but it can be easily done using the foot pump available in each trunk. The diameter of the fitting is similar to the wheel one, you just need to add cleaning agent and pump your foot several times.
If you have problems mentioned at the beginning that started recently, cleaning should fix them. If there were problems from the beginning, do not forget about improvements. Sometimes only replacing the throttle assembly helps.
Service
To eliminate the possibility of the seals being pressed through, you need to periodically clean the engine ventilation system. If you remove dirt twice a year, there will be no problems with the work, since the dirt is removed with a rag.
Dirty breather of Skoda Octavia
You should start with the breather itself. In some engines it is secured with bolts, while in others the breather is tightly seated in the seat.
After removing the breather wall, carefully wipe it with a rag. If the contamination is strong, then they are removed with wire or a screwdriver. Before installing the breather, wipe the seat.
We wash and clean the ventilation system pipes with a cleaning rod made of rags and wire.
The oil trap screen installed in the valve cover also needs to be cleaned. If it is slightly dirty, just wiping is enough.
If the mesh is heavily contaminated with deposits, then everything will have to be removed using a knife, screwdriver, or wire. You can also simply burn out the deposits. To do this, pour a little gasoline onto the grid and set it on fire.
Such simple actions allow you to keep the crankcase ventilation system, which includes the breather, in working order and prevent the seals from being pressed or oil being squeezed out through the dipstick.
What are failures?
Solution:
Failure when pressing the gas pedal lies in the improper reaction of the engine to this. Thus, when trying to accelerate, the engine does not gain the required speed .
This leads to a drop in speed. It manifests itself with gradual and sudden acceleration. Dips appear when you press the gas pedal in different ways:
- Short-term failures. There is no response to pressing for a couple of seconds.
- Lingering failures. The engine loses speed for 4 to 10 seconds, and it is possible that the car will stall.
- Jerks. Laps up to 1 or 2 seconds. The car seems to be “twitching”.
- A series of jerks. The engine either increases speed or slows down, although the pedal is in the same position.
- The car jerks. Consists of a series of protracted failures.