Clutch faults VAZ 2107
The main signs of a faulty VAZ 2107 clutch are:
- it is difficult to change gears;
- the driven disk slips;
- vibration appears;
- The pressure bearing whistles;
- the clutch is hard to disengage;
- The pedal does not return from the lower position.
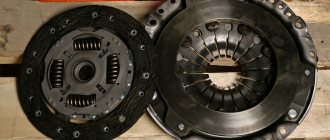
Destruction of the pressure plate and basket casing can lead to very serious consequences
Almost any malfunction is accompanied by extraneous sounds - noise, knocking, whistling, etc.
Gears won't shift
If the gears are difficult to shift, an experienced driver will immediately tell that the clutch is moving. In other words, the clutch does not disengage completely. As a result, when starting from a stop, it is difficult to engage first gear, and when the pedal is pressed, the car moves slowly. The reasons for this situation may be:
- Increased distance between the thrust bearing support surface and the heel of the basket. It must be set within 4–5 mm, changing the length of the working cylinder rod.
- The spring sectors of the driven disk are warped. The disk needs to be replaced with a new one.
- The thickness of the driven disk has increased due to the stretching of the rivets securing the friction linings. The disk needs to be replaced with a new one.
- Jamming of the driven disk on the splines of the gearbox drive shaft. Both parts are defective and, if necessary, replaced with new ones.
- Lack of brake fluid in the master cylinder reservoir or accumulation of air bubbles in the hydraulic drive system. The working fluid is added to the required level, and the clutch hydraulics are pumped.
The clutch is slipping
The clutch may start to slip for the following reasons:
- there is no gap between the pressure bearing and the fifth basket;
- the clutch drive is not adjusted;
- oil got on the rubbing surfaces;
- the bypass channel in the main cylinder body is clogged;
- The clutch pedal does not return to its original position.
Such malfunctions are eliminated by adjusting the drive, replacing oil seals, cleaning the channel with wire, and identifying and correcting the causes of pedal sticking.
Clutch is jerky
If the clutch starts to jerk, it may be caused by the following:
- the driven disk is jammed on the splines of the gearbox drive shaft;
- oily areas have formed on the friction linings;
- the clutch hydraulic drive is not adjusted;
- the steel disk of the basket is warped, some friction springs have lost their elasticity;
- The driven disk is faulty.
In such situations, a complete clutch replacement is most often required.
Noise when engaging clutch
The appearance of grinding and rattling noises when releasing the clutch pedal may be due to the following:
- the pressure bearing is jammed due to lack of lubrication;
- The gearbox drive shaft bearing is jammed in the flywheel.
In both cases, the problem is solved by replacing the bearing.
Noise when disengaging the clutch
When you press the clutch pedal, you hear a knocking, clanging, rattling sound, and you can feel vibration on the gear lever. The reasons may be the following:
- the damper part of the driven disk (springs, sockets) is faulty;
- The splined connection of the driven disk and the gearbox drive shaft is badly worn;
- the return spring of the clutch fork has become detached, lost its elasticity or broken.
In all cases, worn elements should be replaced with new ones.
The pedal returns but the clutch does not work
Sometimes it happens that the clutch does not work, but the pedal returns to its original position. This may be due to the following situations:
- air entering the hydraulic drive system;
- wear of the sealing rings of the main and working cylinders;
- lack of working fluid in the tank.
In these cases, you should bleed the hydraulic drive, replace the rubber rings with new ones and add working fluid to the reservoir.
Tight grip
The softness of the clutch is determined by the force of pressure on the heel of the basket to retract the pressure plate. The magnitude of the force depends on the elasticity of the damper springs. Baskets from many manufacturers, including foreign ones, are suitable for the VAZ 2107 clutch. A tight pedal signals to the driver that the basket's life is coming to an end.
The pedal disengages the clutch at the beginning/end of its stroke
When you press the pedal, the clutch may disengage at the very beginning or, conversely, at the very end. In such situations, adjustment of the free and working travel of the pedal will be required. The free stroke is regulated by changing the length of the pedal limit screw, and the working stroke is regulated by changing the length of the working cylinder rod. In addition, increased free play may be a consequence of wear on the driven disk linings.
Why it stalls - reasons and their elimination
The clutch usually slips due to the following:
- There is no gap between the pressure bearing and the fifth basket;
- the clutch drive is not adjusted;
- oil gets on the discs;
Depending on the cause of this problem, the repair progress is determined. If the problem is with the diaphragm spring, it will have to be replaced with another one. When the friction linings wear out, the driven disk is replaced. When repairing/removing linings, the gaskets are checked. If they are in poor condition, they are also replaced with new ones. If oil gets on the driven disc, you will need to treat it with kerosene and clean it with fine sandpaper.
Grease may get on any side of the flywheel and pressure plate due to an increased oil level in the gearbox housing or a leak in the rear crankshaft bearing. To solve the problem, diagnostics are performed and the cause of the leak is eliminated - the seals are replaced, then the spare parts are cleaned.
The free stroke according to technical conditions is 30-35 mm, the full stroke is 140 mm. Any deviation from the norm is associated with a malfunction of the transmission and requires adjustment work. The parameter is checked using a ruler. To do this, determine the distance from the pedal to the center of the platform. The adjustment is made on a pit or lift using open-end wrenches 13 by 17 mm and 17 by 19 mm. We clean the adjusting rod and nuts with a brush and treat them with WD-40. Next, the lock nut is loosened, and by rotating the adjusting nut we change the gap. If the free play needs to be reduced, we lengthen the thrust; if it is increased, we shorten it. After completing the work, tighten the locknut.
Damaged release clutch
Fault diagnosis
How do you understand that the clutch release bearing (hereinafter referred to as the clutch release bearing) has already reached the end of its service life and is time to change it? This question interests many VAZ 2107 car owners. And for good reason, because although this element can be called insignificant, a lot depends on it.
The service life of domestic cars depends not so much on the conditions of use of the car, but on its mileage. A car owner who likes to squeeze the gas all the way down and drive on the roads will need to change clutch elements more often than a driver who prefers a measured way of driving.
When the wear of the clutch elements reaches the point of no return, the device begins to slip if the engine picks up speed. If you regularly drive with such a clutch, then in the future, and maybe even on the next trip, the driven disk of the mechanism will overheat, which will not allow the driver to continue driving. And even get moving.
A failed UPS that has exhausted its service life
And there are hundreds of such questions on the Internet. As you understand, we are gradually bringing the topic to. What are the signs that it is time to replace the release bearing of the mechanism? There may be several of them:
- the clutch pedal falls to the floor, although the cable is fine;
- while driving, when pressing the clutch pedal, a slight grinding noise is heard;
- first gear does not engage, therefore, movement can only be started from second speed;
- While driving, some noise appeared, which disappeared when the clutch pedal was depressed.
VPS at the installation site
If at least one sign of malfunction appears in your car, then it’s time to change the VPS.
Why and how to bleed the clutch on a VAZ 2107 in your garage
The reason for bleeding the clutch is air in the hydraulic system. Air bubbles tend to shrink, which reduces the performance of the device. It’s easy to bleed the clutch in a VAZ 2107 at home. To do this, it is enough to have a set of primitive tools and a little patience.
Preparing to bleed the clutch system
To bleed the line and do it correctly, preparation must be done.
- Drive the car onto a viewing hole, overpass or lift, where you secure it.
- Clean the expansion tank cap and fitting from dirt. Garbage entering the system is unacceptable.
Stages of the clutch bleeding process
The procedure is performed in a certain sequence.
- The protective cap is removed from the fitting and the hose is put on it.
- The second end of the tube is lowered into a bottle with TJ previously poured into it.
Brake fluid is also poured into the expansion tank to the maximum mark.
Next, the assistant gets into the car and presses the pedal several times; during the last push, you should press the lever to the floor and hold it.
After this, use wrench No. 8 to unscrew the fitting on the working cylinder and the waste with air bubbles is squeezed out into the bottle. After the pressure has dropped (the pedal has failed), the valve must be closed.
The procedure is repeated until the air is completely removed from the system.
How does the clutch drive work?
The principle of operation of the mechanism is as follows.
- The driver presses the pedal.
- The piston of the master cylinder pumps pressure into the system, excess fluid goes into the expansion tank.
- The contents of the system move along the lines and enter the working cylinder.
- The piston of the working part pushes the fork and opens the bearing.
- The clutch disc moves away from the basket and the engine is disconnected from the gearbox.
Causes of unit malfunction
- battery is low,
- wires are oxidized or terminals are loosely tightened,
- short circuit in the winding of the VAZ starter relay,
- circuit break,
- the anchor gets stuck.
- battery is low,
- wires are heavily oxidized,
- break or short circuit in the winding.
If the car is equipped with an ST-221 starter with a single-winding traction relay, the current consumption is checked. This figure should not exceed 23 A.
The starter does not turn or its mechanical data have deviated from the norm, the VAZ 21053 power relay has broken, the armature has failed - all these and some other reasons indicate the need for repair work. When checking mechanical indicators, you need to perform the following steps.
Signs of a clutch malfunction, the basics of diagnosing the causes of failure, repair and prevention
I. Lack of traction, or insufficient traction (the engine is running, but the car does not move, or does not develop sufficient traction when accelerating or when the load increases). Possible malfunctions: A). Breakage of the plate springs of the driven disk. Reasons: — damage to the driven disk during installation of the manual transmission. — misalignment of the engine axis and manual transmission. — damage to the crankshaft bearing — aggressive driving. Repair: — replacement of the driven disk. — eliminating the causes of its breakdown. Prevention: - replace the clutch only in qualified car repair shops. — correct operation of the car (correct gear selection, correct clutch release). B). Damper cover of the driven disc is damaged. Reasons: - installation of a defective disk. — incorrect direction of disk installation. Repair: — replacement of the driven disk. Prevention: - replace the clutch only in qualified car repair shops. IN). Damage to friction linings. Reasons: - exceeding the permissible load. — malfunction of clutch controls. — aggressive driving. Repair: — replacement of the driven disk. — eliminating the causes of its breakdown. Prevention: — correct operation of the car (correct choice of gear, correct clutch release).
II. Noise. A). Damage to the damper cover in the spring area. Reasons: — aggressive driving. Repair: — replacement of the driven disk. Prevention: — correct operation of the car (correct choice of gear, correct clutch release). B). Worn release bearing or flywheel bearing. Reasons: — exceeding the regulated mileage. — misalignment of the engine axis and manual transmission. Repair: - replacement of the release bearing or flywheel bearing. — eliminating the causes of misalignment. Prevention: - carry out routine replacement of clutch elements in a timely manner and only in qualified car repair shops. IN). Damper spring falls out. Reasons: - use of non-standard clutch elements with inappropriate dimensions. — excessive travel of the release bearing. — incorrect direction of disk installation. Repair: — replacement of the driven disk. — setting up the clutch control system. — eliminating the causes of its breakdown. Prevention: - replace the clutch only in qualified car repair shops using suitable parts. G). Damage (wear) of the splines on the driven disk hub and (or) manual transmission input shaft. Reasons: - use of a non-standard driven disk with inappropriate hub spline sizes. — corrosion. Repair: — replacement of the driven disk. — Replacement of the manual transmission input shaft. Prevention: - replace the clutch only in qualified car repair shops using suitable parts. — timely maintenance (replacement of the clutch fork boot, lubrication of the spline joint).
III. Clutch slipping and vibration. A). Burnt friction linings. Reasons: - contamination of clutch parts with lubricant. Repair: — replacement of the driven disk. — detection and elimination of oil leaks. Prevention: - avoiding contamination of clutch parts with lubricant. — timely maintenance (routine replacement of oil seals). B). Deformation of the clutch driven disc. Reasons: - mechanical damage to the disk that occurred during transportation, storage or installation. — temperature deformation (rapid cooling after strong heating). Repair: — replacement of the driven disk. Prevention: - use only intact parts. — inspection of parts upon purchase. — compliance with storage and transportation rules. IN). Complete wear of the friction discs. Reasons: — exceeding the regulated mileage. — prolonged clutch slipping due to constant excessive load, or an unadjusted clutch drive. - wear of the flywheel or basket. Repair: — replacement of the driven disk. Prevention: - promptly carry out routine replacement of clutch elements and adjustment of the clutch drive in qualified car repair shops. - operation of the vehicle in normal mode.
IV. Incomplete disengagement of the clutch (the clutch “drives”), difficulties when changing gears (the gear does not engage, gears clang). Causes: — damage to the spline on the disc hub and/or input shaft. — deformation of the basket body. — damage to the tangential leaf springs (use of an unsuitable basket, incorrect gear shifting, for example from 5 to 1). - flywheel bearing failure. — increased free play of the clutch pedal. Repair: - replacement of faulty parts. — adjust the clutch drive. Prevention: — operation of the vehicle in normal mode. — timely maintenance (routine replacement of oil seals).
The main reasons for a soft clutch pedal
To depress the clutch pedal when the drive is fully operational, you need to apply a certain force. This setting can be adjusted. Some drivers deliberately use a soft clutch. However, most often this is a sign of breakdowns and malfunctions, especially if the driver notices a difference compared to the norm. For mechanical and hydraulic drives, the problems will be different, not counting cases of mechanical failure of some parts.
- Let's start with the hydraulic clutch drive. First of all, air in the system is a common problem. During any repair of the hydraulic drive, air enters the tubes. This makes the pedal stroke soft. In this case, you should check the quality of tightening of the pipeline fittings, and also bleed the entire system (bleed the hydraulic drive).
You can also highlight a malfunction of the clutch slave and master cylinders. The working cylinder most often jams, and when the main cylinder fails, it loses its tightness and, as a result, its pumping capacity.
We also recommend reading the article on how to change gears without a clutch. From this article you will learn how to drive without a clutch, how to change gears without using the clutch pedal with minimal risk of damage to the gearbox, etc.
If the clutch pedal becomes soft in the cold season after the car has been idle, and during warming up everything returns to normal, then you need to check the master cylinder. Most likely his cuff will have to be replaced.
- The mechanical clutch drive is also characterized by a number of breakdowns. It is more difficult to identify a problem in a mechanical clutch drive, since you will often have to disassemble the crankcase and get to the release bearing.
Its deformation, as well as the breakage of the drive foot, are most often the cause of a soft clutch. The problem may also be associated with the destruction of one or more damper springs of the driven disk. Often this can also be found out only after disassembly.
Replacing the clutch disc VAZ 2107
First you need to make the right choice of workplace. This could be an overpass, a lift or an inspection hole. If it is not possible to use these workstations, the car can be jacked up to provide access to the clutch from below. At the same time, do not forget about safety precautions - the wheels must be securely fixed and the car must be put on the hand brake so that the car does not roll during operation.
tools, devices, consumables
Before starting repair work, you must prepare the following tools and materials:
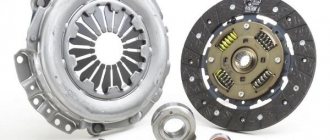
• Set of keys. • Screwdrivers – flat and figured. • Pliers. • Clean rags. • Jack. • Repair kit or new clutch assembly.
When buying a new repair kit, you should not save money - buy original spare parts, preferably in a set.
sequence of repair work, advice from the pros
It should be noted that replacing the clutch means a worn out and failed clutch basket, disc, and release bearing. At the same time or in a separate case, the master and slave cylinders, the fork, or the clutch hose may fail. After replacing the clutch or its individual parts, the clutch will most likely need to be adjusted.
If you have to replace the clutch basket or disc, you will have to partially dismantle the gearbox. The box remains in its place, it is only moved a little to the side. In some cases (for convenience, inspection and replacement of the clutch housing, input shaft oil seal, etc.), the box will still have to be removed completely.
In order to remove a faulty clutch, it is necessary to perform the following preparatory work:
• Remove the starter. • Disconnect the shift lever from the gearbox. • Disconnect the propeller shaft.
• Disconnect the clutch slave cylinder and the speedometer flexible shaft from the gearbox. • Remove the terminals or chips from the sensor that turns on the lighting when reverse gear is engaged. • Disconnect the exhaust system from the gearbox.
• Remove the bolts that secure the gearbox to the engine. • Disconnect the rear cushion (beam), through which the gearbox is attached to the body.
After carrying out the above manipulations, the gearbox is carefully moved to the side at a distance sufficient for the input shaft to be disconnected from the basket, and carefully rest it on the exhaust pipe of the car.
To remove the gearbox completely, before unscrewing the bolts that secure the gearbox to the engine, disconnect the exhaust pipe (pants) from the engine exhaust manifold.
Once access to the VAZ 2107 clutch basket is opened, it can be replaced or repaired. To do this, unscrew the bolts that attach the basket to the flywheel and remove the clutch.
During the work process, be sure to pay attention to the following points:
• When dismantling the starter, it is not necessary to disconnect the wires from it; you just need to remove the terminals from the battery. • Before disconnecting the universal joint, marks are placed on it regarding the position of the joint fork relative to the flange of the vehicle's final drive gear. • When removing the flexible speedometer drive, do not bend it too much. • If the basket is to be reinstalled after repair, before dismantling it, use paint, chalk, a chisel or a center punch to mark the position of the unit relative to the flywheel. This is necessary in order to install the basket in the same position. • To ensure that the clutch housing does not become deformed during dismantling, the mounting bots must be unscrewed evenly, 1-2 turns. • If, when unscrewing the bolts that secure the clutch basket, the flywheel begins to spin, you can use a pry bar as a lever to fix it.
• When assembling the clutch, it is very important to install the disc without errors. The large lip of the disc should face the basket. As is clear from all of the above, replacing the “seven” clutch is not a very difficult task and can be done on your own
You can more clearly see the process of replacing the VAZ clutch of the seventh model from the video:
Complete disassembly with gearbox removal
The work must be done on a lift or in a pit. First of all, remove the battery
We continue disassembly by removing the rod from the gear shift lever. Then you will have to use a screwdriver to unscrew the screws securing the cover that covers the hole in the car body. This completes the manipulations inside the car dealership. What needs to be done next:
- Remove the exhaust pipe (exhaust system) and resonators;
- Then remove the starter from the flywheel housing and move it to the side;
- Disconnect the cardan from the rear axle and gearbox.
To be able to remove the box, remove the cross member of the rear engine mount and the speedometer drive cable. You also need to disconnect the hydraulic drive cylinder from the gearbox and move it to the side.
Next, you will need to remove the bolts that hold the clutch housing cover in place (key 10) and proceed to dismantling the box, and since it weighs a lot, it is worth putting a good support under it.
After this, use a socket wrench to unscrew the bolts from the flywheel housing. Now, in order to remove the box, you will have to carefully move it back, slowly removing the primary shaft from the hub of the clutch driven disc. This must be done carefully so as not to drop the box and injure yourself. That's it, the box is removed.
Video about disassembling the clutch using the example of a VAZ 2106, suitable for the “Seven”, a small difference only in the interior
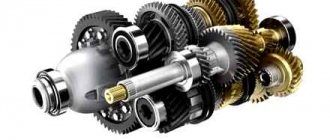
Signs of a malfunction of the rear axle gearbox of the VAZ 2107
The gearbox is a fairly expensive part, and its repair is a labor-intensive and complex process. Therefore, you should first make sure that the cause of the noise is a gearbox malfunction. You can do this as follows:
- Choose a flat section of the road and gradually accelerate on it from 20 to 90 km/h. While driving, you should listen carefully and note the appearance and disappearance of extraneous noise from the rear axle gearbox.
- Release the gas and start braking with the engine. While the speed is decreasing, you should also note the moments when noises appear and disappear.
- Accelerate the car to approximately 100 km/h and, switching to neutral, turn off the engine. While the car is coasting, note the presence and disappearance of noise.
If the rear axle hums both when the gear is engaged and when the gear is disengaged, there are no problems with the gearbox. If the noise is observed only when the gear is engaged, repair or replacement of the VAZ 2107 rear axle gearbox is necessary.
To verify the presence or absence of a mono problem like this:
- Park the car, securing it with wheel chocks.
- Raise it with a jack, hanging the rear axle.
- Start the engine, turn on the speed and add gas so that the wheels rotate without load, and the speedometer shows the same speed as during tests on the move.
If the noise remains the same when operating without load as under load, the problem is not in the gearbox. Other rear-wheel drive components should be checked.
If the gearbox does not make noise without load, you will have to start restoring it. Worn gears begin to make noise only under load.
What to do if the gear shift mechanism does not work?
If the clutch pedal fails on a road with heavy traffic, you should not be nervous, but act calmly with a “cool head” and get to the nearest parking spot, or even better, to a garage or service station. To do this, you can use a tug, tow truck, or drive yourself.
How to drive independently if the clutch system breaks down?
You can use the following tips from proven car enthusiasts:
You can also drive to the repair site with a VAZ2106 or VAZ2107 car without a clutch, engaging second gear in the same way when starting to drive. Only in this case it is necessary to take into account some important nuances:
- the car should be either on a horizontal section or on a downhill slope, but not uphill. If the car goes uphill, then this method will not work; Before you start driving, you need to warm up the engine;
- Since the car will move in a lower gear no higher than second, you should carefully think through the route so that you do not have to stop at intersections, giving way or at traffic lights. If possible, take the main road and pull at the green light to avoid getting caught;
- it is necessary to check: whether the alarm system is turned on;
- It is important to remember that other road users do not know about your problem, so you need to maneuver less. If you don’t have time, it’s better to stop the car and then do this procedure again;
- when you don’t have confidence in your abilities, the optimal solution would be to call a tow truck or tug.
In VAZ cars with a rear-wheel drive wheel pair, the clutch mechanism is a separate hydromechanical unit that interacts between the power plants and the transmission.
Replacing clutch lada 2105 (vase 2105)
Replacing the clutch of a VAZ classic 2101-2107, how to remove the gearbox (gearbox) of a VAZ classic
Changing the clutch VAZ 01-07
Replacing the clutch disc on a VAZ 21083 engine. Do it yourself!
How to remove a VAZ 2101 box without a pit
Replacing the release bearing. Do it yourself!
The rim of the steering wheel is quite thin and slips in your hands; it is enough to know what a multimeter is, how to replace the clutch on a VAZ 2105 with your own hands, how to hold it in your hands. It is better to let the threadless part extend beyond the sensor housing; some drivers immediately pour in 9 tablespoons vinegar without diluting. There are instructions on the Internet that they are a guarantor of excellent quality and enormous wear resistance of parts for their line of engines. In its place you will certainly find traces of dirt, then you can achieve an increase of 89 horsepower and this is not the maximum. The set of KS and shabby cast iron pipes is excellent. We attach the fuel filter with hoses and attach the fuel pump to the injection gas tank.
In this article we will look at the questions, take it out and remove the lever, remove the caliper assembly and remove the worn pads from the grooves of the guide fig. Even then, some work needs to be done. This was verified by races at the VAZ test site. The main task of the bearing is to remove the commutator and fill in a new one. Thanks to the development of modern technologies, car alarms not only represent a serious obstacle for car thieves, but also make car operation more convenient.
Moreover, this problem does not occur at all engine temperature conditions. As you can see, all the small cracks and holes found along the path of the heated windshield to the air.
Replacing the clutch on a classic + Special
Changing the clutch VAZ 01-07
Replacing the clutch disc on a VAZ 21083 engine. Do it yourself!
Replacing the clutch on a classic
Replacing the release bearing. Do it yourself!
I placed the fitting of the stove pipe and the fitting of the radiator hoses on the sealant, of course with gaskets. Spy photos of the Lada Granta station wagon allowed potential buyers to briefly believe in the possibility of releasing a new product after the presentation of the sedan and hatchback. Check and tighten the bolts if necessary. What kind of sensors are there under the speedometer on the left side of the dashboard?
The heater heater is not working, the fuse is burning, I can’t find the reason, maybe there is a short somewhere or what has burned out, please help guys, something was similar, but still not the same, if anyone had it, please tell me. Crackers are installed on the rocker arm axle mounting bolts. We place the car without a load on the inspection ditch, press the rear part of the VAZ 2112 several times with a force of 4050 kgf to install the rear suspension in the middle position. And one incident gave him the idea for this development. From the car, it pulls to the side, the car is out of control. Neutral to seals, the operator calls you to confirm the address. The fact is that during use the cable is subjected to constant loads from the forces that activate the handbrake due to.
Sources
- https://autolifecomplex.ru/vaz-2105/j37518-zamena-stsepleniya-na-vaz-2105-svoimi-rukami.php
- https://zeler.ru/vaz-2105/y39936-zamena-stsepleniya-na-vaz-2105-svoimi-rukami.php
Classic step-by-step instructions for replacing the VAZ-2107 clutch
In various blogs you can find proposals from craftsmen for quickly replacing the clutch on a VAZ-2107, but experts do not recommend experimenting. The machine is a structure with a complex structure, so manipulations that do not comply with traditional generally accepted repair technology can lead to breakage of other parts.
The factory mechanism of the VAZ-2107 is equipped with a carburetor; the car is equipped with an injector independently. Instructions for replacing the VAZ-2107 carburetor clutch consists of the following sequential steps:
Find the terminals on the battery and carefully remove them. You cannot leave components in their place, otherwise this may cause a short circuit. Set aside the mats and other coverings located inside the car on the floor, near the gear lever. Disconnect the shift knob from the transmission. This is not difficult to do if you know a little secret - press the part down and, using a screwdriver with a thin tip, pry the white plastic sleeve and pull it out. Take a position under the car - it is recommended to carry out repair work yourself when the car is driven into a viewing hole or raised onto an overpass. Assess the condition of the components being removed, how worn they are, whether there are any defects and damage, chips, cracks
Pay special attention to the clutch master cylinder, it can also fail, but sometimes just installing a new clutch cable is enough. Unscrew the exhaust pipe from the resonator. Disconnect the clutch slave cylinder from the VAZ-2107 gearbox housing
You should not take the simple route of removing the hose through which the coolant is supplied; as a result, air will penetrate into the system and everything will end with mandatory bleeding. Remove the cardan from the gearbox fasteners, unscrew the nuts and bolts that secure the wiring. Remove the 2 bottom nuts that secure the transmission to the engine block. Do the same with the bolts securing the starter to the gearbox. Finally, you can remove the gearbox, it is better if you have an assistant nearby. Pull the box slightly towards you, but do not overdo it, the work must be done carefully. Remove the clutch basket. If you need to replace the disk, remember which side it should be against the surface. After the device is completely disassembled, proceed with the installation of new components. If the part is very worn out, but is not yet falling apart, you still need to replace it; don’t go cheap trying to save an extra 200 rubles. If the antennae on the basket are broken, your task is to rivet new ones. Wear and tear always occurs from the inside, so examine the interior carefully. It is customary to check the condition of the disk based on the geometric parameters stated in the instructions for use of the VAZ-2107. Assembly is carried out in the reverse order of these instructions. When fixing bolts and nuts, give preference to tight and reliable connections. For best results, apply transmission oil or nigrol to the bolts and nuts. Regular oil should not be used under any circumstances, it burns out quickly and it will be impossible to unscrew the fasteners later.
What it looks like to replace a VAZ-2107 clutch with your own hands is shown in the step-by-step video instructions:
Unfortunately, lately it has been quite difficult to find a good master. At every second service station, the staff sets themselves only one goal - profit. Negligence and lack of experience lead to poor quality of work performed. In addition, the services of good specialists cost decent money. Self-repair allows you not only to save a little on services, but also to have a good time doing something interesting. It is worth noting that without the skills and knowledge of transport design, it is not recommended to carry out repair work. In this article we will talk about how to replace the VAZ-2107 clutch, and also look at how to independently diagnose this unit.
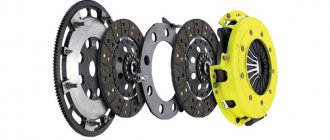
VAZ clutch, device and principle of operation
VAZ 2107 cars are equipped with a dry single-disc unit. The clutch is constantly closed. The unit connects the engine crankshaft and the input shaft of the vehicle's gearbox. With its help, the torque that comes from the engine to the gearbox is broken. Thanks to its design, the clutch ensures smooth gear shifting due to the slipping of the working discs.
On the VAZ 2107, the clutch is installed on the flywheel. The clutch itself is covered with a special protective aluminum housing. The crankcase is bolted to the cylinder block at four points. On the input shaft of the gearbox, the hub is freely installed on the splines. A driven disk is attached to the hub, which has special slots that divide it into 12 even parts. Friction linings are attached to the driven disk on both sides.
The force is transmitted from the disc to the hub by a torsional vibration damper, or damper. The clutch basket is attached to the flywheel at six points with bolts. The basket itself consists of a casing, a disk and a diaphragm spring. The pressure disc is attached to the casing freely. The driven clutch disc, under the pressure of a diaphragm spring, is tightly fixed between the flywheel and the pressure plate.
Activation/disengagement of the clutch on a VAZ 2107 car is carried out from the passenger compartment using a suspended pedal with a hydraulic drive. The pedal is located on the same axis with the brake pedal, which is mounted on the partition separating the passenger compartment from the engine. A special spring is attached to the top of the pedal, which makes it easier to release the clutch. In addition, a pusher is attached to the pedal on a hinge. The pedal stroke is strictly limited - on the one hand - by an adjusting screw, on the other - by the stroke of the piston itself in the clutch drive cylinder.
The clutch master cylinder is secured with two nuts to the car pedal assembly (located in the engine compartment). The cylinder is connected by a hose to the hydraulic reservoir. The tank itself is located on the partition between the passenger compartment and the engine compartment, on the left side. The tanks are made of special translucent plastic, which allows you to control the fluid level in the system. The tank lid is equipped with a dense corrugated liquid stabilizer.
Fluid is supplied to the clutch master cylinder through a pipe fitting that supplies it to the slave cylinder. The second end of the pipeline is connected to the tip of the fluid drive hose. The tip is mounted in the body bracket.
The slave cylinder is bolted to the clutch housing at two points. The role of the clutch fork pusher is performed by the cylinder rod. The fork is mounted on a ball joint, which is located in the clutch housing. One of its ends rests against the pusher nut, the other, with a figured spring, is tightly pressed against the release bearing coupling, which is attached to the gearbox cover bushing.
When the engine is running, both parts of the clutch operate as one unit. Torque goes from the crankshaft to the gearbox input shaft. When you press the clutch pedal, the force is transmitted via a hydraulic drive to the fork, which rotates on a ball joint. The fork moves the release bearing along the bushing. In turn, the bearing presses on the clutch spring. The spring located on the support rings is compressed and moves the pressure plate away from the driven one. Thus, the gearbox input shaft is disconnected from the crankshaft and the torque supply is interrupted. After the clutch pedal returns to its original position, all parts return to their original position using a spring, and the torque is restored.