The VAZ-2114 and VAZ-2115 models are in stable demand. These are inexpensive, quite dynamic and comfortable cars, with affordable spare parts. From time to time they have problems with the heating system, many of which can only be solved by replacing the radiator of the VAZ-2114 or model 2115 stove. You can do this yourself, and without removing the dashboard, as required in the operation and repair manual.
Necessary diagnostic measures
It probably won’t be difficult for the driver to determine that the heating system has failed.
The following signs will indicate the need to replace the heater radiator on a VAZ 2114:
- There is a significant temperature difference between the pipes for heat supply and removal.
- The heating system works with obvious interruptions. Heat simply does not flow into the cabin.
- You can observe a leak from the heating circuit. Antifreeze will leak from the radiator.
Repairs should not be put on the back burner, especially if the onset of persistent cold weather is just around the corner. If the heat generator is faulty, the heater radiator on the VAZ 2114 needs to be replaced.
How much does this repair cost?
With proper skill, you can dismantle the old heating element yourself, even without removing the console. It is clear that the procedure is much easier to carry out with the console removed, but if there is not enough time, you can carry out the replacement this way. You don't need a pit or a lift to work, but you shouldn't do any repairs on cold days. If there are no conditions, it is better to seek qualified help from service technicians. The price for this work, depending on the region, starts from 1,500 thousand rubles and above. For repairing a breakdown on a VAZ, this price is quite high, but it is due to difficult access to the element being replaced.
For what reasons does a malfunction occur?
It must be said that there can be quite a lot of reasons for this, but the most common of them are the following circumstances:
- There is a blockage in the radiator duct. During long-term use, this is a completely natural phenomenon in which the pipes simply become clogged with dirt.
- Factors contributing to natural wear and tear of the radiator. These include the following points:
- dynamics of temperature changes;
- the influence of atmospheric factors that lead to corrosion;
- internal pressure.
- Air ducts are not sealed.
- Heater motor malfunction.
- Resistor fault.
Naturally, metal wears out over time. A hole may simply form through which antifreeze will escape. All this dictates the need to take measures to replace the radiator heater on a VAZ 2114.
On average, a new stove radiator will serve its owner well for 5-8 years.
Main reasons for replacement
There are not many reasons why it may be necessary to replace the radiator of the interior heating system. One of them is the appearance of a leak.
Heat exchangers are made of non-ferrous metals - copper or aluminum.
Gradually, these metals oxidize due to exposure to liquid, which leads to the appearance of cracks through which coolant flows out.
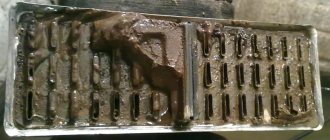
The second reason for replacing the heater radiator is clogging of the tubes with contaminants. The coolant, circulating through the cooling system, washes away corrosion products, small particles, etc.
Moreover, the liquid cannot contain them and these polluting elements settle on surfaces, including the stove radiator.
As a result, the heating system first loses efficiency, and later (if it is heavily contaminated) it simply stops working.
In some cases, radiator blockages can be eliminated by flushing using chemicals.
But if the blockage of the tubes is severe, then the plugs can only be removed from the dirt mechanically. And this can only be done with the radiator removed.
Before you start disassembling, you should first make sure that the problems arose with the radiator.
So, a leak of this element is manifested by the appearance of traces of antifreeze on the floor in the cabin.
Now they are reading Lada Largus FL 2022 in a new body or everything new, not yet forgotten old 796 Chevrolet Niva: a good purchase or a headache, is it worth buying on the secondary market? 23k
But the same result can also be caused by damage to the radiator pipes or loss of tightness at the point of their connection with the heat exchanger.
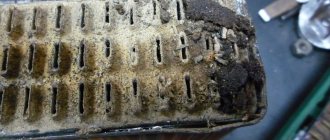
A decrease in heating efficiency can occur not only due to blockage of the radiator tubes, but also due to severe clogging of its honeycombs.
Dust, fluff, leaves, and insect remains get clogged between the cooling fins, making it difficult to transfer heat to the air.
But in this case, it is very easy to identify the problem - turn on the stove fan at full power and check the air flow from the deflectors.
If it is not strong, the radiator should be cleaned, which also cannot be done efficiently without removing the element.
The stove may also stop heating due to the radiator becoming airy, which often happens when replacing the coolant. Often the cause is a malfunction of the cooling system elements, especially the thermostat.
In general, before removing the heater radiator, you should make sure that it is the cause of poor interior heating that is hidden there. And for this you will have to check almost the entire cooling system.
Heater design features
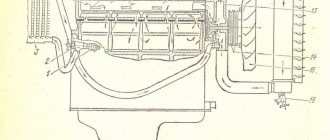
It must be said that the eighth and ninth family of VAZ cars have an identical heating system. In each case, the heat source is the main element of the car, which is represented by the engine. But the generated heat still needs to be conveyed, as they say, to the consumer. In this case, the coolant is antifreeze, which is supplied to the cooling system. It warms up the stove radiator. He himself is in a closed casing. It is blown by a stream of air, which is pumped by the heater turbine.
Heater design features: 1 — heater control damper lever; 2 — left heater casing; 3 — thrust of the foot heating damper; 4 — radiator gasket; 5 — heater radiator: 6 — heater seal; 7 - electric motor; 8 — fan casings: 9 — impeller; 10 — windshield heating flap; 11 — air duct for heating the windshield; 12 — side nozzle air duct; 13 - side nozzle; 14 — draft of the windshield heating flap; 15 — central nozzles; 16 — foot heating damper; 17 — right heater casing; 18 — heater control handle; 19 — crane control rod; 20 — heater control damper rod; 21 — handle for supplying air to the windshield; 22 — handle for supplying air to the feet of the driver and passengers; 23 — bracket for control levers; 24 — bracket for fastening the heater casings; 25 — internal ventilation air duct; 26 — window in the heater casing; 27 — heater control damper; 28 — lever for the foot heating flap.
There is an air duct for warm air to enter the cabin. If the heater radiator is cold, then we can definitely say that it is “sick.” This unpleasant situation can occur in all VAZ cars without exception. If the clogged radiator of stove 2114 is made of copper, then it will still last for some time. The case with an aluminum radiator requires immediate replacement.
Resistor fault
Despite the fairly simple design of the heater, some of its elements may fail over time. At the same time, the probability of failure of the heating system as a whole is quite small. The most common stove failures include:
- problems with the radiator;
- faucet leak;
- wear of pipes;
- resistor failure;
- switch malfunctions.
Let's look at each fault block in more detail.
As noted above, the resistor is designed to change the level of resistance of the current supplied from the generator to the heating system fan. In the VAZ-2114, using a switch, you can ensure the fan operates in three modes. In the extreme position, the fan is powered by a voltage equal to the nominal voltage of the vehicle's on-board network, providing maximum power output.
In the intermediate position of the switch, the level of the supplied voltage is reduced due to one of the two resistor windings, the resistance of which increases by 0.20 Ohms. In the third mode, the second winding also comes into operation, due to which the total resistance of the resistor increases by 0.80 Ohms, reducing the fan rotation speed to a minimum.
If the windings burn out, regardless of the switch position, the fan operates only at full power. The inability to switch fan operating modes is evidence of a resistor malfunction.
A faulty resistor may be indicated by the fan operating in one mode, when manipulations with the switch do not affect its blowing speed. To replace the resistor, you need to prepare a screwdriver with a Phillips head, fine-grain sandpaper and a multimeter. Algorithm of actions:
- disconnect the negative terminal of the battery;
- unscrew the screws that secure the right console cover;
- Use a screwdriver to unscrew the screws securing the right cover of the center console;
- you will have access to the resistor, from which you need to disconnect all the wiring and evaluate the contacts for burning. If the contact surface is oxidized, use sandpaper to clean it down to metal;
- It may well be that the resistor has lost its functionality precisely due to burning/oxidation of the contacts, so we assemble everything in the reverse order and check whether the fan will work in all normal modes;
- in case of a negative result, again remove the negative terminal, the panel cover and unscrew the screw that secures the resistor to the body;
- We remove the resistor and use a multimeter to measure the resistance at the resistor inputs and at the inputs of both windings. In the latter case, the indicator indicating the working condition of the additional elements is 0.2 Ohm. For the entire resistor, the standard resistance should be 0.8 ohms. If the multimeter readings do not match the specified values, replace the resistor with a new one, and then reassemble in the reverse order.
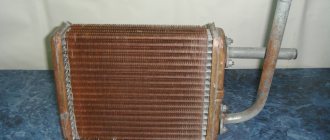
The best heating radiators for VAZ 2114
Structurally, heating radiators differ not only in the material used for their manufacture, but also in the presence or absence of turbulence. They are made from copper or aluminum.
Copper radiators
Purchasing a radiator made of copper is an excellent choice. It has remarkable heat transfer properties; if the need arises, it can be repaired. The disadvantages are high cost and significant weight.
Aluminum radiators
Such radiators are much cheaper, but if they break, they cannot be replaced. Such devices heat up quickly, but also cool down so quickly. They are produced in a wide range and are relatively inexpensive.
The size of the honeycomb is of great importance. The smaller they are, the better the rapid heating of the air. But in terms of efficiency, they cannot compete with radiators with large cells, although, undoubtedly, the low price and light weight are positive aspects.
At the time of purchase, you should ask the seller about the presence of plastic swirlers or turbulators in the design. In their presence, better transfer from the liquid to the material of the swirler honeycomb is observed. If they are present, the efficiency of the radiator increases by 25-30%. From here it becomes clear that it is better to purchase a radiator with a swirler. The choice of material is at the discretion of the buyer.
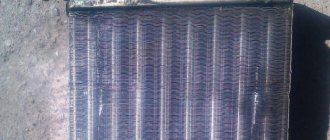
Heater radiator failures
The most common causes of radiator failure are:
- depressurization of the device;
- clogged tubes.
When clogged, the internal radiator tubes become covered with deposits, narrowing their clearance and impairing the circulation of coolant. Clogging most often occurs as a result of using poor-quality coolant. The advanced age of the car also leads to the appearance of this problem, as does the entry of dust, dirt, water, and friction products of the power unit into the heating system.
The appearance of a leak in the radiator is a consequence of mechanical damage, corrosion processes and drying out of the material from which the radiator tubes are made. In this case, a decrease in the volume of antifreeze leads to an increase in its temperature and a deterioration in engine cooling, as evidenced by the readings of the temperature sensor.
The second reason for the inability to change the heater operating mode is a malfunction of the switch itself. True, its failure is a rather rare phenomenon, occurring due to oxidation of the contact surfaces.
If, after repairing or replacing the heater resistor, the fan continues to show signs of life in only one mode, regardless of the position of the switch, it is necessary to check the functionality of the latter. To do this, we again need a screwdriver, as well as scissors (or fairly powerful tweezers). Work order:
- remove the negative terminal from the battery;
- unscrew the 4 screws that secure the right panel cover;
- remove from the slots and pull out the switch by pulling it towards you;
- Using scissors, tweezers or another suitable tool, unscrew the nut that holds the switch;
- on the right side of the console, remove the switch, identifying and disconnecting all connectors from it;
- inspect the contacts for scale, rust or other defects, clean them with fine sandpaper;
- We install the switch in place, connect the terminal and check its operation. If there is no effect, the switch must be replaced with a new one.
If you perform any of these operations for the first time, it may take a lot of time, but you can save on buying extra spare parts and gain invaluable experience in replacing a VAZ-2114 stove. It is worth noting that for VAZ 2112 - 2115 models there are no fundamental differences in the repair or replacement of heating system parts.
Positions of radiators in the rating
A large number of radiator models offered by the manufacturer made it possible to arrange them in accordance with the rating:
DAAZ (article 21080-8101060-00)
DAAZ (article 21080-8101060-00)
The model comes with original packaging in red or blue. There are swirlers. The radiator itself has a small honeycomb size. Such a radiator can last the owner from 3 to 6 years. Aluminum is used as the manufacturing material.
Radiator with article number 1102-8101.100
Radiator with article number 1102-8101.100
The manufacturer is Orenburg Radiator LLC. Made from copper, with excellent heat transfer properties. The design is equipped with small honeycombs. Such a radiator will work no worse than the “native” device. The service life is up to 10 years.
Heater radiator luzar vaz 2114
Heater radiator luzar vaz 2114
This design is used more and more often by motorists. It is made of aluminum, but in terms of characteristics and quality it is not inferior to the “native” copper radiator. Has a large number of positive reviews.
AURORA
AURORA
This radiator costs the least of all, but also has the lowest characteristics. The radiator is made of aluminum of the poorest quality. In addition, airflow is carried out over a fairly small area. As a rule, it is used only in extreme cases.
Alaska
Alaska
There are no swirlers in the design. It has approximately the same cost as the Luzara radiator. Made from aluminum.
In any case, when purchasing, you should inquire about the availability of a certificate for the product.
Wear of pipes
Coolant may leak from the heating system through the inlet/outlet pipes. This result is usually caused by their wear under the influence of aggressive substances that are components of the liquid, combined with high temperature. The appearance of leaks in the pipes can also be caused by excessive efforts when tightening the clamps during their installation (for example, after replacing leaky old pipes).
The heating system of the VAZ-2114 car includes 4 pipes, half of which are located in the engine compartment, ensuring the passage of antifreeze between the power unit and the heater, and the other two are located in the cabin, ensuring coolant circulation between the radiator and the heater tap. Liquid leakage can occur in two different scenarios. The first involves antifreeze leaking out into the area where the power unit is protected; with the second option, it will flow into the cabin. Signs of a leak in the pipes:
- decreasing coolant level in the expansion tank;
- the appearance of a persistent unpleasant odor in the cabin;
- presence of smudges in the passenger compartment or under the engine protection.
How to change the radiator on the stove on a VAZ 2114?
It should be noted that replacing the radiator of a VAZ 2114 stove involves two methods.
- In the first option, it is necessary to remove the torpedo.
- In the second option, the dashboard is not dismantled.
Any professional will prefer the first method without the slightest shadow of doubt. Any master mechanic at a service station will replace the VAZ 2114 heater radiator, having previously disassembled it, as they say, down to the last nut. This is quite a painstaking job, involving a lot of nuances. It is simply not possible for a beginner. This can only be done by someone who has repeatedly had to assemble and disassemble the dashboard. A car enthusiast of insufficiently professional level will prefer to remove the VAZ 2114 radiator heater in a way that does not involve the need to dismantle the dashboard.
On a note . There is a purely folk way of replacing a VAZ 2114 stove radiator. It requires cutting out the bottom. After this, the newly minted mechanic crawls under the radiator and quickly removes it.
Of course, you will need the necessary set of tools for the job. It includes screwdrivers, wrenches, pipe clamps, and some other repair tools. Naturally, a new radiator itself is needed. You can change the stove by replacing only the radiator itself.
Algorithm of actions
When replacing the radiator of a VAZ 2114 stove, you must perform the following steps:
- You need to turn off the car and open the hood. After this, the car should be de-energized by removing the wires from the battery terminals. All antifreeze present in the stove must be poured into a previously prepared container.
- The heating regulator should be set to a position where it is at maximum heating of the interior.
- Then you need to remove the plug that is located on the heating circuit. Actions should be carried out as quickly as possible, otherwise antifreeze will splash on the generator. In order for the liquid to flow out faster, you can open the cap, which is located on the antifreeze tank itself.
- It is necessary to take safety measures to ensure that the seats in the cabin do not get dirty. The rear seats should be moved back and reclined. On top they are covered with oilcloth and an old blanket.
Important! Replacing a stove radiator on a VAZ 2114 is not a quick process, so the car owner will need a lot of patience.
- Then the central pillar is unscrewed. The fasteners are unscrewed from both sides to the floor, and the self-tapping screw is unscrewed from above. In addition, the side fasteners unscrew. The caps of some fasteners are closed with plugs, and they are invisible. This is something to pay attention to.
If the radiator of a VAZ 2114 stove is being removed, the dashboard is disassembled in accordance with the technical passport. In it, the places where the fasteners are located are marked in detail. This is due to the fact that there are various modifications of the VAZ 2114. Some variants have certain nuances. For example, a VAZ 2114 with a radio is different from what comes standard.
- Then you should unscrew the dashboard mount. This must be done so that the dashboard, as they say, shakes. At the moment when the radiator is removed, this is very important. In other words, it is not thoroughly disassembled, but simply moved away.
- Then you need to get to the cables that regulate the heating tap.
- Next, you need to remove the protective casing from the radiator.
- The ducts are secured with clamps. They also need to be removed.
- Now, when replacing the radiator of a VAZ 2114 stove, you will need an assistant. Together with your partner, you need to lift the dashboard and pull it towards you. Such actions are necessary in order to remove the old radiator and install another device in its place. This is done with utmost care to avoid any damage.
It is necessary to remember that when removing the radiator, antifreeze may pour out, which may flood the electronics and for this reason they may fail. Therefore, you need to be extremely careful.
- After installing a new radiator, assembly is carried out in the reverse order.
Please note that after assembly the circuit must be refilled with service fluid. Then the heater is pumped. It is recommended to thoroughly heat the interior. Then the engine is turned off. If the need arises, antifreeze must be added to the tank.
The heating system of the VAZ 2114 may be faulty for other reasons.
STOVE TAP REPAIR
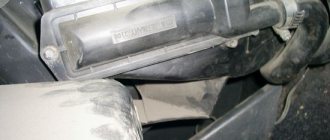
VAZ heater valve
The heater tap (see photo above) is designed to regulate the flow of coolant through the heater radiator. On VAZ 2113, 2114, 2115 models the same heater faucet is installed. The main failures of the stove tap are oxidation, jamming, leakage, which results in a puddle of coolant appearing under your feet.
Why is the faucet leaking?
Possible reasons:
- With the onset of spring, we close the heater tap and move the regulator to the extreme position.
- From spring to autumn, we don’t use it, so the faucet turns sour.
- In winter, we open the tap again, turn on the stove, and as a result the tap flows.
- In this case, it must be replaced.
- In addition to replacing the faucet itself, it is recommended to replace the cabin filter in the fall because... it becomes clogged with leaves and the air flow weakens.
Which faucet to choose
In the spare parts store you can see three heater taps:
- Ceramic
- Factory (standard)
- Ball
Which to choose:
- The body of a ceramic faucet is ordinary plastic, but the locking mechanism consists of two ceramic plates.
- Factory cost from 80 to 100 rubles. The operating principle of which is based on a rubber membrane. As practice shows, it is not reliable, subject to acidification and is installed only if there is nothing better at hand.
- Let's move on - ball valve. Its operating principle is based on a ball with holes instead of a membrane, as in the second option. This specimen is subject to oxidation, but is much more reliable than a factory faucet.
- The ceramic faucet is the most reliable of all of the above; we recommend installing it to avoid unnecessary problems.
- The only drawback is the reduced throughput of the ceramic faucet, which reduces heat transfer. It turns out: the most reliable faucet is a ceramic one, but the heating weakens when using it.
Where is the stove valve located?
The heater valve is located under the console (in the center). Remove the side panel near the passenger's feet. Two pipes lead to it. To change the heater tap you do not need to drain the antifreeze or remove the dashboard. But in this case, you have to lie head down and do some of the work by touch.. To change the heater tap you will need:
- New heater tap
- Crosshead screwdriver
- Clamp 16x23mm
- Capacity 5L or more
- Coolant
- Key to "10"
- Rags
How to replace a stove faucet
We carry out the work on a cold engine:
- Completely remove the instrument panel.
- Place a rag under the passenger's feet and the faucet to absorb spilled coolant.
- Open the hood, remove the heater hose clamps, then remove the pipes from the tap itself, drain the antifreeze into a prepared empty container.
- We move to the salon. Using a Phillips screwdriver, unscrew the clamps securing the heater pipes to the faucet and remove them. We place a container for coolant under the pipes
- We take out the lever rod bracket and pull it out of the hole.
We take out the rod bracket, pull it out of the hole in the lever
- Let's move under the hood again. Using a 10mm wrench, unscrew the fastenings of the faucet to the shield.
- We return to the salon and take out the faucet.
We insert the new tap in the reverse order of removal:
- Installing the new faucet in place
- We secure it from the engine compartment using two nuts (pre-lubricated with a product that protects them from corrosion)
- From inside, open the tap completely and tighten the bracket.
- Then we put on the pipes from the passenger compartment and secure them from the engine compartment.
- Pour in coolant
- We start the engine and warm it up. We check the pipe clamps, tighten them if necessary, and turn on the heating.
If you don't fully understand something, be sure to watch our video.
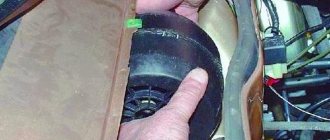
Replacing the heater motor
The following sequential steps must be performed:
- The electrical network is completely de-energized.
- The positive wire should be disconnected from the motor. It is located under the dashboard.
- It is necessary to unscrew two bolts located in the engine compartment. They serve to hold the stove casing.
- Then you need to disconnect the mass.
- Unscrew and remove two bolts that serve to secure the fan to the heater housing.
- The air duct grille is being dismantled. To do this, the element is rotated 90 degrees and removed from the casing.
- The device should be assembled using the reverse sequence. The power supply contacts must be securely fixed. Otherwise, the assembly will have to be disassembled a second time.
Preparing to replace the heater radiator
The experience of motorists suggests that it is much more profitable to replace the stove radiator with your own hands than to turn to specialists for help. So, in 2022, installing a new radiator will cost approximately 2,500 rubles. without the cost of a new device, which will double the cost.
So, before starting work, you will need to buy a new radiator and prepare the tools.
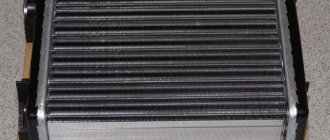
New radiator
Motorists have different opinions about the best radiator model. But they are unanimous on one thing: original spare parts are the most reliable. The heater radiator for the VAZ-2114 is completely identical to the same element for the VAZ-2115 and VAZ-2113, so they can be replaced with each other.
The following companies offer good stove radiators for VAZ:
- DAAZ. The most popular radiator model. It has very small honeycombs, due to which the air warms up better. The plates are rigid and resistant to deformation.
- Oberkraft. Aluminum radiator, which is lightweight, resistant to corrosion and evenly distributes heat throughout the cabin.
- "Orenburg radiator". Expensive model, but the price is completely justified. The company produces copper radiators that will last for decades.
- Bautler. Not ideal, but not a bad model. However, some drivers complain that the new Bautler radiator started leaking within a couple of months after installation.
You can also select spare parts by article number. Suitable numbers are 2108–1301012, 21082–1301012, PO2108–01 and LRc 01082.
Important! It is not recommended to buy painted radiators, as during operation they can spread an unpleasant odor throughout the car interior. In addition, such models have low heat transfer.
Tools
Tools you will need:
- slotted and Phillips screwdrivers;
- wrenches 8 and 10;
- pliers;
- jack;
- unnecessary rags;
- oilcloth;
- container for draining coolant.
We adjust the damper of the VAZ 2114 stove
All work is performed in the following sequence:
- It is necessary to remove the bracket holding the cable sheath to the housing.
- On the left is a yellow galvanized lever. It should be taken over. This position indicates his maximum openness.
- To adjust the length, the cable should be pulled. The correct arrangement is when the long lever, when moved to the right position, is on the lever block. In this position, the device is considered to be maximally open.
- When the adjustment is completed, the cable is securely fixed.
Step-by-step instructions for removing and installing the stove
The heat exchanger of the VAZ 2114 car is located in an extremely inconvenient place. Therefore, when removing and installing it, you will have to do a fairly large amount of disassembly and assembly operations.
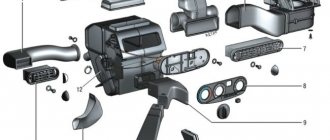
The VAZ 2114 heater is equipped with air ducts, ventilation nozzles and levers for regulating the warm air flow
Tools and consumables
To work you will need the following tools:
- Phillips and slotted screwdrivers with short and long handles (screwdriver);
- set of wrenches;
- container and rubber hose for draining coolant;
- rags, a piece of oilcloth.
Procedure for replacement
In order to remove the heater radiator of a VAZ 2114 car, you should perform the following operations:
- First, drain the antifreeze on a cold engine.
- Then unscrew the screw located behind the plastic plug. Remove the glove compartment on a VAZ 2114 car
- Remove the glove compartment. First, unfasten and detach the bottom half. Then remove the cover along with the light bulb. Unscrew the screws securing the upper part and, with slight pressure and rotation, lower it down. In total, you will need to unscrew six screws.
Unscrew the screws securing the instrument panel
- Unscrew the two upper and two lower self-tapping screws securing the instrument panel.
This is how the lower steering column cover is removed
- Remove the lower protective cover from the steering column. To do this, remove three self-tapping screws and three screws from below.
- Pull the plug out of the cigarette lighter socket.
Disconnect the connectors of the radio pads and pull it out
- Disconnect the connectors of the pads from the car radio and remove it from the slide.
Unscrew the screws securing the plastic console - On both sides, unscrew the screws securing the plastic console.
Unscrew the two self-tapping screws securing the console
- Pull out the flags that regulate the position of the damper and remove the heater fan mode switch.
Detaching the plastic console from the panel
- Disconnect the console from the panel. Be sure to use a marker or notches to mark the disconnected terminals from the buttons on the console
- On the console, disconnect the terminals from the buttons for turning on the lights, heated rear window, fog lights, etc. Be sure to mark them with a marker or notches in the order of their location.
- Disconnect the console from the panel.
- Disconnect the ashtray illumination block.
Unscrew the two screws from the diagnostic connector. - Unscrew the two screws from the diagnostic connector and carefully completely disconnect the console.
Carefully remove the console
- Carefully remove the console and set it aside.
Unscrew the two screws securing the metal base
- Unscrew the two screws securing the metal base to the floor - one on the left and the other on the right side of the bracket.
Unscrew the four screws securing the dashboard
- Unscrew the four self-tapping screws securing the front panel (“dashboard”) - two each to the left and right of the center of the console mounting.
Unscrew the two large screws securing the metal structure
- First remove two large screws, then two smaller screws that secure the iron structure.
Remove the metal structure and pull out the ECU
- Pull the electronic control unit out from under the console.
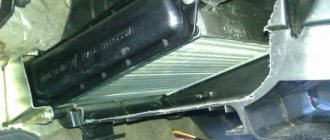
To access the heater radiator, lift the left side of the dashboard
- To access the heating radiator, lift the left side of the dashboard using a jack.
- In case antifreeze spills, place an oilcloth under the hoses and rags on it.
Unscrew the clamps connecting the radiator to the engine cooling system from the hoses.
- Unscrew the clamps from the hoses connecting the radiator to the engine cooling system.
- Remove the rubber tubes from the heat exchanger pipes.
- Drain the coolant from the radiator into a prepared container. Removing a faulty radiator from its socket
- Remove the heater core from its socket.
- Install the new radiator by performing all operations in reverse order.
To avoid the formation of an air lock in the cooling system, remove the hose from the throttle body - To prevent an air lock from forming in the cooling system, remove the hose from the throttle body after loosening the clamp. Pour antifreeze into the expansion tank in a thin stream. At the same time, watch the end of the disconnected hose - as soon as liquid flows from it, put it in place and tighten the clamp.
Replace the additional heater resistor
The operating speed of the stove on a VAZ 2114 car is regulated by an additional resistor. Its design provides for the presence of two spirals with a certain resistance. If the heating system operates in the first mode, then the current passes through two spirals. If you turn on the operation at second speed, the current will flow through one spiral. When using the third speed, the current will flow bypassing the resistor altogether. The location of the additional resistor is in the place under the gas pedal.
For the most part, repair of this part is not required, but it often fails due to the fact that the contacts burn out. In this case, they need to be cleaned. It is possible that the block may melt.
First of all, it is necessary to remove the left trim, which is located on the instrument panel. Then you need to disconnect the wires from the additional resistor and remove it, after unscrewing the screw. Visually inspect its integrity. Use a multimeter to determine the presence of a break. If it is found, the part is replaced. Assembly must be carried out in reverse order.
In conclusion, it must be said that replacing a VAZ 21114 stove radiator is quite a painstaking job and requires certain experience and knowledge. Therefore, to solve this problem, it is better for beginners to seek help from service station specialists.
Replace without removing the panel
But no matter what method is used, you will first have to drain the coolant from the system. Therefore, you will have to stock up on antifreeze in the required quantity in advance.
First, let's look at the replacement method without removing the panel. As already mentioned, this will require making cuts in some places.
To complete the work you will need:
- Set of screwdrivers of different lengths;
- Hacksaw blade for metal;
- Flat container for draining residual coolant from the radiator;
- Rags.
Having prepared everything and drained the coolant from the cooling system, you can begin work:
- We remove the storage box (glove compartment) from the panel, for which it is necessary to unscrew 6 screws securing it;
- Remove the side trims on the center console;
- Use a metal blade to make the necessary cuts: The first cut is vertical
, we do it on the inner wall of the panel near the center console (behind the metal strip of the glove compartment). Moreover, here you will have to make two cuts.The second cut is horizontal
, running in the upper part along the rear wall of the opening under the glove compartment.The third is also vertical
, but not end-to-end. It is done on the right on the rear wall of the lower storage shelf of the panel; - After all the cuts, part of the panel together with the wall can be bent down, which will provide access to the radiator. We bend this part and fix it;
- Unscrew the near bracket for fastening the heating system flap control cable and move the cable to the side;
- Loosen the clamps of the coolant supply pipes to the radiator. In this case, you should place a prepared container under the connection points, since liquid will flow out of the heat exchanger. Remove the pipes;
- We unscrew the three screws securing the radiator, remove it and immediately inspect it.
Afterwards we replace the heat exchanger, fix it in the seat, connect the pipes to it and clamp it with clamps. To make the pipes fit easily, lubricate them with soap.
At this stage of work, you should fill the cooling system with liquid and run it to remove air pockets.
Next, it remains to make sure that the connections between the pipes and the radiator are not leaking, and that the damper and faucet are connected without errors.
After this, all that remains is to return the cut part of the panel to its place and fix it. To do this, you can use screws and plates.
The main thing is to fix it in several places so that in the future the cut off part does not rattle when moving. Use sealant or silicone.
This method is convenient because if you replace the radiator again (which is quite possible), all the work will be very simple - you just need to remove the storage box and unscrew a few screws.
In addition, all cuts are made in such places that after assembling the panel and installing the glove compartment they will not be noticeable.
What to choose?
Today, for the VAZ 2114, two options for radiators are offered, which differ in the material of manufacture. This can be a copper or aluminum unit.
To understand which one is better, let's conduct a comparative analysis.
Radiator type
Advantages
Flaws
Price
— The number of side ribs exceeds those of the competitor
— The air flow channels are wider, which reduces the risk of crashing and increases the efficiency of heat transfer at idle speed
— Rapid heating is accompanied by equally rapid cooling
— If a leak is detected, repair is impossible, only replacement
— It takes a long time to heat up, but at the same time it takes a very long time to cool down;
— If a leak occurs, repairs can be made by soldering the holes
— In terms of the number of ribs it is inferior to its aluminum competitor;
— The channels are narrow and small, they clog quickly, which reduces heating;
— Repairs have to be carried out more often due to clogged channels;
— Minimally heats at idle;
— It is difficult to find a high-quality heater, since almost always, in addition to copper, there are impurities that reduce the efficiency of the radiator
From this we can conclude that aluminum ones are more popular than copper ones. But this popularity is due to the availability and opportunity to purchase a high-quality aluminum product.
Aluminum device
Which of these you choose is up to you to decide. Although copper is more expensive, it can be repaired, while if an aluminum device fails, you will certainly have to buy a new unit.
Copper analogue
CABIN FILTER
One of the reasons why the heater in the interior of a VAZ 2114 stops heating the air normally is that the heating system is clogged with various debris and dirt. To prevent the entry of dirt and dust, a cabin filter is used; it is located between the engine compartment and the upper part of the heater housing. To replace it, you need to open the hood and find the filter protective housing; it is located just below the windshield, approximately in the center of the wiper panel. Changing an element is easy - just remove the old one with your own hands and install a new one. A cabin filter adapter has been developed especially for VAZ models (2108-2115); this design allows the installation of a modern type filter element. Replacing the element every 10 thousand kilometers will keep the heating system parts clean.
When the engine is warmed up to operating temperature, and cold air is blowing from the car’s interior heater, or a puddle (drips) forms in the interior of the VAZ-2114 car on the passenger seat side, a possible solution to the problem lies in replacing the heater radiator. It should be removed if it is established that the reason lies precisely in the heat exchanger, since the process of removing it is very labor-intensive for the average car enthusiast. But if you have patience and study the algorithm of the sequence of actions well, then it will be possible to do this in ordinary garage conditions.