The VAZ-2114 and VAZ-2115 models are in stable demand. These are inexpensive, quite dynamic and comfortable cars, with affordable spare parts. From time to time they have problems with the heating system, many of which can only be solved by replacing the radiator of the VAZ-2114 or model 2115 stove. You can do this yourself, and without removing the dashboard, as required in the operation and repair manual.
The design of the heating system VAZ-2114
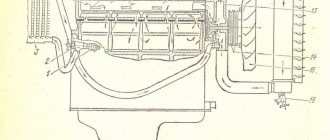
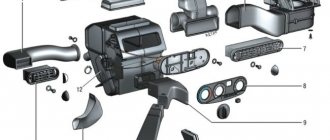
The design of the heating system for cars of the Samara-2 family, including the VAZ-2114 and 2115, was unified to reduce the cost of production and the cost of cars. It is simple and reliable, but from time to time some of its elements fail. The heating system consists of:
- radiator-heat exchanger with connected pipes;
- faucet that shuts off the coolant supply;
- air duct systems with dampers;
- fan for air supply;
- control block.
The air is heated by feeding it through the honeycomb of the stove radiator. The flow is forced by a fan and directed through the air ducts by dampers. The entire system is controlled by a special unit from the driver's seat. In the warm season, the tap allows you to shut off the supply of coolant through the heat exchanger. If the radiator of the VAZ-2114 stove leaks or remains cold when the tap is open, the only solution is to replace it.
What to install?
Brand Pekar
Heating radiators used for the VAZ 2110 are usually divided into two types:
- Old style;
- New sample.
Until the fall of 2003, old radiators were installed on the “tenth” model, and then cars with new units began to be offered. There is practically no difference between them, but the repair differs in approach and complexity.
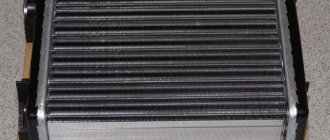
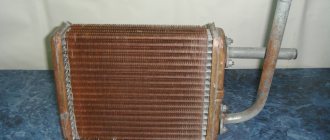
In addition to the standard aluminum radiator, a copper analogue is perfect for the VAZ 2110. This unit has fewer fins, but is characterized by more efficient heat transfer. This will make the stove work much better. The only drawback of a copper radiator is its cost. Ideal for installation on a VAZ 2110, a double-row copper radiator marked 2110-8101060 will cost you up to 2,000 rubles.
If you don’t want to spend that kind of money, but want to get an effective device with high quality indicators, then choose the DAAZ model. This radiator is made of aluminum, works well, and the price does not exceed 1000 rubles.
Causes of radiator failure
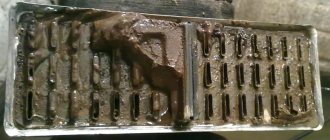
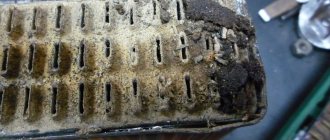
The need to replace the stove radiator arises in several cases. If the heat exchanger remains cold even when the heat supply is set to maximum, it is highly likely to become clogged. The reason is scale that forms at high temperatures and settles in the radiator tubes or pipes connected to it. The second reason is a burst and depressurized radiator or pipes. When this breakdown occurs, antifreeze begins to flow into the passenger compartment on the passenger side, the mats become wet, and a characteristic unpleasant odor appears in the car.
In both cases, be it a cold heater radiator or an antifreeze leak, this unit will need to be replaced, since it cannot be repaired. Copper heat exchangers can be temporarily soldered, but this will not solve the problem for a long time; the part will still need to be replaced. This must be done as quickly as possible, since driving a car with a damaged heating system is uncomfortable and can be dangerous, since fogged or frozen windows impair visibility.
Drain the ANTIFREEZE / ANTIFREEZE
We unscrew the bolt, but before doing this, do not forget to place a container underneath into which the liquid will be drained. It is worth unscrewing a little at a time, gradually draining the liquid, and when the bulk is drained, you can unscrew the cap of the expansion tank. But you shouldn’t do this right away, as the pressure will be strong and the liquid will spill with a 99% chance.
Tools and materials
To replace the heater radiator in a VAZ-2114 you do not need expensive and complex tools or equipment. It is enough that almost every car enthusiast has a new spare part in his garage. To complete the job you will need:
- new heater radiator - aluminum or copper;
- a set of ring and open-end wrenches, you can use a set of sockets with a ratchet;
- curly screwdriver;
- set of hexagons;
- container for draining antifreeze;
- fresh coolant, no more than 4 liters.
Additionally, it is better to stock up on rags to wipe off antifreeze that has spilled into the cabin; in addition, you will need a stop for the torpedo - a wooden block of 50x50 mm, about 40 cm long, is perfect.
Unscrew the pipes
After draining the liquid from the system, you need to unscrew the pipes leading to the radiator. Be careful, there may be liquid left in the radiator.
Then we unscrew the three screws that hold the radiator itself and pull it out.
Don't forget to clean the inside of the stove from leaves and other debris. Then we install a new radiator and reassemble in the reverse order.
This method helped me save a lot of time and did not require complete disassembly of the dashboard, which is good news.
Work order
Replacing the radiator of a VAZ-2114 stove without removing the dashboard allows you to save time, and this does not require any special skills. Let’s immediately make a reservation that part of the torpedo will still have to be disassembled, but the center console will remain in place, and this is the most labor-intensive part of the operation. At the initial stage of work, the side part of the panel on the passenger side is removed; to do this, use a screwdriver to unscrew the screws securing it.
To drain the coolant, you need to unscrew the bolts of the front protection, which is located under the engine compartment. The antifreeze is drained through a special plug located in the cylinder block; to unscrew it, you will need a 13 mm spanner. To prevent it from spilling on the ground or the garage floor, a container is placed under the car. To increase the rate at which antifreeze flows out, you can open the cap of the expansion tank.
Using a hexagon on the passenger side, the torpedo mount is unscrewed, after which it can be easily bent.
Next, you need to unscrew another fastener, located on the passenger side under the lower part of the center console. After this, the torpedo can be easily raised so that it remains in the same position, a stop of suitable length can be installed under it; a block with a cross-section of 50x50 mm and a length of about 40 cm is enough.
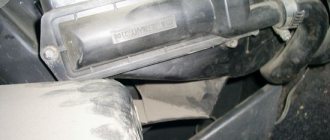
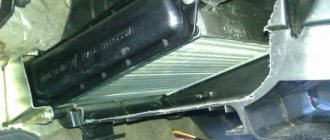
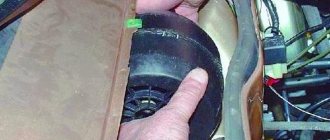
In the opened space you can see the heater radiator, which is attached to three self-tapping screws. They must be unscrewed so that it can be safely removed from the socket. In this case, a problem will arise - another self-tapping screw is hidden behind the plastic body of the torpedo, which needs to be unscrewed. To get to it, it is advisable to drill a small hole in the plastic through which you can insert a screwdriver. To do this, you first need to remove the glove compartment. If you try to move the torpedo, you can break the plastic and then removing the heater radiator on a VAZ-2114 will turn into an expensive procedure.
Next, you can proceed directly to dismantling the heater radiator. To do this, remove the clamps and disconnect the pipes, under which it is better to place a small container or rag, since there is still antifreeze in the system, which will spill directly into the cabin. After this, the radiator is removed from the mounting socket without any effort. It is advisable to examine it to see where the damage was and where the antifreeze is leaking from; corrosion damage appears in this place and streaks are visible, which once again confirms that the stove radiator needs to be replaced.
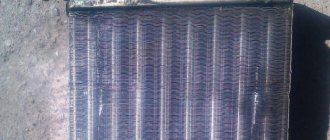
The new heater core fits into place effortlessly and should not cause any problems. It is secured with self-tapping screws, including through a hole previously drilled in the dashboard. In this case, it is advisable to inspect the faucet, since this is another weak point of the heating system. It should be completely dry and the lever should be easy to turn. The glove compartment is installed in place, the dashboard and the removed side panel are screwed to the mounts.
Before adding coolant, you need to check whether the plug on the cylinder block is tightened so that the coolant does not spill out. Fresh antifreeze is poured into the expansion tank to the level; if during operation the level drops, it will have to be topped up.
To carry out the tests, you need to start the engine and, after waiting until it warms up, turn on the heater. It should heat well in different modes, and the interior should remain dry, without stains of spilling antifreeze with a characteristic odor. At first, it is recommended to periodically look at the floor to make sure that all connections are tight and the new radiator is not defective.