Sooner or later, owners of a VAZ-21099 car are faced with the need to carry out repairs taking into account the requirements for the vehicle. At the same time, replacement of equipment can only be carried out taking into account numerous nuances that determine the effectiveness of the result. It is mandatory to first drain the coolant and disassemble the dashboard, and then replace the VAZ heater radiator. Such a phased implementation of the event guarantees the successful restoration of the heating capabilities of the car interior.
Principle of operation.
Before identifying a malfunction, you should know how the system operates. Only then can you judge the likely breakdown.
- This unit has an electric motor with a fan. Which supplies hot air to the car interior;
- Then we have a button for on off;
- Resistance system, they provide the desired fan speed;
- There is a heater radiator through which the liquid passes.
That is, there are not many parts that can lead to failure. It could be a radiator.
Or liquid leakage occurs due to leaky connections.
See:
How to choose a heater radiator 2109
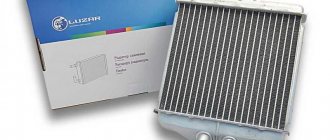
All commercially available heater radiators are divided into three groups:
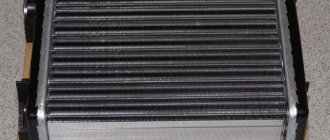
- Copper stove radiators. An excellent opportunity to tune the stove, because copper has good thermal conductivity, but the most valuable thing about copper radiators is that they can be restored. If you approach the process of repairing and cleaning a copper radiator correctly, it will last almost forever. I don’t dare call it expensive, because with a difference in price from the standard one of 500-800 rubles, the effect and subsequent operation will confirm its unconditional superiority over aluminum models. A copper radiator is a little heavier than an aluminum one, but compared to the junk that we constantly carry in the trunk, this is not weight.
- Aluminum heater radiators 2109. A good replacement for a copper-brass radiator if the replacement budget is no more than a thousand. This money will also include a lightweight aluminum radiator and pipes with clamps. The bad thing about aluminum models is that they are prone to corrosion, heat up quickly, but cool down just as quickly. Okay - price. For 800 rubles you can buy an average quality radiator, the only caveat is Luzar radiators. In terms of price, they are in the middle range, and the quality of the enterprise floats, as does the equipment. In addition, judging by the reviews, they tend to develop microcracks that are invisible to the eye, but the antifreeze, which will invariably evaporate from their surface all winter, will give the interior a unique aroma and the eternal mystery of “where does the antifreeze go.”
- This category includes cheap radiators without a clear name of the manufacturer; we would not recommend dealing with them, despite the attractive price. Such a radiator can cost no more than 500 rubles, but if you look closely at its design, you can see a number of differences that lead to a decrease in the area of useful airflow. and the material used in their manufacture is another mystery.
Checking the system
Before you start work, you need to make sure that it is the heater radiator that is to blame for the malfunction.
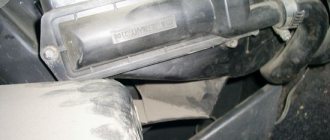
- We bend the center console where the computer is located. We disconnect the shield from the overhead torpedo, here we will see the body of the heater itself;
- We take a flashlight and look, it should be visible if water is leaking. We immediately check the tap and pipes.
- Let's look at the leaks. The fact is, if the leak is not large, you might not notice it in the cabin.
Therefore, it is worth inspecting everything with sufficient quality.
You can watch the video on replacing the stove radiator on a VAZ 21099 on our website. But only after a thorough inspection can you begin to work.
Instructions for this topic are given below.
Features of the heating system
First of all, you need to understand on what principle heating works. Only after gaining basic knowledge can you judge a potential breakdown.
It is recommended to take the following features into account:
- the electric motor must supply hot air;
- the stove can be turned on and off;
- the fan must operate successfully at various speeds;
- a radiator is required for the successful flow of fluid used when operating the stove.
In fact, only if all the parts are in working order can you count on the successful functionality of the stove installed on a VAZ-21099 car.
Disassembling the torpedo
First, we prepare a couple of containers; they will be needed for the machine parts. You can put plastic in one, and different screws in the other.
- In order for us to get to the torpedo bolts, we need to remove the trim, which is located in its upper part;
How to replace the radiator of a VAZ 21099 stove
The video shows how to replace the radiator
interior heater
of VAZ
2109 with a high instrument panel.
How to replace the heater (stove) radiator of a VAZ 2109
Everything is simpler than it seems!
Attention: You should prepare and place empty containers nearby; they will come in handy if coolant suddenly starts leaking. Take the volume within 6=7 liters. It's better to have a reserve.
- The most important thing is to purchase a radiator. Before paying, inspect and check it for defects and only after that make a purchase;
- Prepare the necessary tools. Put in a set of sockets and screwdrivers.
After this, take a flashlight and you can begin further work;
- Replacing the VAZ 21099 radiator heater begins with closing the tap, and the heater should be set to cold. The engine must also be completely cooled;
- We unscrew the radiator mount, which consists of three bolts, raise the rod, which is located above the radiator and remove the pipes;
- When you remove the first pipe, be careful to place the container. A little liquid should come out of it, about 200 grams.
Use clean containers; after repairs are completed, you can use this antifreeze back;
What to do in case of depressurization
If there is a flood in the cabin, then first of all you need to move the crane control handle to the extreme left position. This will save you from scalding, engine overheating and the need to buy another bucket of antifreeze. If the valve is closed, but coolant flows out from under the torpedo, it means that the supply pipes, hoses, or the valve itself have burst. In this case, you need to urgently stop, turn off the engine and either take the car to a service center, or get the necessary tools from the trunk and begin repairs.
To determine the scope of work, you should find out the cause of the leak. First you need to look under the torpedo with a flashlight. The simplest option is that if the supply hose bursts, it will be immediately visible. Replacing it takes minutes if you have a repair kit and a screwdriver. However, the most common cause of heating system leaks is cracks in the radiator housing. Replacing a stove radiator is not an easy task.
Failed part
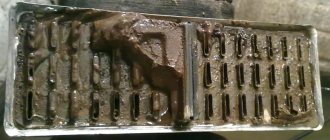
In the engine cooling system, the interior heater is located immediately after the cylinder block jacket. All particles washed off the walls of the block enter the radiator tubes and over time clog them severely. The coolant enters the stove under high pressure, and due to congestion, this pressure increases even more and penetrates worn areas. Reality confirms the theory: where it is thin, it breaks.
The depressurization of the stove is usually the fault of the car owner himself, who did not carry out an inspection in time, did not clean the device, or did not replace the hoses. This must be done at least once every 3 years.
How does the heater work?
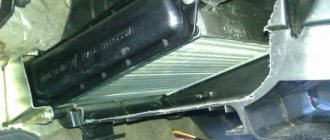
In order to understand how to correctly remove the device, for example, in the case when it is necessary to replace the body of the VAZ-21099 stove, it is worth familiarizing yourself with its design. In this car, the heater is located in the central part of the instrument panel between the engine shield and the dashboard on the air supply line, to which the heater is attached with four bolts. The design of the 99 VAZ stove is represented by two casings made of durable plastic (casing), between which there is a radiator. There is a fan on top of the heater housing that blows heated air to heat the interior. You can get to it through the engine compartment. In order to shut off the supply of hot coolant to the heater and turn it off during the warm season, a special tap is provided. The stove design also contains heat-conducting lines, pipes and rods.
Removing a faulty device
First you need to determine whether your car has a low or high center panel. If the panel is low, then you are definitely out of luck. To remove it you will have to sweat.
- First, turn the front wheels so that they point straight ahead.
- Then open the hood, remove the negative terminal from the battery, remove the choke cable from the choke lever, and disconnect the speedometer cable from the gearbox.
- Remove the stove faucet handles.
- We take out, by pulling towards ourselves, the electric fan switch handle.
- Unscrew the 4 screws securing the beard trim and pull it towards you.
- We disconnect all the plugs, having previously marked or remembered which connectors they will need to be inserted into later.
- Unscrew the 4 screws securing the stove control panel.
- Unscrew the 2 screws securing the instrument panel visor and remove it.
- We squeeze the clamps of the instrument panel and remove it from the dashboard.
- Disconnect the speedometer cable, all plugs and fittings from the dashboard, and remove it.
- Pull it towards you and remove the handles for the headlight range control and the dashboard light switch.
- Unscrew the nuts securing the headlight range control and the dashboard light switch.
- Remove the steering wheel and steering column switches.
- Set the ignition key to position “0” and remove the connector with the ignition switch wires.
- Unscrew the fastening screws and remove the central panel.
Now we can get to the details of the interior heating system. We need to take them off.
- Let's look under the hood again. If you have containers or extra money, drain the antifreeze from the system.
- We find hoses in the engine compartment going to the heater tap pipes. We remove them by loosening the clamps.
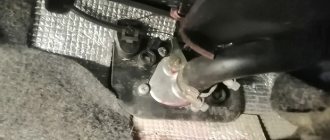
- Moving into the interior, we remove the hoses from the pipes under the dashboard. Unscrew the two nuts securing the stove tap and remove it.
- To the right of the stove body, unscrew the screw that holds the clamp of the heated glass flap rod.
- Unscrew the three screws securing the heater radiator and remove it.
- Now let's examine all the details. If we find faulty ones, we replace them.
Return to contents
How to remove the VAZ-21099 stove (low panel)
Owners of cars with a low central panel will encounter certain difficulties when removing and replacing the heater. So, let's describe this process in detail:
- You will need to turn the steering wheel so that the front wheels are straight. Next, open the hood and turn off the power to the car by disconnecting the terminals from the battery.
- At this stage, you need to remove the speedometer cable, which comes from the gearbox and the choke (it is located on the choke lever).
- You need to remove the handles from the heater faucet and pull out the fan mode switch knob towards you.
- Removes the so-called beard by unscrewing its fastening screws.
- All plugs must be disconnected. Before doing this, it is advisable to photograph or mark the wires so as not to confuse them with connectors later.
- Unscrew the fastening screws from the heater control panel.
- The instrument panel visor needs to be removed. To do this, you need to unscrew the screws that secure it.
- We remove the clamps from the dashboard, after which it should be disconnected from the dashboard.
- We remove the dashboard, disconnecting all the plugs from it and the cable from the speedometer.
- By moving towards yourself, you need to disconnect the switches for the instrument lighting and the headlight range control, after which you will have to dismantle them by unscrewing the nuts that secure them.
- We dismantle the steering wheel along with the steering column switches.
- You need to remove the ignition switch along with the wires, and then remove the central panel.
- The system must be freed of coolant by draining it.
- In the engine compartment, you should remove the hoses from the heater tap pipes, then in the cabin, remove the hoses from the pipes that are located under the dashboard.
- The stove tap must be removed by unscrewing its two fastening nuts.
- Remove the rod for the heated glass flap, which is located on the right side of the heater housing.
- Remove the heater radiator by unscrewing its screws.
The VAZ-21099 stove has been completely dismantled, now you can clean it or replace it. Installation is carried out in reverse order.
Sequence of actions when replacing a radiator
For most beginners, the question of how to remove a stove radiator is not such a difficult task. You should first prepare containers for small parts and liquid remaining in the hoses. The sequence of manipulations is as follows:
Dismantling
- Unscrew the bolts located on the hose clamps. After which the radiator is disconnected from them. Important! When removing the hoses, you need to be prepared for the fact that residual coolant may spill out of them. In this case, keep a special container on hand.
- Remove the glove compartment.
- Unscrew the fastenings to the floor.
- Next, unscrew all the screws securing the radiator to the stove.
- The fastening of the cable that regulates the windshield blower damper is unscrewed.
- The radiator is disconnected from the stove. At this stage, problems with the torpedo are possible. To lift it up, you should rest your torso against the lower part of the glove compartment.
Installation
Next, a new radiator is installed. Actions are performed in reverse order. The car radiator is carefully installed, the torpedo is lowered down, the screws are screwed in, and they take their rightful seat.
Replacing the stove on a VAZ-21099 (high panel)
Now about the advantages of dismantling the heater on cars that have a high panel installed in the interior. There is absolutely no need to fiddle with disconnecting the choke and speedometer cables. To get to the heater radiator, you need to remove the plastic trim from the steering wheel, unscrew the dashboard, and then move it into the cabin. All. All elements of the car’s heating system are revealed to us in all their glory and free access.
It is worth suggesting to VAZ-21099 owners a more radical method of accessing the car’s heater elements. To do this, you need to carefully cut off the bottom of the panel that covers the stove, and then think of some kind of secret fastening or simply screw the bottom shelf with self-tapping screws. To access the parts of the device, it will be enough to simply dismantle it.
SubaroMows 01/25/2012 — 13:06
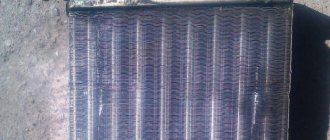
How the stove works: the coolant passes through a radiator, which consists of very small tubes and plates for heat transfer. The coolant is heated by the engine, goes to the radiator, the radiator plates heat up, the fan blows and the heat from the plates moves throughout the cabin through the air system. How to check: 1. Checking the temperature of the radiator: Without removing the panel, you can put your hand under the bottom and feel how hot it is. It should be such that the hand cannot tolerate it. If it is hot enough, move on to the second point. If it is cold, or is eaten warm, it is clear that the heat will not flow off it very well. see point 3. 2. If the radiator is hot, just hot, then naturally if you blow hard on it, hot air will come out. The whole trick here is to blow on it, and accordingly we are limited to the operation of the stove fan. It is not difficult to check it; we look at how powerful the air flow is; just put your hand on the air outlet from the stove. If it is blowing, then the problem is in the fan. 3. If the radiator is not hot: Problem with coolant flow through the radiator. Well, since Hiro replaced him, we rule that out. The problem of coming oh. fluid to the radiator: this work is performed by the faucet and pipes (those that lead from the faucet to the radiator and those that go from the engine to the faucet. We take and touch the pipes in the engine compartment that go to the engine, they should be hot, it’s also impossible to hold your hand. If they are hot, then the problem is in the faucet or the pipes that lead from it to the radiator. If they are cold, then either they themselves do not work, or the engine produces warm liquid. See point 4. 4. If the engine produces warm liquid, then this fluid is probably has time to cool down in a small circle. And this is possible if the fan in the engine compartment turns on earlier than usual, in theory it turns on when the coolant temperature is 92-95 degrees, this is normal, but if earlier then the problem is in the temperature sensor
The check is not difficult, you can do everything yourself.