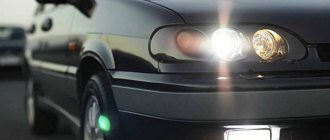
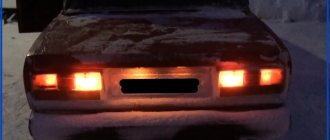
According to modern traffic rules, the side lights of a car must always be turned on when driving. And if they do not work, then this malfunction must be corrected immediately. And to make it easier for you to do this, we will look at the causes of malfunctions of the side lights on a VAZ 2109 car.
The first and most common reason for the failure of side lights is a burnt out light bulb or poor terminal contact. The solution is to replace the light bulb with a new one and clean the contacts. Lack of contacts is especially common on rear lights, since contact between the light bulb and the board is lost there.
Sometimes tapping on the headlight is enough to make it light up. Also, the location of the rear lights is not very good; water and dust get in there, which leads to rapid failure of the board.
The second reason is, of course, the fuse. Or rather, on the nine, two fuses are responsible for the dimensions. The size fuse F10 (7.5A) is responsible for the front and left rear markers; it also contains the instrument cluster lighting, panel lighting, license plate and cigarette lighter.
So if the dimensions fail, you can see if the lighting works, as indicated above, to understand whether the fuse is really the culprit.
Fuse F11 (7.5A) is responsible only for the rear right marker. In order to change the fuse, you will have to open the hood and the cover of the mounting block and, if necessary, replace the fuse with exactly the same one.
The third reason for the malfunction of the dimensions on the VAZ 2109 car is the K4 lamp serviceability relay, sometimes jumpers are installed instead of this relay, perhaps the old owners installed it better to replace it with a relay.
The fourth reason is the headlight and side light switch itself. Perhaps the contact has come loose or the button has already outlived its usefulness; most likely, it will have to be replaced with a new one.
The fifth reason is the mounting block itself. As you already know, it is located in a bad place, and if the drain holes become dirty, water will flow into it and onto the plug contacts, which leads to oxidation and failure of the car’s electrical devices.
You will have to remove the fuse box and clean the contacts. Therefore, you need to keep the drainage holes clean.
And the sixth reason is the wiring itself, since most of the nines are already old and worn out by time, respectively, and the wiring, or rather the insulation of the wiring, is no longer the same. There may be a short circuit somewhere or a break will appear.
You need to pay special attention to the wires that go to the rear lights, as there are places where the wires bend. Logically, when the wires are shorted, the fuses should constantly blow and it is worth paying special attention to this!!!
The “dimensions” do not light up on the VAZ 2108, 2109, 21099
Let's look at how to quickly find the reason for the failure of the "dimensions" on VAZ 2108, 2109, 21099 cars. The side lights are part of the vehicle's external lighting system and its operation with non-functioning "dimensions" is difficult, especially at night. We are looking for the reason for the non-functioning dimensions, as is customary in such situations, from simple to complex.
Causes of the malfunction “the dimensions of the VAZ 2108, 2109, 21099 do not light up”
— The side light bulb in the socket has burned out
One light bulb, or several at once, can suddenly burn out. In some cases, it may be impossible to visually identify a burnt-out light bulb. Therefore, we replace the burnt out one with a known good one. You can use a similar one from a nearby headlight.
— The contacts in the side light bulb socket have oxidized
We rotate the light bulb in the socket several times to remove the oxidized layer and restore contact. In the future, you can clean everything with sandpaper.
— The contacts in the connecting blocks of the headlight or tail light unit have oxidized
We remove and put on the connecting blocks several times to remove the oxidized layer and restore contact. More radically, we remove the pads and clean the contacts.
- No “mass”
The “negative” wires of the front headlights and rear lights with side lights on VAZ 2108, 2109, 21099 cars are attached to the car body. It is necessary to clean the mounting location to ensure good contact with ground. Usually the negative wire is the black wire from the headlight connection block, attached to the body next to the headlight or taillight.
Weight of the front headlight, place of attachment to the body of the VAZ 2108, 2109, 21099
— The fuse has blown
If fuse 10 (F11) is blown, the side lights of the right headlight and right rear light will not work. If fuse 9 (F10) is blown, the left headlight and left rear light of the vehicle will not work. We replace them with new ones, and then look for the cause of the burnout (possibly a short circuit somewhere).
— Relay K4 is faulty (monitoring the health of the lamps)
A faulty K4 lamp control relay can be replaced with jumpers. We connect the holes for relay terminals 1-7-8, 9-10-11, 4-5. On some VAZ 2108, 2109, 21099 vehicles, jumpers are already installed instead of lamp health monitoring relays.
— The tracks in the rear light boards have crumbled
Visually inspect the tracks in the rear light circuit boards for shedding, rust, or burnout. If necessary, we check their integrity using a test lamp or tester. A faulty track can be repaired by soldering wire onto its frayed edges.
— The pads in the mounting block have come off or the wire tips in them have oxidized
It is necessary to check the secure fit of the connecting blocks in the fuse mounting block. For an electrical circuit of “dimensions” these are plugs Ш4 (Х4), Ш6 (Х6), Ш9 (Х9), Ш11 (х11). If necessary, the wire tips present in them should be cleaned from oxidation.
— The external lighting switch on the instrument panel is faulty
You should remove the exterior lighting switch and connect the black and yellow-red wires together. The black current flows into the switch, and the yellow-red current flows out. If the lights light up, replace the switch with a new one. If not, we look for a fault in the electrical circuit further.
— “Open” or short circuit in the wiring
It is necessary to check the presence of electric current on the external lighting switch (circuit from the ignition switch to the switch), fuses (circuit switch - mounting block) and on the lamp control relay (functionality of the mounting block).
Notes and additions
— Side light lamps are located in the front headlights and rear lights of the car. The front lights use an A12-4-1 bulb, and the rear lights use an A12-5 bulb.
— The electrical circuit for switching on the external lighting (“dimensions”) is the same for all these cars. The only difference is in the fuse mounting blocks used: on old Samaras, before 1999. this is 17.3722 with finger fuses, on cars after 1999. modifications of the mounting block 2114 with flag fuses. Accordingly, fuses 9 and 10 are used in the external lighting circuit with the old mounting block, with the new F10, F11.
— “Dimensions” of the right side of VAZ 2108, 2109, 21099 cars on the 10th (F11) fuse. “Dimensions” of the left side on the 9th (F10) fuse.
— Simultaneously with the side lamps, the rear license plate lights turn on. Here is their connection diagram “Rear license plate illumination VAZ 2108, 2109 connection diagram.”
Source
The rear lights of the VAZ 2109 do not light up - reasons and solutions
Hello everyone, today we will look at the main reasons why the lights on a VAZ 2109 do not work. According to modern traffic rules, the side lights on a car must always be turned on when driving. And if they do not work, then this malfunction must be corrected immediately. And to make it easier for you to do this, we will look at the causes of malfunctions of the side lights on a VAZ 2109 car.
The first and most common reason for the failure of side lights is a burnt out light bulb or poor terminal contact. The solution is to replace the light bulb with a new one and clean the contacts. Lack of contacts is especially common on rear lights, since contact between the light bulb and the board is lost there.
Sometimes tapping on the headlight is enough to make it light up. Also, the location of the rear lights is not very good; water and dust get in there, which leads to rapid failure of the board.
The second reason is, of course, the fuse. Or rather, on the nine, two fuses are responsible for the dimensions. The size fuse F10 (7.5A) is responsible for the front and left rear markers; it also contains the instrument cluster lighting, panel lighting, license plate and cigarette lighter.
So if the dimensions fail, you can see if the lighting works, as indicated above, to understand whether the fuse is really the culprit.
Fuse F11 (7.5A) is responsible only for the rear right marker. In order to change the fuse, you will have to open the hood and the cover of the mounting block and, if necessary, replace the fuse with exactly the same one.
The third reason for the malfunction of the dimensions on the VAZ 2109 car is the K4 lamp serviceability relay, sometimes jumpers are installed instead of this relay, perhaps the old owners installed it better to replace it with a relay.
The fourth reason is the headlight and side light switch itself. Perhaps the contact has come loose or the button has already outlived its usefulness; most likely, it will have to be replaced with a new one.
The fifth reason is the mounting block itself. As you already know, it is located in a bad place, and if the drain holes become dirty, water will flow into it and onto the plug contacts, which leads to oxidation and failure of the car’s electrical devices.
You will have to remove the fuse box and clean the contacts. Therefore, you need to keep the drainage holes clean.
And the sixth reason is the wiring itself, since most of the nines are already old and worn out by time, respectively, and the wiring, or rather the insulation of the wiring, is no longer the same. There may be a short circuit somewhere or a break will appear.
You need to pay special attention to the wires that go to the rear lights, as there are places where the wires bend. Logically, when the wires are shorted, the fuses should constantly blow and it is worth paying special attention to this.
Well, that's all with this, we looked at the main reasons why the side lights on a VAZ 2109 car do not work. Good luck to everyone so far...
The entire line of VAZ 2109 cars can be divided into two branches - those produced before 1998 and those produced after 1998.
Older cars are equipped with fuse blocks whose marking is 17.3722. This power supply consists of a housing and an engineering board. Wire contacts, fuses and relays are soldered to the board.
Newer versions of nines, the production of which began in 1998, here the power supply is marked 2114-3722010-60. Here we are already seeing fuses.
The required mounting block is also located the same everywhere - in the engine compartment opposite the driver's seat, almost under the windshield.
Differences
Are there any differences between the old and new versions of the power supply? Of course. They are as follows:
- The parts of the mounting block are marked differently;
- The fuse ratings are different;
- The new power supply does not have a relay for the cooling system fan motor and a time relay for the rear window washer device.
Fuse block 2114-3722010-60
Each fuse in the power supply is responsible for a specific circuit, here is a summary table.
| Fuse number | Current strength | The chain he protects |
| F1 | 10A | Backup fuse |
| F2 | 10A | Turn signal indicators, hazard signal breaker (in hazard mode), hazard warning light |
| F3 | 10A | Rear brake lights, interior lighting |
| F4 | 20A | Rear window heating element, rear window heating switch contacts, carrying socket, cigarette lighter |
| F5 | 20A | Horn (horn), horn switch |
| F6 | 30A | Backup fuse |
| F7 | 30A | Heater fan electric motor, windshield washer electric motor, electric radiator fan relay, rear window heating relay, rear window heating indicator light, glove box light |
| F8 | 7.5A | Backup fuse |
| F9 | 7.5A | Backup fuse |
| F10 | 7.5A | Left side light |
| F11 | 7.5A | Right side lamp |
| F12 | 7.5A | Right low beam headlight |
| F13 | 7.5A | Left low beam headlight |
| F14 | 7.5A | Left high beam headlight, high beam indicator lamp |
| F15 | Right high beam headlight | |
| F16 | 15A | Turn signal indicators and emergency flasher relay-breaker (in the turn signal indication mode), turn signal indicator indicator lamp, rear reverse lights, gear motor and windshield wiper activation relay, oil pressure indicator lamp, hand brake indicator lamp, coolant temperature indicator, fuel level indicator, fuel reserve warning lamp, voltmeter |
VAZ 2109 dimensions and instrument lights do not light up
- To the beginning of the forum
- Forum Rules
- Old design
- FAQ
- Search
- Users
Dymdyr
First, check the key switch.
which fuse is responsible for?
It was when it was starting to get a bit rusty that I thought it was the clutch, maybe a fuse.
1) button on off 2) Rheostat 3) fuse. 4) I’ll check for dampness, because there’s snow and humidity. I’ve already put a plastic bag on the ChY, I shouldn’t have tied it with an elastic band.
Types of panels
Instrument panels on the VAZ 2109 are of at least three types:
- Low panel;
- High panel;
- Electronic panel on nines with Europanel.
On versions with a low panel, failure of the entire panel is extremely rare. This is due to the fact that here the speedometer and econometer are equipped with mechanical drives. Therefore, it is unlikely that they will fail along with the electrical component.
Why doesn't it light up?
- First, remove the cover of the mounting block and make sure that the fuse is intact. The fuse markings are located on the inner surface of the cover. You should look for fuse F16 or F5, depending on the year of manufacture of your VAZ 2109.
- If the fuse is intact, be sure to check whether the contacts of the fuse you are looking for have not oxidized. It is not uncommon for shields to fail due to broken contact.
- Check if there is power to the dashboard. To do this, you will need a warning light and the ignition on. Disconnect connector X4 in the mounting block and check for voltage at pin 3. The disadvantage of the VAZ 2109 design is that when it rains, the mounting block immediately becomes wet. This causes oxidation of the contacts in the pads, which causes the electrics to stop working. Sometimes not only the contact is oxidized, but also the board of the Nine mounting block.
If none of the above actions yielded results, you will have to be disappointed. After all, now you need to remove the dashboard and check the condition of the wiring, contacts, and negative connections. Here it is better to trust a professional electrician or set aside a whole day to troubleshoot problems yourself. There is no need to rush here.
Simple cases
The main thing is to notice in time that the feet have failed, before an accident occurs. The most likely and, one might say, common reasons will be the following.
- Light bulb burnout
. A simple inspection will not give results; outwardly it may seem functional. Take a new lamp that works exactly and screw it in instead of the problematic one. If it lights up, the cause has been found; - Oxidation of contacts directly in cartridges. Detected visually. To clean, the light bulb rotates in the socket several times - the layer gets knocked down and the stops light up. To guarantee, you can unscrew the lamps and go over the contacts with fine sandpaper. In some cases, hopeless damage to contacts is detected; in this case, the cartridge itself will need to be replaced;
- Oxidation of contacts
in the wire block, which is placed on the terminals of the board (track) of the headlamp. The actions are similar to point 2, only they are done with the block: it is removed and put on again 3-4 times. Or the contacts are cleaned manually; - Burnt out tracks
. Visible upon visual examination. There are 2 options: buy a new board and replace the damaged one or restore the existing one by soldering wiring of the appropriate thickness onto the damaged track; - The brake light sensor (the so-called “frog”) has failed. In the VAZ 2109 it is located under the brake pedal. To check, both wires are removed from the DSS and short-circuited directly with a piece of wire. If the stops work, then we go to the auto shop for a new sensor. If there is no response, we look further for the reason. O in the entire system is the most vulnerable point (except, perhaps, the light bulbs). Many VAZ owners begin their search for the cause of non-working brake lights with it.
We looked at the simplest and most likely breakdowns. Next, brake lights that do not light up require a more serious check.
Popular faults
If we talk about the dashboard of VAZ 2109 cars, then they are characterized by certain problems. We will tell you about them, and also tell you how to act correctly in a given situation.
| Fault type | Your actions |
| Gasoline level and temperature indicator does not work | In most percent of cases, this situation occurs due to breakdown of devices, sensors of these devices, or an open circuit of the power supply. Therefore, first check the circuit for continuity, make sure that the fuses have not blown. If this is not the case, check whether the gas level and temperature sensors are working. Only if none of the actions allowed you to get rid of the breakdown, you can begin to replace the devices themselves. No options, the problem lies in them |
| When the fuel tank is full, the arrow points to zero | If you have worked on the fuel level sensor, the fault most likely lies with you. When manipulating this device, the float limiter is often knocked down. Either the limiter is installed incorrectly or adjusted, causing the resistor winding to end. To resolve the problem, remove the sensor and then adjust the limiter again |
| The fuel gauge needle regularly jumps and ends up at zero | Here, most likely, the resistor has weak contact with the current collector. Another possible option is that there is a break in the resistor. To resolve this situation, we recommend replacing the hot level sensor with a new measuring device |
| The fuel level lamp is constantly on | If this lamp is constantly on, there is probably a short circuit in the fuel level sensor supply wiring to ground. Another option is that the sensor’s flexible bus is shorted to the fuel intake pipe. You will have to disassemble the device to align the bus and get rid of the resulting short circuit |
| Indicator lamps do not work on the dashboard | There is a high probability that the light bulbs have simply burned out, or they are poorly held in their seats due to loose contact. Replace the bulbs, but first try tightening the contacts. Traces of oxidation may be detected. When cleaned, the light bulbs can work normally again. Also, do not exclude the possibility of wiring breakage or oxidation of the tips of the supply wiring. Try going over the wires with a tester, cleaning the contacts if necessary. |
| The speedometer does not work, the flexible shaft is noisy | In such a situation, you will have to change the speedometer drive cable or replace the entire speedometer assembly. But before you bother so much, check that the fastening nuts of the tips are tightened correctly and properly. The flexible shaft may make noise during operation due to deformation or violation of the permissible bending of the shell of less than 10 centimeters during installation |
Main causes of malfunction
Well, let's try to find out why the rear lights of the VAZ 2109 do not work. Let's sketch out a list of possible faults:
- The light bulb burned out.
- The flashlight is faulty (oxidation of the socket or connector, burnout, broken board tracks, etc.).
- The connectors of the mounting block have oxidized.
- The control relay is faulty (more about it below).
- The side light switch is faulty.
- Break/short circuit of supply wires.
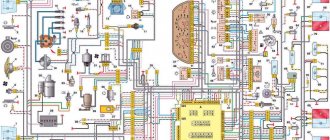
The list is decent, but before we get started with diagnostics and repairs, let’s get acquainted with the electrical circuit of the external lighting of the VAZ 2109 car.
Connection diagram for side lights
We don’t need a complete wiring diagram for the car, therefore, in order not to get confused and waste time, we will limit ourselves to only the power supply diagram for the external lighting of the VAZ 2109.
External lighting diagram for VAZ 2109
The numbers on the diagram indicate:
- Front dimensions;
- Engine compartment lighting;
- Mounting block (MB);
- Engine compartment light switch;
- Egnition lock;
- Outdoor lighting switch;
- External lighting control on the dashboard;
- Rear lights and brake signal;
- License plate illumination;
- Dimmer control for instrument panel lighting;
- Brake light switch;
- On-board control system.
After turning on switch 6, the voltage of the on-board network through fuses F10 and F11 is supplied to the lamp health monitoring relay (K4 in the mounting block) and from it to side light lamps 1, 8. In this case, F10 is responsible for the left side, and F11 is responsible for the right side of the car.
Important! In some modifications of the VAZ 2109, jumpers are installed instead of the K4 control relay. They are indicated by arrows in the diagram.
Causes and actions in case of breakdown
Among the reasons for the breakdown of the rear parts of the lighting system on a VAZ 21099, 2108 or 2109, the most common are:
- Bulb burnout. It happens due to wear or power surges and is almost the most popular reason for replacing rear headlights.
- Oxidation of contacts. Occurs due to poor quality of terminal contact, electrolyte leakage, or cracks in the battery case.
- Fuse failure. This cause of failure is due to voltage surges.
- The reverse sensor is broken or its wiring is broken.
- Burnt out contacts on the headlight film.
- Lack of ground on the board.
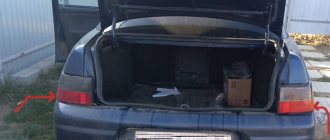
The most common and easiest fault to solve is a lamp burnout. The product must be replaced with a new one by turning off the light sources, opening the trunk and disconnecting the column of wires.
To do this, you will most likely have to remove the trunk trim of the VAZ 2108 or 21099, which is located behind the lamp. After this, squeezing the latches (they are located on the sides), you need to take out the panel and unscrew the lamp, after pressing on it. To install a new rear lamp, reverse the process.
Diagnostics and repair
We are familiar with the scheme - it is quite simple, it’s time to get to work. If only the tail light does not light up, and the front light of the same side works, then there is no need to blame the fuse - it is fine. Let's assume that everything is so: only the rear light does not work, the fuse is intact. We'll decide later what to do if it burns out.
We will need a device capable of measuring 12 V DC voltage. Any multimeter will do: even a dial multimeter, even a digital Chinese one. We set it to constant voltage measurement mode.
Multimeter set to measure DC voltage up to 20 V
We securely connect one probe of the device to the car body. It is better to do this with a piece of long wire so as not to limit your freedom of movement. Let's start with diagnosing the flashlight as the weakest link. The “cheerful” VAZ designers installed a flexible circuit board in the flashlight, which has no place at all in a device operating in extreme road conditions.
We open the trunk and see the lid covering the back of the lamp. It is secured with two plastic nuts.
Rear lamp cover
We unscrew the nuts with our bare hands, remove them and get to the power supply.
Removed rear light cover
The block is placed directly on the flexible circuit board; carefully(!) remove it by pulling in the direction of the arrow in the next photo.
Removing the power supply
We turn on the dimensions and measure the voltage on the block. If it's the right tail light, then we need the yellow wire. If the left one is black and yellow. Is there voltage? Either the lamp or flashlight is faulty. We'll talk about replacing the rear light bulbs later.
Let's assume there is no voltage. Go ahead. Open the engine compartment and find the MB (mounting block). How to do this and which fuse is responsible for the side light is described in the last section of the article. In the meantime, we are working. We unscrew the two mounting bolts that secure it.
We turn it over and see the pads. They are marked.
The pads are located on the underside of the mounting block
We need block X9 (see diagram). Without removing it, we measure the voltage on the yellow (right lamp) or black-yellow wire. This can be done by inserting a sewing needle between the wire and the block, connecting it to the probe of the device. Eat? There is a break in the wiring harness from the mounting block to the lamp. You'll have to climb around the body with a flashlight. We inspect the harness along the entire length from the MB to the rear light, paying special attention to the places where it passes through the body and ribs. We find a break, restore the connection, isolate it.
Installation and testing of rear lights of VAZ 2109
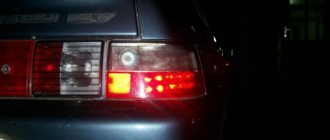
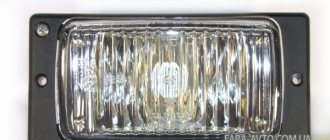
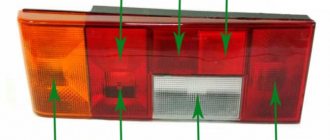
The rear lights (headlights) of the VAZ 2108, VAZ 2109, VAZ 21099 have the following bulbs: 1) Brake lights. 2) Dimensions. 3) Reverse. 4) Turns. 5) Fog lamp.
Tail light board
A wiring harness goes from the mounting block to the rear lights. The purpose of each individual wire in the harness can be understood by its color: 1) Brake lights - red 2) Dimensions - yellow 3) Reverse - green. 4) Turns - blue. 5) Fog light - orange-black.
Remove the connector from the rear light board
Naturally, you need to understand that if the car is old and a lot of people have done the wiring, then the color match of the wire to its purpose may be disrupted. That is, the red wire can be converted not to brake lights, but, for example, to dimensions. But in general, this is a very important point: AvtoVAZ developers specifically marked the functional purpose of the wire with a certain color to make it easier to use.
If some light signal in the rear headlight of a VAZ 2109 does not work, then before climbing into the mounting block and opening the electrical circuit, we check the following: 1) The reliability of fastening the rear light mass to the body. 2) Check the reliability of fastening the wire connector to the headlight. 3) Integrity of the light bulb 4) Quality of contact between the light bulb and the flashlight board. It often happens that everything is intact, the light bulb and the mass are good, and 12 Volts come to the light bulb, but it does not light. The reason is poor contact between the light bulb and the board. In this case, you need to clean both the light bulb base and the area on the lantern with fine sandpaper. As one smart person said: “Electrics is the science of contacts.” To disassemble the rear light of the nine, first remove the protective plastic cover. Then disconnect the black wire of the flashlight from ground. Then we remove the connector from the flashlight board and remove the board itself with the bulbs from the headlight housing. If it is necessary to replace the headlight itself, then unscrew the remaining bolts securing the headlight to the car frame and remove it.
There is one important point that many owners of the ninth model Zhiguli do not know. This is the rear fog light. It is turned on by a button between the hazard warning button and the heated rear window. The rear fog light will only work if: 1) The ignition is turned on. 2) Low beam headlights are on. 3) The flashlight power button is pressed. The fog light bulb is the only one that has a reflector inside the headlight. Thanks to this reflector, the glow of the lantern becomes brighter.
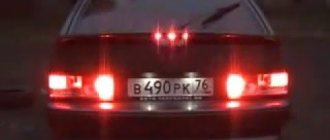
The side lights can be turned on either with the ignition off or on. In the event that at least one side light bulb does not light, relay K1, located in the mounting block, will turn on a warning light on the instrument panel to warn the driver about this malfunction.
In this case, the driver, with the side lights on, needs to get out of the car and see which of the four lamps is not on. If all the size lamps are on, then you also need to check the brake light lamps, since relay K1 is also activated for these lamps, and if at least one of them burns out, the warning lamp on the instrument panel will light up. After all, brake lights also ensure traffic safety.
How to change a headlight bulb
Unlike the vast majority of imported cars (thanks to our designers), you can replace the light bulbs in the rear light in a minute and literally with your bare hands. No removal of wheels, bumpers or engine.
Open the trunk, find the cover covering the back of the lamp, and remove it. Disconnect the power supply from the flexible board (extremely carefully!). We discussed in detail how to do this above. Now you need to remove the back panel of the lamp. To do this, on the side located closer to the central axle of the car, press the plastic lock.
Retainer holding the rear panel in place
Carefully remove the panel, starting from the side of the latch.
Removing the panel
Place it face up. Before us are five different-sized light bulbs. We need the smallest one - the one marked with an arrow.
Rear light panel of VAZ 2109 from the lamp side
We recess it a little, turn it counterclockwise and take it out. We install a new one in place of the burnt one, fixing it by pressing and turning clockwise. We connect the power supply and turn on the dimensions. Everything is working. Place the panel in place and close the lid.