The windshield of the VAZ 2106 is the most vulnerable of all car glazing, so it is necessary to resort to replacing it most often. Even a small chip caused by a pebble or a thorn can spread over time and form a crack over the entire area, making replacement unavoidable. The procedure for replacing a windshield is not complicated and you can do it yourself with only a couple of flat-head screwdrivers on hand. It is advisable to have a large size so that the pickup area is larger. I used drums as they are quite wide and perfect for this repair:
First of all, you need to pry the “lock” from the bottom center of the elastic band and remove it, and then use a screwdriver to pry off the edging:
And then we pull it with our hand, removing the edging along the entire perimeter of the glass:
Now about the dismantling process. I personally performed this operation several times and started prying it off from the upper left corner. First, insert one screwdriver so that the sealing rubber disengages from the body from the inside.
Then, from the inside, gently pressing on the edge of the elastic with a screwdriver, push it outward in small sections (approximately 1 cm):
To avoid problems, you need to free half of the glass from the inside from the rubber band, that is, push it out, as shown in the photo above. That is, from above we reach somewhere to the rear view mirror, and from below, respectively, to the middle of the instrument panel. After this, we pry up part of the windshield from the outside and carefully pull it towards us, slowly loosening it from side to side. Please note that there should not be much effort. If the glass does not give in, then you do not need to use much force; it is better to remove the rubber a few centimeters at a time.
The glass is removed along with the rubber band and after that you can install a new one in its original place.
If you buy a new one, you can buy a VAZ 2106 from the factory, produced by BOR, at a price of 1200 rubles or 1500 rubles. with a black stripe at the top. Installation is carried out in the reverse order and it is also necessary to act with extreme caution so as not to damage the glass.
In the VAZ Six, as in other cars, comfort and safety are ensured by car windows. As the vehicle is used, they are exposed to negative environmental factors, which leads to gradual damage to the surface. Ultimately, one glass or another has to be replaced. This procedure is simple and can be done by every Zhiguli owner.
Why do you need glass on a VAZ 2106?
At the beginning of the advent of such means of transportation as cars, their speed was barely faster than that of a person. The driver and passengers did not experience any discomfort and did not need any additional protection. But as speeds increased over time, the need arose to protect the people in the car both from the oncoming air flow and from dust, dirt, stones and precipitation. Automotive glass began to be used as such protective elements. They simultaneously play the role of a kind of shield, and also provide the necessary comfort in the vehicle interior. The main requirements that auto glass meets include high strength, safety and reliability during operation.
Replacing windshield and rear windows
You will need: a screwdriver, a blanket (or something similar) to lay under the glass, a piece of cord (preferably nylon slippery) with a diameter of 3.5–4 mm and a length of about 5 m.
Do the work with an assistant.
Pay attention to the marking in the upper right corner of the windshield. Purchase new glass with the same markings. Moreover, to avoid buying fake glass, check its strength by rubbing it with a cloth moistened with a solvent. The markings on branded glass cannot be removed, but on fake glass they are often easily washed off.
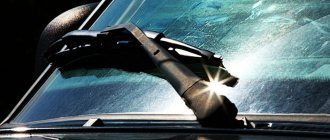
1. Move the windshield wiper arms and blades away from the glass.
2. Unscrew the three screws securing the decorative trim of the front side pillar of the body and remove it (the right one is shown, the left one is located symmetrically).
3. Remove the rear view mirror (see “Rear view mirrors”).
4. Remove the sun visors and their holders (see “Interior fittings”).
5. Disconnect the front fastening of the right handrail (see “Interior fittings”).
6. Remove the decorative trim for the left ceiling lining mounting.
7. Remove the screw and remove the cover holder.
The pad is held in place by its own elasticity, but it is better to have an assistant support it.
8. Remove the trim.
9. Pry up the seal in the upper corner of the glass and move it behind the body flange.
Operations with the right corner of the glass are shown. On the left, the work is performed in the same way. Work can be done on both sides simultaneously.
If the seal has hardened, remove its surround.
To do this, slide the trim covering the joint of the edging in the middle of the lower part of the seal.
Use a screwdriver to pry up the trim, remove it from the groove of the seal and remove.
10. While squeezing out the seal with your fingers, simultaneously press on the glass and.
eleven. . remove its upper corner from the body opening.
12. Press the corner of the glass from the body from the inside.
13. Move the top and side parts of the glass away from the body and remove the glass.
14. Place the glass on the hood, carefully moving it over the windshield wiper arms.
15. Starting from the middle of the bottom side of the glass.
16. . remove the seal from it.
17. Clean the glass opening from rust and dirt.
In the upper part of the opening, the ceiling lining is secured to the body flange with seven spring holders.
. check their integrity and replace if necessary.
18. Clean the grooves of the seal from dirt, mastic (if used), and glass residues (if it is broken).
Replace the seal if there is mechanical damage or signs of aging.
19. Clean the two drain holes (one each on the right and left) in the lower corners of the seal.
Windshield
The windshield of a car, also called a windshield, is installed in the front of the body and provides protection for passengers and the driver inside. Since it is the windshield in a car that experiences the greatest impact from the environment (gravel, sand, dirt, etc.), it is on this element that damage in the form of chips and cracks most often appears. Sometimes situations arise when a pebble flies into the glass from passing or oncoming traffic, causing a cobweb (numerous cracks) to appear across the entire surface of the glass. In this case, the windshield must only be replaced. Therefore, it would be useful for owners of the VAZ “Six” to know in advance the dimensions of the windshield, which have the following values: 1440 x 536 mm.
Windshield Frame Repair
Causes of damage and diagnosis of the windshield frame
Car enthusiasts believe that the main reason for rusting and rotting of glass frames in domestic models is the imperfection of the factory body assembly. Direct welding of the windshield frame to the roof is carried out on unpainted metal without anti-corrosion coating. Considering the poor quality of the rubber seals at the junctions of the frame and the windshield, this assembly method leads to water leakage during rain and washing. Active pockets of corrosion appear, which the car owner can notice by the “saffron caps” on the glass frame. In the future, corrosion and decay lead to increased vibrations or glass loss.
In foreign cars, frames rust less frequently; they are characterized by accidental damage due to side impacts and car rollovers. In some cases, local repair of metal distortions is possible, but usually a comprehensive restoration of the geometry of the frame, the leading edge of the roof, and the side pillars of the windshield is required. Body work is complicated by the complex curved configuration of the windshield, which is precisely followed by the contours of the frame.
A comprehensive professional diagnosis of frame damage is only possible after dismantling the windshield. The main purpose of diagnostics is to determine the extent of damage, technology and cost of repair. To dismantle the glass, it is necessary to remove rubber gaskets, decorative moldings, and remove layers of sealant and glue. Many foreign cars have special fasteners welded inside the frame for plastic clips on moldings, which are easily damaged.
After dismantling work, the geometry of the windshield opening, front support pillars, and roof edges are checked. Minor metal distortions can be corrected using adhesive or vacuum extraction, which does not require repainting the frame and stands. To correct more complex deformations, a spotter extractor is used, under which the paint layer is cleared to bare metal. The final adjustment of the geometric dimensions of the window opening is carried out by hand straightening. It is unacceptable to correct unevenness with a thick layer of putty, which will crack from vibrations after a couple of months of use. If large metal tears or extensive corrosion areas are detected, welding or complete replacement of the windshield frame will be required.
Methods for body repair of windshield frame
If it is impossible to apply gentle pulling or manual straightening techniques on site, the windshield frame is completely dismantled. To do this, depending on the body structure, you need to unscrew the bolted connections or cut off the welds (drill out spot welds) of the frame fastenings to the support pillars and the roof of the body.
After dismantling the windshield frame, auto mechanics carry out restoration work on it:
- completely remove paint;
- restore shape and size (in case of mechanical deformations);
- cut out rusty fragments or the perimeter of the edge;
- measure and prepare metal inserts;
- weld frame fragments;
- clean the welds;
- treat internal surfaces with “anti-corrosion”;
- try on the repaired frame on temporary fastenings;
- prime, putty the metal, grind the putty after drying;
- install the frame in its original place;
- connect the frame to the body (bolt connections, spot welding);
- paint the frame or the entire car;
- install windshield.
When painting a frame locally, you need to select automotive enamel to match the color of the old paint - we will select, paint and polish it.
Advantages of ordering frame repairs from our car service center
Judging by customer reviews, they consider the main advantages of our car service to be the skill of tinsmiths and the use of various body repair technologies. To carry out body work, the workshop is equipped with modern equipment (paint booths, power stocks), and hand tools.
Our customers like having measurements taken in front of them and a detailed discussion of repair estimates. The craftsmen always explain to customers the chosen repair technology and advise on the necessary additional work.
Customers consider the following benefits of ordering windshield frame repair:
- speed of repair work;
- affordable repair prices;
- own guarantees of the quality of the “Auto Captain” service;
- take care of the car during repairs.
For our working customers, it is convenient to quickly receive applications (by e-mail, telephone), and receive cars in the evening. Cumulative bonuses and promotional offers save money for regular customers.
Rear window
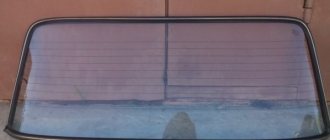
The rear window of the “six” is also a body element, through which rear visibility is provided, protecting the interior and the people inside from precipitation and other external influences. It is necessary to remove the part infrequently and this is done mainly for the purpose of replacing the sealing rubber, during repair work or replacing it with heated glass. The rear glass measures 1360 x 512 mm.
How to remove glass
The sequence of work for removing the rear window is similar to the procedure with the wind element, but there are some features that we will consider in more detail:
- Use a screwdriver to pry out the elements in the lower corners of the seal.
The rear window is installed in the same way as the windshield.
Rear window tinting
The rear window is dimmed in the same sequence and using the same tools as the windshield. To make it easier to apply the tint film in bends, some car owners divide it into three longitudinal stripes.
Heated rear window
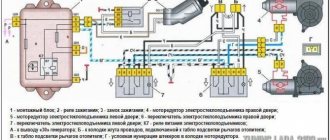
The sixth model of the Zhiguli, although equipped with a heated rear window, was only of the last years of production. This option is not superfluous at all, since it allows you to get rid of glass fogging in damp and frosty weather, thereby improving visibility. Therefore, many owners of “sixes” strive to install such glass on their cars. For such a conversion you will need:
- heated glass;
- terminals - wide and bolt-on;
- circuit breakers;
- wires;
- relay (PC527 or analogue) and a block for it;
- screw;
- rubber tubes;
- on/off button.
Since glass heating consumes quite a large current, it is advisable to use the button from the indications, which will allow you to disable this function in a timely manner.
We install heated glass in the same way as regular glass, and then connect it as follows:
- Remove the negative terminal from the battery.
- We dismantle the instrument panel and embed a button into it.
How to replace the front windshield and rear windshield on a VAZ 2106
Replacing the front windshield and rear windshield on a VAZ are, in principle, very similar processes. Why the glass is being replaced is completely clear. Let's look at what else glass removal can be used for. This process is carried out when it is necessary to tint these windows, or when body work is being carried out for which the glass is a hindrance (for example, painting).
To replace the front windshield and rear windshield we will need:
- Assistant;
- Unnecessary blanket or blanket;
- Screwdriver;
- a 5-meter piece of rope with a diameter of about 0.5 cm;
Having found all this, you can begin the repair process.
- We free the interior from absolutely all interfering decorative interior details. The front side pillar trims are removed first. Then we dismantle the internal rear view mirror, also remove the sun visors and the decorative trim on the ceiling;
- Now that nothing interferes with us, and we do not risk damaging anything during the process, we move on to the main part of the work. Start the subsequent work from one of the upper corners.
Use a screwdriver to pry up the edge of the seal and push it past the body flange. Then, maintaining constant uniform pressure on the glass, squeeze out the seal. In this process, you need to gradually move the corner of the glass (top, of course) along with the seal outside the body; - Having carried out this operation along the entire perimeter, you will already be holding the glass and the seal in your hands;
- We begin to remove the seal from the glass itself. We do this in several stages. First, we pry it in the middle with a screwdriver and begin to carefully separate it from the middle to the edges. We inspect the seal for contamination and mechanical damage. If you find even one of these, the seal must be replaced with a new one, and the seal is also replaced if the rubber hardens. We clean the edge of the glass and the seal itself from dirt. Also check the sealant grooves; quite often they may contain debris, sealant residues, etc.;
- Clean the moisture drainage holes, which are also present in the seal;
- Take a new car glass and install a seal on it. Start installing it from the bottom corner, moving first along the bottom side, then along the side, then along the top, and again along the side;
- Place the cord that you prepared in advance in the groove of the seal, in the one that fits onto the body flange.
Once you have inserted the cord around the entire perimeter, pay attention to whether one end overlaps the other. It is necessary that such an overlap be at least 20 cm; - Prepare a soap solution of sufficiently high concentration. Cover the seal and the body opening where the new glass will go. you need to coat it in sufficient quantity;
- Together with your partner, install the glass so that the seal groove sits on the flange of the opening where the cord exits. In this case, the ends of the rope should be located strictly in the cabin;
- Now you and the assistant must separate. One of you is inside the car, and the other is outside it. The person who is in the cabin begins to slowly pull out the rope, making sure that the edge of the seal gets behind the flange of the opening, but if it doesn’t get there, then you need to pry it off with a screwdriver. The participant in the process, located outside, applies light pressure to the glass by tapping, exactly in the place from which the rope is pulled out. Thus, the glass sits in place;
After the glass is installed, reinstall all removed parts in the reverse order of removal.
Now let's talk about replacing the rear windshield. It changes in exactly the same way as the front one, but it must be removed starting from the lower corners.
In addition, before removing the glass, you need to remove the trim trim. It is located in the lower corners and can be easily removed by prying it off with a screwdriver.
This completes the replacement of the front windshield and rear windshield. If you have basic skills and an intelligent assistant, it will not take much of your time and effort.
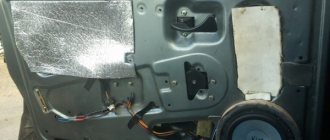
Front door side glass
On the sixth model of the Zhiguli, two windows are installed in the front doors - sliding and turning (window). The first of them has dimensions of 503 x 422 x 5 mm, the second - 346 x 255 x 5 mm. In most cases, the need to dismantle the glass of the front doors arises during the repair of the latter.
How to remove glass
To remove the glass, you will need a slotted and Phillips screwdriver, as well as an open-end wrench for 8 and 10. The dismantling process itself is carried out in the following sequence:
- Remove the plastic plugs from the door armrest by prying them off with a flat-head screwdriver.
Door glass seal
The sliding glass of the front and rear doors is sealed with special elements, the profile of which ensures ease of installation. To reduce friction, the seals are covered with a layer of fluff. When water seeps under the rubber, it flows into the bottom of the door and comes out through the drain holes. Over time, the pile wears off and the seal cracks, resulting in the need to replace the element.
The swing glass of the front door and the rear corner glass are sealed with rubber bands, which also become unusable as the rubber ages and bursts. To prevent water from leaking into the cabin, the seals are replaced with new ones after first dismantling the window and fixed glass.
How to remove a window
To remove the tilt glass, follow these steps:
- We remove the upper sealing element from the door frame.
Video: removing the window on a “classic”
Installing a windshield on a VAZ 2101-2107 car
Installing a windshield on VAZ 2101-2107 (Zhiguli) cars is much simpler than on the “ten” and subsequent models, since in this case the glass is not glued to the body, but stands on a seal. Installation requires only a flathead screwdriver and a rope 4 meters long and about 4 mm in diameter.
Removing old glass VAZ 2101-2107
In order to remove the old glass of a VAZ 2101-2107, you need to rest a screwdriver against the seal (inside the passenger compartment) in the upper part of the windshield, about 5 mm below the top edge of the seal. Then we push the seal away from us and place it behind the opening.
Thus, a small section of the seal ends up on the outside of the car. Next, move the screwdriver 5 cm to the side and push out the next section of the seal in the same way. When the upper part from the seal to the upper side corner is freed, you can remove the glass.
You can either squeeze it out from the inside or remove it from the outside, pulling it towards you and at the same time lifting it up. I would like to note that it is almost impossible to preserve old glass, so you shouldn’t even try. Even experienced craftsmen do not undertake such work.
Preparing new glass
The first step is to put the seal on the new glass. If you are using an old seal, this is quite easy to do. If you decide to install a new seal, you will have to work hard - you must first put it on all corners of the glass for VAZ 2101-2107 and the sides, only then put it on the top and bottom sides.
After the seal is put on, you need to insert a lock (a wedge with a U-shaped profile), which should be located in the center of the seal and go around the entire perimeter. Before installation, the wedge must be stretched, since it is very plastic and during transportation it decreases in length by twenty centimeters.
You need to insert the lock in the following way: first insert the long part, then the short one, and so on around the entire perimeter. When the wedge is inserted, a small residue remains - it can be cut off with any knife or cut with wire cutters.
Glass installation
This is where the rope comes in handy. We roughly determine the middle of the rope and insert it into the seal (along the outer perimeter) in the upper part of the glass. The seal in its outer part has two grooves; the rope must be inserted into the one that is closer to the outer, outer surface of the glass.
Next, using a screwdriver, we recess the rope into the groove until it stops and continue to recess it in the same way until we reach the middle of the lower part of the glass. On the other hand, we do the same with the rope. At the place where they intersect, it is necessary to lay the ropes overlapping one another, and the overlap should be 5-10 cm long and recessed until it stops.
Before laying the windshield of the VAZ 2101-2107 on the opening, you need to throw the free ends of the rope into the car interior. After this, you need to lay the glass on the opening so that the lower part of the opening fits into the outer groove (the one in which the rope is placed) in the lower part of the seal. Then we seat the glass down so that it does not come out of the groove.
We begin to pull the rope towards ourselves - horizontally. The seal begins to enter the interior. We extend approximately half the distance to the lower corners of the glass and seat the glass down from the outside.
Then we also pull the rope further, holding the glass through the open door. The corners must be passed as follows - to pass the left corners, you need to rotate the rope clockwise (it will move slowly, but the seal will fit well on the opening), and when passing the right corners, counterclockwise.
When retracting the rope, you need to periodically “seat” the glass into the opening. At the same time, you cannot hit him, you can only push him with your hands. After the entire perimeter has been passed and the rope has completely come out of the seal, we check the interior. The seal could come out too far and lie on the dashboard, in which case it needs to be driven into the space between the dashboard and the opening using a screwdriver.
The final touch is to shrink the glass all the way. To do this, place your hand on the upper edge of the seal and lightly hit it with your fist. Thus, we go along the entire upper edge of the glass.
If there are small gaps between the seal and the opening, do not let this bother you, this may be a consequence of a slight displacement of the glass, or due to the rigidity of the new seal. After a few days, as a result of vibration, the glass will find its place and will stand like a glove.
Installing a windshield on a VAZ 2101-2107
3.7 car — Ratings: 71
Rear door side glass
The main purpose of removing glass in the rear door of a "six" is to repair the door. The glazing is made of two elements - downward and fixed (corner). The first glass has dimensions of 543 x 429 x 5 mm, the second - 372 x 258 x 5 mm.
How to remove glass
To remove the rear door glass, you will need the same tools as for working on the front door. The process itself is performed as follows:
- We dismantle the door trim, unscrew the fastening of the guides and remove them from the door.
Even with careful operation of the car, sometimes you have to deal with glass replacement. This especially applies to the frontal element. To replace car glass, you will need to prepare a minimum list of tools, familiarize yourself with the step-by-step actions and follow them during the repair.
- Home
- Auto garage
- How to Install a Windshield on a VAZ 2106
We change the windshield of a VAZ 2107 ourselves
The windshield of a VAZ 2107, VAZ 2106 is replaced in case of damage to stones, chips, etc., emitted from under the wheels. This procedure seems extremely complicated for many car owners, but in reality it is not.
Everything is much simpler and can be done by the car enthusiast himself with sufficient courage. In this article we will look at independent replacement of the windshield of VAZ 2107, VAZ 2106. The work of replacing the windshield should be done with a partner.
Replacement of front and rear windshields of VAZ 2106
Removal of the front and rear windshields on a VAZ 2106 car is carried out if they are replaced with new ones, during body work, for example, when painting a car or for tinting them.
To remove the glass, we will need the help of an assistant, as well as a blanket or something like that, a screwdriver, and a piece of cord with a diameter of about 4-6 mm. and about 5 meters long. If everything is there, then you can start repairing:
- The first step in the car interior is to remove all the decorative interior parts that will interfere with us. First of all, these are decorative trims for the front side pillars, remove the interior rearview mirror (see Replacing rearview mirrors on a VAZ 2106), remove the sun visors, and remove the top decorative trim for the ceiling.
- Now, starting from the upper right corner (if it’s convenient for you, you can do both at once), use a screwdriver to pry the edge of the seal and slide it behind the body flange and then manually press the seal while simultaneously pressing on the glass. When performing this operation, it is necessary to remove the upper corner of the glass together with the seal from the body opening and press the corner of the glass from the body from the inside.
- From outside the car, pry the windshield frame (lock) with a screwdriver and remove it from the seal. Next, having previously bent the windshield wipers, you need to move the top and sides of the glass away from the body and remove the glass, placing it on the hood, with a blanket or any other material laid in advance.
Now that we have removed the front windshield, we need to:
- Remove the rubber seal from it, starting from the middle. Check the seal for mechanical damage and, if necessary, replace it with a new one. Hardening of the rubber seal is also not allowed. We clean the seal and the edge of the glass from dirt and rust.
- Check and, if necessary, clean the seal grooves from dirt, sealant and other debris.
- Locate and clean drainage holes in the seal.
We install a new windshield on a VAZ 2106 car. Follow the following sequence of actions:
- Install the seal onto the new glass, starting from the bottom corners.
- Next, take the previously prepared cord and insert it into the groove of the seal, which fits onto the flange in the body opening. By placing the cord in a circle, ensure that it overlaps with the opposite end by about 20 cm.
- Dilute the soap solution and use a brush to generously coat the seal and the internal opening of the body where the glass will sit.
- Together with a partner, install the glass back into the opening so that the seal groove at the point where the cord exits sits on the flange of the opening and the ends of the cord are located in the car interior.
- Now one person remains in the cabin and slowly begins to pull the cord so that the edge of the seal goes beyond the flange of the opening; if the edge does not go, then pry it up with a screwdriver, and an assistant, outside the car, lightly taps on the glass in the place where you pull the cord , puts a little pressure on the glass, thereby setting it in place.
After installing the front windshield in place, install all removed parts in the reverse order of removal.
The rear windshield is replaced in the same way, with the exception of some features:
- The glass must be removed starting from the bottom corners.
- Before removing the glass, in the lower corner, outside the car, you need to remove the trim trim using a screwdriver.
At this point, the repair work on removing and replacing the windshields of the VAZ 2106 has been completed.
How to install a windshield on a seal (elastic band) VAZ 2101. 2107, classic
Contacts for cooperation (sponsors, advertising offers): Mail I'm on VKontakte.
If the edging fits together, install the lock.
Then turn the glass again and insert a cord with a diameter of no more than 4-6 mm and a length slightly exceeding the perimeter of the glass in the seal section. The ends of the cord should cross across the middle of the bottom edge of the edge of the glass.
Place the glass in the body hole and center it.
Now from the outside, press on the bottom of the windshield . An assistant inside the car should begin to pull the cord out of the seal, first from one end and then the other. Using your fingers, gradually press the sealant onto the flange. This way we lower the entire bottom of the glass.
Apply gentle blows with the palms of your hands on the top edge of the glass from top to bottom to deposit the glass.
Replacement of windshield and rear windows of VAZ 2106
To replace the windshield and rear windows of a VAZ 2106, you will need: a screwdriver, a blanket (or something similar) to place under the glass, a piece of cord (preferably nylon slippery) with a diameter of 3.5-4 mm and a length of about 5 m.
USEFUL TIPS Replace the windshield and rear windows with an assistant. Pay attention to the marking in the upper right corner of the windshield. Purchase new glass with the same markings. Moreover, to avoid buying fake glass, check its strength by rubbing it with a cloth moistened with a solvent. The markings on branded glass cannot be removed, but on fake glass they are often easily washed off.
1. Move the windshield wiper arms and blades away from the windshield.
2. Unscrew the three screws securing the decorative trim of the front side pillar of the body and remove it (the right one is shown, the left one is located symmetrically). 3. Remove the rear view mirror (see “Rear view mirrors of VAZ 2106”). 4. Remove the sun visors and their holders (see “VAZ 2106 interior fittings”).
5. Disconnect the front fastening of the right handrail (see “VAZ 2106 interior fittings”).
6. Remove the decorative trim for the left ceiling lining mounting.
7. Remove the screw and remove the cover holder.
NOTE The pad is held in place by its own elasticity, but it is better to have an assistant support it.
8. Remove the trim.
9. Pry up the seal in the upper corner of the windshield and move it behind the body flange.
NOTE Operations on the right corner of the windshield are shown. On the left, the work is performed in the same way. Work can be done on both sides simultaneously.
HELPFUL TIP If the windshield seal has hardened, remove the trim.
To do this, slide the trim covering the joint of the edging in the middle of the lower part of the seal...
... by opening the joint.
Use a screwdriver to pry up the windshield trim, remove it from the seal groove and remove.
10. While squeezing the windshield seal with your fingers, simultaneously press on the windshield and...
11... move its upper corner out of the body opening.
12. Press the corner of the windshield away from the body from the inside.
13. Move the top and side parts of the windshield away from the body and remove the glass.
14. Place the windshield on the hood, carefully moving it over the wiper arms.
15. Starting from the middle of the bottom side of the windshield...
16... remove the seal from it. 17. Clean the glass opening from rust and dirt.
WARNING
In the upper part of the opening, the ceiling lining is secured to the body flange with seven spring holders...
... check their integrity, replace if necessary.
18. Clean the grooves of the windshield seal from dirt, mastic (if used), and glass residues (if it is broken).
HELPFUL ADVICE Replace the glass seal if there is mechanical damage or signs of aging.
19. Clean the two drain holes (one each on the right and left) in the lower corners of the seal.
NOTE
Drainage hole in the seal.
20. Place the seal on the new glass, starting from the bottom corners (if the trim was removed, install it).
21. Place the cord into the groove of the seal, which is used to put it on the flange of the body opening, so...
22... to ensure that the cord overlaps approximately 200 mm in the lower part of the windshield...
23... and the ends of the cord remained of sufficient length.
HELPFUL ADVICE If the cord is non-slip, lather it. To make work easier, additionally lubricate the edge of the seal with soapy water.
24. Insert the windshield into the opening so that the groove of the seal where the cord exits fits onto the flange of the opening, and the ends of the cord are inside the body.
NOTE Be guided by the marks of the sealant on the surface of the body.
25. Install the windshield on the VAZ 2106 car, slowly and carefully pulling out one end of the cord so that the edge of the seal that it moves back passes through the flange of the opening, covering it from the inside of the body.
WARNING An assistant must press the glass against the opening. If necessary, use a screwdriver to adjust the edge of the seal.
Replacing the windshield is done in two steps - pull each end of the cord to the middle of the top side of the glass.
26. Align the seal on the outside along the perimeter of the windshield by tapping it with the edge of your palm. If the edging was removed, adjust its joint and cover it with an overlay. 27. Install the removed parts on the VAZ 2106 car in the reverse order of removal.
The rear window is replaced in the same way as the windshield, with the exception of additional operations.
1. Use a screwdriver to pry up the trim trim in the lower corner of the rear window and...
2.... remove it (the left one is shown, the right one is removed in the same way).
3. Remove the rear window starting from the bottom corners.