Place the car on a lift or inspection ditch; holding the end of the rod by the flats with a wrench A.57070, disconnect the upper end of the shock absorber and remove the front wheels.
Having straightened the locking plates, unscrew the bolts securing the caliper to the bracket. Move the caliper to the side and secure it so that it does not hang on the hoses. Remove the shock absorbers with brackets.
Disconnect the ends of the anti-roll bar from the lower control arms.
Using puller 67.7801.9513, press the pins out of the holes in the levers and move the steering rods to the side.
Choice of springs and wheels
Both stock springs and those with variable pitch without lowering are suitable for us. To achieve overall stiffness, the front springs must be less stiff than the rear springs. The original rear suspension is no good, it is too soft, so if there are several people in the cabin, the car instantly loses controllability, and what to hide, you risk running into the first bump and damaging the bottom of the car. The wheels may begin to catch on the fender liners.
The correct choice of tires and rims is important.
About the dangers of low clearance
Before you decide to make such drastic changes to your “Seven”, it is impossible not to mention the dangers that may await you on the road. Important information! Before you decide to lower your car's ride height, consider whether it's worth it. There are several points that we recommend paying attention to:
- the possibility of damage to important parts of the car when hitting potholes. At least you will visit the service station much more often;
- If the work is carried out by unqualified specialists, the car will very soon require additional cash injections.
The ideal option is springs from Niva
Therefore, one of our tasks is to increase the rigidity of the rear suspension. We recommend installing Niva springs there. Their rigidity is quite suitable for the VAZ 2107. On the road the car will feel confident, despite the fact that there is a maximum number of people in the cabin. Feel free to install these springs and don’t even hesitate. As for the front of the car, it is advisable to install shock absorbers in a circle, this will add elasticity to the suspension.
If you have domestic tires, we recommend replacing them. Advertising is advertising, but whatever one may say, its quality is much inferior to that of foreign ones. Rubber has a huge impact on comfort. If you do everything correctly, then at 150-170 km/h the car will behave perfectly. Pay attention to the climate of the place where you live. If it is cold enough, then you should buy shock absorbers designed for weather conditions. In addition to the fact that the car will become more controllable, its aerodynamic qualities will also improve and passive safety will increase. It is almost impossible to find a complete set of sports suspension for the “seven”; you need to manually adjust the suspension to the parameters of the car.
Lowering the suspension as an option for tuning it
Many car enthusiasts prefer that the higher the ground clearance (the so-called ground clearance), the better. And they are partly right. Domestic roads can very quickly “kill” a low suspension. However, when tuning, some owners of the Seven set themselves completely opposite goals. They want to lower the suspension, giving the car a sportier look. How logical is this in conditions of poor road surface?
In fact, low suspension has its advantages. For example, the car's handling in corners improves. This is achieved due to less roll (the level of the center of gravity decreases). Another advantage is changing the appearance of the car. She becomes more athletic and aggressive. Finally, reducing resistance allows for reduced fuel consumption.
Increasing rear suspension stiffness
In order to tune the rear suspension, you need to replace several components. Namely: springs, shock absorbers, silent blocks and rubber bumpers.
In order to make a balanced modification of the rear suspension of the VAZ-2107, you need to take into account the lift height and spring length. You may have to remove a few threads to get the correct fit. The springs need to be changed to more powerful and stiffer ones. Usually good for replacing springs from a Niva car.
The next step is to replace the shock absorbers. The main thing here is to meet the requirements. It is better to look for shock absorbers with a fixed rod, as they are usually much stiffer than their counterparts.
Even seemingly insignificant parts: bumpers and silent blocks must be replaced with more reliable and powerful ones. Because abrasion of rubber bands leads to deterioration in car control. This is immediately felt, so upgrading the chassis makes the car more reliable to use.
NOW LET'S START DISASSEMBLING THE EXISTING STRUCTURE
1. This is where you will need the previously prepared spring ties. Install them on the second coil (top and bottom) of the spring, as indicated in the picture. We install the second screed in the same way, only on the other side.
2. Now start bringing the spring together; to do this (if anyone doesn’t understand) you need to twist the tie bolts of the first tie. This is done until the second tie begins to move freely on the turns; repeat all of the above in relation to the second tie.
3. Using a 22″ socket and hexagon, unscrew the nut securing the strut rod to the support.
4. Next, remove the bump stop (limiter), as well as the support bearing, compression limiter and support.
5. We replace the old rebound limiter washers with new ones that came with the struts, be careful, they are different - the top one is slightly larger than the bottom one.
6. Remove the spring cup along with the rubber damper, as well as the spring, compression buffer and boot.
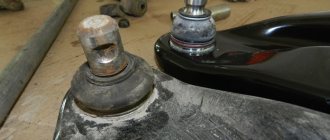
Now let's carefully examine the rack.
The cause of the malfunction was discovered almost immediately, after checking the play, I raised the rod to the top point, then simply released it, after which the piston sharply went down without the slightest resistance and “slammed” into the upper part of the cylinder. Here, as they say, no comments... Now it’s clear where the dull knocks were coming from.
What else can be replaced in the VAZ 2107 suspension
Suspension tuning should not be limited to work under the car. It is advisable to take care of improving the steering system. As an option - a steering column from Niva. It is possible to install an electric amplifier. But such work is best left to professionals. The point is that the equipment must be connected correctly. Doing this yourself is quite difficult. In addition, experts recommend paying attention to the brake system.
Installing disk drives will significantly improve the car's performance. Finally, all work can be completed by changing the tires and performing a wheel alignment. It is better to choose foreign tires. Both classic and low profile options are available. But it is worth remembering that the latter is good in terms of handling, although it reduces the level of driving comfort.
Spring Upgrade
The process of upgrading springs involves changing the length of the part on your own. To do this, the element is shortened or replaced with a longer sample.
Shortened springs
Drivers resort to reducing the size of a part in order to improve the characteristics of their iron comrade. Trimming the springs gives the car some advantages:
- Lowering the body position
- Better steering response
- Reduced roll when entering a turn
Many manufacturers offer a ready-made solution in the form of special versions of short springs. However, it is worth remembering that after tuning the ground clearance will decrease significantly. Such a “seven” will not be able to drive on uneven roads.
You can lower the “seven” yourself. To do this, you need to cut 2 turns from each spring using a grinder.
It is not recommended to cut off more rings, because the body will touch the ground.
Video: cutting springs on a classic
The video shows working with a VAZ 2106, but the technological process for the “Seven” is completely identical.
Link to video:
Discs
Despite the fact that the model was produced for many years, and it would seem that the restyled versions should have differed greatly from each other over time, the wheelbase, body shape and other exterior parameters remained unchanged.
Wheel rims on the VAZ 2107 in the factory configuration have the following parameters: Standard drilling for VAZ products, or the diameter of the mounting hole on the vehicle's axle shaft, which is 58.5 mm, as well as a bolt pattern - each hub is attached to 4 studs of 98 mm each. This is a fairly universal size, because many European manufacturers of wheels, which are installed on most economy-class cars, often use the 4×100 dimension, which is fully compatible with the products of the Russian plant.
- Over the past 30 years, the concern has installed “classic” car wheels on its cars in the simplest configuration with the dimension 5J × 13 ET29 in a stamped version and without hubcaps, on which 165/80/R13 and 175/70/R13 tires were easily installed.
- More expensive modifications were equipped with 5.5J × 12 ET32 wheels and 175/65/R14 or 185/60/R14 tires, slightly increasing the disc offset so that the visible part of the wheel did not protrude beyond the transverse dimensions of the body.
- Wheels 15 on 2107 are a special “highlight” of the models of the first years. All these years, the plant installed wheels with parameters 6J × 15 ET25 and, accordingly, tires 185/55/R15 or 195/50/R15 on the top-end configurations, and this was the maximum that Russian engineers were able to achieve.
Stamped wheels for VAZ 2107 Please note! Almost all car enthusiasts, immediately after purchasing a car, additionally purchased and installed special decorative plastic linings on the wheels, produced in abundance by the same manufacturers that supplied “stamping” to the AvtoVAZ concern. However, some of the most demanding and wealthy clients often resorted to more expensive products and drove on cast and even forged wheels.
How to replace them yourself
Replacing the front struts on a Lada Priora with your own hands is quite possible if you make sure you have all the tools and components. You also need to take into account the recommended sequence of actions so that you do not have to overpay when correcting errors.
To carry out this procedure:
- We take the jack and install it on the side where the installation begins.
- We remove the wheel, unscrew the brake connections, take out their fastenings located on the rack.
- We take pliers and carefully unbend the lock on the finger of the steering tip, take it out, and unscrew nut number seventeen.
- We reach the steering tip puller and pull it out.
- Scroll the support and unscrew the steering knuckle nuts. If you used WD-40 before, this will not be difficult to do.
- If this was not possible, but you can’t unscrew it, you can try knocking them out with a hammer. We just act as carefully as possible so as not to damage the thread.
- Next, we take on the eccentric bolt located on top and save it - it is necessary for adjusting the wheel alignment. It is also recommended to remember its location, focusing on static elements.
- All that remains is to unscrew the retaining nuts that secure the structure; access to them is under the hood.
- Now it’s time to remove the assembled structure with the shock absorber from the wheel well.
Replacement of racks is carried out after dismantling the old ones, so we disassemble everything step by step.
What wheels are suitable for the VAZ 2107 in a non-standard version?
Any manufacturer will always recommend for installation as an option exactly the same dimension that he sets himself, since when using it he can guarantee the operation of the car without any risk of mechanical failure. This means that when developing the model, all calculated loads were taken with these wheels, and other parameters can harm the car.
AvtoVAZ allows the following options for replacing disks for the VAZ 2107:
- If a driver wants to change all 4 standard wheels on a car, and their original radius was R13, he should consider “stamping” or “casting” with dimensions of 5.5J × 13 ET32 or 6.0J × 13 ET32, which will be especially convenient for installation of winter tires, which should be slightly wider than summer tires to increase the specific area of adhesion to the road surface. Tires suitable for this size are 175-195/70-80/R13.
- When a car enthusiast prefers a 14 radius, but for some reason he is not satisfied with the factory size, he has the opportunity to use the 6.0J × 14 ET32 size and tires with a width of up to 195 mm and a profile height of at least 60 mm on his Lada. These characteristics are so universal for VAZ that you can install all-season tires on them and not spend extra money on seasonal re-shoes.
- When a car owner sets the radius to R15, he should still adhere to the factory size, changing the rim width to a maximum of 6.5J or the overall tire size to 205/50/R15, since otherwise he will not be able to do without modifications to the suspension, or the deadline car service will be significantly reduced.
Read, it may come in handy: Installing a 16 valve engine on the “07” and other classic models
Alloy wheels
In some cases, some car enthusiasts prefer to install alloy wheels with dimensions R16 or R17 on their “Seven” cars, but this inevitably increases the overall width of the wheel and its offset (ET). This leads to the need to strengthen the suspension elements and the use of low-profile tires, which do not work well on country roads or in winter.
In order to choose the right stamped or cast wheels for a VAZ 2107, drivers should not go beyond the limits of wheel offset ET23-34 mm, width 5.0J-6.5J, and also should not set the radius above 16. In addition, you must carefully observe bolt pattern and drilling pattern upon purchase, as this is the main indicator of compatibility.
Problems with front springs
The springs on the VAZ front suspension are located in the front part of the car on the sides of the engine compartment. Their main task is to “absorb” road imperfections. With prolonged use, parts inevitably wear out and require immediate intervention by a mechanic. Atypical behavior of the car indicates an imminent breakdown. If the car body sags significantly compared to the initial condition of the car, this is a sure sign of wear and tear. Trouble does not come alone, so as a result of body roll, accompanying troubles emerge:
- Drastic reduction in ground clearance
- Increased tire wear
- Rapid failure of other suspension elements
- The muffler and driveshaft periodically cling to the road surface
- The body sways intensely when moving
Minimum and maximum possible parameters of non-standard disks
So, the smallest disk diameter provided by the VAZ-2107 manufacturing plant is 13 inches. The maximum size should not exceed 15 inches, provided that low-profile tires are available.
The wheel rim must either correspond to the parameters of the VAZ-2107 hub according to PCD - 4x98 mm and according to DIA - 58.5 mm, or its installation will require the use of special adapter spacers. The product with PCD – 4x100 mm can be installed using fasteners with an eccentric.
You can try to get around the 5J-6J rim width limitation by changing the “ET” value. The use of spacers will reduce the size of the offset, which will allow the installation of wider wheels. But the question immediately arises about the appropriateness of these actions.
Giving a more modern look to any older car model is quite appropriate and acceptable in most cases. Changing disks in this sense is no exception. However, once you get carried away with tuning, you shouldn’t forget about the technical characteristics.
Any re-equipment must be accompanied by an improvement in both appearance and performance. Or at least you should try not to spoil what was originally there.
How to change the front struts of a Lada Priora - detailed instructions
1. First of all, remove the mounting bolts on the wheel, then install the jack on the side from which you are going to make repairs.
2. Next, unscrew the bolts completely and remove the wheel.
3. It is necessary to disconnect the brake hoses, and then remove them from the holder located on the rack.
4. Take pliers and carefully unscrew the locking cotter pin on the steering end pin, then you need to take it out and unscrew the nut with a “17” key.
5. Now it’s the puller’s turn, install it on the steering end as shown in the photo and press it out of the socket.
6. Unfold the support and start unscrewing the fastening nuts on the steering knuckle. If you followed my recommendations and treated all connections with WD-40, there should be no problems with unscrewing.
7. If necessary, use a hammer to knock out the bolts, being careful not to damage the threads!
8. The top eccentric bolt is used to adjust the camber and has a washer on it that often likes to stick to the strut. Do not throw away the bolt itself; it will be reinstalled during the replacement process. There is no point in remembering the position of the eccentric along the axis, since in any case you will have to go to the wheel alignment.
9. Let's move on. Using a wrench set to “13”, unscrew the fastening nuts that secure the front pillar to the body; they are located under the hood.
10. We take out the front strut from the wheel well assembly.
How to lower the classics correctly?
1. At the beginning, you will need to decide on lowering the car, namely how much you will cut the coils, but before you do this, find a car that you definitely like based on the fit and, after talking with the owner, find out what has been done to the springs. , you can also ask how the car behaves in everyday driving (namely, how it overcomes obstacles, are there any problems with movement and similar questions) and having learned all this, decide for yourself how much you will cut the springs and remove them from the car, cut them down, but under no circumstances cut the springs if they are installed on the car.
Note! Still, there are a number of people who file down the springs without removing them from the car, we immediately warn you that you cannot do this, because the spring can then not only jump out, but shoot out of its seat, there have also already been cases when the coils damaged people and it is especially dangerous if the coils will get into your face, thereby injuring you!
2. Let’s say straight away that it’s very difficult to do such work in one day, of course it’s possible, but it’s hard, so be patient and take into account the fact that the car will not be running for at least two days, or even a week (Depending on what kind of work it will be and depending on modifications to the body), after the springs are removed from the car (You can start with whatever is convenient, but the front ones are the hardest to replace; it will take a very long time), file them down and install them in their regular place, if the gash is the simplest (Approximately 1.5- 2 turns, we’re talking about the front springs) then you don’t have to do any work on the body (But you still have to cut the rubber bumpers in half) and install all the same shock absorbers if the cut is around 3 or 4 turns then here the KX (Short-Stroke Shock Absorbers) and the bumpers will have to be cut down (As shown in the photo below), then the bumpers will need to be painted with a primer and paint applied on top, and put mastic or some other anti-corrosion coating on the paint (Thus this is a place to rot will not), if with such a lowering large wheels or ordinary R13 wheels are installed but on standard tires, then after assembling the entire suspension, do the following, unscrew the wheel completely (First in one direction, then in the other) and look where it is behind the arch touches, those places will need to be bent well with pliers and will not touch anything, or roll out the arch (In this case, the paint will crack in those places where you will roll out the arch), rolling is done as follows, take a special device for rolling out (Which almost no one has whom) and the arches are rolled out, the most common version of rolling out is when you take an aluminum bat or a handle and use it to roll out the arches, but if everything is done correctly, then you will also need to heat the paint with a construction hairdryer so that the paint does not burst.
3. We’ve sorted out the front part, now about the rear, it’s the easiest to cut, if the cut is small (Around two turns), then you don’t need to install any shock absorbers either, everything remains on the standard shock absorber, they will also handle impacts normally, if all If the rear suspension will not be comfortable, then special ones are sold. mounts for the rear shock absorbers, thanks to which the shock absorbers can be moved (so that they are slightly lower), in connection with this the shock absorbers will have movement and the suspension will be comfortable, if the gash at the rear is in the region of 4 and 5 turns, then here the tunnel will need to be digested (since the cardan will touch the body), in addition, it is necessary to install KX shock absorbers and cut off the bump stop in the middle and two rubber bands at the back, where the springs are located, in order to digest the tunnel, it will be necessary to cut it out, before cutting everything is good mark, there are brake pipes below above the tunnel, so between them, stick something, a board for example, so that the pipes are not accidentally damaged, when it is cut out, take new iron and weld it by welding, but be careful, make sure that the metal didn't catch fire.
Read, it may come in handy: How to independently restore the effectiveness of the handbrake
Note! If there are large wheels at the rear and touch the arches, then you will have to do the same thing as with the tunnel, namely cut out the arches and weld on other pieces of iron, see the photo below for more details:
4. After the operations have been completed, go to the wheel alignment and let everything be set to normal for you there, this is necessary because when the car sits down, the wheel angles all change and very much.
Additional video clip: Read in more detail the process of lowering the classics and rolling out the arches in the video clips below and we hope that you will lower your classics moderately, not too much or too little, there are 3 turns in front and 3.5 in the back, the best fit in our opinion opinion and the car looks very beautiful and there are many places where it can go.
The main options for reducing clearance
The first option, which is considered the most economical, is to shorten the standard springs. You can do this yourself or, if you don’t have the necessary tools and skills, entrust it to a novice specialist. This operation can be performed without removing the spring. It is important to remember that the springs are shortened by a different number of turns (front, for example, by two, and rear by three). This is due to the fact that the weight of the machine must be distributed evenly.
The advantage of this method is low costs. As for the disadvantages, these include the risk of breaking both the spring and the shock absorber. Another option is to purchase and install shortened springs. Such springs are often called sports springs. The main costs here are associated with the purchase of finished parts. The advantages of this method include the fact that you can return everything to its place at any time (after all, the standard springs are not shortened). In addition, you can carry out such an operation yourself. The only thing is, upon completion, you need to contact specialists to perform camber/alignment work.
What are spring spacers and why are they needed?
Spacers are such devices - liners that are installed in the suspension structure. Their installation allows you to solve many different problems. They can be intended to increase ground clearance, or to increase the stiffness of springs that have sagged, as well as for tuning the car.
Spacers can be installed in both the front and rear springs of a VAZ 2107. If you often have to transport heavy loads in a car, then installing inserts is mandatory. The use of the devices in question allows you to increase the weight of the cargo transported in the car. They are made from a dense and durable material that is designed to withstand heavy loads. Moreover, this material is not metal, but polyurethane, ABS plastic, aluminum or rubber.
Before installing inserts on a car, you need to understand their types, as well as their distinctive features.
Types
The materials used for manufacturing must be distinguished not only by high strength, but also by resistance to the negative influence of the external environment. That is why rubber, polyurethane, plastic and aluminum materials are used for manufacturing. Most often, polyurethane or rubber reinforced spacers are used to increase ground clearance.
To make a choice, you need to understand what types of spacers are produced and how they differ.
How to raise the suspension of a VAZ car
If the car suspension is raised, then you need to make sure that the car does not lose its characteristics. The main suspension components need to be replaced:
- Shock absorbers, when replacing there is no need to do anything on your own. In the catalog you need to select those shock absorbers that the manufacturer offers for a specific car model.
- But to raise the suspension, stiffer and shorter shock absorbers are chosen.
- Anti-roll bar. It is better to change the stabilizers together with the struts.
- The springs are chosen to be stiffer and shorter.
The suspension of a VAZ car is raised for several reasons. As a rule, car owners decide to raise the suspension in 2 cases: to increase load capacity and increase ground clearance (cross-country ability). Most often questions arise about how to properly raise the rear suspension. There are lift kits on the market today for different car models. These kits allow you to raise the suspension to a certain height.
We must not forget that an increase in vehicle clearance is accompanied by some changes in the physical properties of the car. For example, the center of gravity increases. This may negatively affect the vehicle's performance when cornering at certain speeds. The important thing is that before you raise or lower the suspension yourself, you need to take into account a very important value - the redistribution of weight, which matters when the car turns.
Weight redistribution is affected by lowering the center of gravity and increasing the distance between the wheels. Increasing the distance between the wheels is done by switching to wider tires. But this method is limited by the dimensions of the car. Lowering the vehicle's center of gravity can be achieved by installing short struts. This reduces the suspension travel. The racks must be chosen sufficiently rigid.
If the motorist is not ready to calculate all the relationships between parts, physical properties of the car and suspension components, then in order to raise or lower the suspension, you need to choose the second option - purchasing a complete suspension package for a specific car model. On request, as a rule, there are various proposals for modifying the suspension. Specialists will select components for the VAZ based on their preferences and the requirements of the car owner.
But you will need to install them yourself. If you think that raising or lowering a car’s suspension is just a matter of replacing springs and shock absorbers, then this will be a big mistake. Suspension tuning requires making changes to the type of tires and wheels, calculating how the behavior of the car will be affected by changing the suspension. This is provided that the result of the modification is necessarily positive.
Air suspension
The “Seven” has great potential in terms of modernizing the front suspension. And many car owners decide to install an air suspension with an electric compressor, hoses and a control unit.
The air suspension kit includes a compressor, hoses, tubes, struts and other equipment
This is a real electronic assistant that makes it possible to change the ground clearance depending on driving conditions. Thanks to this innovation, the stability of the car at high speeds increases, trips over long distances become comfortable, the car goes over bumps more smoothly, in a word, it becomes like a foreign car.
The system modernization goes like this.
- VAZ 2107 is installed on a pit.
- The battery is de-energized.
- The wheels are removed from the car.
- The front suspension is completely disassembled and air suspension elements are installed in its place.
- Under the hood there is a control unit, compressor and receiver. Then the elements are connected to each other by pipes and hoses.
Air suspension elements under the hood are connected via hoses and integrated with the on-board system - The compressor and control unit are integrated with the vehicle's on-board network.
↑ Sequence of tightening nuts and axles in rubber-metal joints
To prevent improper distribution of forces in rubber-metal joints, tightening the nuts and lever axles must be done in the following order:
- Place the car on a level surface and place the wheels parallel to the axis of the car;
- load the car with a load of 3136 N (320 kgf);
- under these conditions, use a torque wrench to tighten the nuts securing the axles of the upper and then the lower arms and the nuts securing the axle of the lower arm to the cross member.
Check and adjust the front wheel alignment angles.