Good day) Finally got around to writing a blog entry on self-repairing headlights on a ninth-generation VAZ car. So, let’s get started! What do we need to repair the headlights, specifically replacing broken glass (as in my case) or simply replacing the ugly orange turn signals (personally, I don’t like them, it’s up to you to decide). I bought all the parts at a regular car store (Specifically at our EKB at the Bolshakova-8 March intersection, I don’t remember the name exactly, like “AvtoSport”, a little PR in honor of these guys, because I like their work with clients)
Initially, I wanted to paint the inside of the headlight matte black, but somehow, after evaluating my strength and time of work, I decided against it (I didn’t regret it). Well, to get the full style, I bought white turn signal repeaters (I remember that they cost 25 rubles). Next, we go to remove the old headlights
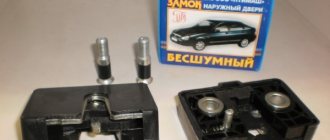
Hello, in this article you will learn how to independently remove the headlight on a VAZ 2108, 2109, 21099. The headlight is usually removed to replace its glass, when it interferes with body repairs or when a complete replacement of the headlight is required, for example, after a minor accident. For this procedure you will only need a 10mm socket with an extension. First of all, remove the terminals from the turn signal lamp, remove the common connector and remove the hydraulic corrector from the headlight
To disconnect the turn signal from the headlight, simply unscrew the 2 screws
Installing the front headlight on the VAZ 2108, 2109, 21099 occurs in the reverse order.
VAZ 2109 : replacing headlight glass on your own
the headlight glass on a VAZ 2109 is carried out quite often. Gear starter for VAZ 2106 - Duration: How to remove Torpedo from Golf 2 in VAZ 2101. The cause could be any little thing that gets inside the headlight, and then leads to damage to the entire glass. Replacing the glass in a VAZ 2109 is such an easy operation that any motorist can carry it out.
Replacement
Replacing glass on a VAZ 2109
When driving along the highway, a stone that bounces off the car in front hits the headlight. How to remove the instrument panel on the VAZ 2114 and 2115. To remove the instrument panel, you will need: an “8” key, a Phillips and flat-head screwdriver. Step-by-step instructions for replacing the clutch on a VAZ 2109 (2108, 21099, 2114, etc.) yourself. The glass is broken and needs to be replaced. This happens often because the road surface is made of asphalt concrete. Over time, it is knocked out, and the crushed stone is left without binding bitumen. The headlight glass also breaks down if it is not properly cared for. Today at VAZ Repair we’ll talk about how to remove the dashboard on a VAZ 2110 with your own hands. If the headlights are on, they should be wiped with a damp cloth or brush if necessary. But under no circumstances should you wipe heated glass that has not yet cooled down with snow or spray it with water.
Note: work on replacing headlight glass must be carried out indoors at a temperature of 20 0 C.
Installation and configuration of VAZ headlights
Installation is carried out in the reverse order of removal. To adjust the headlights after replacement, you need a vertical wall and a flat area in front of it. The size of the site should be sufficient to park the car at a distance of 5 meters from the wall. Before starting the setup, fill a full tank of gasoline and place an assistant in the driver’s seat, whose weight is approximately equal to yours, and set the hydraulic corrector to the driver and passenger position. This will allow you to more accurately adjust the headlights. Cover the left headlight with a piece of cardboard or a black flat rag. Turn on the low beam.
The upper border of the left side of the light spot should be equal in height to the distance from the ground to the middle of the headlight. The right border of the spot should be 6-7 cm higher. The lower part of the light spot should be located opposite the center of the headlight. If the light spot is shifted vertically, then move it using the vertical adjustment screw (it is located on the side of the radiator grille in the upper part of the headlamp). If the spot is shifted horizontally, level it using the horizontal adjustment screw (located at the bottom of the headlight on the wheel side). After you have adjusted the headlight unit, check the operation of the hydraulic corrector. To do this, switch it to different modes and check whether the height of the light spot changes.
Without removing the headlight
Replacing headlight glass on a VAZ 2109
In summer, this work can be done outside without removing the headlights:
- Choose an asphalt or concrete site, in a place where there is no wind.
- Water the area with water, this must be done in order to prevent the ingress of dust and sand during cleaning and applying glue.
- To perform the work, you must wear cotton gloves. This hand protection prevents injury when removing broken fragments.
Note. Remaining glass must be removed carefully.
- To make the work easier, try to gently hit the glass with a hammer.
- Clean off any remaining debris.
- Use a screwdriver to remove any remaining old glue around the perimeter of the headlight
- Moisten a rag with a solvent and degrease the reflector.
- Also wipe the inside surface of the glass with solvent.
- Afterwards, clean the place of the sticker in the headlight housing again (see Repairing a VAZ headlight with your own hands).
- Gradually, carefully squeeze the glue out of the tube.
- Apply a thin layer along the rim of the headlight, along the inner edge of the glass.
- Wait 3 minutes.
- After this, press the glass against the headlight, try to glue it in the middle.
VESKO-TRANS.RU
AutoNews / Reviews / Tests
- Home
- Auto garage
- How to disassemble the Tail Light of a VAZ 2109
How to disassemble the Tail Light of a VAZ 2109
Rear dimensions for VAZ 2108, 2109, 21099
The functioning of the rear lights of any car is necessary to ensure road safety. These devices at the rear of the car perform a lighting and information function (warn road users about the movement of the car).
On Vuala 21099 and other models, the lights turn on automatically when changing gears and moving the car in reverse.
- reversing lighting;
- side lighting;
- brake lights;
- turn signals;
- emergency alarm.
Rear view lights for VAZ 21099
The structure of the lighting devices is as follows:
- a body made mostly of plastic (in some cases glass);
- lamp holder;
- latch for holding wires;
- diffuser of light rays for uniform illumination of the road surface. It is glued to the back of the product body, so if it breaks, it needs to be replaced along with the body.
The device of the rear light on VAZ 2109-2108 and 21099
The following types of rear lights can be installed at the rear of a VAZ 2108 or 2109:
- incandescent lamps.
Inexpensive, but they break down relatively quickly and are not bright enough. Such lamps burn with a yellow light, which is not very visible in unfavorable weather conditions; - halogen light bulbs
. They are considered more modern and durable, since air is pumped out of their flask and inert gas is pumped in. There are models with H1 and H3 sockets on sale; - LEDs
. They burn with a cool white light and last several times longer than incandescent lamps. They are sold in strips and today often replace obsolete incandescent lamps.
Complete analysis of the rear light of the VAZ 2114
Completely disassembling the rear light
, for further tuning with LED strip.
REVIEW OF THE REAR LIGHT (GLASS) ON THE VAZ 2109 margin: 0 10px 5px 0;" src=»C:UsersOLEGDesktop1imageszadniefonarinavaz2108210921099_CEAD02DF.jpg» /> Replacing lamps in the rear lights of a VAZ 2109
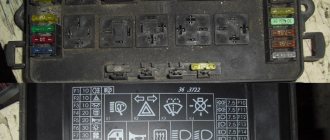
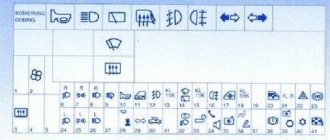
To clean the contacts from the white coating that accompanies oxidation, you need to clean them. To do this, remove the headlight unit. The ground must be returned to its place, and the nearby wiring must be tested for correct operation. Broken fuses on VAZ 2109 and 21099 are not difficult to find - their diagram is usually presented on the block cover.
If you are faced with the problem of constant lighting of the reversing lights, this may be caused by problems with the wiring or the cessation of operation of a special sensor located on the box.
When the car headlight switch stops working, you can get to it through the engine compartment or from underneath the car. You can diagnose the failure of this component of the lighting system as follows:
- start the VAZ 21099 and shift it into reverse gear;
- close the contacts. The rear lights should light up at this time;
- Use a multimeter to check if the contacts are closed when you turn on the rear headlight switch, having first removed the switch;
- make sure that the contacts are soldered securely, assemble the switch and check its operation again. If a normal short circuit is observed, replace it.
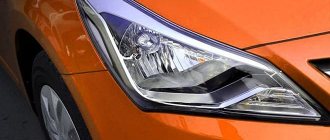
Changing the head light on a VAZ 21099 I want light.
The end of the headlights has come, the windows burst and dirty water got inside. We exchange the old for the new and the difference is obvious.
Note. If the glass is slightly larger, this gap is necessary for an expansion joint. Cooling system on VAZ 2109 and 21099. How to remove the front bumper on a VAZ 2114. How to remove the instrument panel (torpedo) on a VAZ 2114. Since when there are temperature changes, metal and glass operate in different ranges.
Replacing headlight glass on a VAZ 2109
Causes and actions in case of breakdown
Among the reasons for the breakdown of the rear parts of the lighting system on a VAZ 21099, 2108 or 2109, the most common are:
- Bulb burnout. It happens due to wear or power surges and is almost the most popular reason for replacing rear headlights.
- Oxidation of contacts. Occurs due to poor quality of terminal contact, electrolyte leakage, or cracks in the battery case.
- Fuse failure. This cause of failure is due to voltage surges.
- The reverse sensor is broken or its wiring is broken.
- Burnt out contacts on the headlight film.
- Lack of ground on the board.
The most common and easiest fault to solve is a lamp burnout. The product must be replaced with a new one by turning off the light sources, opening the trunk and disconnecting the column of wires.
To do this, you will most likely have to remove the trunk trim of the VAZ 2108 or 21099, which is located behind the lamp. After this, squeezing the latches (they are located on the sides), you need to take out the panel and unscrew the lamp, after pressing on it. To install a new rear lamp, reverse the process.
Replacing lamps in the rear lights of a VAZ 2109
To clean the contacts from the white coating that accompanies oxidation, you need to clean them. To do this, remove the headlight unit. The ground must be returned to its place, and the nearby wiring must be tested for correct operation. Broken fuses on VAZ 2109 and 21099 are not difficult to find - their diagram is usually presented on the block cover.
If you are faced with the problem of constant lighting of the reversing lights, this may be caused by problems with the wiring or the cessation of operation of a special sensor located on the box.
When the car headlight switch stops working, you can get to it through the engine compartment or from underneath the car. You can diagnose the failure of this component of the lighting system as follows:
- start the VAZ 21099 and shift it into reverse gear;
- close the contacts. The rear lights should light up at this time;
- Use a multimeter to check if the contacts are closed when you turn on the rear headlight switch, having first removed the switch;
- make sure that the contacts are soldered securely, assemble the switch and check its operation again. If a normal short circuit is observed, replace it.
With headlight removed
Replacing headlight glass on a VAZ 2109
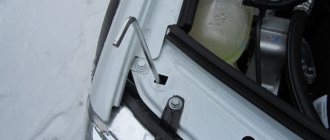
For better quality work, the headlight must be removed. Its mounting is located in the engine compartment:
- Therefore, it is necessary to raise the hood and install a strut.
- The headlight is secured with four screws and nuts.
- Unscrew them with head No. 10.
- Pull the entire body towards you, if necessary, press a little on the front bumper.
- Disconnect the two power supply plugs.
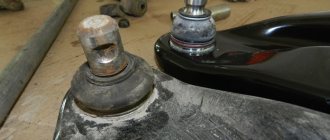
- Remove the adjustment corrector, turn its head to the left, and pull it off the headlight.
It is advisable to carry out further work indoors at a temperature of 18 0 C. You must:
- Place the headlight on the table;
- Unscrew the turn signal housing;
- Remove the wiper travel limiters;
- You can use a knife to remove any remaining glass from the headlight housing;
- Thoroughly clean the glass seating areas from any remaining glue;
- Use a solvent to degrease the contacting surfaces of the headlight and glass.
How the headlight works
The headlamp unit provides the necessary shape of the low and high beam beam, indication of the direction indicator signal and turning on of the side lights. The basis of the headlight is an adjustable reflector, which is responsible for the height of illumination. If the reflector is not configured correctly, the headlight will either dazzle drivers of oncoming cars or insufficiently illuminate the space as the car moves. The reflector can be adjusted in two ways - using a screw and a hydraulic headlight adjuster. The screw ensures a constant lighting height, and the hydraulic corrector allows you to change the height depending on the vehicle load. The power supply for the headlight bulbs is supplied through two connectors. One ensures the operation of low and high beams, as well as side lights, the other is connected to the direction indicators. The glass of the headlight ensures dispersion of the light beam and uniform illumination of the space in front of the car.
Models of good fog lights
As for fog lights, the most popular products are considered to be high-luminosity lamps from manufacturers Osram (Night Breaker model) and Philips (Xtreme Vision). According to the manufacturers, these models of fog lights have an increased luminous flux. Philips EcoVision lamps are considered less bright but more durable. You can also find Chinese fog lights from the Nord YADA brand on the market. Their cost is the lowest compared to analogues, but their build quality is appropriate.
Engine and exhaust system
With the engine, everything is somehow ambiguous. And it seems that it has become an ordinary spare part and has ceased to be a numbered unit, but the engine model is entered in the title and the tax is paid according to its power. Therefore, when replacing a motor with another one, re-registration is required. But there is no such control, the traffic police don’t check the serial number - you can put whatever you want. Of course, if a VAZ 2108 arrives with a V16 engine, it will be noticeable to the naked eye, but if the engines are similar in appearance, hardly anyone will be able to tell the difference.
The engine can be legally installed if the car has a certified version with it from the manufacturer. For example, if you are the owner of a 41st Muscovite with a Ufa or VAZ engine, you can install a two-liter Renault F3R instead, since the plant produced such modifications. Otherwise, the traffic police will require you to obtain a certificate, which is quite expensive and difficult.
Self-installation of turbines and compressors is prohibited. But there is an interesting point: traffic police inspectors don’t know the engine compartment of the foreign automobile industry well, so they may not see the turbine. In common foreign cars it is more noticeable, but it can be passed off as a “noise reduction device” or “injector design.”
Aftermarket exhaust systems are illegal. Not long ago, during technical inspections they began to check the volume of the car, so owners of direct flow vehicles most likely will not receive a maintenance ticket. Although in our country this is a small problem.