Added Mar 30, 2015 to Dashboards
VAZ 2170 is a fairly popular car from the domestic automobile industry. It is popular both among ordinary car enthusiasts and among professional tuners who are involved in radical improvements in all parameters: appearance, interior, driving performance.
In this article we will talk about the process of removing the instrument panel, as well as dismantling the instrument panel itself, that is, the dashboard. There is no need to explain why this may be needed: either for repairs or for tuning. By the way, regarding tuning, as an addition to this guide, we recommend that you read the article: modification of the Priora dashboard.
Removing and installing the center console of the instrument panel on a Priora
The center console trim on cars with “standard” and “luxury” configurations may differ in the size of the cutout for the radio. Otherwise, there will be no difference in fastenings. Moreover, many owners cut a hole out of a regular one for installing a 2-din radio and everything works out quite successfully. So, let’s get closer to the point - if you have a radio installed, you must first remove it, using special removable keys that usually come with it.
After the niche is free, pressing on the button connectors from the inside, we take them out, approximately as can be seen in the photo below.
Then we disconnect the block with wires from the buttons that go to the console.
Next, you need to remove the ashtray by pulling it with a certain force from each edge in the open state, since it is attached along guides in the grooves:
After this, two fastening screws are clearly visible in the recess, which, of course, will need to be unscrewed.
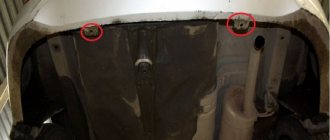
Next, we go to the upper part of the console, and unscrew a few more fastening screws, two of which are located in the upper part of the niche for installing the audio system:
In this case, we are dealing with a 2-din console that has already been cut out, so the two remaining screws are not visible, and only a little lower are the attachment points that were once there visible. In the photo above they are visible - slightly in the recess. If you have everything in factory form, then everything will look like this - a couple of screws are under the cover:
After this, carefully move the console to the side, threading all the wires from the buttons that were disconnected:
Now all that remains is to disconnect a few connectors. The first is from the heater control unit:
Second from standard quartz watches:
And the last one is from the hazard warning button. The most convenient way to do this is with the button already removed from the console body:
Now you can remove the console, since nothing else prevents this.
I think there is no need to explain that if it is necessary to replace this part, from the inside it will be necessary to unscrew and remove the control unit from the heater, as well as the clock and the central nozzles of the heater air duct.
Installation occurs in reverse order. If you need to buy a new console, this may be a problem. It is not so easy to find it in stores and car markets, although the price is not high and is about 700 rubles. You can buy a similar thing at a car disassembly for no more than 400-500 rubles, and the quality is better than “new” ones.
Peculiarities
Despite the fact that removing the element in question is a fairly simple process, you should remember some nuances. Disassembly must begin by dismantling the radio. For this procedure, special pullers are used, which are inserted into the sides of the tape recorder until it clicks. Then you just need to pull the element towards you, and then disconnect all the connectors that appear. The metal niche where the radio was located is removed. Then the two console trim fasteners are unscrewed.
In order not to miss all the fastening elements, it should be taken into account that the console is fixed with two hidden screws under the Open cover and four similar screws under the ashtray and radio. In the upper part, the cladding is secured with additional metal brackets. To remove it you will need to apply some force.
If the center console is dismantled to eliminate an unpleasant squeak, after dismantling the cladding, you need to paste over the edges of the panel with a special insulator, which acts as protection against extraneous noise. In addition, you should treat in a similar way all areas with which the console interacts and make sure that the element is securely fixed and will not rattle after assembly.
Life hack: dashboard of a Lada Priora car, everything you need to know
Priora has several panels, depending on the year of manufacture, plus non-standard ones made specifically for it. Everyone knows how important it is to know the instantaneous status of instruments and machine parameters. The panel, also known as the control panel, on a Lada Priora car is, in fact, brief information about the condition of the car at the moment. It contains all the basic information, from movement speed to indicator readings on malfunctions of the main units and components of the machine. When something in it doesn’t work, it’s immediately alarming, because it’s current information. A description of all the icons and their meaning can be found below in the article. Technology is gradually developing, so the dashboard is becoming more and more technologically advanced. But since the Lada Priora is a low budget car, the panel on it is of the same quality. On the first devices, the backlight often does not light up, or is only half lit. Of course, this doesn’t look good on Priora.
THERE ARE TWO DIFFERENCES
To be a “ten” driver, and not to be left in the past. Today there are many so-called “time machines”, which take you back several decades.
In the late 80s, Audi, Citroen, and Rover cars with their dashboards with large keys along the edges were very popular. In terms of ergonomics, the VAZ-2110 is not designed very well - the steering wheel is covered by indicator lamps on the keys.
If the steering wheel were a little smaller, maybe it was planned to do this earlier, but they were late with the power steering, but the unified steering wheel arrived on time. As a result, we received fewer expenses, but no increase in convenience. In addition, most of the VAZ-2110, produced last year, were equipped with a similar arrangement of instruments, similar to the panel of the Priora, but of course with a different panel with no keys on the visor.
Car VAZ-21104. having undergone preparation before sale, we are visually distinguishable from the “ten” cars that we sometimes drove to the editorial office. We usually had to set the maximum recommended castor, install a brace, between the supports of the front struts. Thus, control was normalized and the steering was reactively strengthened. When testing a car, you may be surprised by such a slow reaction and large play in the steering wheel, because VAZ test drives are supposed to go like this.
Standard instrument panel - article number and price
The original car tidy exists in three types.
- the first is an option for a pre-restyling car;
- the second panel is for a restyled car;
- and the third is the “Lux” option for the restyled one, which has become faintly similar to all previous torpedoes.
Each of them contains standard elements such as a tachometer, so their functionality does not decrease. . Who wants to do tuning of the instrument panel, this option is for them.
Priora first generation
The instrument cluster for the first generation Lada Priora received catalog number 2170-3801010. Cost – about 6,000 rubles. Everything is standard with it - from left to right there are four arc scales with red arrows: odometer, speedometer, coolant temperature, fuel level. Below the speedometer there is a small on-board computer display, and above the arches are all the indicators, including the direction indicators.
Priora 2
For the Priora “Lux” variation there are two more “subtypes” - with or without a CAN bus. Different subtypes were made so that the panel could be connected to any car. Catalog number – 2170-3801010-50 without tire, 2170-3801010-60 with tire. It is distinctive in that it contains an elongated display with a screen that can highlight the navigator.
The catalog number of the combination for the “Norma” assembly is 21720-03801010-20. Cost – 6,500 rubles. Like the “Lux” version, it received a brighter speedometer and odometer, and the coolant temperature along with the fuel level indicator is hidden at the bottom of the speedometer and odometer. The base will not create a route on the display, but will show all the information in color.
Do-it-yourself dashboard overexposure
You will need: remove and disassemble the instrument cluster, SMD LEDs (unsoldered from LED strip or LED lamp), soldering iron.
The process of replacing LEDs on the instrument panel board consists of unsoldering the standard SMD LED and soldering a new one in its place. During such tuning, there are several important points to consider:
- take your time so as not to damage the conductive traces of the board;
- observe the polarity (SMD LEDs have a bevel on one side, install a new LED in the same position);
- do not overheat the LEDs; high temperatures may cause them to fail;
After soldering the required LEDs, it is recommended to check the backlight. To connect the instrument cluster at home, you need to apply +12V to pins 19 and 21, and ground to 17. You can also verify that the installed LEDs are working properly using a multimeter in “tester” mode, connecting the probes to the LED according to the polarity (red probe is plus) :
If all LEDs are installed successfully, reassemble in the reverse order. Relighting the instrument cluster of Grants or Kalinas is a great way to make your car more individual and stylish. It is noteworthy that there are a lot of options for implementing such panel tuning, but which style suits you best? Participate in the survey, share video materials and photos of your improvements.
Let us remind you that the website presents other modifications to the instrument panel, for example, you can reflash it and install an outside air temperature sensor.
Photo: logbook ARIST0KRAT and serg156
Keywords: instrument panel Lada Granta | dashboard of Lada Kalina | interior lighting for Lada Granta | interior lighting for Lada Kalina | torpedo Lada Granta | Lada Kalina torpedo
4
1
Found an error? Select it and press Ctrl+Enter..
Icons on the factory dashboard
All indicators should light up like a Christmas tree for three seconds when the engine starts. If some icon remains, it means the system is signaling a breakdown. To make it easier to understand all the indicators, here is a schematic picture:
1,5,9,10 are already known scales that display the main parameters that can change. 19 – on-board computer display. Further:
- 2 – Icon indicating the operation of the braking system.
- 3 – Battery condition. If the light remains on, the battery is discharged or the charge level is too low.
- 4.7 – Doublers for direction indicators (“turn signals”).
- 6 – Oil level (indicates low level).
- 8 – Handbrake. Lights yellow when the lever is tightened.
- 11 – “Gasoline light bulb.” Lights up when there are only 10 liters left.
- 12 – Button for switching on-board computer modes.
- 13 – “Emergency”.
- 14 – Electric power steering (indicates a breakdown).
- 15 – High beam on.
- 16 – Side lights/low beam.
- 17 – Airbag condition (malfunction).
- 18 – Immobilizer (if you hear a beep and the icon itself blinks, the immobilizer is faulty).
- 20 – Seat belts not fastened.
- 21 – Unsatisfactory condition of the service brake system.
- 22 – Disabling the airbag.
- 23 – ABS malfunction.
- 24 – “Check”, “Check Engine” - engine failure.
Replacing lamps
In previous posts we figured out how to remove the instrument panel on a Priora. There is no point in writing again, go ahead, read, film. This post is only about replacing lamps.
The instrument panel is illuminated by five lights. Bulbs are very easy to change. We take the base and turn it counterclockwise. You will feel the base with the light bulb come out of the seat.
Install the lamps in the reverse order. We insert the base with the lamp instead of the seat and turn it clockwise until it locks.
Video lesson
Experienced and experienced people may not read further, since this entry is for “dummies” like me, who are faced with replacing light bulbs in the dashboard for the first time. My light bulb for illuminating the coolant temperature and the amount of gasoline in the tank went out. The right side of the speedometer periodically went out and then came back to life on its own.
To replace, you will need a Phillips screwdriver, a thin flat-head screwdriver and 5-7 minutes of free time. It is better to take a shortened one (cross), as it is more convenient for it to operate in a limited space. Unscrew the 2 screws from the top.
Remove the panel under the steering column (simply snap off the top, turn the 3 plastic fasteners from the bottom). If you had to change fuses, then removing the panel will not be difficult. We see 2 more bolts (one on the left, the other on the right)
Unscrew them (be careful with the washers - they fly off quickly)
Next, remove the decorative trim that we unscrewed. Lower the steering wheel to its lowest position and pull out the trim. There is no need to remove the steering wheel!
Next we see 2 more fasteners (left and right), which secure the instrument panel itself.
We unscrew them carefully, as washers and screws can fall deep into the torpedo
Afterwards, you can pull the instrument panel towards you a little to gain access to the wiring harness and block. When you are already skilled in this matter, you will be able to change light bulbs without disconnecting the cable.
We see a green block at the back of the panel. It's easy to disconnect, but it's inconvenient the first time. Lightly press the stop tab with a screwdriver and pull the black lever up. The plug will come out of the socket on its own.
Let's take out the panel and see the mounting sockets for the light bulbs. Turning slightly counterclockwise, we pull out the burnt out light bulb. We install a new one. We reassemble in reverse order.
I bought the light bulbs completely assembled (lamp + socket), but some craftsmen replace burnt-out light bulbs, leaving the old socket. I decided to try a diode light bulb to have an idea of whether all the light bulbs should be replaced with LED ones. The diode lamp is slightly longer. Thus, it is closer to the filter and gives a light spot in the illumination area (the center is lighter, the edges are darker). The diode light bulb shines with a cold white light, which is noticeable through the light filter - the green has become brighter, more juicy. For now, I’m happy with the soft green light that came with warm incandescent lamps, so I won’t install diode lamps.
It turned out that the light on the right side of the speedometer was going on and off because it had burned out. But the shaking caused the filament to short circuit and burn again until the next bump “teared” it again. The lamp was replaced. I also bought some spare parts)))
Unfortunately, numerous car components can sooner or later fail, so car owners have to replace them. If the lamps on the instrument panel burn out in a Lada Priora or any other car, you can cope with this breakdown without the help of service station employees, which will save a lot of money. We will analyze how to change the light bulbs on the Priora’s instrument panel correctly and step by step in this article.
Experts strongly recommend replacing the failed component as quickly as possible, because it is these elements that warn car owners about the occurrence of a malfunction, which must be dealt with immediately. According to experienced drivers, it is better to replace not just one failed lamp, but the entire set at once, since the service life of these elements is approximately the same. If the first lamp burns out, you won’t have to wait long for the subsequent lamps to fail.
Possible faults
The instrument cluster does not always tell the truth, and sometimes its readings can mislead the driver - they may seem absurd. For each common malfunction, a brief commentary will be given on the possibility of eliminating them:
- The fault lamp does not light up (check the lamp);
- the lamp is on - check the sensor, reset the error via the diagnostic connector.
If none of the above measures help resolve the problem, carefully inspect the wiring - damage to it may cause the light bulb to activate or deactivate.
Pinout of the instrument panel of a Priora car
The panel pinout looks quite complicated, but there is a more simplified diagram that will help you figure out the wires connected inside:
- EUR
- "emergency light"
- Engine oil
- Handbrake
- Immobilizer
- Airbags
- Headlights and dimensions
- Right turn signal
- Left turn signal
- Electronic control unit
- Pad wear sensor
- Seat belts (closing sensor)
- ABS
- Reset button
- Brake system, brake fluid
- ABS
- High beam headlights
- Torpedo shield lighting
- "Weight"
- Thirtieth terminal
- Fifteenth terminal
- Fuel consumption
- Forward key
- Back key
- Ambient temperature sensor (minus)
- Ambient temperature sensor (plus)
- Fuel level
- Speed sensors
- Coolant temperature
- Odometer
- Diagnostics of the shield (service)
- Generator regulator
How to enable self-diagnosis of the instrument panel
Using the panel you can “dig into the brains” of the Priora:
- Hold the button under the fuel gauge and turn on the ignition. The display should indicate the start of the test.
- Press the button again. The display should show the operating system version.
- Click again. The system should show error codes:
- (2) – High voltage level;
- (3) – DT malfunction;
- (4) – DTOZH malfunction;
- (5) – DTV malfunction;
- (6) – Motor overheating;
- (7) – Low oil level;
- (8) – Malfunction of the brake system;
- (9) – Battery discharge;
- E – Brain error, EEPROM.
- If necessary, reset the error: hold the button for three seconds.
- Release the button. Click again. All indicators should light up.
- Leave all the buttons. After 30 seconds, the self-test will automatically complete.
Step-by-step instruction
1. Set the steering wheel to the lower position.
2. Next we need to remove the instrument panel trim. It is secured with four Phillips screws.
Unscrew the 2 screws on top.
In order to get to the lower mounting screws, you need to remove the plastic from the bottom of the steering wheel.
To remove, turn the three latches counterclockwise half a turn.
After turning the clamps from above, pry up the plastic with your hand and remove it.
3. Unscrew the 2 lower screws securing the instrument panel trim.
4. Using both hands, remove the cover. Let's start from the top.
Be careful not to break the latches.
5. Unscrew the 2 screws securing the dashboard using a Phillips screwdriver.
6. After unscrewing the screws, pull the dashboard slightly towards you.
7. Next you need to remove the connector that goes to the dashboard. The connector comes with a clever lock.
Press the latch in the indicated place below with a flat-head screwdriver.
After pressing, use a screwdriver to move the lock back. There is a boss on the latch that a screwdriver hooks onto and you can pull the latch back.
After the lock is removed, the connector can be easily removed from the instrument panel by hand.
8. We remove the instrument panel and perform the necessary operations, for example, replacing the panel backlight lamps.
9. We perform assembly in reverse order.
Voltmeter instead of a Priora watch
The current time is displayed on the Priora dashboard, so there is no particular need for a separate clock.
To install a voltmeter instead of a clock you will need:
- digital voltmeter with LED scale of suitable size;
- hot glue;
- file;
- knife or jigsaw;
- a piece of plexiglass or CD case;
- a piece of tint film.
To install a voltmeter in the body of a standard clock, you need to dismantle it and remove the mechanism. After this, you need to install the voltmeter panel into the case, slightly filing its corners. It is better to secure the panel to the housing with hot glue.
There is a hole in the middle of the glass for the time adjustment knob, so you need to find a replacement for it. You can cut new glass from a CD case or from a piece of plexiglass. To hide the “filling” of the voltmeter, the glass should be tinted before installation, for example, with a piece of tinting film. In this case, only the luminous LED display of the voltmeter will be visible from the outside.
Next, all that remains is to solder the wires to the voltmeter terminals and insert the voltmeter instead of the Priora clock. Connecting the wires will be discussed below.