Good night) I can’t sleep, I was sitting making a diagram for connecting additional buttons and closers.
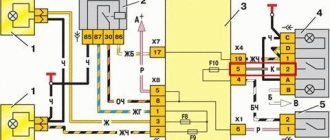
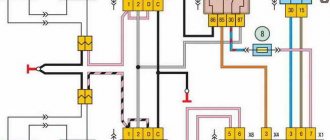
The standard electrical circuit of the ESP (electric windows) of the VAZ 2110 looks like this
I made it into what I needed using PAINTa))
Designations on the diagram: 1) “Black box” (where the relays and fuses are) 2) Ignition switch 3) ESP button of the front right door 4) ESP button of the right rear door 5) ESP gearmotor of the front right door 6) ESP gearmotor rear right door 7) ESP gearmotor of the front left door ESP gearmotor of the driver's door 9) ESP button of the left rear door 10) ESP button of the driver's door 11) Relay for turning on the buttons from the ignition 12) Button for blocking the buttons in the passenger doors 13) Locking relay buttons in passenger doors
Something like this. .I hope experienced electricians will appreciate my work, and if they find a mistake, they will tell me... I don’t pretend that the diagram is 100% correct, I will assemble it according to it, if everything goes well, then naturally the result will be here)
And another question: should the buttons on the tunnel also be run through the blocking relay, i.e. so that only the buttons in the driver's door work or not...
PS in the diagram the buttons in the driver's door and on the tunnel are not blocked.
If it’s not difficult, please rate me in the comments, and if anything is not clear, questions are welcome)))
Selecting window regulators for installation on a VAZ-2110
If you want to install electric windows on your car, you will first need to choose the most reliable device that will serve for many years without causing any problems. On the modern market you can find the following options:
- traditional cable structures, which are relatively easy to install, but differ from others by not having a very long service life, wear out quickly;
- strip devices that are not very convenient to use;
- rack and pinion window lifters, which are deservedly recognized as the most suitable and reliable in operation.
When choosing devices suitable for your car, pay attention to factors such as:
- the speed of raising and lowering the glass, which largely depends on the gear motor installed on the car;
- the ability to use the device in the cold season;
- noise level during product operation.
Taking into account all these factors, you will be able to choose window lifters that will not only work flawlessly, but also will not create any problems in specific operating conditions.
Choice of window regulators
Turn the block over and carefully install the block Ш1 of the harness that was prepared earlier into the desired connector. The simplest and cheapest kit includes only an electric motor with a gearbox.
But the quality of workmanship and resource are very high.
Its design is similar to that of the windshield wiper gearmotor.
If the power supply circuit is broken, you need to find a place and then restore it.
Turn the block over and carefully install the block Ш1 of the harness that was prepared earlier into the desired connector. There are 2 wires coming from the closer and they are constantly closed in it.
Now, in order to close the window, you have to reinsert the key into the ignition... I think you are all familiar with this situation.
They are considered the most suitable and are the most reliable. If voltage is applied to the winding, then contact 30 is disconnected from contact 88 and connected to the contact how to connect a VAZ window lifter
How to install and connect power windows on a VAZ-2110
The most preferred devices are rack type, so we will describe the installation process as an example. The connection diagram for the window regulator on a VAZ-2110 car is as follows:
- remove the negative terminal from the car battery to stop the supply of voltage to the on-board power supply network;
- we take the wires that come standard with rack-and-pinion window lifts and make a kind of harness out of them that makes connection easy;
- remove the car mounting block, which will require unscrewing the self-tapping screw that secures the special latch;
- turn the block over and carefully install block Ш1 of the pre-prepared wiring harness into the corresponding connector;
- dismantle the door trim;
- we pull the wires to the electric window drive. To do this, you will need to carefully pass them through the holes in the door itself and the body pillar on the desired side.
After this, buttons or keys are installed that will be used to control the power windows. Depending on your desire, they can be attached either to the door trim of a VAZ-2110 car, or to an existing control panel. In the first case, you will need to use an additional wire, which will allow you to equip the key backlight.
Features of connecting power windows
Unlike conventional mechanical devices, power windows are not equipped with traditional gear reducers, but with a special drum. The shaft of a DC electric motor is inserted into its hole located in the center. In this case, the motor is only a component of the gearmotor, on which, as we found out earlier, the speed and quality of raising and lowering the windows depends.
Before installing a new power window, you must select the correct device based on its technical characteristics, and also make sure that the product is in a fully folded state. Otherwise, you are unlikely to be able to install the product efficiently and ensure its flawless operation after connecting it to the vehicle’s on-board network.
You've probably noticed that on almost all foreign cars the power window buttons are duplicated on each car door. To connect additional ESP buttons in the doors, you need to run an additional three wires into each door .
Standard ESP connection diagram
Changed to this scheme (here without rear ESP)
Connection diagram for additional ESP button.
How the additional ESP button is made on Kalina
To install one duplicate button in the door you will need:
- 2x contact (plastic connector) block male + female 1 pair
- Large male terminals 2 pcs.
- Mom large 2 pcs.
- Mom little 7pcs
- Earth 1pc.
- Power window button 1 pc.
- Button installation cup 1 pc.
- Power window button connector 1 pc.
- Wire diameter 0.75 4 met.
- Door pistons 7pcs
If your ESP buttons have been moved to the doors. then the insert into the harness for additional buttons will look like this. The meaning is that we need to run 3 wires :
- Ground (Ground, in theory, can be taken into the doors, but there is not always good contact there, so it is better to run a separate ground wire)
- +12V “after ignition” (with power window relay at ChYa)
- illumination (take it from the cigarette lighter, since it is in the middle between the doors.)
Disconnect the negative terminal from the battery.
We look for +12V on the ESP relay (black and white wire) to it and screw both of our red +12V
Then we climb through the door. There are 2 wires going to the ESP motor - gray and blue, through a connector. Unplug the connector:
We take 2 wires (I have black and black and white), of such length that we can reach from the original chip with the blue and gray wire going into the corrugated door to our future button. We crimp 2 large male terminals onto them and insert them into the connector. We put it on the chip with blue and gray going into the corrugated door, so that the black comes from the gray, and the black and white comes from the blue:
Insert the wires into the button connector:
- Red +12V
- Black mass
- White backlight
- Black with gray wire chips
- Black and white with blue wire chips
We crimp with small “mothers” and insert the ESP buttons into the connector. We do it according to the scheme:
- Red +12V to slot 2
- Black ground - in slot 5
- White backlight - in slot 4
- The black wire from the gray wire of the chip goes into slot 6
- Black and white from the blue wire chips - into slot 3 (THREE).
Do not mix up the button connector sockets! That's not all, we need two more short wires, through which we will now connect our button to the ESP motor, like we'll do it as before. For beauty, we take the same colors of wires that were attached to the original chip going into the corrugated door, i.e. black and black and white. It will be like a continuation of the original wires, and in the middle of them is our button. We insert the black wire into socket 1 of the button connector. Black and white - into socket 7. We crimp the other ends of these wires with large “mothers” and put the purchased connector on them so that when putting this connector on the dangling chip going to the ESP motor:
- The black wire went to the gray ESP motor chips
- Black and white - to the blue wire of the ESP motor chip.
In principle, that's all. Don't pay attention to the orange wire in the photo - it's a mass for heating the mirrors.
You can use the button from Kalina. it is more beautiful and a little more expensive than the VAZ 2110.
Electrical circuits of cars VAZ 2110, VAZ 2111, VAZ 2112, repair
Electrical diagrams of VAZ 2110, VAZ 2111, VAZ 2112
Installation process of electric windows
In addition, it is necessary to install the power windows themselves. The procedure is performed in the following sequence:
- temporarily remove the glass seal located on the inside of the door;
- remove the glass, and then dismantle the window regulator fastening mechanism;
- we install devices that will operate from an electric drive;
- connect the negative terminal to the battery and check the operation of the new window regulator;
- We install the glass in place and trim the door.
Our instructions in pictures will help you understand the installation procedure in more detail.
Removing old window regulators
- Disconnect the negative connection to the battery or use the ground disconnect button.
- Next, carefully remove the door trim. It is fastened with plastic pistons, so there shouldn’t be any problems: just pry up the edge near the piston and pull. As a last resort, then replace the broken fasteners with new ones (they cost pennies).
- Before removing the window lifting mechanism, install the glass in a position in which there is free access to the mounting bolts through the technical hole of the door, and secure it with regular tape.
- Unscrew the bolts that secure the glass.
- At the bottom of the door, unscrew the guide nut.
- Near the window lifter handle, unscrew 3 more nuts. After this, you can remove the mechanism from the door cavity through the largest opening (pull it up).
Some features of power windows on the VAZ 2110
Not much time has passed since they began installing electric windows on the VAZ 2110. However, during this short period, many cases of ESP breakdowns and developments in their repair have already accumulated.
You can, of course, replace the used device with a new one. But you can go another way, especially since the design of the window regulator allows you to restore its functionality independently. By the way, this can be done without much difficulty. The main thing is that the installation/dismantling and repair instructions are strictly followed. But before you get started, it is recommended to understand the types of these devices.
Installing an additional ESP button in the door of a VAZ 2110, 2111, 2112 and operating the ESP without ignition and relay
The content of the article:
ESP operation without ignition and relay for VAZ 2110, 2111, 2112
As we all know, the Internet is full of information on how to wind a wire and make the power windows work without the ignition key, but it seems to me complete nonsense. Let's look into this.
The proposed method on the Internet is this: first of all, we must open our mounting block with fuses and find there the relay responsible for the electric windows.
Types of window regulators and the main causes of their breakdowns
Today the following types of window lifters are in use on VAZ:
- rack type (experts consider them the most reliable of all known designs);
- cable;
- plank.
Depending on which company produced the product in question, it can be installed in the car door as standard, or, if it does not fit in size or other technical characteristics, it can be altered without unnecessary problems.
Since both domestic and imported gear motors can be installed on the lift, the described devices, depending on the type and origin of the electric motor, may differ:
- by the speed at which the glass is raised or lowered;
- according to the noise level recorded during operation of the window lifter;
- if possible, its normal operation in winter conditions.
The parts in question can fail for a number of reasons, which can be summarized into two main groups: mechanical and electrical failures. The list of possible reasons looks like this.
- The whole design doesn't work. The cable has broken or become jammed. Lifting mechanism malfunction.
- The electric motor failed due to moisture getting into it. Such a malfunction occurs quite often, since the gearmotor has a leaky housing into which water leaks, which is why rust forms inside the device over time. As a result, spreading corrosion destroys the entire mechanism.
- The power window relay has failed. The performance of this component can be determined by replacing the problematic relay for testing with a guaranteed working one.
- The corresponding fuse has blown. If after installing a new element the device starts to work, then this is the reason. If the new fuse blows again, you need to look for the short circuit.
- Short circuit in the circuit. Its location is determined by which fuse burns when turned on. The cause of this malfunction can be either burnt out wire insulation or a failed gear motor or mechanism switch.
- Breakage of the switch. Determined after replacing the problematic one with a new, known-good switch.
- Break in the common circuit. This can happen due to a mechanical break in the electrical wire, disconnection of the block or poor contact in it.
Return to contents
Installing an additional ESP button in the door of a VAZ 2110, 2111, 2112 and operating the ESP without ignition and relay
The content of the article:
ESP operation without ignition and relay for VAZ 2110, 2111, 2112
As we all know, the Internet is full of information on how to wind a wire and make the power windows work without the ignition key, but it seems to me complete nonsense. Let's look into this.
The proposed method on the Internet is this: first of all, we must open our mounting block with fuses and find there the relay responsible for the electric windows.
Having verified it experimentally, namely by turning on the ignition and pulling out the relay, we understand whether the window lifts work or not. If this is what we need, take out the relay.
Then we begin to do some manipulations with the relay by winding wire around it.
I don’t know about you, but I have a question: why do we need this?
We have in our hands an ordinary 4-pin relay, where the principle of operation of the relay is clear to us.
On the Internet they simply suggest that we short-circuit the water contact of the power supply-30 and the output contact of the ESP-87. This will lead to a contact that bypasses the coil (relay), which will only work if it receives power (plus) from the ignition switch (contacts in Relay-85,86-Coil).
So isn’t it easier for us, without making a collective farm, to simply make a jumper to provide power directly?
Make it from a thick wire with a cross-section of 2.5-4 squares so that our jumper does not get hot.
And connect it directly to the block. On the input voltage connector, contact is 30 and output voltage is 87.
Then to turn on the ESP you will not need to turn the ignition key. Since Power (plus) will come to the ESP, bypassing the relay, which will only work when power (plus) is supplied from the ignition switch.
Then there will be no need to farm collectively.
Installation of an additional ESP button in the door of a VAZ 2110, 2111, 2112
I bring to your attention a step-by-step description of the process of installing an additional power window control button (ESP) in the door. The process is not very complicated and time-consuming; everything will take about two hours.
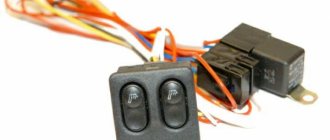
In order to install an additional power window key on the VAZ 2110 door, we will need:
1. 9 meters of wire (I used wires of the following colors: black, yellow, white, 3 meters each) 0.75 mm (section) 2. Button for controlling the ESP (VAZ 2110)* 3. Block for the ESP button 4. Terminals "mother" large - 2 ** 5. Terminals "male" large - 2 ** 6. Terminals "mom" small - 7 ** 7. Terminal "ground" 8mm - 1 8. Blocks for terminals "mother - father" large — 1 (of each type) 9. Plastic clamps (small) — 8 10. Pistons for sprinkling the door trim — 7***
* - in principle, instead of a ten-point rocker button, you can install HIGH-CURRENT (power) buttons from Kalina or Priora, but check with the seller that they are high-current, trigger ones will not work. ** — I didn’t buy these terminals, they came with the pads. *** - they are soft for me, so they didn’t break => I didn’t buy them.
Wiring diagram for the ESP button in the door.
Now we determine the contact numbers on the button and block, according to the diagram:
Okay, we figured it out. The next thing is to find the ESP relay. Typically, the relay is located on top of the mounting block cover. If you have more than one relay installed, then remove them one by one and check if the ESPs are working. The relay, after removing which the ESP stopped working, is the ESP relay.
We remove it from the socket and remove the negative terminal from the battery. Then we disconnect the relay itself from the housing. To do this, use a flat-head screwdriver to slightly press the holder latch and press on its body. The relay holder will disengage. The picture shows the latch:
We are interested in the white wire with a black stripe (this is “+ 12 V” after ignition. If you want the ESP to work regardless of the position of the ignition key, then bridge contacts 30 and 87 of the ESP relay - white with a black stripe and blue with a black stripe) :
We connect our “+12 V” wire to it (according to the diagram, it is connected to pin 2 of the block, I used a yellow wire) Now we need “ground”. You can take it from the door, but the contact there is very unstable, so I took the mass from the bolt behind the mounting block. To see this bolt, open the mounting block and look up and slightly to the right).
Crimp the wire that goes to ground at the ground end and attach it to the bolt. (I used black wire for these purposes)
The next step is to connect the plus from the backlight. I ran into the white wire of the ashtray illumination (I also used a purchased white wire for connection), it is located behind the shield on the left, at the feet of the front passenger.
Do not pay attention to the orange wire (+ to the radio backlight).
Now, we have connected all three wires that we will run into the door to the sources, then we will need to run them through the corrugation inside the door. Remove the center pillar trim (unscrew one screw in the middle and two at the bottom). Also loosen the fastening of the driver's seat belt on the floor (bolt 17).
To make it easier to route the wires through the corrugation, disconnect it from the door.
Unscrew and remove the door handle (two bolts for a Phillips screwdriver). Then we remove the door trim (card), it is best to do this starting from the bottom. Don't forget to unscrew the nail. We find the blocks (male and female) for the ESP engine and disconnect them.
Now the fun begins. We crimp the three wires we have drawn with little mothers and insert them into the block according to the diagram given above. Accordingly, “+12 V” - (yellow) contact 2
, plus backlight (white wire) -
4
, and ground - black - by
5
.
There are 4 contacts left: 1,3,6,7. We connect the original wire (green with a black stripe) that went to the ESP engine block to 6
, and the orange wire to
3
.
Now the block that will be connected to the ESP engine block: blue wire - 7
, brown -
1
contact.
Here, in fact, is the photo (all numbers and designations are in accordance with the diagram above):
Location of wires in the block:
I tidied this mess up a bit:
We connect the button, connect the ESP relay and the minus to the battery. Let's check... if everything works, put all the parts in the reverse order of disassembly. If the glass works normally with the native ESP buttons, but with the connected ones it goes in the opposite direction, swap 3-6, and 7-1 (was 3 - became 6, was 6 - became 3, etc.) contacts in pads that connect to the original wiring in the door. But first, check that the connection according to the diagram is correct.
DIY USB installation in VAZ 2110, 2111, 2112
I decided to make myself a USB for charging my phone and tablet (+5 volts). I decided not to bother too much and bought an adapter from
Installation procedure for glass lifting devices
Installation of the lifting device is quite simple. It starts with disconnecting the battery. After this, use a curved screwdriver to unscrew 3 screws, unfasten the door trim latches and remove the door pocket. Using a thin screwdriver, pry off the handle (latch) of the window lifter - the tip of the tool is inserted into the recess between the latch and the socket.
The handle itself is removed. At the next stage, the car door opening handle is dismantled. To do this, use a screwdriver to pry the handle cover and remove it. Now use a screwdriver to remove the 2 fastening screws that were hidden by the cover plate. After this, the handle can be removed without much difficulty. Using a screwdriver, you can also remove the power window button, which serves to lock the door.
After removing 6 pistons, the trim covering the car mirror adjustment mechanism is also removed. As a result, it remains easy to dismantle the door trim. Armed with a 10mm wrench, unscrew the 2 bolts that hold the auto glass clips. Next, 2 nuts securing the lifting mechanism, nuts of the upper and lower fastenings, and 3 nuts securing the lifting mechanism are unscrewed in sequence.
Upon completion of the described stage, it is time to remove the lower guide pin of the lifting device from the door panel. To facilitate and simplify such an operation, the upper pin of the guide must be bent using a screwdriver. Now the entire lifting mechanism can be safely removed through the resulting opening in the door frame.
In order to quickly, efficiently and without problems install a new electric window regulator in the door, you must first make sure that it is in the fully folded position. Otherwise, the entire operation will not be possible.
However, as already mentioned at the beginning, replacing an inoperative device with a new one is most often not particularly necessary. If the contractor can accurately determine the reason why the window regulator refuses to function normally, it can be repaired quite easily.
Repair
It is not possible to repair window regulators in all cases. Mostly, these glass lifting devices can be repaired in case of obvious mechanical fractures of the elements.
But we can still give some useful tips regarding restoring the functionality of the window regulator without replacing it.
- If the electric window motor fails to work, then the brushes or winding are most likely to blame. To verify this and fix the damage, you need to remove the motor, disassemble it and clean the outer and inner surfaces.
- For cleaning, it is recommended to use a lint-free cloth. The cloth is soaked in gasoline, alcohol or a special cleaning agent. When you buy the latter, you can use it for a long time, the efficiency is higher compared to gasoline.
- After cleaning and drying the parts, it is recommended to treat the moving elements with lubricant so that the mechanisms function longer.
- If the cable comes off the lifting mechanism, you will have to dismantle it, remove the electric motor, or unwind the cable if it is mechanical. Then the cable is pulled back onto the grooves and the assembly is reassembled.
- If a malfunction occurs in the mechanism or the electrical circuit of the device, it is necessary to study this circuit, determine the direction of the wires, and then ring them. This is the most effective way to check for electrical failure.
Lifting device diagram
Repairs in most cases only give temporary results, so soon you will still have to make a full replacement. This is due to the fact that each part has its own service life and degree of wear. When they are reached, the window regulator stops working.
Replacing or repairing mechanical or electrical window regulators cannot be called complex undertakings. It is quite possible to cope with such tasks with your own hands.
Connection diagram, restoration of functionality
To successfully repair a power window, you need to know the structure of the lifting mechanism and the principle of its operation. The window connection diagram looks like this.
- Mounting block.
- Ignition switch device.
- Power window switch for front right door.
- Power window switch for rear right door.
- ESPD gearmotor for the front right door.
- ESPD gearmotor for the rear right door.
- ESPD gearmotor for the rear left door.
- ESPD gearmotor for the front left door.
- Power window switch for left rear door.
- Power window switch for left front door.
- Power window on/off relay.
Diagram of electric windows VAZ 2110, VAZ 2111, VAZ 2112, Lada Ten
Electric windows are used to raise and lower door windows and are installed on some cars. These VAZ 2110 cars have a plug in the door trim instead of a window lifter handle, and there are corresponding illuminated switches on the floor tunnel lining.
In the window lift mechanism, instead of a gear reducer, only a drum is installed, into the hole of which the output shaft of the VAZ 2111 gear motor is inserted.
The gearmotor consists of a worm gearbox and a DC electric motor with excitation from permanent magnets. The direction of rotation of the shaft depends on the direction of the current in the armature winding. To protect against overloads, a built-in thermobimetallic fuse is used. The faulty gear motor is replaced.
Voltage is supplied to the switches only when the ignition is on through a relay of type 904.3747-10 located at the rear of the VAZ 2112 mounting block.
Wiring diagram for power windows
1 – mounting block 2 – ignition switch 3 – power window switch of the right front door 4 – power window switch of the right rear door 5 – power window motor of the right front door 6 – power window motor of the right rear door 7 – power window motor of the left rear door 8 – power window motor of the left front door 9 – power window switch of the left rear door 10 – power window switch of the left front door 11 – power window relay A – to power sources B – to instrument lighting switch C – conventional numbering of plugs in power window blocks
Diagnostics of electrical equipment of the Lada 2110 car. Instructions for troubleshooting the lighting system. Repair of the generator and starter of the Lada 2111. Diagram of the Lada 2112 car. Power window lifter. Electrical circuit diagrams for a VAZ 2111, VAZ 2112, VAZ 2110 car.
- Units and electrical circuits of VAZ 2110, VAZ 2111, VAZ 2112,
- Repair of electrical equipment VAZ 2110, VAZ 2111, VAZ 2112,
- Diagram of electric windows VAZ 2110, VAZ 2111, VAZ 2112
© Club of domestic cars Lada. Do-it-yourself repair and tuning of VAZ (Lada) with photos. The portal will help you do the work on modifying and repairing your VAZ car yourself.
Not much time has passed since they began installing electric windows on the VAZ 2110. However, during this short period, many cases of ESP breakdowns and developments in repairing them have already accumulated.
You can, of course, replace the used device with a new one. But you can go another way, especially since the design of the window regulator allows you to restore its functionality independently. By the way, this can be done without much difficulty. The main thing is that the installation/dismantling and repair instructions are strictly followed. But before you get started, it is recommended to understand the types of these devices.
Connecting power windows VAZ-2109
Owners of a VAZ 2109 car can replace power windows with electric windows. On 2109 cars, electric windows can be connected via standard wiring, which already has everything provided for connecting an ESP.
This circuit is used to connect ESP on more “rich” configurations of the nine and it is advisable to use it when connecting independently. Below are diagrams for connecting an ESP with fuse blocks of new and old models.
Wiring diagram for power windows on a VAZ 2109 with an old-style mounting block (17.3722):
- 1 - Mounting block
- 2 - Ignition relay
- 3 — Ignition switch
- 4 — Right door electric window motor
- 5 — Left door electric window motor
- 6 - Right door power window switch
- 7 - Left door power window switch
- K7 - Power window power relay
- A - To terminal “30” of the generator
- B - To the wiring harness block connected to the heater lever illumination display
- B - to the heater lever illumination display
- G - conventional numbering of plugs in the gear motor block
Types of window regulators and the main causes of their breakdowns
Today the following types of window lifters are in use on VAZ:
- rack type (experts consider them the most reliable of all known designs);
- cable;
- plank.
Depending on which company produced the product in question, it can be installed in the car door as standard, or, if it does not fit in size or other technical characteristics, it can be altered without unnecessary problems.
Since both domestic and imported gear motors can be installed on the lift, the described devices, depending on the type and origin of the electric motor, may differ:
- by the speed at which the glass is raised or lowered;
- according to the noise level recorded during operation of the window lifter;
- if possible, its normal operation in winter conditions.
Installation procedure for glass lifting devices
Installation of the lifting device is quite simple. It starts with disconnecting the battery. After this, use a curved screwdriver to unscrew 3 screws, unfasten the door trim latches and remove the door pocket. Using a thin screwdriver, pry off the handle (latch) of the window lifter - the tip of the tool is inserted into the recess between the latch and the socket.
The handle itself is removed. At the next stage, the car door opening handle is dismantled. To do this, use a screwdriver to pry the handle cover and remove it. Now use a screwdriver to remove the 2 fastening screws that were hidden by the cover plate. After this, the handle can be removed without much difficulty. Using a screwdriver, you can also remove the power window button, which serves to lock the door.
After removing 6 pistons, the trim covering the car mirror adjustment mechanism is also removed. As a result, it remains easy to dismantle the door trim. Armed with a 10mm wrench, unscrew the 2 bolts that hold the auto glass clips. Next, 2 nuts securing the lifting mechanism, nuts of the upper and lower fastenings, and 3 nuts securing the lifting mechanism are unscrewed in sequence.
Upon completion of the described stage, it is time to remove the lower guide pin of the lifting device from the door panel. To facilitate and simplify such an operation, the upper pin of the guide must be bent using a screwdriver. Now the entire lifting mechanism can be safely removed through the resulting opening in the door frame.
In order to quickly, efficiently and without problems install a new electric window regulator in the door, you must first make sure that it is in the fully folded position. Otherwise, the entire operation will not be possible.
However, as already mentioned at the beginning, replacing an inoperative device with a new one is most often not particularly necessary. If the contractor can accurately determine the reason why the window regulator refuses to function normally, it can be repaired quite easily.
Window lifter.RF › Blog › Replacing the rear windows of the VAZ-2110
This report on the installation of electric windows in the rear doors of a VAZ-2110 was prepared by our buyer Andrey Aleksandrovich Serebrennikov from Sevastopol, as part of his participation in our promotion.
And finally the long-awaited rear electric windows have arrived.
It all starts with removing the door card. We unscrew everything that can be unscrewed, and then pull off the card with the pistons, you just need to pull it off carefully, you can break off the leg under the pistons.
Then unscrew the 3 “8” nuts that hold the lowering lever, and the 2 “10” nuts that secure the guide to the door, be careful not to lose the growers!
Then unscrew the 2 bolts securing the guide to the metal base of the window.
Holding the base of the window with your hand, we take out the entire mechanism and place it at the bottom of the door, now we need to secure the window.
Since there was no stick at hand to support the bottom, an L-shaped wrench was used in this way:
Now the window does not try to move down, and will not interfere with us pulling the entire mechanism out.
We pull out the mechanism through the lower left hole of the door (for the left rear door), the whole difficulty lies in removing the mechanism block itself, since the pulley is very long and does not want to fit through.
Then I checked the power windows for functionality by connecting it to the wire going into the door and pressing the button so that I wouldn’t have to take it all back out later.
We begin to put the ESP inside the door. Compared to the stock one, I didn’t experience any difficulties; everything fits in quite quickly.
We begin to attach it all to the door. And then I discovered a small problem: there are only 2 fastenings of the ESP unit to the door and they are designed for nuts at “10”, while the standard ones were at “8”. It's good that I take it with me in reserve. In total, instead of 5 fastenings we get 4, but now everything is turnkey to “10”.
We check the functionality and fasten the card in place. And we are waiting for the deluxe 2 cards to arrive so that we can fully enjoy the view of the salon!
Thank you, Andrey, for the prepared photo report. We will transfer the promised prize to your mobile phone account.