Just a few years ago, electronics in a car were a real luxury item, available only in the most expensive models.
But time flies, technologies change. Now even the simplest, most affordable cars have in their arsenal an impressive number of electronic devices that ensure the operation of literally every system, monitoring the condition of the car and its individual components.
From this point of view, VAZ models are not distinguished by sophistication and a wide range of electronics. That’s why many people decide to install their own on-board computer.
Why is it needed?
By installing an on-board computer, you can get a device that informs you about the operation of all systems, and with enviable accuracy. The computer reads parameters, reports potential malfunctions, and allows you to prevent breakdowns before they lead to serious repairs.
New device
It is incredibly difficult to overestimate the benefits of an on-board vehicle, which is why many decide to install it on their VAZ 2114. This way, car owners, without the help of expensive equipment at a service station, will be able to independently monitor the condition of the car and promptly respond to messages from the computer, which carries out regular diagnostics.
How to connect an on-board computer to a VAZ 2114
Before proceeding with installation, you need to decide for which functions the on-board computer of the VAZ 2114 is needed. Before deciding on the choice of an electronic system, you need to pay attention to the characteristics of the machine. Of course, it is not advisable to buy a very complex system for an ordinary car, or one that is too expensive for a budget car. It is enough to purchase a system that includes a monitor, the necessary set of wires and, accordingly, a processor.
Next, determine where to mount the electronic system monitor. The best solution would be to install it in the central part of the console, if space allows. If there is no free space, the monitor can be mounted on a dashboard; therefore, an external housing is required.
The next step is to place the processor itself. Do not forget that all ventilated openings of the processor must be freely accessible, and the case must be mounted in a certain place. The wires must also be routed through a special tube that protects them from external negative influences.
After installing all the elements, connect the wiring. To display the technical condition of the machine, you need to connect the on-board computer to the center of the machine. After completing the installation process, turn on the system and install the necessary programs. The final step will be setting up.
If there are problems with the operation of the electronic system, for example, the on-board computer of the VAZ 2114 does not work. Most likely, the problem lies in incorrectly connected contacts or incorrect settings. To solve this issue, just check all connections and correct them, or check the existing settings according to the instructions.
What to choose?
The range of on-board computers for the VAZ 2114 is quite extensive. But you shouldn’t take the first one you come across.
First, make sure that the computer you choose supports programs designed for the electronic control unit of the “fourteenth” model.
Model Gamma GF 415T
We do not recommend purchasing cheap models under any circumstances. Once you decide to install a sideboard, make sure that there is no doubt about its quality and reliability. You'll have to pay a pretty penny for it, but believe me, it's worth it.
conclusions
As you can see for yourself, in order to install the BC yourself with your own hands, you do not need any special skills, but just strictly follow our instructions.
Content
The on-board computer (BC) is an automated vehicle control system. There are several types of BC; to find out which type is installed on your car, you need to read the contents of the sticker on the device. Depending on the type of engine, the corresponding types of BC are selected. The largest number of automated control systems are produced for fuel-injected car engines. Multitronics can be considered the most universal on-board computer for the VAZ 2114.
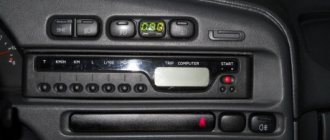
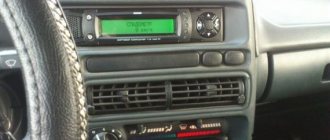
This is what the installed VAZ 2114 on-board computer looks like
BC errors
If you buy a car that already has an onboard vehicle installed, this is quite good. You don't have to install it yourself.
Plus, it's a great way to check whether the car is as good as the owner claims.
To check the BC for errors, reset the daily mileage on the dashboard and at the same time turn on the ignition. Then press the button located near the windshield wiper lever. The display will show the firmware version of the installed BC, plus error codes, if any.
The main bookmaker errors are shown in the table. Moreover, the most popular of them, which are found on the VAZ 2114, are 4, 6 and 8.
| Code | What does it mean |
| 2 | The car's mains voltage is too high |
| 3 | Fuel level sensor is faulty |
| 4 | The coolant temperature sensor has failed |
| 5 | The outside temperature sensor is faulty |
| 6 | The engine gets very hot |
| 7 | Oil pressure has reached a critically low level |
| 8 | There are problems with the braking system |
| 9 | The battery is low |
Once errors are detected, appropriate decisions can be made. If we are talking about your car, simply reset the data by pressing and holding the daily mileage button. Without doing this, the errors will persist during the next diagnosis, although you have taken measures to eliminate them by repairing the corresponding components of the car.
Why do you need an on-board computer?
In previous articles we have already talked about what an on-board computer is, what it is needed for and what types they come in. But let me repeat myself so that you clearly understand all the advantages of having an on-board computer, and there are probably no disadvantages, except perhaps spending money on the purchase and that’s all.
Let's take, for example, the on-board computer STATE 115×24. With this model in your possession, you can:
– set the radiator fan start temperature; this function is very useful, for example, in winter, when you can control the temperature of the coolant, thereby monitoring the temperature of the heater radiator
– the function of drying and warming up the spark plugs before starting the engine is very useful
– the function of resetting the settings and adjustments of the ECU is needed to switch to gasoline with a higher or lower octane number (from 92 to 95 and vice versa), this function is also needed to reset the settings after a long trip with increased load on the engine.
– the ability to read errors allows you to monitor the condition of the car and change non-working sensors and elements in a timely manner.
- and much more…
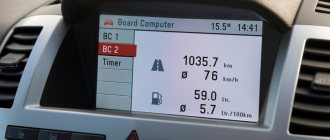
What parameters does the BC screen display?
By connecting the onboard vehicle, you will be able to access a large amount of information and data about the operation of your car.
Article on the topic: How to change the rear struts on a VAZ 2114 with your own hands (video)
Parameter displays
Most computers suitable for the VAZ 2114 display the following data:
- Vehicle speed;
- The volume of fuel remaining in the tank;
- Travel time;
- Engine speed;
- Fuel consumption indicators;
- Engine heating degree;
- Temperature inside the cabin;
- The distance that the car can travel on the remaining fuel;
- Distance traveled by the car;
- Voltage in the on-board electrical network;
- The amount of heating of the coolant;
- Throttle position;
- Total air flow;
- Error codes and their designation in understandable language;
- Average car fuel consumption;
- The amount of fuel consumed for the current trip;
- Distance traveled during the trip in kilometers;
- Average speed;
- Other useful information.
How to remove the on-board computer on a VAZ 2114
Unfortunately, many drivers are not satisfied with the performance of the electronic system of the car installed during the assembly of the VAZ. You can remove this gadget yourself without any problems. The first step is to study the machine's instructions; it provides for the process of dismantling the on-board system.
Be sure to check with the car dealership where you purchased the car about the warranty period. Most dealerships can cancel the warranty if you tamper with the car yourself. Let's start removing the on-board computer:
- First you need to take out the radio, but first disconnect the negative terminal from the battery.
- Remove the outer panel of the radio.
- Then remove the entire body of the radio, making sure to unfasten the wires connected to it.
- Place your hand through the opened hole and carefully open the fastenings of the computer unit.
- Remove the on-board computer, having first unfastened all the wires connected to it. If you do not plan to install a new electronic system, it is necessary to connect the wiring.
- Also gently remove all devices connected to the computer.
- Connect the radio tape recorder back and install it in its place.
Having an on-board computer is an opportunity for the car owner to always be aware of events occurring in the electrical and power parts of the car. At the same time, unpleasant surprises are excluded. If you don’t want to spend money on an additional device, you can go the other way - periodically monitor the condition of the car’s systems yourself or contact specialists at a service station.
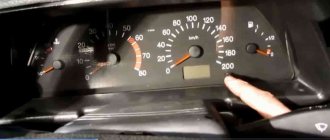
How does a bookmaker differ from a control panel?
Many car owners are sure that there is no need for an on-board computer; all data is displayed on the dashboard, and that’s enough.
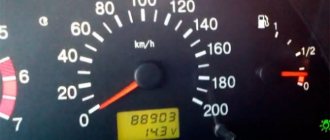
But let's take the speedometer as an example. As you know, it reads the engine speed, converting from to speed. But if you install wheels of larger diameter, the speed will increase, but the dashboard will work according to the old scheme, that is, you will exceed the speed limit, although everything on the speedometer is “within the limits of the law.”
Universal model
Simple clamps do not cope with their tasks as well as BC is capable of it. In theory, it is possible to calculate only from the dashboard the amount of fuel used, current and average fuel consumption, the number of kilometers traveled, and so on. But why sit behind the wheel and calculate something, be distracted, if you can just get an on-board vehicle and look at its screen, receiving the necessary information based on changing parameters.
So there is a significant difference between the BC and the dashboard.
What to do if there is no block designed for the on-board computer?
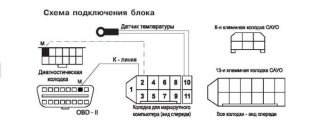
In this case, you will have to install a new header with nine contacts and run all the necessary wires to it according to the diagram shown below:
• green – fuel consumption signal; • orange – ignition is turned on; • red or white – plus twelve volts; • black – mass; • brown – vehicle speed indicator; • gray – line six K; • red or green with a red stripe – mute; • white – control of the instrument panel illumination; • pink – indicator of the volume of fuel substance.
Preliminary preparation
Preparing for installation
There are several activities that you should think about and implement before you begin installing the BC.
- Determine the set of functions that you want from your bookmaker. For this purpose, standard instructions are attached to each device. Plus a lot of information can be found on the Internet.
- It makes no sense to buy a highly sophisticated system for the VAZ 2114. But budget bookmaker models are not the best solution.
- The optimal package includes a monitor, a set of wires and a processor.
- Decide where the BC will be installed. The center console is best suited for this. But there must be adequate free space for it.
- If the center console doesn't fit, try the dash. Although in this case you will need an external housing.
Remember right away that after installing the on-board computer, you will also have to install the software and make the appropriate settings. Therefore, do not think that by connecting all the wires, the work can be considered completed and the BC will miraculously begin to give you objective and adequate information.
Installing BC on a car
Having decided on the choice of device, you can proceed to installing the BC. First of all, you should study the manufacturer's instructions, which should be included in the kit.
As for the installation location, this is usually the center console. By the way, you should prepare the installation shaft for the BC in advance. If for some reason such installation cannot be implemented (the seats are occupied by other devices), you can buy an on-board computer with a remote housing.
It is also important to consider that even after installing the on-board computer, you will need to configure it. In other words, once the wiring is connected, the computer will not immediately display accurate information without adaptation.
- Let's move on to connecting the on-board computer. First of all, the on-board computer 2114 or on-board computer 2115 is usually placed in a standard and previously prepared place. This option will be the best. Before starting work, you need to disconnect the terminals from the battery.
To connect the on-board computer, you need to supply 12V power to the device and also connect ground. To automatically start with the engine, power is supplied from the ignition. By the way, when powered by side lights, the computer screen may glow less brightly, which is quite convenient in the dark.
If the model supports receiving a signal from a fuel level sensor, you should not ignore this possibility and connect this sensor to the BC. You also need to connect the controller’s diagnostic line “K-line”.
Typically, the connection diagram for an on-board computer comes down to switching the BC and the diagnostic connector. In fact, a standard four-pin block is connected to adapters, and power is taken from the cigarette lighter, autostart is implemented through the ignition switch, ground is taken from the body, etc. If the block in a particular on-board computer does not fit the VAZ 2114 connector, you can use adapters.
Installation
Installation process
To connect an on-board vehicle to your VAZ 2114, you don’t have to be a great specialist. By following the instructions, you can do all the work yourself. Just devote enough time and effort to this issue.
- First, remove the plug located on the dashboard. We will start from the fact that you have found a place for your on-board computer.
- After removing the plug, look for a bunch of wires that have a nine-pin connector. All VAZ models have it, so your “fourteenth” will not be an exception.
- Now connect this connector to your on-board computer.
- One of the most important activities is conducting a K-line.
- To do this, take a wire about 1 m long and connect it to the second pin of the nine-pin connector.
- The second end of the wire is connected to the diagnostic block. It is located directly under the dashboard. To make the task easier for yourself, we advise you to disconnect the panel on the right side.
- If you have a Euro 2 block, the wire is connected to the diagnostic block using an M-socket.
- If the pad is Euro 3, then you will need socket number 7.
- In some cases, on a VAZ 2114, the Euro 3 block is mounted upside down. Therefore, be sure to pay attention to this when connecting, so as not to confuse anything.
- After connecting the on-board computer, place it in the designated place and check its operation.
Article on the topic: How to remove the headlight on a VAZ 2110 and replace the glass with your own hands
Errors when connecting/operating the on-board computer
Error: “No connection with controller” or “C-line break”
This error indicates that the K-line is not connected or a contact break has occurred. Check the wire according to the diagram described above. Most likely the contact has come off the diagnostic block.
Incorrect readings of the sea temperature sensor
If your temperature outside is -40, then this indicates that the wire to the temperature sensor has broken, or there is no such sensor at all. If the temperature is, for example, -25, but it’s only -10 outside, then you need to replace the sensor with a working one. Home page
Broken wire to the line on a VAZ 2114. Do-it-yourself diagnostics using the K-line, part 1
The control unit is a microprocessor device and can transmit information about its operation via a serial communication channel.
The standard for such a channel in automotive electronics is the K-line. The diagnostic line is a means of transmitting information between the electronic unit and external devices: immobilizer, testing equipment, diagnostic devices. Communication with the immobilizer is established after turning on the ignition switch. The control unit and the immobilizer exchange via the K-line the parameters specified during training of the immobilizer. If the parameters meet the specified conditions, the electronic unit proceeds to the normal operation of the control algorithm. Failures and malfunctions in the communication lines with the immobilizer, mismatch of training parameters transfer the control program of the unit to a mode in which engine operation is impossible. The K-line in the car is connected to a diagnostic connector, to which a tester can be connected to diagnose the operation of the control system. The standard software protocol for data exchange between devices and the electronic unit, implemented in these devices, makes the operation of all devices connected to the K-line transparent. Lack of communication between the control unit and the diagnostic tool may indicate a malfunction of both devices. If there is no such connection, and confidence in the performance of the tester is beyond doubt, then the first step is to check the diagnostic circuit. First you need to make sure that there is power to the on-board network at the control unit and the K-line circuit from the control unit reaches the diagnostic connector. The voltage at the K-line terminal of the diagnostic connector, with a working circuit, is equal to the on-board network voltage. Since the K-line circuit is connected to the diagnostic connector through the immobilizer connector, checking the circuit should be carried out taking into account the serviceability of the immobilizer. If the immobilizer is not functionally involved in the system, it is best to connect the wires (K-line input and output) directly from the immobilizer connector. During the preparation of production, it was assumed that immobilizers would be installed on some cars with a control system based on blocks from Bosch. But mass production of immobilizers was not prepared in the required time frame. In this case, if the wiring harness provides for the installation of an immobilizer, the connection between the diagnostic output of the control unit and the diagnostic block is broken. To correct this situation, it is necessary to install a jumper between pins 9 and 18 of the immobilizer connector. On vehicles where the wiring harness does not provide for the installation of an immobilizer, this problem does not exist. Good day to everyone who is reading this entry! And so I’ll start with the fact that I don’t have an on-board computer, I have a desire to install it, but more on that later. There was an interest in identifying my car with my own hands. In one of the previous articles, I wrote that after a rainstorm I filled up the air flow sensor, the check light came on and I went for diagnostics: they charged me 100 UAH. Within 30 seconds, having discovered that the sensor does not work, it needs to be replaced. I don’t need professional diagnostics; if necessary, I’ll go to a diagnostician, and for easy diagnostics, I decided to buy a K-line scanner
VAG-Com 409.1 K – Line scanner
oh, and even though my car is from 2004, it is 1.5l and 8kl with EURO-2, and is equipped with an ODB-1 connector. I googled it: it turns out that ODB-2 was already installed but on 16kL cars with EURO-3 from earlier years. I also had to buy an adapter with
Adapter OBD-II 16pin to GM12
I ordered everything from the online store, along with the cords I received a disk with programs for diagnostics and a bunch of different information on diagnostics. I configured all the com ports on the laptop and went into the garage with the laptop to try. I plugged it in, turned on the ignition, bam, and the fuel pump immediately began to hum without stopping. Naturally, nothing happened and I abandoned the matter (and this was last year at the end of autumn). Well, it’s already warm - there is a desire to resume this business. When I rang the adapter, I didn’t really understand anything, one rings 3 at a time, some don’t ring at all, I decided to redo it all. As you know, for diagnostics via the K-line you only need 3 wires (channels): 1) potassium itself 2) +12V 3) -12V aka ground, ground
K-line connection
I would like to note that in the figure above the contacts on the adapter are drawn as they should be, and not on the adapter or block! So imagine applying the adapter and think about where the contacts on the adapter and block should be, here is the picture below
location of K-line contacts on the blocks
Lamaaat adapter! Well, what can you do, the design is not collapsible (breaking the connector turned out to be not an easy task))) the black body is very hard, everything inside is still filled with white plastic. 4 wires are soldered, everything is called where which goes to the adapter where is the K-line, +12 and ground, the fourth, judging by the continuity, is the L-line, which we do not need. I’ll connect these 3 wires directly to the diagnostic block and try to connect to the ECU again! Good luck for me! Read the continuation!
| Do not forget to disconnect the battery before performing any manipulations. Next, you need to get the trip computer itself (MK or BC). It is obtained in the same way as a watch, by prying it off with a screwdriver. The BC is held on by four plastic latching brackets, two at the bottom and two at the top. Next, you need to familiarize yourself with the bookmaker itself, with the inscriptions on the back side. Why this is necessary, I explain, initially the BC of the Kursk Schetmash (passport) (I can lie further, but as far as I understood everything exactly like this) was obliged to contact the K-line, but VAZ changed the technical specifications, and the firmware was cut off, i.e. the part responsible for communication with the ECU was simply cut out. |
|
| If there is a track, and when you press the 'clock' button in clock mode, nothing happens, then you have a full-fledged BC with defective firmware that needs to be updated (file 527-10.hex and instructions for the firmware are in the archive). You can update the firmware using standard means (by unsoldering the processor, it is there, by the way, PIC18F252, and flashing the firmware in the header, or by soldering the wires directly to the legs, I did this), or through the K-line from the PC. There is information that this did not work with all K-line adapters, plus for this you need to have Win 95-98, some did it on XP, but most had problems with XP. In order not to install Win 95-98 solely because of the BC firmware, you can use a virtual machine (thanks to Ivan Kuchinsky for the successful experiment). |
The K-line is connected to the BC block simply; fairly common contacts are used there. We prepare a contact with a wire, insert it into the BC connection block, and connect it to pin 7 of the OBD-II block. Next, select your controller in the settings, as described in paragraph 3.8.3 of the BC instructions:
- ECU.0 - M1.5.4
- ECU.1 - M1.5.4N or January-5.1
- ECU.2 - MP7.0
- ECU.3 - MIKAS 5.4, MIKAS 7.1, 301.3763 000-01
- ECU.4 - Bosch 7.97
Communication with the controller only when the ignition is on. Information does not appear immediately! We wait patiently from a few seconds to minutes.
By the way, it doesn’t work fully with Bosch 7.9.7, but there is an option to look at errors and reset it.
What I mean is that it is not indicated in the instructions at all. And yet, don’t be afraid to kill him! You will always have the opportunity to buy the same PIC18F252 processor and flash it (ask anyone who is interested in or works with microelectronics) separately, or solder it and flash it. But this does not at all negate the accuracy and thoughtfulness of actions! If you have any questions, I am ready to provide clarification. Instructions on how to check the VAZ K-line
10/11/2014 02:52
Most often, the solution to the problem really lies in breaking the K-line wire. That is, the wire has simply moved slightly out of the block (the APS block of the immobilizer, or the BC block) and there is no longer any contact.
If you have checked all the contacts, but the on-board computer still does not see the K-line wire, then you can proceed as follows:
1) Check the voltage on the K-line. We set the multimeter to the mode for measuring constant voltage, connect the red probe to the K-line, and the black probe to ground to any point on the body. The readings on the device should be 12+-2V. You cannot use a lamp to check the voltage, because it has a load.
2) If on your VAZ the connector with the APS is disconnected, then check for the presence of a jumper in the APS block between pins 9 and 18.
3) The problem may be in the immobilizer (the K-line signal comes, but disappears after the immobilizer). Check for the presence of a K-line on pin 18 of the APS block. Using the same method, you can check whether there is a break between the APS block and the BC block.
4) Interference or broken wire. Try replacing the wire from the BC to the diagnostic connector with a new, shorter one.
You can also check the k-line at a service center using computer diagnostics, or by connecting a known working on-board computer to the car. And if the k-line does not work and at the same time there are problems with starting the engine, then start checking the additional VAZ fuses.
Thematic materials:
All achievements Vulcan Warface Increased stomach acidity Determination of stomach acidity by foll Plastic card editor Register a fixed price card Fixed price activate a bonus card again Eat and lose weight recipes with Lera History of Como. City of Como, Italy. Souvenirs. What to bring as a gift Mythical male and female names and their meaning The most, most, most... in the world - history, facts
103583
If you notice an error, select a piece of text and press Ctrl+Enter
K Line connection problems
K - Line adapter ( VAG COM ) does not connect
When making a K-Line adapter yourself or purchasing it in a store, users in some cases encounter problems connecting the adapter.
This problem has two subtypes:
— Problem when connecting the adapter to a PC (with our K-Line 409 adapter, the kit includes a video instruction on how to use the device, we recommend that you read it if you have any questions)
— Problem connecting the K Line 409 (VAG COM) adapter to the car
To solve the first problem, you need to install the driver for the device located on the disk, then go to the device manager and see if your adapter is displayed correctly. If in the device manager you see your adapter in the COM ports and LPT section without any question marks, etc. then you can rest assured that the drivers are installed correctly. To be more confident, you can double-click on it to find an inscription stating that the device is working normally.
If your adapter is indicated with a question mark or is located in the other devices section, apparently you have not installed the driver and you need to reinstall it.
We select our device, select, update the driver and specify the folder with the drivers, then click next and see the installation process, otherwise select another folder and repeat the operation until we achieve success.
If you installed the driver correctly, but when connecting to the car the connection does not occur, first check the cable for functionality, to do this, install the Vasyadiagnostic program, then in the settings section select the port number on which your adapter is located and click the test button ( The car engine must be running or the ignition is on).
If you receive a message about successful detection of the adapter, the next step is to select a program for your car from the disk that comes with the adapter and diagnose it.
If you receive a message that the adapter was not found or the port is closed, then double-check the port number in Device Manager and that the device driver is installed correctly. If everything is done correctly, check the functionality of the cable on another car and another PC.
If, when connected via another PC on another car, the adapter works but refuses to work on your PC, then there may be a problem with the installed OS, antivirus, or computer components. Most often, if the cable on your PC works on another car, but refuses to work on your car, the problem is a broken K-line wire. Perhaps the wire has simply moved a little out of the block (the APS immobilizer block) and there is no normal contact. If you have checked the contacts on the car and everything is in order, but the cable still does not work, then you need to perform the following steps:
— Check the voltage on the K-line . To do this, set the multimeter to the mode for measuring constant voltage, after which connect the red probe to the K-line wire, and connect the black probe to ground to any point on the body. Look at the device readings, the device should display a voltage of about 12+V plus minus 2V . Please note that you need to check with a multimeter, and not with a light bulb or other improvised means. If there is no voltage, proceed to the next step.
Pinout of OBD 2 Pinout of GM 12 Pin OBD 1
2) If on your VAZ car the connector with the APS is disconnected, you need to check for the presence of a jumper in the APS block between pins 9 and 18 of the block.
WHAT TO DO WHEN A BC STOPS WORKING
This sometimes happens when the on-board computer does not work. What do experts advise to do in this case? The first step is to determine the type of malfunction of the device. If it does not show “signs of life” at all, you need to check fuse F3, which is installed in the power supply circuit of the VAZ 2114 processor. If replacing it does not “revive” its operation, check the connection connectors.
There is no point in describing the essence of the process of repairing such a complex electronic product, since for this, in addition to having the necessary devices and tools, you also need to have an education in the field of electronics.
PURPOSE AND MAIN FUNCTIONS
Cars produced in Russia are equipped with such a device. For example, the standard on-board computer of the VAZ 2114 became the first-born in the family of VAZ cars. To put it in simple words, this is a car reference book on wheels. The driver needs it in order to know what is happening both inside the car and outside.
WHY IS IT INSTALLED IN THE CAR?
The on-board computer of the VAZ 2114 of the first versions performed few functions, these were the following:
- Control over the availability of fuel on the vehicle and the distance that can be covered on it. This will help the driver make the right decision in time to refuel or stop driving;
- Monitors the operating temperature of the coolant in the engine and helps prevent it from overheating.
The use of more expensive versions of computers makes it possible to diagnose individual components and assemblies of the machine.
They are endowed with the ability to decipher fault codes issued by the controller, and this allows the driver:
- Be promptly informed about problems that have arisen in a particular machine system, and respond correctly to this. Eliminating the problem in its “bud” eliminates expensive repairs;
- Get savings from using your car.
ABOUT ITS FUNCTIONS
On-board computers of the VAZ 2114 are equipped with and perform the following basic functions:
- Display information about which indicators have instantaneous parameters;
- Displaying current information on the information panel;
- Route parameters are reported. They mean information about mileage, average fuel consumption, travel time and other data;
- Ability to read error codes and diagnose a car engine. This allows you to receive information about all the problems of the power unit without lengthy consultations with “specialists”.
Some of the models have additions to the basic functions, which may include:
- Information about the timing of the next machine maintenance;
- Some adjustments to basic functions;
- Control over the insurance period;
- Availability of organizer functions;
- Possibility to set parameters at which it will be possible to turn on the fan in the cooling system.
Additional functions can be installed on any bookmaker (contact a specialist and they will flash it for you)