The VAZ 2107 is far from a perfect car; it cannot boast of the reliability of its systems. Including brake mechanisms, on which the safety of driving depends. Sometimes situations arise when the system does not work efficiently or there is a brake fluid leak - in such cases, immediate repairs are required. You can do the work yourself, for which you will need to prepare the necessary tools and read the instructions.
- Soft brake pedal
- Stiff pedal
- One wheel does not brake
- Liquid is leaving the reservoir
- Repair of master and working brake cylinders
Video: GTZ repair on a VAZ 2107
- What kind of brake fluid should I fill in the VAZ 2107 and how much?
- Procedure for bleeding the brakes
Video: pumping brakes on a VAZ
Which wheel to start with?
Let's start the conversation with the sequence, and then move on to a description of the process. You know that the brake system of the VAZ 2107 and other domestic classics has two circuits, or more precisely, three. The first is the front wheels, it consists of two separate lines, it is customary to combine it into one circuit of the front brake mechanisms. The second is the rear wheels. From the main brake cylinder there is one brake pipe going to the “stern” of the car, which is divided into each side of the rear axle. Based on the design, you need to start pumping from the farthest element of the system - the right rear wheel.
Important! Each circuit swings separately, from the beginning we deal exclusively with one, let’s say the rear one, then we move on to the front. If the sequence is violated, problems may arise in the adequacy of the brakes.
Having released the air from the right rear mechanism, we move on to the left rear one. Having finished with it, we move on to the right front, and then to the left front. We start pumping from the farthest section from the GTZ (it is located under the hood on the left side) - this is the rear contour, the right side, then the left, then the farthest section of the front contour - the right side, then the left.
If you replaced the master cylinder, you first need to bleed the air from it
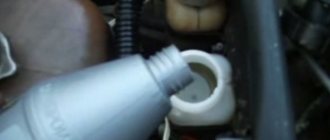
- Fill the brake fluid into the reservoir
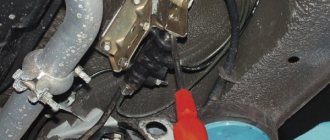
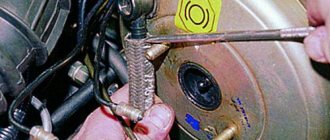
- We “fit” the fittings of the brake pipes into the outlet holes of the cylinder. Don't tighten them, just wind them a couple of turns. This is necessary so that air can freely escape from the junction of the tubes and the GTZ housing
- When pouring brake fluid into the reservoir, it can flow out of the fittings by gravity. Otherwise, ask an assistant to press the brake pedal several times. The liquid will not emit a fountain from loosely twisted tubes. First, air will come out, you will see characteristic bubbles, then the liquid itself will begin to ooze.
- Make sure all connections are leaking evenly. Only after this do we tighten the fittings of the lines and wipe these places with a dry cloth
Video on how to bleed the master brake cylinder or why the system is not bleeding:
What kind of brake fluid should I fill in the VAZ 2107 and how much?
The hydraulic brake system of the VAZ 2107 uses DOT-4 brake fluid. Its volume is 0.382 l. The fluid is topped up or changed not only in case of repairs, but also when the color changes or moisture gets into it. As a rule, on classic Zhiguli cars a complete fluid change is performed every 3 years. The essence of the procedure is to pump fluid through the system.
The brake system of the VAZ 2107 uses DOT-4 brake fluid
Why in this order?
Who the hell knows! All experts claim that it is necessary to pump the brakes on sevens in exactly this sequence, but no one gives a logical explanation. If you know, write in the comments, it’s interesting to discuss this topic.
Why start with the rear wheels? - because they are the farthest, you answer. Okay, but the contours of the rear and front are separated from each other by the piston cuffs of the master brake cylinder! The front circuit starts working first in case of braking, why not pump it first?
I will express my theory based on experience and observations. Since the second chamber of the master cylinder is responsible for the rear brakes, the last one along the piston stroke, it means that after pumping it, it will be easier to pump the first one. If you do the opposite, then it will be problematic to completely “expel” the air from the rear brake circuit. When pressing the brake pedal, the piston will compress the fluid in the first chamber, and you will not be able to feel with your foot the degree of elasticity of the pedal after pumping. There is a chance that not all the air will escape and the rear axle will not brake.
But in the family of front-wheel drive VAZs, the order is different, cross to cross. The chamber closest to the vacuum amplifier is pumped first, that is, vice versa. We will talk about this in detail in other articles.
Replacing the brake hose
If the car owner notices smudges resulting from tire wear, it is necessary to change the brake hoses. Technical literature says that hoses installed more than 3 years ago are prohibited from being used. The explanation for this is simple: firstly, rubber ages, and secondly, it is more susceptible to deformation.
In a VAZ-2107 car, brake hoses are located both at the front and at the rear. These components lead the fluid fluid to the working cylinders. Having found out that the rubber component requires replacement, you need to stock up on:
- screwdrivers;
- pliers;
- a set of keys;
- new hose;
- brake fluid.
- Remove the front tire from the desired side so that there is convenient access to the caliper.
- Unscrew the bolt securing the hose from the reverse side and remove it with copper washers.
- Unscrew the hose in the area of fixation to the brake pipe.
Correct bleeding of brakes
For these purposes you will need:
- Key to “8”, preferably a ring one
- Rubber hose, container. Be sure to be transparent so you can see the air bubbles coming out. This way we will control the de-aeration of the system
- Brake fluid for topping up
Bleeding the rear brakes
We put our partner in the car and climb into the hole ourselves. Remove the protective cap from the bleeder fitting and put a hose on it. We collect some brake fluid into a container and lower the end of the hose into it.
Important! Its end must be completely immersed in liquid. Otherwise, you can “suck” air through it back into the system.
We ask the assistant to press the brake pedal several times and rest his foot in the lower extreme position, with the pedal fully depressed. Use the key to “8” to slightly open the fitting. Watch the brake fluid with air bubbles come out through the hose.
At this time, the pedal should “fail”, its resistance to the foot will disappear. He reports this. Tighten the fitting and ask your partner to press it a few more times. It locks the leg in a pressed position. Repeat the procedure until clean liquid without air comes out of the hose.
When you tighten the fitting, be sure to put the protective cap on it. It will protect it from dirt. We move on to the opposite rear wheel and repeat the operation.
Important! If your car is equipped with a rear brake force regulator and it is faulty, then bleeding will not work. If its rod is soured in the closed position, then the brake fluid pressure will not be transferred to the cylinders, or this will happen very slowly. It is not a fact that it will be possible to completely “drive out” the air.
Bleeding the front brakes
We move on to the front wheels, we do not let the assistant out of the cabin, no matter how much he resists. The process is identical to the rear wheels, only the location of the fitting is different.
We achieve complete de-airing of the front circuit and check the brake pedal for adequacy. It should be tight when the engine is off. We pumped it a couple of times, if you need to make a certain effort to push it “to the floor” - everything is in order, if it’s “sluggish” - pump it again. You can remove the front wheels and visually see whether the pads are closing on the disc. Try turning the rear ones by hand while pressing the pedal. They don't spin - everything is fine.
Important! Don't forget to add fluid to the reservoir. As you pump, its level will decrease. There is a chance to re-air the system and do all the work all over again.
Video on how to properly bleed the brake system of a VAZ classic:
Malfunctions of the brake system of the VAZ 2107
The safety of driving a VAZ 2107, like any other car, directly depends on the effectiveness of the braking system. If problems arise with it or repairs are carried out, the brakes need to be bled. In order for the system to always be in good condition, you need to know how malfunctions manifest themselves and what causes them.
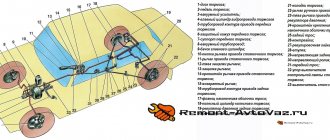
The brake system of the VAZ 2107 consists of the following elements: 1 - brake disc; 2 — brake pedal; 3 - vacuum booster; 4 — master cylinder for hydraulic brakes; 5 — pipeline of the front brake drive circuit; 6 — front brake protective cover; 7 — front brake caliper; 8 - vacuum pipeline; 9 — master cylinder reservoir; 10 — parking brake lever button; 11 — parking brake drive lever; 12 — lever latch rod; 13 — lever latch; 14 — brake lever bracket; 15 — return lever; 16 — pipeline of the rear brake drive circuit; 17 — flange of the cable sheath tip; 18 — wheel cylinder of the wheel brake; 19 — rear brake pressure regulator; 20 — pressure regulator drive lever; 21 — brake pads; 22 — lever for manual drive of the pads; 23 — rod of the pressure regulator drive lever; 24 — bracket for fastening the tip of the cable sheath; 25 — rear cable; 26 - lock nut; 27 — adjusting nut; 28 — bushing; 29 — rear cable guides; 30 — guide roller; 31 — front cable; 32 — parking brake warning lamp switch stop; 33 - brake light switch
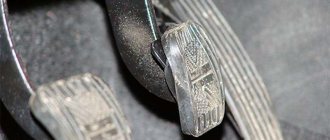
Soft brake pedal
The normal state of the brake pedal on the “seven” is one in which there are no jerks or dips at the moment it is pressed and there is no need to make any special efforts. However, as the vehicle operates, drivers may encounter a situation where the brake pedal has a different condition: it may be too soft or too tight. Both phenomena are considered unacceptable and indicate problems with the braking system and the need for prompt repairs. Most often, the pedal becomes soft when the system is filled with air. Sometimes this phenomenon is also called a failure. The malfunction is eliminated by bleeding the brakes, as a result of which air is removed from the system, which could enter it for the following reasons:
- There is too little brake fluid in the expansion tank.
- Violation of the tightness of the braking system.
- Malfunction in the main brake cylinder (GTC). The problem is resolved by repairing the mechanism.
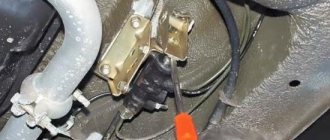
The brake fluid level is checked in the expansion tank, which is located next to the clutch hydraulic reservoir.
Stiff pedal
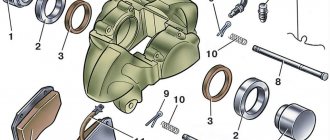
Excessive force to press the brake pedal is mainly required when the vacuum booster (VS) is faulty. This device creates a vacuum in the intake manifold, due to which the necessary braking torque occurs with little effort from the driver.
The vacuum amplifier consists of the following parts: 1 - tip mounting flange; 2 - amplifier housing; 3—rod; 4 - cover; 5 - piston; 6 — amplifier mounting bolt; 7 - spacer ring; 8 — valve spring support cup; 9 - valve; 10 — valve support cup; 11 — return spring support cup; 12 — protective cap; 13 — holder of the protective cap; 14 — pusher; 15 — air filter; 16 — valve return spring; 17 — valve spring; 18 — housing cover seal; 19 — retaining ring of the seal; 20 - thrust plate; 21 - buffer; 22 — valve body; 23 - diaphragm; 24 — valve body return spring; 25 — rod seal; 26 — master cylinder mounting bolt; 27 — rod seal cage; 28 — adjusting bolt; 29 — hose tip; 30 - valve; A - vacuum cavity; B - channel connecting the vacuum cavity with the internal cavity of the valve; C - channel connecting the internal cavity of the valve with the atmospheric cavity; E - atmospheric cavity
The reasons that lead to the pedal becoming tight may be the following:
- The air filter of the vacuum booster (VA) is clogged. Eliminated by replacing the filter.
- The valve body in the VU is jammed. To solve the problem, replace the vacuum booster.
- The vacuum booster diaphragm is damaged. The malfunction is eliminated by replacing the computer.
- The tip of the vacuum booster has failed. The tip itself needs to be replaced.
- The check valve in the control unit is not working correctly. To fix the problem it is changed.
- Violation of tightness. The vacuum booster or check valve needs to be replaced.
- Failure of the hose connecting the intake manifold and the intake manifold, or the clamp on it is loose. The problem can be resolved by replacing the hose or tightening the clamp. The condition of the hose must be monitored regularly . Over time, rubber can delaminate, which leads to a decrease in the amount of fluid passing through it .
- An increase in the size of the cuffs in the working brake cylinders, which often occurs due to the use of low-quality brake fluid. The malfunction is eliminated by replacing the rubber seals and the liquid itself.
The vacuum booster is connected to the intake manifold using a hose, which is often the cause of poor braking due to loss of tightness or loose clamp tightening
One wheel does not brake
Sometimes situations arise when one of the wheels brakes worse than the others, or there is no braking at all. Causes could be brake pads or cylinders, assuming the system is bled and there are no leaks. To determine in more detail what caused the problem, you will need to unscrew the wheel and inspect the brake drum and pads. You should then ask someone to press the brake pedal. The force should be small, but sufficient to force the pistons slightly out of the cylinders. If this does not happen, then the unit needs to be replaced. In addition, you need to try to return the pistons back to the cylinders by “pressing” them with a screwdriver. If this cannot be done, the mechanism must also be replaced. The pistons of the front brake cylinders may become sour due to the rupture of the rubber boot, as a result of which they become immobile.
The inspection procedure for rear and front brakes is the same.
Liquid is leaving the reservoir
One of the maintenance points for the VAZ 2107 is monitoring the level of brake fluid in the expansion tank. If it is found that it has decreased, it is imperative to find out the reason that led to this. You should not delay it, as there may be breakdowns in the braking system that can lead to failure when you press the brake pedal in an emergency. Let's look at the most likely reasons why liquid may leave the tank:
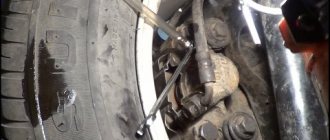
- Leaking through the brake cylinder. It is necessary to inspect the working braking mechanisms for leaks. To do this, you need to climb under the car, for example, on an overpass, and pay attention to the inside of the wheels. If traces of liquid are detected, it is necessary to repair or replace the faulty cylinder.
- Depressurization of the braking system as a result of wear of the cuffs of the main brake cylinder. It is not difficult to identify this type of malfunction. To do this, check the GTZ for leaks. If traces of brake fluid are found, the product will need to be repaired or replaced with a new one.
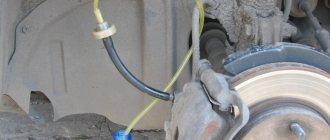
- When inspecting the elements of the braking system in order to detect fluid leaks, you should not lose sight of the rubber hoses. Over the years, the rubber dries out and cracks form on the surface of the products, through which liquid leaks. If traces of leakage were detected at the junctions of the hoses with the cylinders or tubes, as well as on the surface of the rubber elements, they must be replaced.
Brake fluid leakage can occur, for example, through the brake wheel cylinders
As the brake pads wear, the piston stroke in the service brake unit increases, which can also lead to a decrease in the fluid level in the reservoir.
In any case, you need to control the level and not allow it to drop below the minimum mark, adding fluid in a timely manner.
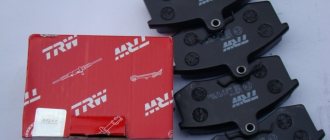
Repair of master and working brake cylinders
The main brake cylinder is the main part of the hydraulic brake drive. When the driver presses the brake pedal, the GTZ creates high pressure in the system, which drives the pistons of the braking mechanisms. The latter press the brake pads against the discs and drums.
The brake master cylinder creates pressure in the system to move the pistons in the working cylinders
Repair or replacement of the master cylinder is carried out when the unit cannot cope with its functions . To carry out repair work, the mechanism must be removed from the vehicle and disassembled. To do this, you will need a set of keys and screwdrivers, as well as a repair kit for the GTZ and brake fluid. To dismantle the cylinder, you need to remove the hoses and tubes connected to it, and then unscrew the fasteners to the vacuum booster. To disassemble, carefully unscrew the plug nut so that the parts located inside do not fly apart. After disassembly, the worn elements are replaced with parts from the repair kit. Assembly is performed in reverse order.
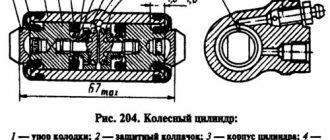
The working cylinder is disassembled and the cuffs and piston are replaced
The brake wheel cylinders are repaired in the same way. If the cuffs or piston are in poor condition, then the parts need to be replaced. It is best to change the entire cylinder, which will be much more reliable.
Video: GTZ repair on a VAZ 2107
Replacing brake hoses
Brake hoses are replaced when leaks are detected that appear as a result of rubber aging. The technical literature says that it is extremely undesirable to use hoses that were installed on a car more than three years ago. This is explained by the fact that rubber not only ages, but is also more subject to deformation.
Over time, the brake hose wears out, causing it to rupture and leak fluid.
Brake hoses on the VAZ 2107 are located both in the front and rear of the car. They supply brake fluid to the working cylinders. Having determined that the rubber element needs to be replaced, you need to prepare the following list of tools and materials:
- pliers;
- screwdrivers;
- a set of keys;
- new hose;
- brake fluid.
Replace the brake hose as follows:
- From the front, remove the wheel from the corresponding side so that you can get to the caliper.
- On the reverse side, unscrew the bolt that secures the hose and take it out along with the copper washers.
- Unscrew the hose at the point where it is attached to the brake pipe.
The brake hose is attached to the working cylinders using a bolt and copper washers
During the repair process, washers are replaced with new ones, since they are used as seals, and when installing old parts, there is a possibility of brake fluid leaking.
The rear brake hose is attached in a similar way, the only difference being that the front one is secured to the caliper with a bolt, and the rear one with a nut. To disconnect the hose and tube, you need to use wrenches: one unscrews the tube, the other holds the nut of the flexible element. After the tube has loosened slightly, remove the stopper with pliers. Having completed dismantling the damaged part, install a new one. At the end of the procedure, the reservoir is filled with brake fluid, after which the system is pumped.
The rear brake hose is secured with a nut
Vibrations in the steering wheel and brake pedal
Although rare, there are still situations when, when you press the brake pedal, vibration is felt, not only in the pedal, but also in the steering wheel. The reason for this is a bent brake disc. Damage may occur during aggressive driving, when you need to brake frequently and sharply. At the same time, the disks heat up, and if water gets on them at this moment, a temperature difference occurs, which contributes to the destruction of the disk. Due to such damage, loss of vehicle control and other unpleasant consequences may occur. If this malfunction occurs, you must visit a service station, where the damaged brake disc is subjected to grooving.
Let's answer some frequently asked questions
Is it possible to bleed the front or rear brakes separately on a classic?
Can. Moreover, you can separately swing the left and right mechanisms of one axis. The rear and front contours are not connected to each other if the entire cuffs are in the GTZ. Therefore, the risk of airing your neighbor is minimal. Agree, when replacing the front brake cylinder, only it is pumped, not the entire system. This also applies to the rear wheels. Repeatedly, when changing the rear cylinder on classic Zhiguli cars, I only pumped it. After this, all mechanisms continued to work properly.
Why don't the brakes bleed?
It often happens that after much torment the pedal remains “sluggish” and has little information.
- If the system or individual element is not sealed. They just didn't notice the leak. When you press the brake, some of the pressure is released into the hole, rather than going into the cylinders, and air may occur.
- When replacing the brake master cylinder. If you do not release the air from its chambers, it is difficult to squeeze it through the narrow passages of the tubes to the bleeder fittings. There is no guarantee that it will come out completely. How to do this correctly was explained at the beginning of the article.
Soft and stiff brake pedal
The normal position of the brake pedal of the 2107 model is when there are no jerks or dips when pressed, and no effort is required. At the same time, during the operation of the car, car owners are sometimes faced with the fact that the brake pedal manifests itself in a completely different way, that is, it becomes too tight or soft.
Such manifestations are unacceptable and indicate problems in the braking system. Therefore, prompt repairs are required. Often the pedal becomes soft when the system is too airy. This phenomenon is also called failure. The damage can be repaired by bleeding the brakes, that is, it is necessary to remove accumulated air from the system. The latter could have happened due to the following reasons:
- not enough fuel fluid in the expansion tank;
- sealing in the braking system is broken;
- damage to the brake cylinder.
At the same time, there is a situation where when pressing the pedal it requires excessive force, for which the vacuum booster (VA) is to blame. This mechanism creates a vacuum in the manifold (intake). The fact that the pedal is tight is indicated by a number of reasons:
- the VU air filter is clogged, therefore, it needs to be replaced;
- the VU valve body is jammed; the vacuum booster should be replaced;
- the VU diaphragm is damaged; replacement of the control unit is required;
- wear of the tip of the device; the tip needs to be replaced;
- incorrect operation of the check valve in the control unit; it is worth replacing;
- the seal is broken; the VU or check valve should be replaced;
- damage to the hose connecting the intake manifold and the intake manifold, or the tightening of the clamp in it is loose;
- increasing the size of cuff cylinders in brake cylinders; this happens when using poor quality fuel fluid.
What if without an assistant?
You can bleed the brakes on a VAZ-2107 without an assistant, but to do this you will have to slightly modify the design of the expansion tank cap. You need to buy a new cover into which you install the fitting from a regular camera. Now you need to create pressure in the system - this can be done using a camera or tubeless wheel. Inflate using a compressor and do the following:
- Fill the expansion tank with brake fluid.
- Install a cover with a fitting on it.
- Connect the fitting on the cover and the chamber using a tube.
- In this case, there is no need to install spool valves inside - they will be superfluous.
- Carry out repairs following the brake bleeding sequence described above.
Do not forget to add fluid to the system, otherwise an air lock will appear in it. You will have to bleed the brakes again. The VAZ-2107 uses the brand of fluid “RosDot-3” or “RosDot-4”. Try to use only those fluids recommended by the manufacturer.