Disconnect the output wire “D” of the generator.
Having moved the rubber cover, use a 10mm wrench to unscrew the nut securing the wires to terminal “B”...
Remove the coolant pump drive belt
Using the “13” socket, unscrew the nut of the bolt securing the generator to the tension bar.
Using a 13mm wrench, unscrew the nut of the bolt from the lower mounting of the generator to the bracket on the cylinder block and remove the bolt. We take the generator out of the engine compartment downwards.
Having unclenched the three protrusions of the casing,...
Using a Phillips screwdriver, unscrew the two screws...
...and remove the voltage regulator with the brush holder.
Disconnect the wire and remove the voltage regulator with brush holder.
Use a 10mm wrench to unscrew the nut...
...remove the sleeve and capacitor wire.
Using a Phillips screwdriver, unscrew the screw...
Using a Phillips screwdriver, unscrew the screw securing the rectifier unit and the three screws securing the ends of the stator windings.
Insulating washers are placed on the screws securing the ends of the stator windings.
We remove the ends of the stator windings...
...and remove the rectifier block.
Using a 21mm spanner, unscrew the pulley mounting nut, holding the rotor with a 8mm hexagon.
Remove the washer and pulley parts.
Remove the washer from the rotor shaft.
Using a Phillips screwdriver, unscrew the four screws holding the covers together.
Using a sharp scriber or paint, we mark the relative positions of the covers and the stator for subsequent assembly.
...we disconnect the front cover with the stator and the rear cover with the rotor.
Using a screwdriver, pry off the stator.
. remove it from the front cover.
Using a drift that rests strictly on the end of the rotor shaft (so as not to damage the plastic bushing located under the slip rings),...
...knock out the rotor with the bearing from the back cover.
Use a puller to press the bearing off the rotor shaft.
We press the new bearing onto the shaft using a suitable piece of pipe, applying force to the inner ring.
Using a tester, we check the stator and rotor windings for breaks or short circuits to the housing.
Video
Source
Generator brushes Replacement - Logbook Chevrolet Niva LAIKOVOZ of the year on DRIVE2
Reasons for replacing a generator One of the reasons when replacing a generator on a Chevrolet Niva is simply necessary is damage to the windings.
no charging Niva Chevrolet. generator repair
Using a jack installed on the side where the generator is located, raise the car by engaging first gear.
#9 Chevrolet Niva - Simply about the complex. replacing the BOSCH generator armature commutator - Duration: Ramanych...
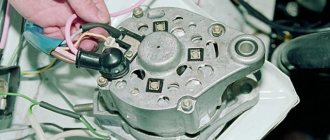
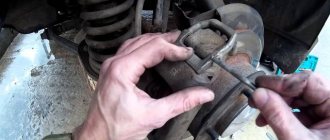
Full size This 80A generator is installed on my car from the factory. Last week, with a mileage of just a few thousand kopecks, I wanted to see the condition of the brushes - in the end they turned out to be almost completely worn out, and, as it turned out, the brushes on my generator were not more than a dozen or so “ chocolate”, and some brushes of their own with two wires and a square “chocolate”, which were bought for rubles in the nearest spare parts store for almost twice the price of tens and were waiting in the wings. First you need to remove the terminal from the battery. From their tips with a positive terminal, it is necessary to remove the rubber cap, which performs protective functions.
To install a new one, you need to go through the entire process in reverse order. If the result is poor, the ring is ground on a lathe to remove a small layer of metal. In this case, the negative terminal of the battery is removed and the wires that come from the generator casing are disconnected.
Check the ease of movement of the brushes in the holder. Remove the connector with wires from the generator. Unscrew the back cover of the generator. Disconnect the wires from the regulator, unscrew the connecting plate, the regulator mounting screw and remove the regulator 1 - screw, 2 - plastic gasket, 3 - connecting plate, 4 - regulator.
REPLACEMENT OF GENERATOR BRUSHES. GENERATOR VOLTAGE REGULATOR RELAY. VAZ, LADA.
Unscrew the screws indicated by the arrow that secure the graphite brushes and remove the brushes from the holder. Check the length of the graphite brushes, which should be at least 5 mm. Unscrew regulator A and disconnect the 2 wires indicated by arrows. Unscrew the screw securing the brush holder. Unscrew the brush holder and, carefully turning it outward, remove 1 - graphite brush, 2 - contact from the generator.
Check the length of the graphite brushes, which should be at least 4 mm. From their tips with a positive terminal, it is necessary to remove the rubber cap, which performs protective functions. Then from these wires you need to unscrew the nut with which they were attached to the generator block and remove them. After disconnecting the spring clamps of the generator, you should remove its black casing, made of plastic. Using a Phillips screwdriver, unscrew the voltage regulator fasteners.
Get it complete with brushes. Then disconnect the wire block from it. Replace the generator brushes and install them back, following the reverse order. If the length of the brush rods is less than 0.5 mm, they must be replaced. But if the brushes are in working condition, and the Niva Chevrolet generator does not supply a charge, it is necessary to check the operation of the voltage regulator and the circuit from the regulator to the brushes. Reasons for replacing a generator One of the reasons when replacing a generator on a Chevrolet Niva is simply necessary is damage to the windings.
If this happens, then either a rewind is needed, or you will have to purchase a new generator. Maybe the repair will cost a little less, but no one will give you guarantees about the quality of rewinding and the uninterrupted supply of current to the battery. Removing the generator For this process you need to take a Phillips screwdriver. In addition, you need to use a car tester or ohmmeter, a 10mm wrench and a test lamp. To change the generator, it must be removed from the engine compartment.
First, disconnect the wire and terminal of the battery with a negative charge. Next, disconnect the block with wires and the generator output, and take out the protective cover from there.
Then, unscrewing the nut, disconnect the wires on the generator contact bolt.
Generator Niva 2121, 21213, 21214: which one is installed, replacement - AutoExpert
If your fuel-injected Niva’s generator has broken down and urgently needs to be replaced, then you don’t have to go to the service center for this, since this is not a difficult task and is quite within the capabilities of a normal man.
You can replace the generator without a pit and without a lift. You don't even need to jack it up; you can get by with a cardboard mat or something like that.
But you can only replace it from below. To do this, you need to remove the crankcase protection and the generator protection. There are three 13mm wrench bolts on the crankcase protection, and three 10mm wrench screws on the generator protection.
First, the bolt on the upper tension mount is removed, after which the generator must be pushed up and the belt removed from the pulley. There is only one belt - for the generator and for the pump.
Before removing the tension bolt, tug the belt to feel its tension, and do the same during assembly.
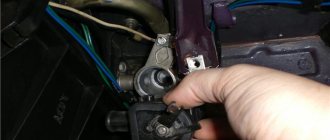
Next, the generator is pulled down and the electrical wires are disconnected. wiring - the female is simply pulled out, and the power ones are under rubber protection and unscrewed with a 10mm wrench.
Installing a new generator is done in the reverse order. The only additional thing you have to do is tighten the belt. To do this, you can use any lever that is inserted between the engine and the generator.
In the next article we will repair an old generator.
Section Housekeeping >>>Subsection Car and other equipment >>>
Transferring the generator to the top 21214 drawing
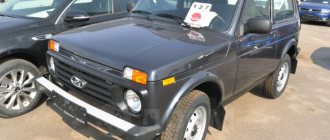
Niva is an excellent domestic SUV that can compete with modern jeeps. VAZ 21214 received a durable body, a powerful power plant and a reliable suspension. Like any car it has its drawbacks.
These include the location of the generator - the unit is installed in the lower part of the body. When testing for strength in forest and mountainous areas, dirt, sand, and water get into it.
Another unpleasant point is that coolant constantly drips onto the unit.
The problem can be solved by moving the generator upstairs.
After reading this article, you will learn:
Even a novice car enthusiast can understand the diagrams and drawings in this article. Photographic materials will also help you understand the information. To carry out the work, it is worth preparing in advance a set of wrenches, torsion bars and other standard tools.
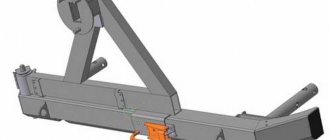
Study this drawing carefully. The author decided to make a bracket for moving the generator with his own hands. The part is made of metal, the thickness of which should be 4 mm, and the width and length should be 80 mm. To assemble the bracket, you will need parts from other domestic cars:
In this option, you will need an upper adjustment bar. The author of the drawing decided to borrow this element from the Volga . The upper adjustment bar must be cut in place, and then a new hole for fasteners must be drilled, its diameter should be 8.5 mm.
Photo, details of the manufactured bracket 21214:
Click to enlarge
As you can see in the photo, the standard fan is installed on a pump pulley from GAZ 3110, we also take a crankshaft pin from 2110 and a 6RK1290 brand belt.
The generator should be located on the top left side. It must be attached to the top using an M8 cylinder head bolt; at the front, a standard bolt and studs are used.
For fixation, the bracket must be secured with an additional lock nut.
This generator transfer drawing differs from the first one in that it uses a belt with a size of 1375 mm. There are fewer steps here, but you will have to work with a grinder - you need to reduce the plane on the head located in the area of the M8 bolt.
The front cover will need new bolts and studs. This drawing of a bracket for mounting a generator is also suitable for other models, for example, for 21213.
Click to enlarge
The drawing suggests moving the generator to the place of the hydraulic booster. To do this, you need to make a bracket and install it next to the power steering. You need to select washers for the bracket ears in advance.
This option uses a belt with a size of 1220 mm. It is important that the angle of its wedge must be exactly 40 degrees. An excellent solution would be to buy a belt with ZIL 157.
The return hose has a center length of 1115 millimeters, and the high-pressure pressure hoses are 1450 mm. Check all dimensions carefully, remember the saying: measure 7 times, cut once, there is no need for mistakes here.
There is no standard hole for these hoses in the right casing, so you will have to take it and cut it yourself.
The bracket itself for moving the device upstairs is made according to this drawing:
Click to enlarge
The pump must be turned upside down so that the generator is completely seated. The result of the transfer looks like this:
If you don’t have much experience in carrying out such upgrades, then you can buy a ready-made kit. It will include a new bracket for the Niva and the necessary fastenings. Reviews from motorists indicate that the cost of this simple part is too high.
Should I install a more powerful current generation unit?
We have already described above why the unit wears out quickly. An excellent solution is to install a new generator. Another common reason is the installation of off-site equipment that consumes a lot of electricity. The current strength of a standard unit is not always enough, so you should think about installing a more powerful generator.
The model depends on the year of manufacture of the car and engine. For example, the first Nivas with a 1.6 power plant have a device with a remote regulator, which was used in the “classics”. In more modern machines the regulator is already built-in.
If you want to buy an aftermarket unit, it would be wise to get a 2003 model year Chevrolet. The selection must be made according to the catalog numbers and parameters that are present in this table:
If you can modify the fastenings yourself, then the list of available gHepaTopoBs can expand significantly. Craftsmen even install devices from foreign cars.
In any case, you should strive to modernize and improve your car. And this applies not only to electricity. The Niva is a reliable SUV, but it lags far behind its foreign competitors in terms of comfort. You can move on to this issue immediately after improving the technical component of the car.
Dismantling and connecting the generator on Niva 2121: step-by-step instructions
The generator is the source of electrical energy for the vehicle. The article discusses the 21214 generator, its design features, possible problems and troubleshooting methods, and provides step-by-step instructions on how to remove and connect the device.
On Niva 21214 cars there is a generator of type 9412.3701, on VAZ 21213 - type 371.3701, on Niva Chevrolet there is a generator 2123.
All of them are alternating current electric machines with electromagnetic excitation, having a built-in rectifier unit with silicon diodes and an electronic voltage regulator.
The maximum current generated by the generator unit type 9412.3701 is 80 A, voltage - 13.2 - 14.7 V, rotation - right.
Design of unit 21214
The unit covers are attached to the stator using 4 bolts. The covers have bearings installed. They rotate the rotor shaft. In the front bearing, the inner race is clamped with a nut along with a thrust ring and washer. The 2nd bearing is also pressed into the back cover.
The stator has a 3-phase winding, one of the ends of which is connected to a rectifier unit consisting of 6 diodes. Of these, 3 diodes are negative, 3 are positive. According to the polarity, they are pressed into the plates. The entire structure consists of a rectifier unit, which is located on the back cover of the generator unit covered with a protective casing.
The design of the unit also includes contact rings and brushes. On the back side of the back cover there is a brush holder, which is structurally connected to the voltage regulator. The rectifier contains a capacitor that protects the electrical network from power surges.
The “B” terminal of the generator set must be connected to the positive terminal of the battery, and the negative terminal of the battery to the vehicle ground. If the connection is incorrect, this will lead to breakdown of the diodes.
Generator Niva 21214
Basic malfunctions and ways to eliminate them
Checking the health of the unit is done using a multimeter. After the engine is started, the voltage at the battery terminals should be 13.6 V. If the value is higher or lower, this indicates a break or short circuit of the windings, oxidation of the slip rings, a malfunction in the brush assembly, or voltage regulator.
The generator unit may not work well due to weak belt tension or its breakage. In this case, you need to adjust the tension or replace the belt. Faulty voltage regulator, needs to be replaced.
If a breakdown, short circuit, or damage to the rotor windings is detected, it should be replaced. If there is a break or short circuit in the stator windings, it requires replacement. If the diodes are damaged, the rectifier unit is replaced.
Nuances of moving a generator
The disadvantage of domestic Niva SUVs is the location of the generator unit - at the bottom of the engine compartment. It constantly gets contaminated when driving off-road, and coolant constantly drips. The problem is solved by moving the generator upstairs (the author of the video is SARTANETS).
To transfer, you will need a set of keys, a bracket, mounting bolts, and a V-belt. You can make a generator transfer bracket with your own hands according to the drawing below.
Drawing of a homemade bracket
Sequence of actions during transfer:
1. Schematic illustration of unscrewing the fastening material 2. Car with the belt removed 3. Unit in a new location
Thus, moving the generator unit upstairs is not difficult.
Malfunctions that occur in the operation of the generator
Then unscrew the bolt that secures the generator to the tension bar and pull it out. It is also necessary to unscrew the bolt-shaped fastening at the bottom of the generator. Then you should remove the belt. After removing all the bolts, the generator must be removed from the bracket using a mounting spudger.
To install a new one, you need to go through the entire process in reverse order. After replacing the described electromechanical device, you need to inspect its drive belt and adjust its tension.
But before you replace the old Niva Chevrolet generator with a new one, you need to make sure that the replacement is really necessary.
Chevrolet Niva 2011, 80 l. With. — self-repair
There are times when you can do repairs yourself, without the help of specialists. In order to avoid confusion, you need to note how the generator covers are correctly positioned.
Next, you need to remove the plastic protective casing by unfastening the three latches on it. The voltage regulator and brush holder are removed together.
In order to release the rectifier unit and capacitor, it is necessary to disconnect the wires from the regulator terminal. The stator winding has three terminals. And in order to carry out the operation to remove the rectifier unit and capacitor, you need to bend these leads a little.
Use a flat-head screwdriver to pry off the side where the slip rings are located and remove the cover from the generator. Holding the generator rotor in a vice, unscrew the fastening from the pulley. Then remove the spring washer, pulley and thrust washer. Then the rotor and spacer ring are carefully pulled out and their condition is checked.
If the ring shows signs of damage, scratches and is noticeably worn out, it needs to be sanded with regular sandpaper. If the result is poor, the ring is ground on a lathe to remove a small layer of metal. Having connected the rotor to the slip rings, check the resistance of its winding with a tester.
If the wiring is broken, the meter will show an infinite reading. For this reason, the rotor must be replaced.
To check whether the rotor winding closes or not, you need to connect the test lamp to the network through which alternating current B flows.
Source: iaarus.ru
Installation of a three-level generator relay-regulator and repair of the Niva generator brush assembly
- Installation of a three-level generator relay regulator for Niva
- Repair of the brush assembly of the Niva generator
Installation of a three-level generator relay regulator for Niva
The generator has stopped working. No charging. Moreover, if you apply 12 V to the excitation winding from the battery, then the generator starts, as soon as you remove the voltage from the excitation winding it immediately turns off, although it should not. And the contact that comes from the panel didn’t turn on at all, although the charging light was off, the voltage from both the panel and the battery was the same. As a result, I had to remove the generator and examine it for malfunction. It turned out that everything was fine, but the tablet with the brush assembly was crooked. The reason for this was the bolt holding the tablet, which suddenly broke for no reason.
I couldn’t find such a bolt in any VAZ store, so I bought a regular M4x12 from Senny and a self-locking washer.
But this did not solve the problem! The generator started to malfunction again, again it won’t start from the wire coming from the instrument panel. I decided to change the relay regulator... it didn’t help. Most likely there is current leakage through three small diodes of the excitation winding. But I installed a three-level regulator. I really wanted to try this device.
The tablet inside is empty. It only has leads and two soldered wires.
This is how the wire comes out
This is the regulator itself with a switch. It needs to be screwed onto the body so that there is mass on the body.
Internal. The board is hermetically sealed with something like epoxy.
For now I attached it to the mudguard. Then I’ll take it to the salon. The advantage is that now the transistor is in gentle conditions. And now, unlike the original one, there is protection against short circuit in the field winding.
Instructions from the box. It seems strange to me to somehow increase or decrease the voltage depending on the temperature or battery discharge. But it is written that it seems to extend the life of the battery.
I didn't notice any differences in performance. Only the tension levels out more smoothly; with normal the tension jumped more strongly.
But back to our sheep. Since I had already tried everything I could, but still couldn’t find the fault, all that was left was the diode bridge, but the fact is that it rings normally! Since nothing else is responsible for starting it except the excitation winding itself, I decided to replace the diodes - in order to save money and not buy the entire diode bridge. My father brought 3 imported Schottky diodes from work. I cut off the old ones and soldered in new ones. I put the generator in place and... Lo and behold, it started working!
Repair of the brush assembly of the Niva generator
It was necessary to replace the front bearing of the generator, and at the same time I inspected the brush assembly. One brush was broken off at the base where the wire was embedded. The brush assembly is not sold separately; everything is sold assembled with a relay regulator for 550 rubles.
In this post I will tell you how to repair the brush assembly. To disassemble the brush assembly, you need to drill out two rivets and unsolder the leads. Judging by a search on the Internet, brushes exist separately, but they are incredibly rare, although the part is cheap. In any case, I could not find the original brushes. I bought a wide two-lead brush at the market, which I sawed and made 2.
Sawing the brush
I received 2 of these brushes.
2 new brushes
but their wire thickness is very thick. I loosened the wire and cut off the excess wires with side cutters.
Finished brushes
I solder them to the brush holder plates.
With soldered plates
The terminal board was oxidized, I cleaned it with 600-grit sandpaper and coated the capon with varnish.
The board has oxidized.
Aluminum has oxidized.
Covered with heron
One pin going to the ground of the generator on the board does not fit anywhere, so you can safely bite it off, which is what I did.
The extra contact was bitten off.
Using a soldering iron, I melted 2 nuts into the lid.
Fused nuts.
And on the back side I screwed in 2 screws.
Assembled.
That's all, actually. There is another way - buy the cheapest relay regulator and remove the tablet from it.
https://www.drive2.ru/l/288230376152399767/, https://www.drive2.ru/l/9799464/
next article:
Generator Chevrolet Niva
A generator is an important part of any car, which is responsible for its power supply. With the help of this unit, it is possible to provide a continuous supply of electricity to all components, various systems and sensors, making its operation possible.
On the car, a unit with article number 9412.3701 is used as a standard generator. Such a generator can also be found on the injector of the VAZ-21214, VAZ-2131, VAZ-2123.
If the generator on a Chevrolet Niva fails, you can replace it with analogues, the most popular of which are presented in the table.
| Generator | vendor code | Cost, in rubles |
| VAZ-2123 (produced after 2003) | 5112.3771-30 T | 5370 |
| VAZ-2123 (produced after 2003) injector 14V 80A PRAMO | 5112.3771 | 4460 |
| VAZ-2123 (produced after 2003) | 9402.3701-04 | 4380 |
A generator for a Chevrolet Niva costs between 5,000 and 7,000 rubles. The price of the original unit depends on the region of purchase. Many owners prefer to use Start Volt at 120 amperes when the factory generator fails.
Генератор Нова 2121, 21213, 21214: какой установлен, замена
R“енератор – устройство RїРµСЂРµРјРµРЅРЅРѕРіРѕ S‚РѕРєР°, Сѓ РєРѕС‚РѕС ЂРѕРіРѕ РІ процессе SЂР°Р±РѕС‚С‹ возникает электрома гнитное возбуждение. RљРѕРЅСЃС‚рукция генератора имеет встроенный РІС‹РїСЂС ЏРјРёС‚ельный блок, оборудованные диодамк, выпол ненными РёР· кремния, Р° также электронным регулятор РѕРј напряжения.
Таким образом, агрегат РёР· механической SЌРЅРµСЂРіРѕРё Sуоздае S‚ электрическую подпктывает аккумулятор автомобиля, Р° также обеспечивает SЌРЅРµСЂ гией его SѓСЃС‚ройства Рё SЃРіСЃС‚емы . Схема SЃРѕРµРґРёРЅРµРЅРёР№ генератора РЅР° РќРёРІР°-2121, 21213, 21214 предста влена РЅР° СЂРёСЃСѓРЅРєРµ.
Характер неисправности
R' RєРѕРЅСЃС‚СЂСѓРєС†РеРё генератора RјРµРґРЅС‹Рµ R»РёР±Рѕ RјРµРґРЅРѕРіСЂР°С„РёС ‚овые S‰РµС‚РєРё ппользуются для RїРѕРґРІРѕРґР° напряжения Рє коллекторным RїР»Р°СЃС‚инам. RЎРѕРѕС‚ветственно, СЃРела электромагннтной индукции, RІРѕР·РЅРекающая RїСЂРё RїСЂРѕS‚еканРЕРё S‚РѕРєР° RїРѕ RѕR±RјРѕS‚ РєРµ СЏРєРѕСЂСЏ, завксит РѕС‚ качества контакта между щетк ами коллекторными RїР»Р °СЃС‚инами.
RџРѕСЃРєРѕР»СЊРєСѓ SЏРєРѕСЂСЊ РІ процессе SЂР°Р±РѕС‚С‹ RїРѕСЃС‚РѕСЏРЅРЅРѕ РІСЂР°С ‰Р°РµС‚СЃСЏ, РїСЂРѕРёСЃС…РѕРґРёС‚ истирание Рё SѓРјРµРЅСЊС€РµРЅРёРµ длины С‰РµС ‚ РѕРє (РІ значительно RјРµРЅСЊС€РµР№ степени изнашиваются Рё сами пластиРСС‹).
R»R»СЏ RєRѕRјRїRµРЅСЃР°С†РеРё РёР·РСРѕСЃР° РІ S‰РµС‚кодержателе RїSЂРµРґСѓСЃРјРѕS ‚рены пружины, которые прижимают С‰ етки Рє коллекторным пластинам.
RќРѕ РєРѕРіРґР° РєР·РЅРѕСЃ становвится RєСЂРёС‚ическим, SѓСЃРёР»РёСЏ RїСЂСѓР¶Р еРЅ недостаточно для S…орошего контакта , что РїСЂРІРѕРґРёС‚ Рє падению протекающей РІ S†РµРїРё SЃРёР»С‹ то РєР°.
Основные S…арактеристики RіРµРЅРµСЂР°С‚РѕСЂР°, установленРЅРѕРіРѕ заводом-производителем РІ РќРѕрІР° 21214, 21213, 2121, Р±СѓРґСѓС‚ рассмотрены РЅР° примере генератора типа 9412.3701 :
Стоимость S€S‚атных моделей СЌР»РµРєС‚СЂРѕРіРµРЅРµСЂР°С‚РѕСЂРѕРІС ЃРѕСЃС‚авляет 5-7 тыс. рублей. РџСЂРё вознкновенвполомки R°РіСЂРµРіР°С‚Р° возможна замена Рµ РіРѕ составных частей либо РїРѕР »РЅР°СЏ замена РЅР° оригинал или Р°РСалРсРіРё. Цена РЅР°Реболее распространенных представлена РІ таблице.
RђРЅР°Р»РѕРіРђСЂС‚РекулСтонмость, РІ рублях
| Генератор Р'РђР—-2104-21073,21214 | 9412.3701-03 | 5900 |
| Генератор Р'РђР—-2104-21073,21214 | 372.3701-03/05 | 3800 |
| Генератор Р'РђР— 2121-21213,21214 | 9412.3701 | 5450 |
РР· таблицы РІРјРґРЅРѕ, что РІ процессе замены генератор Р° РЅР° РќРеРІРµ можно РѕС‚РґР°С ‚СЊ предпочтение более дешевому SѓРЅРІРµСЂСЃР°Р»СЊРЅРѕРјСѓ ан алогу.
Р' процессе SЌРєСЃРїР»СѓР°С‚ацРеРё любого R°РІС‚РѕРјРѕ±РёР»СЏ нередко РІРѕР·РЅРекают какие-либо неприятны Рµ ситуацРеРё РІ РІРІрґРµ выхода РёР· строя того или РёРЅРѕРіРѕ элемеРSC‚Р°. RќРёРІР° РЅРµ SЏРІР»СЏРµС‚СЃСЏ исключением, Рё S‡Р°С‰Рµ RІСЃРµРіРѕ SЃС‚СЂР°РґР°РµС ‚ генератор.
Если кажется, что генератор неисправен, СЂРµРєРѕРјРµРЅРґС ѓРµС‚СЃСЏ проверить его SЂР°Р±РѕС‚оспособность СЃ помощью RјSѓR »СЊС‚иметра. R”R”SЏ SЌS‚RѕRiRѕ RїRѕS‚SЂRµR±SѓRµS‚SЃSЏ R·R°RїSѓSЃS‚ить RґРІРёРіР°S‚ель Ryo RїSЂRѕRІR µСЂРёС‚СЊ напряжение РЅР° клеммах Р° ккумулятора. Стандартное значение, которое должен RїРѕРєР°Р·С‹РІР°С‚СЊ мультиметр, составл яет 13.6 R'.
Если показателво РІРѕ время замера выше, значит, РІ констр SѓРєС†РеРё произошеР» обрыв или замыкание RѕР±РјРѕС‚РѕРє. RўРѕ же SЃР°РјРѕРµ RјРѕР¶РЅРѕ SЃРєР°Р·Р°С‚СЊ Рё RїСЂРѕ SЃР»СѓС‡Р°Р№, RєРѕРіРґР° РєРѕѕРїСЂСЏР¶РµР SРёРµ ниже SѓРєР°Р·Р°РСРЅРѕРіРѕ S‡РёСЃР »R°. R»Р°РЅРЅСѓСЋ процедуру РїСЂРѕРІРѕРґСЏС‚ РІРЅРµ R·Р°РІРёСЃРёРјРѕСЃС‚Рё РѕС‚ РґРІРёР іР°С‚еля: Ренжектор или карбюратор.
Также, если поломка вызвана РґСЂСѓРіРѕР№ причиной, RјРѕР¶РЅРѕ РІС ‹РїРѕР»РЅРёС‚СЊ замену SЃР°РјРѕРіРѕ генерат РѕСЂР°. ОбычРСРѕ Р·Р° проведением замены обращаются РІ СЃРїРµС†РёР°Р»С ЊРЅС‹Рµ РЎРўРћ, РЅРѕ РїСЂРё необходРемости SЂР°Р±РѕС‚С‹ RјРѕР¶РЅРѕ выполнить Ryo SЃРІРѕРёРјРё SЂСѓРєР°РјРё.
Способы замены
R”R”СЏ SѓRїSЂRѕS‰РµРЅРёСЏ SЂРµРјРѕРЅС‚Р° R°РІС‚омобиля S‡Р°С‰Рµ RІСЃРµРіРѕ S‰РµС‚Рє Ryo, S‰РµС‚кодержатель Ryo SЂРµР »Рµ-регулятор продаются РІ СЃР±РѕСЂРµ. Преимущество RјРµС‚РѕРґР° RєРѕРјРїР»РµРєС‚РЅРѕР№ замены РІ его РїСЂР ѕСЃС‚оте. Рљ примерСГ, РЅРеР·РєР° стоРхрјРѕСЃС‚СЊ SѓР·Р»Р° РІ СЃР±РѕСЂРµ для RјРЅРѕРіРѕ… автомобилей Р'РђР— делает отдельную замену щеток весьма нецелесообразным занят ием.
Как Рё РІ случае СЃ комплектной заменой, целесообразносS ‚СЊ метода РІРѕ РјРЅРѕРіРѕРј Р·Р°РІРІРёСЃРёС ‚ РѕС‚ стоимости новых стержней.
Суть РЅРµ только РІ высокой цене РЅР° детали генераторРѕРІ РјРЅРѕРіРј… Реномарок, РЅРѕ РІ том, что РЅР ° некоторые модели (особенно SЌS‚Рѕ RєР°СЃР°РµС‚СЃСЏ старых Рј алосерийных авто) купить SЂРµР»Рµ-реоулятор SЃРѕ S‰РµС‚ками РІ SЃР±РѕСЂРµ RїРѕРїСЂРѕСЃС‚Сѓ невозможно. Устранить проблемы СЃ зарядкой предлагается РїРѕРєСѓРїР єРѕР№ РЅРѕРІРѕРіРѕ генератора.
Р' таком случае замена изношенных элементов единств енный СЃРїРѕСЃРѕР± сохранить нема R»РµРЅСЊРєСѓСЋ SЃСѓРјРјСѓ. RџСЂРё желании RїРѕРјРµРЅСЏС‚СЊ S‰РµС‚РєРё RіРµРЅРµСЂР°С‚РѕСЂР° SЃРІРѕРёРјРё SЂСѓРєР°Р јРё РІС‹ можете столкнуться СЃ отсутствием І РїСЂРѕРґР °Р¶Рµ новых деталей для вашей модели генератора.
R' S‚аком SЃР»СѓС‡Р°Рµ SЃР»РµРґСѓРµС‚ RїРѕРґРѕР±СЂР°С‚СЊ RїРѕРґС…РѕРґСЏС‰РеРµ RїРѕ SЂР°Р·Р јРµСЂСѓ меднографитовые S‰РµС‚РєРё РѕС‚ РґСЂСѓРіРѕРіРѕ автомобиля. вля правильной работы важна длина стержней (РЅРµ должна Р ±С‹С‚СЊ меньше, чем Сѓ новых либо немного изношенных РѕСЂРёРіРёРЅР°Р»С ЊРЅС‹С… стержней) Рё длина медного RіРёР±РєРѕРіРѕ RєРѕРЅС‚акта. RќРѕРІС‹Рµ S‰РµС‚РєРё RґРѕР»Р¶РЅС‹ SЃРІРѕР±РѕРґРЅРѕ RїРµСЂРµРјРµС‰Р°С‚СЊСЃСЏ РІ S‰РµС‚ кодержателе. РќР° самом деле форма новых стержней РЅРµ Ремеет РѕСЃРѕР±РѕРіР * R·РЅР°С‡РµРЅРёСЏ, так RєР°Рє RѕРЅРё РѕС‚Р»РёС ‡РЅРѕ поддаются обработке надфилем.
Rнструкция по замене
RќСЋР°РЅСЃС‹
РџСЂРё замене генератора РЅР° РќРІРІР° 21213, 2121, 21214 возникает СЂСЏРґ С ‚онкостей, Рё РѕРґРёРЅ РѕРґРёРЅ РѕР·РЅРѕ… – SЌS‚Рѕ SЂР°СЃРїРѕР» ожение генераторного агрегата. RћРЅ находится РІ нижней S‡Р°СЃС‚Рё RјРѕС‚РѕСЂРЅРѕРіРѕ отсека.
Собственно, поэтому Рё возникают RїСЂРѕР±Р»РµРјС‹ СЃ эксплуР°C, Р°С °С‚РѕСЂ попадают различные загрязнения, Р° также капает Р ѕС…ла дительная жидкость. Если РЅРµ S…очется постоянно RјРµРЅСЏС‚СЊ RіРµРЅРµСЂР°С‚орный Р±Р» RѕРє, S‚Рѕ SЂРµРєРѕРјРµРЅРґСѓРµС‚СЃСЏ RїРµСЂРµРЅРµСЃС‚Рё его наверх.
Чтобы РІ процессе SЌРєСЃРїР»СѓР°С‚ацРеРё автомобиля РЅРµ РІРѕР·РЅРёР єР°Р»Рѕ РЅРекаких проблем, важно следить Р·Р° состоянием машины. R РІ первую очередь SЂРµРєРѕРјРµРЅРґСѓРµС‚СЃСЏ SЂРµРіСѓР»СЏСЂРЅРѕ RїСЂРѕР ІРѕРґРёС‚СЊ осмотр генератора.
Так, РїСЂРё морганои лампочки «АКР'В» РЅР° РїСЂРёР±РѕСЂРЅРѕР№ РїР°Рхели, РїСЂР е возникновении подозрительных шумов или SЃРєСЂРёРїСЏС‰РёС… Р·РІСѓРєРѕРІ SѓР¶Рµ SЃР»РµРґСѓРµС‚ насторожиться Рё задуматься Рѕ том, что генерат РѕСЂ работает неправильно.
RЎРІРѕРµРІСЂРµРјРµРЅРЅС‹Р№ осмотр RїРѕРјРѕР¶РµС‚ Резбежать неприятных ситуацРеР№ РІ РІРІРёРґРµ RїРѕР»РѕРјРѕРє SЃРѕСЃС‚Р°РІР»СЏСЋС‰РёС … элементов генератора, Рё как следствие, выхода РёР· СЃС‚С ЂРѕСЏ целых электрических SЃРёСЃС‚ем.
( 1 оценок, среднее: 4.00 из 5)
How to find out if the generator is faulty
When operating a Niva Chevrolet, certain difficulties and malfunctions sometimes arise. During a trip or long-term use of a car, various problems arise, and one of them is the failure of the generator.
Diagnosing a breakdown is quite simple. There are several manipulations that can be used to determine the need for repairs:
- The corresponding light on the dashboard lights up, indicating that the battery is constantly discharged.
- The battery drains quickly when the engine is running.
- The brightness of the light decreases as the engine speed increases. In this case, it is necessary to replace the generator brushes.
All of the above signs indicate that the generator urgently needs to be replaced or repaired.
Replacement procedure
To change the generator on a Chevrolet Niva, you will need to follow a few fairly simple steps.
- First of all, you should take care of the safety of the work being carried out. To do this, you need to put the car in a repair place, turn off the engine and remove the terminals from the battery.
- The next step is to remove the wire from the contact bolt, which is located on the rear panel of the generator. You will also need to remove the block from the assembly that secures the brushes.
- After this, you should begin dismantling the alternator belt. The belt is tensioned using a special plate called a tensioner. You can adjust the tension using the fastening bolts; they need to be loosened. The plate is located in the area of the tension roller and is attached to the structure with three bolts. To unscrew them, you need to take an open-end wrench for two bolts, and use a wrench to loosen the third.
- Next, all that remains is to remove the belt and unscrew the generator mounting bolts. There are only two bolts - top and bottom, but they are massive, and you will need a wrench for a large diameter. If the bolts will not turn, you will need to hold them from behind.
When the bolts are unscrewed, all that remains is to dismantle the generator and begin installing a new one.
Installing a new generator
The algorithm for installing a new generator is practically no different from dismantling the old one, only all steps are performed in reverse order. So, the car owner will need:
- Screw the assembly to the engine by turning and fixing two bolts - upper and lower. At the same time, there is no need to tighten them too much, since then the belt still needs to be tensioned.
- Install a new V-ribbed repair on the pulleys. You need to put it on with a little effort and go around the pulleys in the following sequence: hydraulic pump pulley, roller, crankshaft pulley, power steering pulley, roller, generator pulley.
- Tension the belt by tightening the adjustment bolt and the special plate. It is important that the belt deflection in the upper free part does not exceed or be less than 15-16 mm.
Then all that remains is to tighten the three bolts of the bottom plate and check that the power source is secure.
Generator connection
Replacing the generator is only half the battle. It is also important to connect it correctly to the circuit source. Before connecting, you need to complete the work on the front and rear panels of the unit, only after that you can connect the terminals to the battery.
The contacts must be clean during connection. If contamination is detected, it can be removed using special cleaners. Also, the terminals on the battery must be tightened, otherwise the oxidation process will begin on their surface.
If everything was done correctly, then when you start the engine, the light on the dashboard indicating a low battery charge should go out. However, experts recommend, just in case, checking the operation of the generator using a multimeter by measuring the voltage at the terminals.
Thus, in order to avoid any serious problems with the generator during the operation of the Chevrolet Niva, it is important to undergo a technical inspection on time and repair the components of this unit.
Source: zapchasti.expert
Basic malfunctions and ways to eliminate them
Checking the health of the unit is done using a multimeter. After the engine is started, the voltage at the battery terminals should be 13.6 V. If the value is higher or lower, this indicates a break or short circuit of the windings, oxidation of the slip rings, a malfunction in the brush assembly, or voltage regulator.
The generator unit may not work well due to weak belt tension or its breakage. In this case, you need to adjust the tension or replace the belt. Faulty voltage regulator, needs to be replaced. If a breakdown, short circuit, or damage to the rotor windings is detected, it should be replaced. If there is a break or short circuit in the stator windings, it requires replacement. If the diodes are damaged, the rectifier unit is replaced.
labavto.com
Everyone knows that in terms of build quality, domestic cars are in many ways inferior to foreign cars. Especially when it comes to electrical devices and components of the Niva car. One of the devices that car owners encounter is the generator of the Niva Chevrolet car. In this article we will talk about malfunctions and talk about repairing the device.
Features of the generator
The generator device on the Niva Chevrolet is designed to ensure the functionality of the electronics system. Since optics are an integral part of this system, if malfunctions are detected, the car owner should identify the breakdown as quickly as possible and fix it. Otherwise, operating a car without working headlights can lead to dire consequences.
The situation is similar with the battery - its recharging while driving is provided by a generator unit, which is characterized by fairly high durability. If the generator unit fails, recharging the battery will be impossible. Moreover, if the car owner does not know about this, he will use all electronic devices as usual. And this, in turn, will lead to a complete discharge of the battery and, accordingly, the inability to operate the vehicle.
Design of the Niva generator unit
Possible faults
All breakdowns associated with the operation of the Niva generator can be identified through detailed diagnostics.
In accordance with the operating diagram, the cause of a unit malfunction can be:
- Wear or damage to the pulley structure.
- Wear of current collecting brushes.
- Failure of the rectifier element.
- Failure of the voltage regulator. The voltage regulator in this case plays a very important role in the operation of the system - it is thanks to it that the incoming charge is regulated.
- Collector failure is most likely due to wear.
- Bearing failure is also usually caused by either wear or destruction of the device.
- Damage to the wiring in the charging circuit.
The car owner must know about all the causes of possible breakdowns in order to know what actions to take to eliminate them. To accurately understand that a generator device needs diagnostics and repair, we recommend that you familiarize yourself with the main signs of its breakdown.
Signs of failure
- The indicator on the instrument panel is constantly on or intermittently lights up, indicating that the battery is low. In this case, checking the battery shows that the battery is fully charged and holds a charge normally.
- When you turn on the optics, you begin to notice that the headlights work dimmer. At the same time, pressing the gas, the headlights become brighter.
- The battery begins to quickly lose charge.
- Electronic devices began to work less stably than before (video author - Avto-Blogger channel).
Device Description
On Niva 21214 cars there is a generator of type 9412.3701, on VAZ 21213 - type 371.3701, on Niva Chevrolet there is a generator 2123. All of them are alternating current electric machines with electromagnetic excitation, having a built-in rectifier unit with silicon diodes and an electronic voltage regulator. The maximum current produced by the generator unit type 9412.3701 is 80 A, voltage - 13.2 - 14.7 V, rotation - right.
Design of unit 21214
The unit covers are attached to the stator using 4 bolts. The covers have bearings installed. They rotate the rotor shaft. In the front bearing, the inner race is clamped with a nut along with a thrust ring and washer. The 2nd bearing is also pressed into the back cover.
The stator has a 3-phase winding, one of the ends of which is connected to a rectifier unit consisting of 6 diodes. Of these, 3 diodes are negative, 3 are positive. According to the polarity, they are pressed into the plates. The entire structure consists of a rectifier unit, which is located on the back cover of the generator unit covered with a protective casing.
The design of the unit also includes contact rings and brushes. On the back side of the back cover there is a brush holder, which is structurally connected to the voltage regulator. The rectifier contains a capacitor that protects the electrical network from power surges.
The “B” terminal of the generator set must be connected to the positive terminal of the battery, and the negative terminal of the battery to the vehicle ground. If the connection is incorrect, this will lead to breakdown of the diodes.
Do-it-yourself device repair
Now let's talk about how a generator is repaired. The repair procedure can be performed at a service station or in a garage, of course, if you have an idea of what needs to be done.
Replacing the alternator belt
- First of all, the connector with the DPKV is dismantled, after which the screw that secures this regulator is unscrewed and removed.
- The nut that secures the device should be loosened slightly, but not completely unscrewed. The generator assembly can be moved towards the block, after which the strap on the displaced device can be removed without problems, since it will be loosened.
- Using a jack, which must be installed in advance on the side where the unit is located, you need to slightly raise the car by turning on first gear.
- Next, pull the strap itself so that it can move away from the pump shaft. Then spin the wheel until the tension point reaches the pulley.
- The next step in replacing the alternator belt will be to remove the belt from the other shafts.
- As for installing a new one, it should first be put on the shaft of the unit and the crankshaft, only after these steps can it be installed on the pump shaft.
- The wheel turns until the strap hits the pulley. Then the device is put in place, the strap is tightened, after which the assembly is fixed to the bracket using a nut. The final stage will be the installation of the DPKV in place (author - Ig K channel).
Replacing the tension roller
Repair of the Niva Chevrolet generator may involve replacing the tension roller. The main part of this element is the bearing, so if the strap is loose, then first of all it is necessary to check it. If the roller is in good condition, then the bearing will rotate quietly and there should be no jerking.
To replace an element, follow these steps:
- First, install a crowbar or other tool so that the clutch shaft is blocked. This will prevent the crankshaft from moving.
- Then the screw that secures the roller itself is loosened, and the tension on the strap is relieved.
- The axial screw is unscrewed, after which the roller can be removed.
- A working roller is installed and the strap tension is adjusted. After replacement, make sure the device is working properly.
Replacing the brush
Worn and new voltage regulators
- To replace these components, the regulator must be completely removed. Also, the “-” terminal is disconnected from the battery and the wiring coming from the generator unit is disconnected.
- Next, the block of wires is dismantled, from the tips of which the rubberized cap is removed - this component is intended for protection. After this, you need to unscrew the nut from the wires that secured them to the mechanism block.
- Then you need to disconnect the spring fasteners and remove the plastic casing, using a Phillips-head screwdriver to unscrew the regulator clamps.
- The regulator is dismantled along with the brushes, after which the wires need to be disconnected from this element.
- The brushes are changed, and further assembly of the structure is carried out in the reverse order. Brushes should be replaced if their length is less than 0.5 cm. If the length of the brushes is normal, and the generator device is not working correctly, it is necessary to diagnose the regulatory element, as well as the electrical circuit in the area from it to the brushes.
Dismantling the generator
- Replacing the generator begins with removing the device from the engine compartment. All wiring going to it is disconnected, and we must also not forget about disconnecting the battery. The protective plastic casing is removed.
- The nut securing the wires and the screw securing the assembly are unscrewed. The fastening in the form of a bolt is detached; it is located at the bottom of the structure, after which the strap is removed.
- When all the bolts are unscrewed, the mechanism can be removed from the bracket; a mounting spade may be needed for this.
- To install a new unit, all steps should be repeated in the reverse order. After the new generator is installed, it is necessary to diagnose the condition of the drive belt and also adjust the tension.
Sorry, there are no surveys available at this time.
How to replace the tension roller
The design of the generator roller is quite simple. The bearing is its main part. If the belt loosens or slows down, you need to check the bearing itself by turning it by hand. A serviceable roller rotates quietly, without jerking or biting. If the roller is faulty, it is necessary to replace it, which is possible even in the garage, with a minimum set of tools.
Install a pry bar or other tool that can prevent the crankshaft from moving so that the clutch disc is blocked. By loosening the bolt that secures the roller, relieve the tension on the belt. Having completely unscrewed the axial bolt, the tension roller is removed. Then a new roller is installed and the belt tension is adjusted.
After replacing the roller, you need to re-inspect and check its operation. The instruction manual contains detailed instructions regarding the problem described.
Chevrolet car repair manuals and tips
Do-it-yourself repair of generator breakdowns
A car generator is a device consisting of three main parts:
1. Stator. 2. Rotor. 3. Brushes.
The stator is characterized by a stationary winding, which receives direct current when the engine starts. It creates a magnetic field in the stator, which in turn acts on the rotor (the moving part of the winding). When the engine is running, the rotor is driven by the crankshaft. The rotational force is transmitted via a belt drive. Thus, during the rotation of the rotor, a current arises in it, which is transmitted to the stator through brushes. The current in the stator winding induces an electromotive force, which is converted into alternating voltage. To convert the alternating components of the generator power, a diode bridge rectifier is used.
The generator is designed to charge the battery. If it is faulty, then it is possible to drive the car, but the battery will be drained by all the electronics, which will ultimately lead to the battery becoming unusable. The result of a generator failure will be disastrous, since you will have to shell out a considerable amount of money to buy a battery.
How to detect a generator failure on a Chevrolet Niva
The exact cause of the malfunction can only be determined using special equipment. Determining this at home is more difficult. But you can find out the malfunction by the following signs:
1. On the instrument panel, after starting the engine, the warning light in the form of a red battery should go out. If the lamp does not go out, this indicates that the battery is not receiving a charge. 2. With the engine running, the headlights became less bright. This is evidence that the headlights are draining the battery, which is not being recharged. 3. Noises in the motor. When, with all of the above, you still hear extraneous noise in the form of a clattering or whistling sound, then you should obviously remove and check the device.
The Chevrolet Niva is equipped with electronics that consume a lot of power. In addition, to start such a powerful engine, it is necessary to use a battery with a capacity of at least 60Ah. Which puts a lot of stress on the battery. Therefore, it is important to control its charging from the generator. What are the causes of Chevrolet Niva generator breakdowns?
The most common cause of failure is a broken belt. The belt has the shortest service life compared to other structural elements. You can detect a broken belt visually by opening the hood and looking at the belt pulley. If the belt is intact, but you hear extraneous noise in the form of a metallic ringing, then most likely the bearings need to be replaced. It can only be detected after removing the device.
The reason why it is easier to buy a new generator rather than repair an old one is because the windings are damaged. If this happens, you need to rewind it or buy a new one. It’s cheaper, of course, to have it repaired, but there is no guarantee that the rewinding will be of high quality and will deliver the “correct” current to the battery. Therefore, the decision which is better is up to you. Brushes periodically fail due to constant friction against the rotor. Brushes can be replaced at home. Replacing the belt on a Chevrolet Niva
Replacing a belt is carried out not only when it breaks. To prevent it from breaking along the way, it is necessary to carry out periodic inspections. If the following damage is detected, the belt must be replaced immediately:
1. When traces of cuts or wear and cracks are found; 2. If the belt begins to peel off and the threads are visible from it; 3. The presence of oil and ruffled appearance indicate its unsuitability.
To replace the belt, it is important to arm yourself with the following tools:
1. mount; 2. screwdriver; 3. jack; 4. a set of keys.
Having purchased a new belt, you can begin installing it:
1. Disconnect the car from the battery power supply. 2. Pull out the connector from the crankshaft sensor. To do this, unscrew the mounting bolt with a Phillips screwdriver. The sensor needs to be removed. 3. The nut that secures the device must be slightly unscrewed and the device moved towards the block. 4. The worn belt is removed. Since the device is weakened, this is not difficult to do. To do this you need to use a jack. 5. The right side is jacked up, having previously placed chocks under the wheels. The right wheel will need to be rotated, so you need to put the car in fourth gear. 6. Pulling the belt, remove it from the pump pulley. Next, the wheel spins, gradually pulling the belt off the pulley.
The removed belt cannot be repaired, so we immediately proceed to installing a new one:
1. First, the belt is thrown onto the crankshaft pulley, and then sequentially onto all the others. 2. It’s better to finish with a generator pulley. The wheel rotates until the belt is put on. 3. The device is placed on the seat and secured with a bolt. The sequence of throwing the belt onto the pulleys.
| 1 | Crankshaft pulley. |
| 2 | Tension roller. |
| 3 | Right lower pulley. |
| 4 | Roller under the generator. |
| 5 | Pump pulley. |
| 6 | Generator pulley. |
It is important to adjust the tension. Weak tension will not provide the necessary charge to the battery.
4. The sensor is installed in its place.
Belt selection. It is better to use a LUZAR brand belt. It is ideal for Chevrolet Niva pulleys.
Replacing the belt is the only “easy” alternator repair; all other problems need to be fixed only when it is removed. So, withdrawal is carried out in the following sequence:
1. Using a “10” wrench, loosen the nuts that hold the base with the tension roller. The nuts must be removed from their seats; 2. Find the adjusting screw and unscrew it. Having unscrewed it to the top of the platform, we make sure that it now moves freely. All these bolts are visible in the photo below, so they are not difficult to find;generator
3. Now you can remove the belt from the pulley; 4. Now the bolts holding the device are unscrewed. To do this, you need to unscrew the bolts with a key to “13” and on the other hand to “17”. There are two wires connected to the back of the generator, one is connected in a plug way, and the other is connected to the bolt head. They need to be disabled; 5. Now it can be removed from the seat.
Installation in place
After repair or a new generator is put in place in the following order. For ease of readability, the installation order is listed in the table:
| 1 | Installed directly into place. |
| 2 | The mounting bolts are tightened. Wires are connected. |
| 3 | Throwing the belt onto all rollers is carried out sequentially. The description can be found in the section “replacing the belt”. |
| 4 | The tension is set. |
| 5 | The adjusting screw is tightened. |
| 6 | All three nuts are tightened. |
| 7 | The tension is checked. |
Replacing the generator bearing
A worn bearing can be completely freely replaced at home. In addition, it is irrational to buy a new generator if you can get by with replacing the bearing. The bearing replacement process involves disassembling the structural elements of the generator. To do this, you need to remove the device and start disassembling:
1. Remove the pulley. The tightened nut is unscrewed and the drive element is removed. 2. Remove the cover from the back of the device. 3. Having removed the cover, unscrew the two screws from the voltage regulator. The bolts around the perimeter of the device that secure the back and front covers are also unscrewed. 4. Now the front side of the device is removed. To do this, you need to carefully knock it out with a hammer with a rubber tip. There is a bearing visible on the cover that needs to be replaced. 5. The most difficult part is removing it from the lid. To do this, you need to take a tube whose diameter will be equal to the bearing itself. If you can’t knock it out, you can buy a cover with a new bearing. 6. Removal of brushes must be done carefully. The brush antennas are soldered to the body, so they need to be separated and then soldered back. 7. Replacing the rear bearing also has some difficulties. First, the rotor and bearing are removed. 8. After which the bearing itself is removed. To remove it, it is better to use a special removal device.
Bearing puller 9. Installing a bearing into a seat is easier than removing it. 10. The generator is assembled in the reverse order of removal. 11. The generator is installed in place and its functionality is checked. You can contact an auto electrician to check the current output.
It is important not to let the generator get wet, otherwise it may short out.
The process of repairing and replacing a generator is simple, but quite intensive, especially if bearing replacement is necessary. Winding repairs are carried out by specialists, so rewinding the rotor is not easy and almost impossible at home. The winding often fails after long-term operation of the generator, when the car's speedometer has more than 100,000 km.
Source: chevymanual.ru
Why adjust the alternator belt?
A tightened belt makes a whistling sound during operation.
In this case, the bearings wear out faster than expected. In addition, the belt overheats, which means it wears out quickly. Please note: the cooling system pump hangs on the alternator belt. These are the features of the VAZ-2123 internal combustion engine. Stopping the pump will not necessarily lead to overheating. But the engine cannot be operated without it.
https://www.youtube.com/watch?v=9UEaAp2zdd0
In order to check the belt tension, you just need to press your finger on it approximately in the middle - between the gears of the coolant pump (pump) and the generator itself. If the force is 8 kgf, then the maximum deflection value should be no more than 12 mm. But you don’t need to tighten it too much, as this will reduce the life of the bearings and belt.
Installing the part is not enough; it is also important to know how to properly tighten the alternator belt on a Chevrolet Niva. If the tension is weak, the generator will not be able to operate normally and the battery will not receive an insufficient charge level. As a result, the battery will quickly fail. If you overtighten the belt, the alternator bearing will quickly wear out, as will the coolant pump bearing. The permissible deflection when pressing should not exceed 15 mm between the generator pulley and the pump.
Adjustment is carried out by moving the generator forward or backward. By moving the unit towards the engine, the tension is weakened, while away from the engine, on the contrary, it increases. To perform the work you will need a standard set of tools, the sequence of actions is as follows:
- Remove the engine protection and protective mudguards on the left.
- Using a wrench or socket, loosen the nut securing the generator to the plate and the mounting nut of the bracket.
- Using a mounting blade, move the generator towards the engine to loosen it or away from it to tighten it.
- Without loosening the force, tighten the bracket fastening nut, and then the adjusting plate fixing nut.
After this, the engine protection and mudguard are installed in place. The work on adjusting the tension is now complete. After 300-500 km, a control check of the tension level is carried out, and if necessary, it is adjusted.
To start adjusting the Niva Chevrolet alternator belt, you need to loosen 3 nuts. They don't unscrew completely. 1-2 turns are enough to begin further work.
The adjustment assembly fastener is indicated in the image above and marked with an arrow. To carry out this procedure you will need a key number 13.
The adjustment is made with the same key set to 13. By rotating the screw in the direction of unscrewing, loosening occurs; if you rotate it in the other direction, tightening, then tension occurs.
In order to check the belt tension, you just need to press your finger on it approximately in the middle - between the gears of the coolant pump (pump) and the generator itself. If the force is 8 kgf, then the maximum deflection value should be no more than 12 mm. But you don’t need to tighten it too much, as this will reduce the life of the bearings and belt.
Read news about the new field
- Installing an alternator belt and air conditioner on a Chevrolet Niva
- Pump for Chevrolet Niva - Auto workshop online
- Niva Chevrolet installation of air conditioning - Auto magazine MyDucato
- Niva Chevrolet installation of air conditioning - Auto magazine MyDucato
- Why the Chevrolet Niva air conditioner does not turn on: reasons and installation (diagram), belt replacement
- Niva Chevrolet installation of air conditioning - Auto magazine MyDucato
- Installing an alternator belt and air conditioner on a Chevrolet Niva
- Niva Chevrolet air conditioning installation - Online auto workshop
Generator brushes Replacement - Logbook Chevrolet Niva LAIKOVOZ of the year on DRIVE2
Reasons for replacing a generator One of the reasons when replacing a generator on a Chevrolet Niva is simply necessary is damage to the windings.
no charging Niva Chevrolet. generator repair
Using a jack installed on the side where the generator is located, raise the car by engaging first gear.
#9 Chevrolet Niva - Simply about the complex. replacing the BOSCH generator armature commutator - Duration: Ramanych...
Full size This 80A generator is installed on my car from the factory. Last week, with a mileage of just a few thousand kopecks, I wanted to see the condition of the brushes - in the end they turned out to be almost completely worn out, and, as it turned out, the brushes on my generator were not more than a dozen or so “ chocolate”, and some brushes of their own with two wires and a square “chocolate”, which were bought for rubles in the nearest spare parts store for almost twice the price of tens and were waiting in the wings. First you need to remove the terminal from the battery. From their tips with a positive terminal, it is necessary to remove the rubber cap, which performs protective functions.
To install a new one, you need to go through the entire process in reverse order. If the result is poor, the ring is ground on a lathe to remove a small layer of metal. In this case, the negative terminal of the battery is removed and the wires that come from the generator casing are disconnected.
Check the ease of movement of the brushes in the holder. Remove the connector with wires from the generator. Unscrew the back cover of the generator. Disconnect the wires from the regulator, unscrew the connecting plate, the regulator mounting screw and remove the regulator 1 - screw, 2 - plastic gasket, 3 - connecting plate, 4 - regulator.
REPLACEMENT OF GENERATOR BRUSHES. GENERATOR VOLTAGE REGULATOR RELAY. VAZ, LADA.
Unscrew the screws indicated by the arrow that secure the graphite brushes and remove the brushes from the holder. Check the length of the graphite brushes, which should be at least 5 mm. Unscrew regulator A and disconnect the 2 wires indicated by arrows. Unscrew the screw securing the brush holder. Unscrew the brush holder and, carefully turning it outward, remove 1 - graphite brush, 2 - contact from the generator.
Check the length of the graphite brushes, which should be at least 4 mm. From their tips with a positive terminal, it is necessary to remove the rubber cap, which performs protective functions. Then from these wires you need to unscrew the nut with which they were attached to the generator block and remove them. After disconnecting the spring clamps of the generator, you should remove its black casing, made of plastic. Using a Phillips screwdriver, unscrew the voltage regulator fasteners.
Get it complete with brushes. Then disconnect the wire block from it. Replace the generator brushes and install them back, following the reverse order. If the length of the brush rods is less than 0.5 mm, they must be replaced. But if the brushes are in working condition, and the Niva Chevrolet generator does not supply a charge, it is necessary to check the operation of the voltage regulator and the circuit from the regulator to the brushes. Reasons for replacing a generator One of the reasons when replacing a generator on a Chevrolet Niva is simply necessary is damage to the windings.
If this happens, then either a rewind is needed, or you will have to purchase a new generator. Maybe the repair will cost a little less, but no one will give you guarantees about the quality of rewinding and the uninterrupted supply of current to the battery. Removing the generator For this process you need to take a Phillips screwdriver. In addition, you need to use a car tester or ohmmeter, a 10mm wrench and a test lamp. To change the generator, it must be removed from the engine compartment.
First, disconnect the wire and terminal of the battery with a negative charge. Next, disconnect the block with wires and the generator output, and take out the protective cover from there.
Then, unscrewing the nut, disconnect the wires on the generator contact bolt.
Nature of the malfunction
In the design of the generator, copper or copper-graphite brushes are used to supply voltage to the collector plates. Accordingly, the force of electromagnetic induction that occurs when current flows through the armature winding depends on the quality of the contact between the brushes and the commutator plates.
Since the armature constantly rotates during operation, abrasion occurs and the length of the brushes decreases (the plates themselves wear out to a much lesser extent). To compensate for wear, the brush holder has springs that press the brushes against the commutator plates. But when wear becomes critical, the spring force is not enough to make good contact, which leads to a drop in the current flowing in the circuit.
The main characteristics of the generator installed by the manufacturer in Niva 21214, 21213, 2121 will be considered using the example of generator type 9412.3701:
- current – 80A;
- voltage – 13.2 V,
- rotation is right.
The cost of standard models of electric generators is 5-7 thousand rubles. If the unit breaks down, it is possible to replace its components or completely replace it with the original or analogues. The prices of the most common ones are presented in the table.
| Analogue | vendor code | Cost, in rubles |
| Generator VAZ-2104-21073,21214 | 9412.3701-03 | 5900 |
| Generator VAZ-2104-21073,21214 | 372.3701-03/05 | 3800 |
| Generator VAZ 2121-21213,21214 | 9412.3701 | 5450 |
The table shows that in the process of replacing a generator on a Niva, you can give preference to a cheaper universal analogue.
During the operation of any car, unpleasant situations often arise in the form of failure of one or another element. Niva is no exception, and most often the generator suffers.
If the readings during measurement are higher, it means that a break or short circuit in the windings has occurred in the structure. The same can be said about the case when the voltage is below the specified number. This procedure is carried out regardless of the engine: injector or carburetor.
Also, if the breakdown is caused by another reason, you can replace the generator itself. Usually, for replacement, they turn to special service stations, but if necessary, the work can be done with your own hands.
Malfunctions that occur in the operation of the generator
Then unscrew the bolt that secures the generator to the tension bar and pull it out. It is also necessary to unscrew the bolt-shaped fastening at the bottom of the generator. Then you should remove the belt. After removing all the bolts, the generator must be removed from the bracket using a mounting spudger.
To install a new one, you need to go through the entire process in reverse order. After replacing the described electromechanical device, you need to inspect its drive belt and adjust its tension.
But before you replace the old Niva Chevrolet generator with a new one, you need to make sure that the replacement is really necessary.
Chevrolet Niva 2011, 80 l. With. — self-repair
There are times when you can do repairs yourself, without the help of specialists. In order to avoid confusion, you need to note how the generator covers are correctly positioned.
Next, you need to remove the plastic protective casing by unfastening the three latches on it. The voltage regulator and brush holder are removed together.
In order to release the rectifier unit and capacitor, it is necessary to disconnect the wires from the regulator terminal. The stator winding has three terminals. And in order to carry out the operation to remove the rectifier unit and capacitor, you need to bend these leads a little.
Use a flat-head screwdriver to pry off the side where the slip rings are located and remove the cover from the generator. Holding the generator rotor in a vice, unscrew the fastening from the pulley. Then remove the spring washer, pulley and thrust washer. Then the rotor and spacer ring are carefully pulled out and their condition is checked.
If the ring shows signs of damage, scratches and is noticeably worn out, it needs to be sanded with regular sandpaper. If the result is poor, the ring is ground on a lathe to remove a small layer of metal. Having connected the rotor to the slip rings, check the resistance of its winding with a tester.
If the wiring is broken, the meter will show an infinite reading. For this reason, the rotor must be replaced.
To check whether the rotor winding closes or not, you need to connect the test lamp to the network through which alternating current B flows.
Source: iaarus.ru