Habit is a serious matter. Both used and relatively new 2106s will be in demand among the public for a long time. The car is over 40 years old, but people buy it and are happy. The point, apparently, is the lack of a reasonable alternative. The problems of the automotive industry will be the last thing that concerns us today. This same six, although ancient, is also a machine, with all its whims and requirements. There are not many of them, which is why they love the car for its endurance and unpretentiousness. And so that it not only drives, but also brakes effectively, the Italians came up with a simple hydraulic brake system, which is installed on all VAZ 2106s.
Important clarifications to the VAZ 2106 brake bleeding technology
If the brake bleeding process is carried out on a lift, it is necessary to block the rear circuit pressure regulator. To do this, simply install a screwdriver between the thrust plane and the piston.
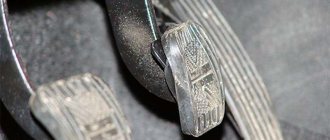
After bleeding the brakes, make sure that all air is removed from the system. To do this, press the brake pedal several times; if it has a normal working stroke and does not change it with subsequent presses, the operation was successful.
Feel the brake pedal and don't forget that stopping on time is sometimes more important than driving away quickly. Safe roads to everyone!
Removing air from the hydraulic drive
Bleeding the VAZ 2106 brakes should start like this: first, bleed the front circuit, and then the rear circuit. Partial bleeding is carried out only along the axles of the car, but not along the wheels. Removal and installation of the master brake cylinder ends with complete removal of air along all axes. When bleeding the brakes, it is recommended to work together with an assistant, since it is very difficult to do it alone.
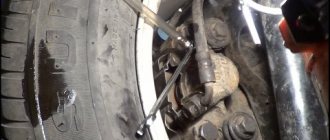
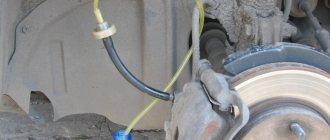
At the same time, you will need to press the brake pedal and relax the caliper fittings. To ventilate the front axle, the car is lifted and the wheels are removed. After this, check the fluid level in the GTZ tank and put a rubber or silicone tube of a suitable diameter on the caliper air fitting.
Its other end is placed in a glass container, into which a little working fluid is poured so that the end of the tube is immersed in it. First you need to slightly loosen the fitting with a size 8 wrench; if this fails, then use WD fluid to clean the threads.
After the preparatory work, you should press the hydraulic pedal 4-5 times, then keep it pressed, and at this moment release the fitting on the caliper. As a result, liquid will be released along with air into the jar. Subsequently, with the fitting released, it is necessary to press the pedal sharply until the air bubbles completely disappear from the tube.
To guarantee, usually press 2 times after the last bubbles appear. The pedal is again kept pressed, the fitting is tightened, after which a control pressure is applied and the next wheel is moved on. After pumping the front axle, work on the rear axle begins.
It is more convenient to carry out manipulations on a lift or inspection pit; in this case, you can do without removing the wheel. The operating algorithm is identical to the procedure on the front axle. It is important to control the fluid level in the tank, since with intense circulation, air may enter the gas cooler.
Then the work will have to be repeated all over again. There is a bleeding method in which you press the pedal 4-5 times with the fitting closed, and then squeeze it out and unscrew the fitting. Then they tighten it again and press the pedal another 4-5 times. Several cycles are carried out in this manner.
Carrying out work on rear mechanisms on VAZ classic models
First, let's look at how to properly bleed the brakes on a Classic. To perform the operation correctly, it is necessary to take into account that on the VAZ-2106 or any other model, the brakes are dual-circuit. That is, the entire system is divided into two independent parts. This was done so that if one of the circuits depressurizes, the second remains operational and the car can stop
But it is important to understand that the separation into circuits occurs on the master cylinder, and if air enters the system due to lack of fluid, then it will be in both components
For all classic models, including the VAZ-2107 brakes, the circuits separate the front and rear wheel drives. This must be taken into account when it is necessary to bleed the brakes of a 2101 or another model.
By the way, if only one circuit is aired, then it is not necessary to bleed the second one, although it would not be superfluous to treat all mechanisms, both front and rear.
So, everything is prepared, and you can get started.
The sequence of actions is as follows:
- It is better to drive the car into a pit to make it easier to get to the fittings. At the same time, he is immobilized using a handbrake or wheel chocks;
- Remove the cap from the brake fluid reservoir, check the level, and if necessary, bring it to the maximum level;
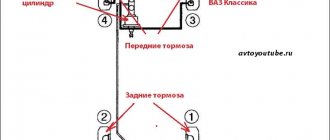
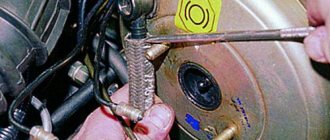
- First, we bleed the rear brakes of the VAZ, since the entire operation is done from the brake mechanism, which is as far as possible from the master cylinder, that is, from the right rear wheel;
- We put the assistant in the driver's seat. We climb under the car ourselves, put the key on the fitting, and then put the prepared tube on it, the second end of which should be lowered into a container with a small amount of liquid poured into it. It is advisable to immediately tear the fitting out of place and immediately screw it back, even before pumping. This is done so that there is no hitch in the process due to a non-unscrewing fitting;
- We ask the assistant to press the brake pedal 5-6 times. At the same time, with each press the failure will be less and less - the drive is pumped with liquid, while air moves to the mechanisms. After downloading the system, the assistant should hold down the pedal - press and hold it;
- Unscrew the fitting half a turn, working fluid will begin to flow out of it. If a transparent tube is used, air bubbles will be clearly visible in it, and the pedal being held will begin to move down until it hits the floor. In this position, the assistant must hold it, at this time the fitting must be screwed back;
- This sequence of actions should be carried out for one mechanism 4-5 times to completely remove air;
- On the “classic”, the left rear wheel is pumped next (since they are combined into one circuit). But before that, you need to check the level of the tank and bring it to the maximum level. The sequence of actions is the same: pump the brakes and hold the pedal - release the fitting to drain the fluid with air (the pedal goes down) - tighten the fitting - pump again. And so 4-5 times;
Note that this sequence of actions is identical for all cars. The difference lies only in some design features of the system itself.
When is brake bleeding required?
There are strict requirements that indicate the need to remove air from the brake lines. Typically, pumping is required in the following cases:
- repair and replacement of brake cylinders;
- replacement of VAZ brake hoses;
- replacement of highways;
- repairs associated with a violation of the tightness of the circuits or the fluid tank;
- after incomplete removal of air as a result of previous deaeration.
List of works that do not require further bleeding of the brakes:
- replacing brake pads,
- repairing drums or turning discs;
- adjusting the hand brake or repairing it.
Replacing VAZ pads does not involve interfering with the hydraulic drive itself. The VAZ master brake cylinder (GTC) may be the cause of unsatisfactory brake performance. To repair or replace it, it will be necessary to disconnect it from the main pipes, which will lead to air entering the circuits, therefore, after assembling the gas turbine engine and installing it, the system is de-aired.
Malfunctions of the VAZ 2106 brake system associated with the vacuum brake booster may require bleeding, since to remove the unit you will have to disconnect the turbocharger from the lines. In some cases, it is possible to remove the cylinder from the studs along with the fittings screwed onto it. Hydraulic bleeding may be required during a planned replacement of the system's working fluid. In this case, it is important not only to replace the fluid, but also to flush the system, monitoring the color of the fluid discharged from the bleeder fittings.
The VAZ brake circuit contains two independent circuits (front and rear), therefore, if one of them has been repaired, you can only bleed it without touching the other. However, if there is a deterioration in the braking response of the car, complete removal of air is carried out. Work on the right or left wheels of any circuit requires bleeding on both sides.
What kind of brake fluid is needed for a VAZ
All brake fluid has its own classification, which indicates its composition and properties. At the moment, there are several brands of TJ - DOT 3, 4, 5 and 5.1. There is also another outdated type of brake fluid BSK, which is still used on older cars.
- DOT 3 is made on a glycol base, which includes anti-corrosion and lubricating additives. DOT 3 is recommended for use on low-speed vehicles with front disc and rear drum brakes. DOT 3 brake fluid reacts poorly to negative temperatures and at -40 degrees its viscosity increases, which negatively affects the operation of the braking system. Therefore, it is extremely undesirable to fill in such liquid on cars operated in northern regions.
- DOT 4 is also made on a glycol basis, but unlike DOT 3 it contains additives that increase the boiling point of the brake fluid, which allows it to be used on high-speed cars, where during braking the slowing mechanisms are exposed to high temperatures.
- DOT 5 is made on a silicone basis and also has fairly high temperature conditions - 180-260 degrees. With and lower viscosity 900 sq. mm/s. DOT 5 brake fluid is more suitable for cars with powerful engines, which, as a rule, are used for fast and difficult driving.
- DOT 5.1 is made on a glycol base, but with the properties of DOT 5. Increased boiling point, more anti-corrosion additives, and low viscosity - 900 sq. mm/s., used on cars with powerful engines.
- BSK - this type includes all brake fluids made on the basis of Butyl Alcohol and Castor Oil, hence the abbreviation in the name. It has very low boiling readings for TJ (115-120 degrees C), as well as at – 20 degrees. It crystallizes, which renders the car’s braking system unusable.
Recommendations for performing work
The brake bleeding procedure usually involves inspecting the brake pads, discs and hoses. Brake pads must have the required minimum reserve, and microcracks are not allowed on the hoses. In the rear drums, it is necessary to maintain the adjustment of the brake pads (for an effective braking process).
A properly pumped hydraulic system produces equal force on each side of the vehicle when braking. If the car tends to change its trajectory, this indicates the presence of air in one of the sides.
Pushing to the right means there is air in the brake mechanisms on the left (and vice versa). The smaller the braking forces on one side, the greater the forces that tend to turn the car in the other direction. List of tools required for work:
- wheel wrench and jack;
- 8 key for fitting;
- rubber tube and jar;
- rags, WD fluid, pliers.
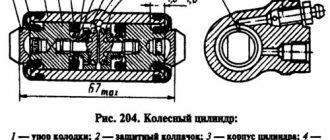
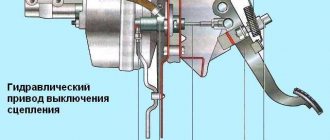
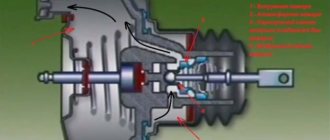
/> 1. Brake disc. 2. Front brake pad. 3. Piston O-ring. 4. Wheel cylinder piston. 5. Front brake wheel cylinder. 6. Brake hose of the front brake drive circuit. 7. Brake pad mounting pin. 8. Piston stroke limit screw. 9. O-ring. 10. Stop cup. 11. Rear brake drive piston. 12. O-ring spring. 13. Bushing. 14. Master cylinder body. 15. Front brake drive piston. 16. Seal. 17. Rod. 18. Vacuum valve. 19. Valve body return spring. 20. Valve body. 21. Diaphragm. 22. Vacuum valve body. 23. Vacuum booster housing cover. 24. Rod buffer. 25. Piston thrust plate. 26. Piston. 27. Vacuum booster valve. 28. Valve spring. 29. Valve return spring. 30. Air filter. 31. Valve pusher. 32. Pedal release spring. 33. Stop light switch tip. 34. Brake light switch. 35. Pressure regulator housing plug. 36. Pressure regulator piston. 37. Housing bushing. 38. Piston head seal. 39. Spring plate. 40. Piston spring. 41. O-ring of the pressure regulator piston. 42. Pressure regulator drive lever. 43. Rear brake pad. 44. Pad tension spring. 45. Rear brake wheel cylinder piston. 46. Piston spacer spring. 47. Wheel cylinder piston seals. 48. Brake pedal. 49. A. Vacuum cavity. 50. B. Channel connecting the vacuum cavity with the internal cavity of the valve. 51. C. Channel connecting the internal cavity of the valve with the atmospheric cavity. 52. D. Atmospheric cavity. 53. K. Hose. connecting the vacuum booster to the engine intake pipe. 54. I. The pedal is not pressed. 55. II. Braking. 56.III. The pedal is paused. 57. IV. Disinhibition.
A correctly performed bleeding procedure guarantees traffic safety and efficiency of the braking system of the VAZ 2106.
About flushing the brake system
A person’s life depends on the serviceability of a car’s brakes, and therefore diagnostics must be approached responsibly. The brake system requires periodic inspection. In addition, it needs to be washed from time to time, which many people don’t even realize. Most car enthusiasts will not even remember when their car had a complete brake fluid change. Moreover, there are often those who have not changed the fluid in the system at all since purchasing a new car.
Why flush the system?
Brake fluid tends to wear out over time, that is, with continuous use, over time it begins to lose its basic qualities. Brake fluid serves to transmit pressure through the master cylinder to the working cylinders when the pedal is pressed. In addition, it serves as a lubricant for the components and mechanisms of the hydraulic system.
Brake fluid is hygroscopic, meaning it can absorb water. This means that with constant moisture ingress, after several years of operation, the working fluid begins to boil at lower temperatures. This level can drop to the point where it boils even during moderate driving with infrequent use of the brakes.
The brake fluid that has absorbed moisture ceases to properly lubricate, and the pistons in the cylinders begin to heat up, the sealing collars overheat and leak, and when the brake fluid gets on the friction linings, it renders them unusable. The internal cavities of the cylinders are corroded by corrosion. All this is developing very quickly, and soon a complete repair of the brake system will be required, in particular, replacement of working elements. To avoid such unpleasant consequences, you can change the working fluid in a timely manner. It’s easier and cheaper than having to deal with repairs and replacement of components later.
Washing rules
The procedure for replacing the fluid is specified in the user manual. In addition, replacement is necessary when the fluid in the master cylinder reservoir becomes dark. In this case, flushing is required. To do this, you will need to purchase a special tool, although you can use a simpler method, namely, use a new TZ for these purposes.
There are several ways to wash it. You can use the services of a service station, where washing is carried out using special equipment. But the VAZ 2106 is easy to maintain, and you can wash it yourself in a garage. The work takes more time than turning to specialists, but the results are no less effective, and you will also be able to save money. The only thing you will have to fork out for is to buy a high-quality TZ. You need to take it with a reserve, as some will go away along with the old liquid. You will also need the help of a friend.
The procedure is as follows.
After washing, bleeding will be required, so you need to prepare a transparent silicone hose in advance, which can be pulled tightly onto the bleeding fitting on the cylinder. In terms of technology, flushing is very similar to pumping and is performed according to the same scheme. That is, you need to start with the left rear wheel, then move to the right front, the next will be the right rear and the last one to bleed is the left front. All liquid is pumped out of the tank. You can use a syringe or a medical bulb. If there is sediment or plaque on the walls, the tank should be removed and washed, or, in extreme cases, replaced. Next, fresh fuel fluid is poured into the tank. Then everything is the same as when pumping: one person sits in the driver’s seat and presses the pedal, the second unscrews the fitting and drains the brake fluid into a container
To avoid having to do pumping after washing, it is important to press and not release the pedal until the fitting is screwed in completely. Determining when to switch sides is very simple. This will happen when the color of the leaking fuel fluid changes, it becomes light
In this case, you need to carefully monitor the fuel fluid level in the master cylinder tank and periodically add it to the maximum.
Before starting this procedure, it is strongly recommended that you study the detailed instructions and read the repair and maintenance manual for the VAZ 2106. There are also methods of washing using compressed air and a compressor, with complete disassembly of all parts and washing by hand, but the result will be the same in any case.
How to bleed the brakes on a VAZ 2107 yourself Video, photo
VAZ-2106, main brake cylinder operating principle, design, repair
The brake system, like all automotive systems, requires periodic inspection and maintenance. In addition to monitoring the condition of the brake pads, it is necessary to periodically remove air bubbles that appear in the brake fluid. To remove air, the system must be bled. The operation can be performed without contacting service station specialists. This does not require special knowledge or qualifications. You will need a special tool and an assistant.
When is it necessary to pump the brakes of a VAZ 2107
It is necessary to bleed the brake system in four cases:
- Replacing brake fluid. Brake fluid has a limited service life. Over time, it absorbs moisture from the air, which can cause corrosion of the surface of the brake cylinders and their failure. Water also worsens the main property of brake fluid - it reduces the boiling point.
- The recommended service life of brake fluid on VAZ cars is 2 years, after which it is worth replacing it. This applies to standard glycol-based brake fluid.
- Troubleshooting the brake system. When replacing brake hoses and cylinders, brake fluid leaks and air enters the system. Therefore, after repair work, the VAZ 2107 brakes must be bled.
- Air ingress during operation. This manifests itself in deterioration in braking efficiency, a “soft pedal” or uneven braking of individual wheels.
What is needed to bleed the brake system
It is almost impossible to bleed the brake system yourself. The work is carried out by two people. One person (“mechanic”) works with the brake system, unscrews the fittings. The second (“partner”) is located inside the car and must press or release the brake pedal on command.
You also need the following tools:
- 8/10 socket wrench;
- a PVC tube or rubber hose, the inner diameter of which corresponds to the diameter of the fitting;
- container for collecting waste liquid.
- Brake fluid is also needed.
If cars are equipped with 8-mm wrench fittings, it is better to replace them with similar 10-mm hexagon fittings. The latter will subsequently be easier to unscrew without tearing off the edges.
How to bleed the brakes on a VAZ 2107
For ease of work and to ensure free access to the brake cylinder fittings, you should use an inspection hole. The design of the front brake mechanisms requires removal of the wheels to bleed the brake system.
Before starting work, it is necessary to fill the brake reservoir to the maximum, and during bleeding, you must ensure that it is constantly filled with brake fluid. If you miss this moment, air will get into the working cylinder and you will have to start work again.
The procedure for each of the 4 working cylinders is as follows:
- Remove the protective cap from the fitting.
- Loosen the fitting using a spanner. If the fitting has not been unscrewed for a long time, significant effort may be required. You must be especially careful not to damage the edges, otherwise the work may become very difficult, even to the point that the brake cylinder will need to be replaced.
- Place the tube on the fitting and lower it into the brake fluid container.
Direct pumping is performed as follows:
- The “partner” sitting in the cabin, at the command of the “mechanic”, presses the pedal all the way.
- The “mechanic” unscrews the fitting half a turn so that the liquid, along with air bubbles, comes out into the container through the inserted tube. The brake pedal “sinks” to the floor.
- The “fitter” tightens the fitting, and the “partner” releases the pedal on command.
The procedure is repeated until no more air bubbles come out of the tube. During bleeding, the end of the tube must be constantly lowered into the brake fluid so that air does not enter the cylinder.
In this way, all four working brake cylinders are pumped. A certain sequence should be followed when bleeding the cylinders. They are pumped “from far to near”:
- Right rear.
- Left back.
- Right front.
- Left front.
After completing bleeding of each cylinder, it is necessary to tighten the fitting and put on the protective cap.
Bleeding the brakes of a VAZ 2107 is quite feasible at home and does not require expensive special tools and devices. No special qualifications are required either. Even a child can release and press the brake pedal at the “locksmith’s” command.
Often, owners upgrade the brake system by installing more efficient, high-quality and expensive parts. However, this does not change the bleeding method in any way and does not eliminate the need for periodic work to replace the brake fluid.
https://youtube.com/watch?v=Zz5lBYsXajo
Is it possible to bleed the brake system without an assistant?
There are several ways to bleed the brake system without a partner. The simplest one is to take the expansion tank cap and modify it a little. To do this, install a fitting with a spool. You will also need a regular camera or wheel. You need to screw the cap onto the tank and install the tube onto the chamber fitting. Its second end is put on the fitting in the expansion tank plug.
And now briefly about how to bleed the brakes on a VAZ-2106 in this way:
- Press the brake pedal all the way and lock it.
- Unscrew the bleeder fittings on the wheel brakes one by one.
- Monitor the fluid level in the system - top up in a timely manner.
- When finished, tighten all threaded connections.
Try not to mix different types of liquids - this can lead to overheating in the system and unstable operation.
What is needed for pumping?
To bleed your brakes, you will need the following tool:
- Special key for 8 crimp type. That's what it's called - a brake pipe wrench.
- Open-end wrenches for 8 and 10.
- Jar - volume 0.3-0.5 liters.
- The tube is transparent - you can use the one that connects the windshield washer nozzles to the pump.
It is also necessary to have a supply of brake fluid. The system holds 0.5 liters. Therefore, it is advisable to buy with a reserve - fortunately, it is not very expensive, about 300 rubles per 1 liter. The rest can be used for topping up or at the next refueling.
The main nuances of pumping the brake system on VAZ 2110 cars
The correct algorithm for bleeding the system should be observed, taking into account the diagonal separation of the brake circuits. If you do not quite understand what the diagonal separation of the contours of the VAZ brake system is, just follow the following sequence of actions:
- bleed the system through the fitting of the rear right wheel, close it;
- go to the front left, follow a similar procedure;
- open the rear left fitting;
- We complete the procedure on the front right wheel.
After all work, be sure to check the tightness of all fittings. Ask your partner in the car to press the brake pedal to the floor, and you yourself, wiping the fitting with a dry cloth, visually check for any leaks. Make sure the brake hoses and lines are completely dry. Only after you have checked all the fittings do you put caps on them.
If after several days of driving the brake pedal again becomes sluggish and the performance of the brakes has worsened, you should not be overly upset. Most likely, shrinkage of the brake fluid occurred (re-foaming of the brake fluid and bubbling of the lines with air). This could happen due to corrosion of both the system itself and poor quality of the liquid itself.
Replacing brake fluid on a VAZ 2110 sometimes results in the above-mentioned problems. Nothing wrong with that. We call our partner back and repeat the pumping procedure again. Checking the brake fluid level. Afterwards you definitely shouldn’t have any problems.
The brake system is one of the important systems in a car, because without brakes it is impossible to imagine a single trip, even the shortest one. The brake system is made up of many parts, but the blood in its veins is brake fluid. We choose high-quality brake fluid for the VAZ 2110.
Why do you need to change the brake fluid? Brake fluid is used under difficult conditions, as a result of which, even during quiet driving, it can heat up to +150-180°C. New high-quality brake fluid copes with its duties without difficulty. But during operation it inevitably absorbs moisture, which causes the boiling point to decrease. As soon as the brake fluid collects a large amount of water, it can already boil at 145-160°C. What causes “vapor blocking of the brakes” is when, due to the sharp expansion of the formed bubbles, part of the liquid is squeezed into the reserve tank, and when the pedal is pressed, the liquid remaining below cannot create the required pressure, because is saturated with bubbles, and the pedal falls through. How to check the condition and level of the brake fluid? The brake fluid level is checked by the level on the barrel. The condition of the brake fluid is determined by its color. If it is darkened or has a rusty color, then it should be replaced.
How long does it take to change the brake fluid in a VAZ 2110? According to the regulations, after 45,000 km or 3 years, whichever comes sooner.
Which brake fluid to choose for the VAZ 2110? Brake fluid, like fuels and lubricants, should be purchased from a trusted brand and in trusted places, this way you will protect yourself from buying a low-quality product. When choosing, you can rely on a review of VAZ brake fluid. survey results or comments.
What type of brake fluid should I choose for the VAZ 2110? Brake fluid is classified into DOT 3, 4, 5 and 5.1.
- DOT 3 (glycol base) – for relatively low-speed vehicles with drum brakes or front disc brakes;
- DOT 4 (glycol base) – on modern high-speed cars with predominantly disc brakes on all wheels;
- DOT 5.1 (glycol base) - on road sports cars where the thermal load on the brakes is significantly higher.
- DOT 5 (silicone) is practically not used on conventional vehicles.
Glycol-based brake fluid absorbs water and corrodes paint. Silicone brake fluid does not absorb water or corrode paint, but requires good brake bleeding. Otherwise, all the moisture in the hydraulic system will accumulate in one place and can cause localized corrosion in the hydraulics.
Brake fluid compatibility All brake fluids are interchangeable in nature. That is, DOT 3, 4, 5.1 are interchangeable, and DOT 5 is only interchangeable with itself.
How to replace brake fluid in a VAZ 2110? You can change the brake fluid according to these instructions.
So, let’s vote and leave reviews about brake fluid for VAZ 2110-12:
- What brand of brake fluid did you choose?
- What type of brake fluid do you use?
- What brake fluid was added before?
- How often do you change the brake fluid?
- Impressions and comments on brake fluid?
ps Off-topic comments will be deleted.
How to bleed brakes on a VAZ 2107
It is impossible to overestimate the importance of high-quality brakes for a car, because they are one of the most important vehicle systems responsible for the safety of the driver and passengers while driving.
The quality of the brakes affects the distance required to completely stop the car in the event of a dangerous situation. Therefore, the car’s brakes must always be kept in good condition and regularly carry out preventive measures and promptly eliminate any malfunctions that arise during the operation of the vehicle.
If microcracks have formed in the brake system, through which brake fluid constantly leaks, it is necessary to eliminate them as soon as possible. In addition, after replacing a part of any unit, it is necessary to bleed the entire system so that there are no air bubbles in the fuel fluid
This is very important, since airborne fluid significantly reduces the effectiveness of the brakes. This is caused by the chemical properties of the brake fluid, which is highly incompressible.
In the VAZ 2107, the brake system consists of a rear and front circuit. This design allows you to maintain the functionality of one circuit in the event of failure of another as a result of depressurization or various types of mechanical damage.
What do you need for pumping?
In order for the process of bleeding the brake system to occur without any problems, it is necessary to prepare in advance all the necessary equipment that will be needed to complete all the work. The first thing you need to do is find an assistant who will help pump the system, since it will be very difficult to do everything yourself. It will take two people several hours to complete all the work, so we can only guess how long it will take one person. Next, you need to go to a car store and buy a can of brake fluid of the same brand that is currently used in the car. It is worth noting that the use of different models of fuel fluid is extremely undesirable due to differences in the chemical and physical properties of the liquid. You also need to prepare in advance a large container into which the aired brake fluid will be drained, and a hose about half a meter long for draining the brake fluid. It is recommended to use a hose made of transparent material, as this will make it much easier to detect air bubbles. The last thing you need during the bleeding process is a set of wrenches.
It is worth noting that in the seven, unlike many other car models, you do not need to hang the rear wheels, as this will block the pressure regulator and the brake fluid will not flow out through the hose. But it is recommended to remove the front ones so that they do not interfere with the work process.
Execution of work
So, the assistant is ready, all the necessary tools are at hand, so you can proceed directly to bleeding the brakes. It will be very easy to do this on the seven, even for inexperienced car enthusiasts. First of all, we place the vehicle on a jack, placing a wooden board under the cross beam to soften and eliminate various types of damage.
Bleeding the brakes on the seven is carried out in a certain sequence. The rear right wheel comes first. Your partner will need to press the brake all the way down repeatedly, about 20 times. When pressed for the last time, the pedal is locked in the recessed position. Once this is done, the second person puts on the hose and opens the fitting slightly. At this moment, aired liquid will flow through the hose, which must be drained into a pre-prepared container. After the brake fluid has completely drained, the fitting is tightened and the brake pedal is released.
The rear left wheel is pumped in the same way, after which you can move to the front circuit. It is worth noting that when bleeding the brakes, it is necessary to monitor the fluid level in the expansion tank. If it falls, it must be replenished to the specified level.
Once the brakes on all four wheels have been bled, the master cylinder will bleed. This procedure is also done by two people: one person holds down the brake pedal, and the second one bleeds air at this time. This concludes the procedure for bleeding the brake system; however, for further use of the vehicle, it is necessary to check the quality of the brakes. If any problems are found, the above procedure must be followed until high brake reliability is achieved.
Damage and strange sounds
If any units are damaged during the occurrence of the problem, they must be replaced with new ones. If the brake disc produces runout with an increase of 0.15 mm, then it needs to be ground, and if it is already less than 8-9 mm thick, then it’s time to replace it. The next problem with the braking system is situations where the car pulls too far to the side when braking. This occurs in cases where there may be a leak from the cylinder.
To prevent brake fluid from leaking, you need to change the seals. To fully check the circuit requires bleeding. In this situation, the pistons themselves from the cylinder may jam. They need to be checked on time. Make sure the parts are intact. If the brake system units are clogged, it should be cleaned. It is imperative to check all drums, linings, discs, as they can become clogged. All parts of the system require timely cleaning.
If the regulator responsible for the pressure level is not adjusted correctly, then you need to adjust it and set it correctly. If its diagnostics and adjustment show that it is out of order, the unit needs to be replaced. If the cable is damaged, the handbrake may stick, which will affect the efficient operation of the entire vehicle, so the cable must be replaced. You need to completely replace the VAZ handbrake if the entire mechanism is damaged and the handbrake fails.
With increased pressure on the brake pedal, there may be problems with air filters, booster valves, hoses and the seal itself. To eliminate all problems, you need to check these units, clean them, and if they break down completely, parts need to be replaced.
If you hear sounds (creaking) in the brakes, this may be caused by weakening of any parts, springs, wear, breakage, contamination, or too much beating of the brake disc. All these elements need to be checked, tightened, cleaned or replaced. Monitoring the operation of the braking system allows you to study the design and ensure safe operation of the vehicle.
labavto.com
The braking system is an important part of a vehicle. To ensure the safety of the driver and other road users, it must always be in good working order. Therefore, it is necessary to monitor its condition and correct faults in a timely manner. To do this, you need to know its structure, symptoms of problems and how to fix them.
Purpose and design of brakes
The VAZ 2106 has two braking systems: service and parking. The primary one is equipped with a hydraulic drive; it includes a vacuum booster, central brake and working cylinders, and a brake pressure adjusting device. It is designed to provide braking while the car is moving by blocking its front wheels. The second operates thanks to a mechanical drive after the car stops, blocking the rear wheel pair. The working system consists of two circuits that are activated by a brake pedal attached to the front panel of the body.
The operating principle of the primary system is simple. The driver presses the brakes, and pistons connected to the brake pads extend from hydraulic cylinders. They squeeze the disk, it rotates more slowly until the machine comes to a complete stop. Thanks to these actions, the car brakes smoothly.
The parking brake includes a cable, brake lever, and C-shaped shoes. The principle of its operation is slightly different. When the handbrake is applied, the hydraulic cylinders extend the pistons. They act on the brake pads, which move apart and press on the drum from the inside, fixing the rear wheels, which prevents the car from moving.
Typical brake system problems
If problems arise with the brakes, they are manifested by the following symptoms:
- the car brakes incorrectly and at the wrong time;
- the car skids while braking;
- the car brakes slowly and ineffectively;
- When using the handbrake, the cable gets stuck.
The car brakes untimely when the engine is still running and the car starts to brake. A breakdown of the vacuum booster can cause a malfunction. Air enters the system through it. In this case, the seal or protective cover is worn out. The assembly may have been performed incorrectly. To eliminate the problem, it is necessary to completely replace the amplifier. The reason may be a lack of lubricant, so when replacing it, you need to generously lubricate the seal by first unscrewing the cap.
How to determine if your brake fluid needs to be replaced
As a rule, the manufacturer, in the list of work performed during scheduled maintenance, determines its brake fluid replacement interval for each vehicle individually. For example, on VAZ cars this interval is 45,000 km. mileage or at least after three years of operation. The replacement period may also be affected by the type of brake fluid and the design of the brake system.
However, car owners are recommended to carry out visual inspection of the fluid from time to time, and they should pay attention to its color. If, looking into the brake fluid reservoir, you see that it has a dirty tint, this indicates that some elements of the brake system drive are worn out, accordingly, in this case, a complete diagnosis is recommended
If the liquid has a brownish tint, this is a sign that it contains water. In any of the above cases, the brake fluid needs to be replaced.
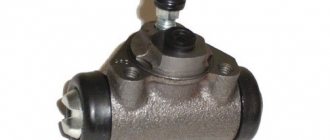
Replacing brake cylinders in VAZ 2106 calipers
The following must be said right away: repairing working cylinders on a VAZ 2106 is a completely thankless task. The only situation in which it is advisable to do this is if the cylinder is corroded or heavily soiled. In this case, the cylinder is simply thoroughly cleaned of layers of rust and installed in place. And if the breakdown is more serious, then the only option is to replace the cylinders, since it is not possible to find spare parts for them on sale. Here's what you'll need to get started:
- a set of new brake cylinders for VAZ 2106;
- flat screwdriver;
- bench vice;
- hammer;
- mounting blade;
- small crowbar;
- open-end wrenches, set.
Sequence of operations
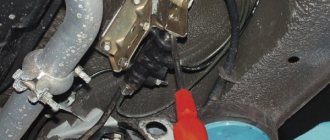
To get to the damaged cylinder, you will first have to jack up the car and remove the wheel. This will give you access to the brake caliper. This caliper will also need to be removed by unscrewing the two mounting nuts.
- After removal, the caliper is screwed into a bench vise. Using a 12-mm open-end wrench, unscrew a pair of nuts holding the hydraulic tube to the working cylinders. The tube is removed.
Video: changing the brake cylinder of the “six”
When to change hoses
By regularly diagnosing the system, it is easy to understand when it is time to change spare parts:
- The appearance of cracks in the braid.
Cracks in the braid To see them, just bend it a little. The size of the crack does not matter; even the smallest tear length can quickly lead to serious wear. - The appearance of liquid near the tips.
- Violation of the integrity of the part, the appearance of frayed areas.
Integrity violation - If the brake fluid starts leaving the reservoir too quickly.
- If the car has just been purchased secondhand.
Any of these reasons is a good reason to replace old spare parts with new ones.
Brake hoses
How to properly install pressure springs
This question has divided all professional car mechanics into two camps. Some argue that it is correct to install from the brake disc side, as shown on the left side of the screenshot below, others - from the brake cylinder side, as shown on the right.
The first ones say - there is no difference, the main thing is that they press the pads and do not let them “rumble”. The latter explain it this way: if you install “gulls” on the disc side, then with their edges they will press the brake element against the disc, increasing wear on the friction clutch. If you install it with the side facing the cylinders, they seem to move them apart; they do not come into contact with the disk, so there is no wear during movement.
If you think logically, then the second part of the people is right. The springs have a design in which they, with their rounded edges, attract the pads in the direction of their installation. Therefore, if you place the springs on the inside, their edges will slightly press them against the disk - they will wear out faster. If from the inside, then there will be no such effect.
Video on how to shoot a classic in a garage:
Self-pumping using the example of a VAZ-2110
On the Lada “Ten” everything is done in the same way as on the VAZ 2108-21099 models, since the design of the brake system is the same. Therefore, let’s look at how to bleed the brakes on models 2110-2112 yourself, without help.
To do this, you will need to use one additional element - an aerator, which you can buy or make, and a rubber hose with ends on both sides for connection to the nipple.
A homemade aerator is a lid from a “classic” brake reservoir (without a built-in sensor), into which a nipple from a tubeless wheel is installed.
The essence of pumping yourself is very simple and it is done like this:
- The car is immobilized. A bleeding hose is put on the fitting of the brake mechanism that is being pumped;
- The aerator is screwed onto the brake reservoir, and one end of the hose is connected to it. The second one is put on the nipple of an inflated car wheel (for example, a spare tire);
- Unscrew the fitting half a turn. In this case, the air pressure from the spare tire will begin to squeeze out the liquid. All that remains is to monitor when liquid flows through the tube without air bubbles, and tighten the fitting;
This way all mechanisms are pumped. The air pressure of one wheel is enough to completely bleed the system;
But there is one nuance in this - the pressure supplied to the tank should not be very high (no more than 1 atm). Otherwise, there is a risk of the lid falling off or the tank being damaged.
Bleeding the brakes using the described methods is also applicable for more modern VAZ models - 2114-2115, Priora, Kalina. And all because the design of the brakes is completely identical.
Using a rubber syringe
Many car enthusiasts do not know how to bleed the brakes on a VAZ-2106 using a rubber syringe. Therefore, let us dwell on this issue in more detail.
A hose of suitable diameter must be placed on the syringe spout. It is best if it is completely transparent. But if you don’t have a transparent hose at hand, it doesn’t matter, you can use what you have.
The syringe is compressed as much as possible. The main essence of this task is to make sure that the least amount of air remains in the syringe. Having fixed the device in this position, a fitting is put on the free end of the hose.
The syringe should be hung in such a position that the hose coming from it is in a vertical position.
Now you need to press the brake pedal quite sharply 3-5 times. But you should release the pedal slowly. This will create excess pressure in the car's brake system. Then we unscrew the fitting a little and through the transparent hose we observe how the brake fluid along with air is sucked into the syringe. In order to completely bleed the brake system of your VAZ-2106 yourself, you will need 2-3 similar approaches.
The only thing left to do is to disconnect the device from the fitting and drain the liquid from the syringe into a jar. A similar action should be performed for each individual wheel.