Lada Vesta became the new flagship of AvtoVAZ in 2015. External design, interior and equipment began to differ radically from all previous models. For the first time in many years, the new product was able to compete with the most popular foreign cars from Europe and Asia. Moreover, Vesta is not inferior to them in quality, and in some cases can give them a head start.
The clutch pedal clicks
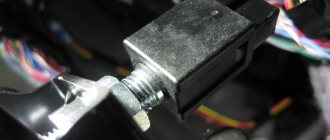
If a metallic click appears when the clutch pedal is released, then the reason may be in the mounting axis of the clutch master cylinder rod. The axle may move along the thread and make strange sounds.
To solve the problem, you need to insert the tip of a flat-head screwdriver into the gap between the head of the rod (No. 2) of the clutch master cylinder and the clutch pedal (No. 1) and, overcoming the resistance of the clamps (No. 3), disconnect the rod from the clutch pedal (flat-head screwdriver). Place a washer under the tip to prevent it from fidgeting.
Or get rid of the plastic clips and install a lock washer.
Have you encountered a similar problem on Lada Vesta? How did you manage to solve it?
Source
Total
If it clicks when releasing or tightening the Lada Vesta clutch in the cabin, the reason may be the limit switch, pedal holder or hydraulic cylinder design. More serious knocking noises in the engine compartment - less often the dealer will refuse to find out the cause, as this may indicate a malfunction of important parts: springs, release bearings, working cylinder.
As a temporary solution to the problem of heavy knocking, drivers use the accelerator. You need to adapt to this: when the clutch is released, the driver gives more gas and the knock disappears. Typically, such actions indicate defects in the media release manual.
Lada Vesta became the new flagship of AvtoVAZ in 2015. The appearance, interior and equipment are radically different from all previous models. For the first time in many years, the new product was able to compete with the most popular foreign cars from Europe and Asia. In addition, Vesta is not inferior to them in quality and in some cases can give them an advantage.
The clutch pedal of Lada Vesta, Largus, XRAY has failed: what to do?
When operating cars with a hydraulic clutch (Lada Vesta, Lada Largus, Lada XRAY, a number of Nissan, Renault models, etc.), when you press the clutch pedal, you can hear a loud click under the dashboard in the pedal area. After this, the clutch pedal falls to the floor. We will understand the causes of the malfunction, as well as how the design can be improved to prevent this problem from occurring again.
Cause of a failed clutch pedal
— a breakdown of the plastic retainer, which causes the clutch master cylinder rod to fly off the pedal axis. As a temporary solution, you can snap the rod into place to get there, but it will still fly off in the future.
At the service station you will be asked to replace the clutch master cylinder assembly with a new one:
- for Lada Vesta - article number 8450007300, price from 1200 rub.
- for Lada Largus - article 306107623R, price from 2200 rub.
- for Lada XRAY - article 306104118R, price from 1900 rub.
In order not to replace the part with a new one, it is proposed to modify the fastening. It will be cheaper and more reliable. It is not necessary to remove the clutch master cylinder.
- washer 10 (3mm thick);
- lock washer for 8 (or fixation washer with petals, article number 8200748573);
- lithol or other lubricant.
- Remove the rod from the pedal axle.
- Using pliers, bite off part of the plastic from the rod along with the latches.
- Lubricate the connection between the rod and axle with lithol.
- Install the washer and snap the lock washer into place.
The refinement process is also shown in the video:
After modification, it was also noted: the disappearance of creaking when squeezing the clutch pedal, and the pedal itself began to be pressed more softly and without rattling.
Have you ever experienced clutch pedal failure? How did you solve the problem?
Source
The problems get worse and it becomes impossible to drive
I planned to solve all the problems with the box before the May holidays, so that I could go to Riga without hassle. It didn't work out.
The already painful nine-hour wait in traffic jams at the border was aggravated by the fact that every start of the heated car was accompanied by the most disgusting shaking. We were really afraid of getting stuck at the border at night with a broken box.
By nine thousand kilometers, manipulating the gas at start stopped helping. As a result of this, the car was guaranteed to twitch when starting from a standstill. Moreover, the jerking appeared when driving in reverse. And they were so strong that before parking I had to take the girls out of the car so that they would not hear the obscene language with which I was commenting on what was happening.
Starting uphill or with the wheels turned completely out also caused strong vibrations. In general, it was impossible to operate the car.
The clutch pedal clicks
If a metallic click appears when the clutch pedal is released, then the reason may be in the mounting axis of the clutch master cylinder rod. The axle may move along the thread and make strange sounds.
To solve the problem, you need to insert the tip of a flat-head screwdriver into the gap between the head of the rod (No. 2) of the clutch master cylinder and the clutch pedal (No. 1) and, overcoming the resistance of the clamps (No. 3), disconnect the rod from the clutch pedal (flat-head screwdriver). Place a washer under the tip to prevent it from fidgeting.
Or get rid of the plastic clips and install a lock washer.
Have you encountered a similar problem on Lada Vesta? How did you manage to solve it?
Source
Fast and Furious is messing up and the second conversation with AvtoVAZ
Two weeks after my previous visit to the service, I did not have any information about the clutch that appeared. In the end, I called Forsazh myself and found out that the clutch had arrived a long time ago and the manager simply forgot to call me. But they can only sign me up a week in advance, because the work is “long and complex for the whole day” (quote). In total, I waited three weeks for something unknown. The clutch for the best-selling car should have been available in a warehouse in the region. Damn the service!
On a wave of indignation, I decided to contact AvtoVAZ again and complain about the operation of the afterburner. I also asked them about the situation with replacement cars during repairs and all that. But this call had no consequences.
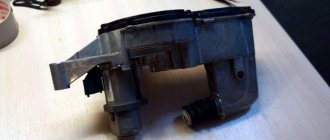
Replacement and repair of the AMT clutch actuator on LADA
The main distinguishing feature of an automated transmission (AMT or “robot”) from a mechanical one is the electric actuators produced by ZF, which change gears at the command of the electronic “brains”. The manufacturer claims that the actuator unit is maintenance-free and cannot be repaired, but craftsmen have found a way to repair it with their own hands.
If the car’s warranty has already expired, then replacing the clutch release mechanism actuator yourself will cost tens of thousands of rubles (article numbers: 21820160901200 and 21820170501200). In an attempt to save money, you can try to repair it.
Difficult to diagnose on a cold car
As luck would have it, on the day of the service visit it was cool, and the car, left overnight in the cold, refused to twitch. During demo runs with a warranty engineer in the passenger seat, I was able to generate only moderate vibration during braking.
The engineer agreed that there was a problem and said that the clutch was to blame. He also said that my appeal on the website could help convince AvtoVAZ to make a replacement, but the problems needed to be demonstrated more clearly. Otherwise, the Zhigulists might not have believed it.
For the demonstration, it was necessary to shoot a video of the car jerking. The first video is a view of the dashboard from the interior during vibrations. The second video is driving with the hood open.
And this is what Rituska and I came up with:
This video had to be sent by mail or brought on a flash drive. The second option seemed more reliable to me. So they did not have the opportunity to refer to the fact that the letter “did not arrive.”
A repeat visit to the dealer was supposed to take place after the clutch arrived. It was supposed to be delivered in about two weeks.
Replacing the AMT clutch actuator
- Disconnect the negative terminal of the battery.
- The engine air filter has been removed.
- Remove the screw securing the wiring harness.
- Remove the three screws securing the AMT actuator unit.
All that remains is to disconnect the connector (press the fasteners, the direction is indicated by the arrow) and pull the actuator out through the top.
Install actuator 1, Figure 8-6, clutch release on bracket 3 and tighten three self-tapping screws 2. Screw tightening torque 7. 12 N.m (0.7. 1.2 kgf.m) (replaceable attachment Torx T30, knob, torque wrench).
Attach block 4, Figure 8-5, of the additional wiring harness to connector 2 of actuator 1 of the clutch release mechanism and secure the harness to bracket 3 with two fastening brackets 6.
Install actuator 3, Figure 8-4, clutch release assembly with bracket and additional wiring harness on the gearbox, install the outlet hose bracket on the actuator bracket and tighten, without tightening, two bolts 2 and nut 4 of the fastening (replaceable head 13, knob).
Adjust the extension of rod 6, Figure 8-7, of the actuator, for which you need to:
- move the actuator 5 in the direction of the arrow until the rod 6 touches the clutch release fork 7 and mark the position of the bracket 4 relative to the gearbox using a non-stress method.
- using the mark, additionally move the actuator in the direction of the arrow by an amount of 6±2 mm and finally tighten two bolts 1 and 2 and fastening nut 3. The tightening torque of the bolts and nuts is 16...25 N.m (1.6...2.5 kgf.m) (replaceable head 13, wrench, torque wrench, ruler or caliper).
Figure 8-7 — Installation of the clutch release mechanism actuator: 1,2 — bolts securing the actuator to the gearbox; 3 — nut securing the actuator to the gearbox; 4 — actuator mounting bracket: 5 — clutch release actuator; 6 — actuator rod; 7 — clutch release fork
Connect the additional wiring harness connectors to the gear shift actuator connectors, the control controller connector, and the input shaft speed sensor.
Secure the additional wiring harness with brackets built into the harness to the radiator outlet hose, to the left engine mount bracket and to the fan housing.
Also, the process of removing and installing the clutch release mechanism actuator is described in TI 3100.25100.20583 (download).
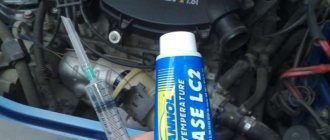
AMT clutch actuator repair
Clean the inner surface with solvent. Let's examine the insides. In this example, wear on the ball stops and a crack on the plastic part of the actuator were detected. The problem is that there are no repair kits. That is, AMT clutch actuator parts are not sold separately. If you cannot restore the old ones, all that remains is to lubricate the mechanism.
LIQUI MOLY Thermoflex Spezialfett was used as actuator lubricant. It is very similar to the one that was in the actuator from the factory. Read more about actuator lubrication here.
We perform reassembly and installation of the AMT actuator on the car (see above).
Let us remind you that if other malfunctions occur in the operation of the AMT (howling, crackling, the car jerks, jerking, rattling, etc.), you can determine the cause using these instructions.
Share on social networks:
Found an error? Select it and press Ctrl+Enter..
Source
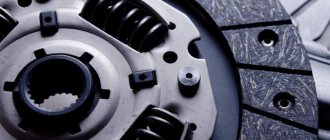
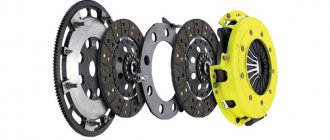
Clutch device
On the Lada Vesta, as well as on all its modifications, including the X-RAY crossover and Cross versions, a standard unit with one disk is installed. The contact of the friction and drive disk occurs under the action of a spring. The main difference between the Vesta clutch and other AvtoVAZ models is the drive.
A hydraulic drive is installed on the mechanics, and an electromechanical drive on the robot.
Structurally, the Vesta clutch is designed according to the standard type and consists of a pressure and driven disc that interact with each other. A pressure disk is installed in the basket; the basket itself is a steel body. The pressure plate in the basket is pressed using a special device in the form of a spring. The clutch basket is installed directly on the flywheel of the power unit and is firmly attached to bolted connections.
A disc with friction linings is placed between the flywheel and the drive disc. The driven clutch disc is also called a friction disc due to special linings attached to both sides. A damper with springs is installed in the center of the hole, designed to eliminate vibrations when the clutch is engaged. The friction disc is mounted through the hub onto the engine input shaft.
Features of the Vesta clutch hydraulic drive
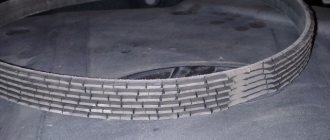
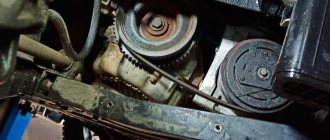
The hydraulic drive consists of pipelines and two cylinders (worker and main). From the master cylinder, the pressure from the rod is transferred to the working one. This, in turn, exerts an influence on the clamping device through pipelines. The working cylinder is a module where the release bearing is also located. All this is mounted in the clutch housing.
Brake fluid performs the functions of working fluid. To ensure the reliability and performance of the hydraulic drive, it is necessary to promptly change the working fluid in accordance with the regulations. Problems with the hydraulic drive most often result from air in the system. In advanced cases, it will simply be impossible to change gears on the car.
Mechanism design
Structurally, the clutch on the VAZ 2114 consists of a total of 15 elements. Namely:
- Main shaft bearing having rollers;
- Clutch protection housing;
- Fork support bushing;
- Switch, also known as bearing;
- Press disk;
- Pressure spring;
- Secondary disk;
- Flywheel;
- Scale;
- Gearbox main shaft;
- Second bushing-switch;
- Carter;
- Plug switch;
- Fork toggle switch;
- Flywheel mounting bolt.
The clutch design on the “fourteenth” model cannot be considered very complex. In practice, you need to know four main points from him:
- Clutch with one disc brake;
- Type dry, closed;
- The driven disk has a device that dampens vibrations;
- The pressure spring is diaphragm.