After changing the brake fluid, the brake pedal fails
Another common problem is when the pedal fails after bleeding the brakes. In other words, the owner has just changed the brake fluid and bled the car's brakes, and the pedal is falling out. First of all, this may mean that air remains in the system.
Often, two people bleed the system (one person works with the pedal, and the other opens and closes the bleeder fittings). So, problems with the brakes appear if the one who pressed the pedal released it early, while the assistant did not have time to close the bleeder fitting.
Let us also add that if, in addition to replacing the brake fluid, the calipers were also repaired/replaced, the brake pads were changed at the same time, and the brake pedal fails (usually on the first press), this happens as a result of the “breaking in” of the parts.
The pistons of the working cylinders are positioned in such a way that the gaps between the pads and the brake discs/brake drums are minimal. In this case, the reverse stroke of the piston is blocked in one way or another (depending on the design features).
When all the parts are in working position, the brake pedal will stop falling. If the brake pedal fails after repair, then there is a high probability that errors were made during assembly, the system is not pumped well enough, there are brake fluid leaks, etc.
Important points
When repairing the brake system of a VAZ 2107, you should remember several very important nuances. Without mentioning them, this article would be incomplete. So:
- On later VAZ 2107 models, spring washers began to be installed under the fastening bolts of the brake brackets. They are thin and very easy to lose when removing the bracket. To prevent this from happening, it is advisable to spread some newspaper or rag under the caliper. If the puck does pop out, it will be much easier to find it;
- If the driver does not plan to change the brake pads when replacing the caliper, then before removing them they should be marked with a marker or chalk so that they can be installed in the same place during reassembly. If you change the original location of the pads, they will become unusable much faster;
- If the driver decides to leave the caliper in place and plans to change only the brake pads, then he will have to buy not one, but two sets of pads, since these parts are always changed on two wheels, and not on one. If you leave old pads on one of the wheels, this will inevitably lead to rapid wear and new problems in the operation of the brake system;
When replacing brake pads on a VAZ 2107, you will have to buy two sets at once - After removing the pads, do not press the brake pedal under any circumstances. The pistons on the hydraulic cylinders mounted in the caliper will move outward and prevent the installation of a new pair of pads. But pushing the pistons back will be very difficult: in some cases, this requires completely draining the brake fluid from the system;
- When unscrewing the fastening bolts on the caliper, you should remember: they differ in the shape of the head. The head of the top bolt is smaller, the head of the bottom bolt is larger (in the photo it is marked with the letter “a”). If the bolts are swapped, it will be impossible to install the brake pads;
The letter “a” indicates the lower caliper mounting bolt with a thick head. - When buying a new caliper in a store, you should definitely tell the seller which side it will be installed on, since on the VAZ 2107 there are differences in the design of the left and right calipers. For example, the holes for the mounting bolts are located differently, so that the left caliper will not fit the right wheel and vice versa;
- Finally, after installing the caliper, you should be sure to press the brake pedal several times to check whether the new caliper works or not. In addition, after pressing the pedal, be sure to inspect the caliper and the asphalt under the car for brake fluid leaks.
So, replacing a brake caliper is not at all as difficult a task as it might seem at first glance. The main thing that the driver should remember when changing this part is its extreme importance. If a mistake is made when installing the caliper or pads, this does not bode well for either the driver or the car. It is for this reason that the article described in as much detail as possible all the nuances of installing a brake caliper. And it is strongly recommended to pay close attention to these nuances.
Other reasons why front brakes stick
The front wheels do not always jam the same way; this can manifest itself in different ways. Both front wheels can “stick” at once, and you simply won’t be able to move. It happens that they seem to be spinning, but with great difficulty, making a creaking sound. This is a dangerous situation, especially if you ignore the problem and continue driving. Only one front wheel can jam, while the other spins freely. Let's look at the possible reasons.
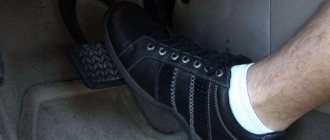
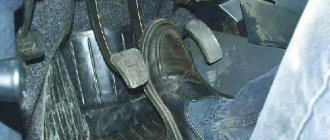
The brake pedal is poorly adjusted or has no free play at all.
There must be sufficient clearance between the master cylinder piston and the pusher for the pedal to move normally. This is adjustable.
The brake pad tension spring is faulty.
This does not mean that it is cracked or completely torn, perhaps just stretched. There is such a thing as metal fatigue, and a weakened spring will no longer function normally; it is better to replace it.
Another reason why the front brakes stick is that the vacuum booster is not in order.
It can jam for several reasons. Perhaps the diaphragm is swollen, or the protective cap or lid seal is pinched.
Pay attention to the amplifier adjusting bolt
It should not be too tight. It is important that it protrudes slightly above the surface of the master cylinder. There is something wrong with the brake pad friction lining.
There is something wrong with the brake pad friction lining.
The problems can be different: the gasket wears out, breaks, or becomes too thin. This usually leads to damage to the pad itself, so in this case it is necessary to change both it and the lining
Important: if you are changing a worn gasket, then the pair to it should also be replaced; they must be the same in thickness, otherwise the car will be pulled off the line of movement to the side. The reason that the front brakes are sticking may be a stuck piston in the wheel brake cylinder.
The reason that the front brakes are sticking may be a stuck piston in the wheel brake cylinder.
This kind of trouble can happen in any car, so you need to be able to deal with it. The reasons for this situation are different: low-quality brake fluid, uneven position of the cylinder body in the caliper, rust and corrosion on the working surfaces of the piston. Disassemble the problematic cylinder, clean all components, rinse with brake fluid, reassemble the system and bleed. Fill with good quality brake fluid.
The cuffs on the wheel cylinder have lost their shape or are swollen - this is also one of the reasons why the front brakes stick.
The cuffs of the master cylinder or wheel cylinders swell from fluids such as oil, gasoline and others that have entered the brake system. This jams the cylinders, which results in a problem with the brakes. But you just have to replace the cuff, and everything will work out
It is recommended to at least occasionally check the condition of the cuffs, and when disassembling the car (no matter for what reasons), replace them, even if these elements look absolutely intact
Oxidation stains on the guides.
They need to be cleaned, lubricated, and you will no longer have to think about why the front brakes are sticking.
The compensation hole on the brake master cylinder is dirty.
This is a labor-intensive process, a large and messy piece of work, but no spare parts will be needed, meaning repair costs will be minimal. It is necessary to clean the hole and bleed the brake hydraulics.
The pistons of the master cylinder as well as the wheel brake cylinders are stuck.
In this case, only experienced car owners who have already disassembled and reassembled various systems of their car more than once will be able to figure out why the front brakes are jamming. It is better to entrust the diagnostics to specialists: they will find the cause of the malfunction and immediately begin repairs.
It often happens that it is enough to just thoroughly clean and lubricate the necessary parts. Check the hoses to see if they are in order. It often happens that the hose is pinched by the clamp holding it, especially if it is corroded. This can also cause the front brakes to jam. The best thing in this case, of course, is to replace the clamp with a new one. But you can just loosen it slightly and blow out the hose well.
It is perhaps not so easy to immediately determine why the front brakes are jamming. This can happen for many reasons, and if you yourself are not very versed in the operation of car systems, then it is better to entrust the inspection and repair of the car to service station specialists. After all, a properly functioning braking system is the key to both your safety and that of other road users.
The front brakes are sticking. Causes, elimination. Watch the video:
https://youtube.com/watch?v=qZ70UPly3kc
Removing the brake caliper
To remove the caliper you must do the following:
- lift the car on a lift or jack up the wheel on which the brake caliper needs to be removed;
- Using a wrench, remove the bolt securing the brake hose bracket;
- remove the bracket so that it does not interfere with further actions;
Important: under the bracket fastening bolt there is a spring washer, which must not be lost when dismantling the bolt and bracket.
- unscrew the bolt securing the brake hose;
- remove the bolt after first removing the two o-rings;
- insert a rubber tube or bolt of a suitable diameter into the hole in the brake hose tip to prevent brake fluid from leaking out;
- Use pliers to remove the cotter pins securing the brake pad pins;
- pull out the pins securing the brake pads and remove them using a bit or a thin, but not sharp, screwdriver;
- remove the retaining springs from the brake pads;
- remove the brake pads;
Advice: if you plan to use the brake pads in the future, they should be marked with a marker so that during reassembly they can be installed in the same place where they were. If this is not done, they will wear out faster and brake worse.
- bend the locking plates of the washers on the caliper mounting bolts;
- unscrew and remove the bolts securing the caliper to the steering knuckle;
- Remove the brake mechanism (caliper) of the VAZ 2107 from the brake disc.
Important: the upper and lower caliper mounting bolts differ in the shape of the head. When installing the unit in place, it is necessary not to mix them up.
Solution
If your car has such a breakdown, the main thing is to solve it comprehensively. It happens that malfunctions are associated with several reasons at once. If the problem is that the pedal is simply rusty, it needs to be replaced. It is easy to correct the situation by replacing the brake fluid with a higher quality one. By the way, you will have to update the fluid in any case - in order to “update” the entire system. Otherwise, over time, the pedal will definitely begin to fail when pressed.
If cracks appear in the pumps, the brake may also begin to fail. Moreover, even microdamages can be the cause of such a breakdown. So if you want the brake to function and not fail in the middle of the road, you will have to replace everything that has stopped working. It turned out to be enough for me to make one replacement. At this point, the question of why the brake pedal failed was closed. To be convinced, it was enough to just start the engine. No extraneous sounds. And if before the return after pressing was too slow, now everything works perfectly.
Repair
After preliminary cleaning of the caliper parts, they need to be degreased and painted. Before applying paint, all holes are sealed with masking tape. You need to paint in several layers. To completely destroy traces of corrosion remaining after brushing, parts can be etched with phosphoric acid before painting.
The removed piston of the VAZ-2108 caliper should be carefully inspected for scoring. Then you need to polish the interface between this part and the cylinder with water using 2000-3000 grit sandpaper.
After drying, the piston, lubricated with brake fluid, is installed in place. At the same time, a new bleeder fitting is installed.
The repair kit contains new rubber seals, including rubber bands that protect the guides of the VAZ 2108 caliper. During assembly, all boots, O-rings, and cuffs are installed with new ones.
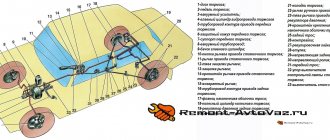
Car brake system: types, general structure and principle of operation
To better understand why the brake pedal fails when pressed, it is necessary to consider the general operating principle and design of the brake system. This system is usually hydraulic, and problem areas are often common on many car models. Brakes operate on the principle that there is incompressible brake fluid in a closed volume.
Note that the machines previously also used a mechanical braking system with cables and other drive elements, but engineers abandoned such a device long ago. The fact is that although mechanics were not inferior in reliability, but were superior to hydraulics, the performance and smooth operation of such a solution turned out to be insufficient, taking into account the rapid development of the auto industry, the increase in the power of installed internal combustion engines, etc. Mechanical brakes simply no longer cope with increasing speed limits and effectively and safely slow down the car.
There is also a pneumatic braking system, which is used on special vehicles (trucks, large buses, various equipment). Air brakes are no worse in efficiency than hydraulics, but the system itself is too heavy and bulky to be installed on compact passenger cars. So it turns out that the hydraulic braking system has become widely installed on civilian and commercial vehicles, as well as on many other types of wheeled vehicles.
Hydraulic brakes have the following elements in their design:
- GTZ (brake master cylinder)
- RTC (brake wheel cylinders)
- Hydraulic lines
- Compensatory device
- Brake discs and brake pads
The working fluid for the brake system is brake fluid, which has certain properties. At the moment when the driver presses the brake pedal, the force is transmitted to the GTZ, which is filled with working brake fluid. The GTZ device has a piston that exerts pressure on the liquid. Through the working fluid, the force is transmitted to the RTC, which are installed in the area where each of the vehicle wheels is located. As a result, the brake pads are pressed against the brake discs or brake drums. If the force is maximum, then the pads completely block the rotation of the wheel. Let us add that depending on the type of brakes installed, the latter are divided into drum or disc. There is also a combination where the front wheels have disc brakes, while the rear wheels are equipped with drum brakes.
The main advantage of hydraulics is smooth and predictable force; the pads are pressed evenly against the brake discs. As for the force on the brake pedal itself, it is proportional to the force that compresses the pads. It turns out that the driver can clearly measure the applied force, thereby determining the degree of wheel locking and the intensity of braking. After releasing the brake pedal, the return springs, which are present at the place where the pads are installed, move them apart, that is, they allow the pads to take their original position. At the same time, the brake fluid is forced back into the master cylinder. This is the general operating principle of the entire system. At the same time, modern cars have additional elements: a vacuum brake booster, a brake force compensator, an ABS system, etc.
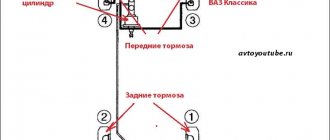
Now a few words about the brake circuit. This solution allows you to reduce the risk of complete failure of the braking system in the event that the brake mechanism on one of the wheels is faulty
This is very important for hydraulics, since a leak in one of the RTCs is a common malfunction. There are several schemes of multi-circuit brakes, according to which the circuits of brake systems are implemented
Let's look at some of them. The axial design allows the braking system to be divided into circuits for the front and rear axles. If the brake wheel cylinder leaks on one axle, then the other will be able to operate normally. There is also a pattern where the braking force distribution pattern is made diagonally relative to the rear and front wheels. There are also solutions that combine the wheels of the front axle and one rear wheel; RTC pistons are additionally installed (double-piston and multi-piston brakes), etc.
Repair of brake caliper VAZ 2107
A damaged or deformed brake caliper on a VAZ 2107 needs to be replaced. Caliper repair involves replacing faulty brake wheel cylinders. In some cases, instead of replacing the cylinders, they can be repaired.
The procedure for replacing cylinders is as follows:
- clamp the caliper in a vice;
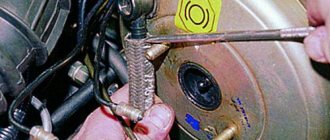
- Unscrew the fittings of the connecting tube with a 10 mm wrench;
- remove the tube connecting the working cylinders;
- Use a hammer to knock out the working cylinders from the guides, after pressing the lock with a screwdriver;
- remove the clamps and replace them with new cylinders (if they are missing);
- insert the cylinders into the guides;
- install the connecting tube and tighten the fittings.
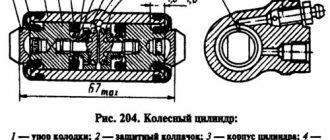
Repair of working cylinders consists of replacing the rubber sealing rings on the pistons. The order of operations is as follows:
- remove the brake cylinder;
- remove the protective cap from the piston using a screwdriver;
- apply compressed air to the cylinder to push the piston out;
- remove the sealing ring by prying it off with a screwdriver;
- install a new ring;
- lubricate the cylinder, piston and ring with brake fluid;
- insert the piston into the brake cylinder.
General information about the brake system
To better understand why the brake pedal fails in a given situation, it is important to first understand how the entire braking mechanism works and how it all works. By the way, most often the brake system in modern cars is of the hydraulic type, and all the main components and problem areas in it are similar in different vehicle models
In this case, the principle of operation of the brakes is that inside the closed system there is a special incompressible fluid, which is called brake fluid.
Brake system design Why does the brake pedal fail?
Despite the fact that mechanics are much better than hydraulics in terms of reliability, their performance is still much lower, and it does not work as smoothly as we would like. Especially with modern powerful engines and increasing speeds. Mechanics are simply not able to cope with the modern level of tasks assigned to it - it cannot stop the car as smoothly, efficiently and safely as we would like.
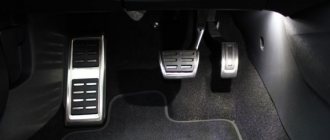
How should the brake pedal move?
There is also a pneumatic braking system, but it is used only on special vehicles - trucks, heavy and powerful equipment, buses, and so on. The system is effective, but is not suitable for passenger cars, as it is too heavy and bulky.
The simplest diagram of air brakes for a car
Why does the brake caliper squeak and jam?
Secondary causes of jamming:
- the pads are not installed correctly initially, so they begin to creak;
- discs are worn out by 70–80 percent - due to aggressive driving style or natural reasons;
- the lubricant is incorrectly selected or is missing;
- Dirt and moisture got inside the mechanism.
One of the main reasons why a mechanism creaks or jams is overheating. Friction during active braking causes heat production. This causes high loads not only on the pads, but also on the presser itself. Therefore, at least conscientious manufacturers try to make it from the most durable material.
Brake bleeding and fluid replacement procedure
Brake fluid needs to be changed every two years. After this, bleeding of the brakes is always required. This procedure is not complicated, but it is inconvenient to carry out alone. However, nothing is impossible.
Procedure for bleeding the brake system
Step 1. If the car has ABS, then under the hood you need to find the fuse relay box and turn off the system by pulling out the fuse responsible for ABS. Then the system will be pumped in exactly the same way as in a car that does not have ABS. Bleeding should be started depending on the location of the master brake cylinder. In this case, the rear far left wheel will be pumped first. That is, you need to start from the farthest highway. Then you need to work on the wheel on the right and front, then on the right rear wheel, and complete the pumping by treating the left front wheel.
Locate and remove the ABS fuse
Step 2. Next, you need to put the car on the handbrake. The engine can be started, but only if the brakes are bled outside. If the procedure is done in a garage, then you will simply have to press the pedal a little harder if the engine is not running. If pumping is done with someone in pairs, then the second person needs to be put behind the wheel and told him what to do. That is, for example, the assistant will press the brake pedal 3-5 times slowly, with an interval of 1.5-2 seconds.
Apply the brake after starting the engine
Step 3. When you press the brake for the last time, you need to fix the pedal pressed and hold it, informing the second person about this.
Keep the pedal pressed
Step 4. After step 3, while an assistant holds the brake, you need to unscrew the fitting in the area of the wheel being processed. When the brake fluid stops flowing, tighten the fitting, and then ask an assistant to pump the brake again using the system described above. After this, you need to look at the fluid level in the tank.
Drain the brake fluidPump the brake after draining the fluid
Step 5. You can use a ratchet and a wrench to loosen and tighten the fitting. And to drain the brake fluid, you can take any thin transparent tube - it can be replaced with a conventional dropper system. The tube is put on the fitting.
Use the key to open the fitting
Step 6. The cycle must be repeated until all the air from the system has been released or until the fluid has been completely replaced. You need to go through all the wheels. For the rear axle, 15 approaches are enough, for the front axle – 10.
Repeat the procedure at least 10 times
Step 7. Before replacing the fluid with a new one, you can pump out the old one from the reservoir with a pump.
Pump out the brake fluid
Step 8. Then you need to pour new liquid into the empty tank to the very top.
Refill with fresh brake fluid
Step 9. If bleeding is done without an assistant, then you can do this: open the fitting and let the brake fluid flow out by gravity. You can open all 4 fittings at once. The process will take about 4 hours. The main thing is not to forget to add fresh brake fluid to the reservoir.
You can do pumping yourself or with an assistant
If pumping occurs without an assistant, and the gravity-feed option is not suitable for some reason, then you can do this.
Step 1. You need to purchase a cap for the brake reservoir and install a nipple from a tubeless tire on it. The prepared lid must be screwed onto the tank.
Install a special lid on the tank
Step 2. Next, you will need to build up pressure (0.5-1 atmosphere is enough) using a compressor or foot pump connected to a lid with a nipple. Thus, the air will put pressure on the liquid in the system and squeeze it out. The liquid also drains into the jar through tubes, as in the instructions above.
Increase pressure to 0.5-1 atmosphere
Step 3
It is important to monitor pressure readings and add it if necessary. It is also important to monitor the level of brake fluid in the reservoir - it always needs to be added
Monitor brake fluid pressure and level
It is worth understanding that this procedure is carried out only if the brake system is in good working order and has no leaks. This will have to be repeated until the brake pedal no longer sinks or is easily pressed.
Installing the brake mechanism and bleeding the system
The restored caliper of a VAZ 2107 car is put on the disc and secured with bolts to the steering knuckle. The pads are inserted into the gap and fixed with guide springs; if necessary, parts are replaced with new ones. The brake hose and tube are installed in place, and the system is filled with fluid to the specified level. Repair of the brake mechanism ends with bleeding to remove it from the system.
This process on a VAZ 2107 car is carried out as follows: a hose of a suitable diameter is put on the nipple of the working cylinder. Its other end is lowered into a container with liquid. The assistant sits behind the wheel and presses the brake pedal several times and holds it in that position. Using the key, release the nipple and let out the air. We repeat this action until bubbles stop appearing in the container.
An important part of the brake mechanism is the caliper. It holds the brake wheel cylinders, which, when the pedal is pressed, compress the brake disc, slowing down the rotation of the wheel. Over time, the brake cylinders and the brake caliper of the VAZ 2107 wear out and the wheel begins to brake worse, which can lead to pulling to the side when braking or brake failure. Therefore, these parts need to be monitored and, if necessary, repaired or replaced.
Improperly performed fluid change or brake bleeding
If you bleed the brakes, but the pedal still falls, this indicates a failure to comply with the procedure. The sequence of actions differs for right- and left-hand drive cars, and each individual car model may have its own characteristics. In this case, you need to check the correctness of execution, or contact a specialized service center.
Many experts prefer to use special pumping equipment for pumping. It allows you to create higher pressure in the system and make the hydraulics work as efficiently as possible. After bleeding the brakes in the usual way by pressing the pedal, the brakes often become sluggish and require repeating the procedure.
What to do if the caliper is stuck on the road
The first thing that is recommended is to give the elements half an hour to cool down. Then identify the problem wheel by conducting an effective test. You need to drive 20–30 meters, stop and touch all four disks with your finger through the provided holes. If the part is hot, it is this particular wheel that jams. It is removed, the car is first placed on a jack.
Cold water will help to quickly cool the elements, but you can water it on a surface that has already partially cooled. Otherwise, the disk will simply blow apart due to strong temperature changes.
If the handbrake cable jams, the inner or outer braid is most likely damaged. It is possible that the return spring has weakened and needs to be replaced with a new one. Also, both return brackets often become dirty. In this case, they must be cleaned of rust and treated with VD-40.
But what to do if sometimes you don’t have time for all this. Then the only way remains is to hit the return bracket with a hammer so that the cable returns to its original position. You can drive further, but just don’t use the handbrake again until it is repaired.
If the piston itself is jammed, a hammer can also quickly solve the problem. You need to tap it carefully, through a wooden spacer, throughout the entire mechanism. If the pads do not wedge, try inserting a screwdriver between the pad and the disc. Finally, the surest, but most dangerous way is to squeeze the hose with a clamp. But you must drive extremely carefully, without brakes.
Vacuum booster diagnostics
Often, a sign of depressurization is unstable engine operation (tribbing). This happens due to air entering the intake manifold. It sharply depletes the air-fuel mixture entering the cylinders. If the pedal does not press when the car is running, first of all you should check the reliability of the connections.
To pinpoint the problem, turn off the engine and wait a few minutes without pressing the pedal. If after this time the pedal remains hard, the most likely cause is a broken check valve.
Also interesting: How to bleed the brakes of a Niva Chevrolet
It is very easy to diagnose the correct operation of the vacuum booster
. To do this, without starting the car, you should “pump” the pedal, then, continuing to hold it, start the engine. If the vacuum seal is working properly, the pedal will go down.
Major breakdowns
The front caliper of the VAZ-2110 is a structural element that holds the brake pads and is responsible for the level of pressure of these elements on the metal discs. It also helps ensure even pad wear, which guarantees effective braking in any situation. The body is made of aluminum alloy and the piston is made of steel.
Between these elements there is an oil seal that prevents brake fluid from leaking out of the system. The main caliper failures are as follows:
- The appearance of oxidation on the surface of the guide elements.
- Oxidation on the main piston, which leads to deterioration of the mechanism.
Failure can be identified by uneven wear of the pads, as well as by an increased braking distance. If such malfunctions are detected, be sure to change the pads.
The brake failed at full speed: what to do?
First, try pressing the pedal sharply several times: perhaps its functionality will be partially restored. Next, assess the situation and identify a place where you can gradually turn. Then tighten the handbrake (don't do it too hard) and start shifting (if you have a manual transmission) to a lower gear. At the same time, when the lever is in “neutral”, press the accelerator (perform “re-throw”) to “prepare” the gearbox gears for emergency operation. As a last resort, choose the lesser of two “evils” - it is better to run into some obstacle near the road (roadside bushes are a good option) than to collide with a car.
https://youtube.com/watch?v=RLKzha1KnDk
How to turn an inoperative brake cylinder piston into a functional one?
1) At the very beginning of the operation, you will need to remove the wheel from the car.
Note! By the way, when you remove the wheel from the car, try to spin it while it is in the air; if it slows down, then some piston has actually become unusable!
2) After your wheel is removed, immediately remove the caliper from the car after it in order to get out the brake piston that is not working. (For information on how to remove the brake caliper on front-wheel drive cars, see the article: “Replacing the brake caliper on a VAZ 2109”, and for information on how to remove this caliper on a classic, see “this article”)
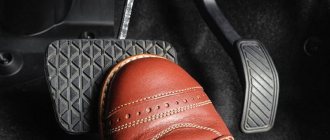
The brake pedal is too soft
If pressing the pedal has become too soft, it means there are air bubbles in the hydraulics and then the system should be pumped, or there is a loss of working fluid. The first thing you need to do is check the brake fluid level. If it is below the permissible level, the hydraulic system must be carefully checked for leaks. A leak may occur at the connection points between the tubes and fittings due to poorly clamped clamps, and the hoses themselves may be damaged. Working fluid can also be lost in wheel brake cylinders if the seals are damaged. After eliminating the leak, you will also need to bleed the brake system hydraulics to remove air from it.
If the brake fluid is of poor quality, contaminated, or has not been changed for a long time and has lost its properties, then heating during sudden braking can quite easily lead to its boiling, and then the brakes will become “wobbly” and the car itself will be difficult to control. An old, dirty, or inadequate brake fluid can cause seized brake cylinders, damaged seals, and other problems.
The conclusion is obvious - pay attention to the condition of the brake fluid and change it in a timely manner
Another reason for a soft brake pedal is the hoses, which are made of rubber and wear out over time, becoming loose. When hydraulic pressure builds up during braking, they simply inflate. As a result, the brakes become too soft and braking becomes less effective.
An extreme and very dangerous manifestation of soft brakes is pedal failure. This occurs due to significant leakage of fuel fluid or damage to the sealing rings in the gas turbine engine.
An excessively soft brake pedal, and even more so if it fails, requires an urgent solution to the problem. You need to stop immediately, braking with the engine or handbrake, and then find and correct the problems.
Necessary tools for repair
To remove the brake caliper VAZ 2108, and then disassemble and restore it, you will need the following tools and materials:
- Balloon wrench.
- Open-end wrenches or heads with a knob for 8, 13, 15, socket wrench for 17.
- Internal Torx for a 15 or 16 bolt, wrench for removing brake hoses. It differs from a conventional open-end nut in that it covers the nut more completely.
- Vise.
- Repair kit for calipers. Suitable for VAZ 2108 - 21099, VAZ 2113 - 2115, Kalina, Grants. The only thing you need to pay attention to is the diameter of the wheels. The VAZ-2108 requires a repair kit for models with 13-inch wheels.
- New guide pins. Often after use they have slight deformations, as well as traces of deep corrosion, which prevents the floating bracket from moving freely. Therefore it is better to replace.
- New bleeder fittings.
- Drill with wire attachment for cleaning rust.
- Solvent, paint, corrosion converter, rags.
- Compressor. Not required, but recommended.
Dips when pressing the pedal
Brake pedal
High-quality and clean brake fluid is the key to normal brake operation. It is thanks to its high density that the braking force is quickly transmitted to the wheels. Over time, it deteriorates its properties, air bubbles form in it, and moisture accumulates.
If a slight depressurization occurs in any area, the liquid flows out and air gets in its place. As a result, the brake pedal is either soft or hard. Several gentle pressures lead to the accumulation of pressure in an insufficiently dense liquid. Then it works, and effort appears.
First of all, you need to check the presence of fluid in the expansion tank of the brake system; it is located on the master cylinder. If there is no liquid in it, you cannot drive; simply refilling it will not solve the problem. If you are planning a DIY repair, you will have to find the location of the leak - it could be any of the cylinders or some kind of tube.
Article on the topic: Registration of an accident according to the European protocol, how to fill out the form correctly
Symptoms of a problem
- oily spots on the visible or inner side of the wheel, which indicates a leak of DOT fluid, a decrease in its level in the expansion tank;
- unexpected, spontaneous pulling of the car to the side after braking - while the wheels are normally inflated and the suspension is fully operational;
- a grinding sound after releasing the brake pedal is the main sign of a situation where the piston is pressed in and does not return to its original position;
- The discs overheat greatly and give off an unpleasant burnt smell - even after driving with relatively infrequent braking.
What's the result?
As you can see, there can be many reasons for a failing brake pedal. If you are not confident in your abilities and skills, then you should refrain from trying to fix the problem yourself and immediately contact experienced specialists. It must be remembered that it is recommended to change the brake fluid in a timely manner, since the maximum service life is no more than 24 months. Also a sign of the need for replacement is cloudiness and blackening, and the appearance of a characteristic odor. Note that brake fluid tends to accumulate water, which significantly deteriorates its properties over time and serves as an additional reason for replacement.
Finally, I would like to note that in the event of unexpected problems with the brakes, you should not panic. There are certain techniques you can use to slow down and stop your car without using the brake pedal. First of all, don't forget about the parking brake. The so-called “handbrake” may well slow down or even stop the car if the car was moving at low speed (20-40 km/h). At the same time, an untrained driver should not sharply pull the handbrake at medium and high speeds (especially on a wet, icy or snowy road), since the car can skid, spin, be thrown off the road, into the oncoming lane, etc.
In such a situation, it is better to brake by gradually lowering the gear from high to low with shifting in a car that is equipped with a “mechanics” (manual gearbox). In some cases, you can use the contact emergency braking method, when the car deliberately collides with an obstacle and slows down after such contact or several contacts. This technique allows you to stop with minimal risks for the driver of a faulty vehicle and other road users.
The pistons of the brake cylinders are jammed, what should I do?
Welcome! Brake cylinders - thanks to them, braking is carried out, and without the pistons that are in them, these cylinders will not work at all, so if a piston fails, then you have to go to a car store and buy a new brake cylinder, because driving without brakes is scary and even more dangerous , but not in all cases the pistons stop working forever, sometimes they can be revived, and we will write in detail about how to do this in this article.
Note! To work, you will need to stock up on: A jack to lift any side of the car, as well as a wheel wrench and you may also have to stock up on bricks, and you may also need a basic set of wrenches and sockets!
Summary:
How to understand that the pistons of the brake cylinder are not working? Let us answer this question before we move on to the repair of pistons, namely inoperative (That is, the pistons do not move in the cylinder), the pistons are recognized if they do not move at all and stand in one place, as a result of which the car, namely the brakes, begins a number of problems occur, that is, the car cannot drive normally because it constantly slows down even though you don’t press the brake pedal at all, or it may be that the car will drive but it will brake much worse than it should, in general, let’s figure it out Why do these cylinder pistons fail?
From time to time, the sealing ring (indicated in the photo below by an arrow) that fits the piston in a circle either wears out, or micro cracks form in it through which dirt begins to get into the piston itself, where the lubricant is located, and as a result the piston becomes unusable.
And also, the piston can simply sour in the brake caliper, and this can happen because of our roads, which in winter are mostly sprinkled with sand and salt, and the brake system is located in the very bottom of the car and therefore is subject to heavy braking. and in general, when moving, all this salt flies which little by little brings the situation to the point where the piston simply rusts, otherwise it simply sours, and therefore it will then be very difficult to move it from its place and thus it stops moving and therefore stops working.
By the way, you can very easily understand if your piston is somehow soured, if your car’s fuel consumption on the highway increases, and also if the car, as already mentioned earlier, starts to drive worse, and also if you notice that In neutral gear, the car began to slow down a little, this can also be understood if the car begins to skid on a winter road from braking, all this indicates that your piston has stopped working.