Avtovaz cars are popular among car enthusiasts, since the cost of the car and its repairs are inexpensive. The VAZ 2114 car is no exception; it is bought as a workhorse.
The secondary market mainly sells cars with an injection engine and an on-board computer installed in the cabin. Malfunctions that occur in a car can be detected using an odometer and a computer by connecting a laptop with a special program to it.
How to do a self-diagnosis
Error codes appear on the display of your on-board computer as a result of self-diagnosis. It is carried out according to the algorithm:
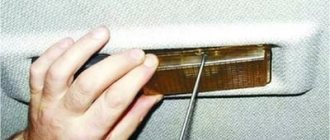
- On the dashboard, locate the odometer button. Press it and don't let go.
- Turn the ignition key to position 1 without releasing the button.
- Release the odometer button.
- While the computer is scanning, the arrows on the dashboard will twitch. This means you did everything right.
- Press the odometer button again to display the information on the on-board computer display. After the first press, the firmware numbers for your system will appear on the screen.
- Pressing the odometer button a second time will cause error codes to appear on the screen.
Most often, during self-diagnosis, you can see two-digit codes that are deciphered using a service passport.
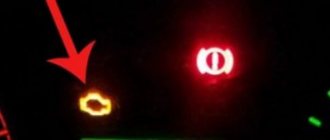
In what cases does error 8 appear after self-diagnosis?
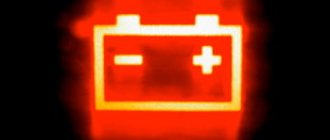
Error 8 on the display means that the power controller during the diagnostic process transmitted a signal: there is insufficient voltage in the VAZ-2114 electrical network with eight valves. In this case, you need to check:
- failure of the generator or its brushes;
- The battery does not hold a charge or discharges quickly.
You can get rid of this error yourself by charging or replacing the battery. If this does not help, then you will have to get to the generator and replace its brushes.
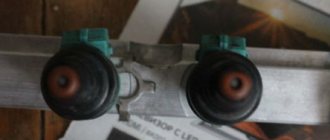
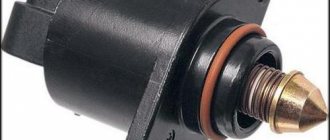
Oxygen sensor
For some reason, it is quite difficult to find code 0525 in the decoding tables, but this is simply an error in the oxygen sensor, otherwise called a lambda probe. And if you see 0525 on the display again, it means that not everything is in order with the oxygen content in the exhaust.
This sensor is not installed on all VAZ models; it sends a signal to the engine regarding how much oxygen should be in the fuel system. That this sensor does not cope with its duties is evidenced by:
- increased fuel consumption;
- unstable work at XX;
- loss of power, lack of "response".
New Bosch lambda probe
In principle, the lambda probe should be changed after about 60 thousand mileage, but this can happen earlier, especially considering the quality of our gasoline. Therefore, it may display 0525, warning that it is time to replace the oxygen sensor.
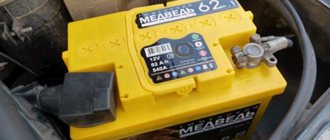
Checking and preparing for use of the battery
First of all, you need to learn how to care for the battery, charge the battery in order to extend its service life.
Experts recommend doing the following:
- Remove the battery and wipe it with a rag. Pay more attention to cleaning dirt from the top of the battery.
- Now you can inspect the battery, paying attention to the electrolyte level. It should be the same in all flasks. If necessary, you can add electrolyte.
- The battery must be charged with a current of 5.5 A for 10 hours.
- During the process, the battery can heat up to +40 °C, which is considered normal. If you think that the battery is too hot, you should interrupt charging and wait until the battery cools down. It is because of the strong heat that it is recommended to charge the battery in a cool room and away from other electrical appliances.
- If the electrolyte temperature exceeds +45 °C, then you can not stop charging, but reduce the current by half.
- Before charging, it is worth measuring the battery capacity; after the recharge period has expired, it should increase by 1.5 times. If for some reason it has not changed or increased not so much, then it is worth replacing the battery.
When charging the battery, you must pay attention to the instructions that come with the charger and the recommendations of the battery manufacturer. Battery failure is caused by deep discharge and difficult operating conditions - sudden temperature changes, cold starts in winter. Therefore, error number 8 in the VAZ-2114 with eight valves most often occurs at the beginning of winter (after the first serious frost) or in the spring.
Recommendations
Comments 40
Contact them on their website: www.multitronics.ru/supp they always provided advice before.
I have exactly the same one. Write what happened
I think that my ECU January 7.2 Avtel is simply not compatible with it ((
I also have January, and it works. Judging by the video, it shows the voltage correctly. The temperature inside is 222, so the wire with the sensor is not connected. Did you connect to the diagnostic connector? Top row, second from the right, it seems
It will be useful: How to replace the cabin filter in a Citroen c4 and 5: step-by-step instructions
I have an x115 on-board vehicle and everything works (so of course I connected it)
Why didn’t you like the old one?)
It contains less information. missing (speedometer, instantaneous consumption, average consumption)
If my memory serves me correctly, then I have the same BC and it shows the average consumption, for which I don’t remember the instantaneous, but there are also l/hour. Why didn't you like the speedometer on the dashboard?)))
Don’t know))) I’m used to having it on the trip computer
I looked today, I have an X114, it’s probably different in some way)
You must have voiceover
that's all the difference))
clear) in extreme heat or cold, does the BC malfunction?
Ummmmm, definitely not in the heat. But I can’t say anything about the cold, because... I installed it in April)))))
find instructions on the internet (if you don’t have them) you need page nine! pull out the immobilizer block and see if you have a jumper as in the picture in the instructions, if not, then put it back in, plug the connector back in, try to start the BC again, if that doesn’t work, pull the connector back from the immobilizer without plugging it in, try again (THAT IS IF YOU HAVE AN IMOBILIZER YOU ARE INACTIVE!)
there are brains that are closed and need to be hacked
How to replace generator brushes
If you recently updated the battery on your VAZ-2114 with eight valves, then the reason for the lack of current in the power supply may be hidden in the generator. There is one weak link in this unit - the current collection brushes. They periodically wear out and stop performing their task. Each car enthusiast can change the brushes himself according to the instructions:
- You need to disconnect the negative terminal from the battery. Then find the block of wires leading from the generator and remove it. To do this, you need to remove the cap from the positive side of the wires and unscrew the nut that secures them to the generator block.
- A plastic cap of the generator block will appear in front of you, which is secured using three spring clips. You will need to remove these fasteners to remove the alternator housing.
- Using a Phillips screwdriver, unscrew the fasteners to remove the voltage regulator along with the current collectors.
- Disconnect the wires from this node.
- Now all you have to do is inspect the condition of the brushes and, if necessary, install new parts on the generator. After this, reassemble the generator unit in the reverse order and check the car again.
If the current collectors of the VAZ-2114 are visually intact, then you need to continue disassembling the generator unit in order to replace it entirely. In most cases, the power, even if the brushes and battery are intact, disappears due to wear of the generator bearing or its coil. To avoid guessing what went wrong, install a new one in place of the old one. In this case, you will be absolutely sure that after assembly the car will not let you down.
Error 8 on VAZ 2114 what does it mean
The VAZ-2114 is based on mechanics, so for many drivers it comes as a real surprise that the car has self-diagnosis. This allows you to avoid checking the operation of the machine at a service station using expensive equipment; the fault can be determined with your own hands at any convenient time, and then quickly eliminated.
Diagnostics of the VAZ-2114 involves displaying an error code on the on-board screen, which indicates a specific breakdown. Error 8, displayed on the panel, stands for insufficient voltage in the machine network. We will tell you how to fix the problem, but first we will teach you how to enable self-diagnosis of the VAZ-2114.
Differences between bookmaker and control panel
Experienced drivers know that the speedometer simply converts engine revolutions into speed, and as soon as you change the wheels to a larger diameter, the speed will increase, although the indicator will work the “old-fashioned way.” In order not to get into trouble at the next traffic police post, you cannot do without a BC. But much remains not taken into account by simple fixators, and on a long journey such factors as actual and average fuel consumption, information about the mileage already covered, the amount of fuel used, etc. will be quite appropriate. These parameters of the VAZ 2114 can be calculated, but is there any time for the driver, who is primarily obliged to watch the road and not do calculations.
This is what the installed On-Board Computer “State” looks like in the cabin
The “smart” car 2114 will itself monitor that the car does not overheat in the heat, and the most advanced on-board computers will even alert you to the danger of ice formation in cold weather. The computer will also report the voltage inside the engine system. With such an assistant, the trip will be much safer, over short or long distances. The main thing is not to ignore your computer's warning signals.
It may seem that an indicator appeared on board and began to count indicators. But in fact, the data on the operation of the car’s equipment was already known, it was simply not displayed in front of the driver. However, why was it necessary to turn the interior of a passenger car into a pilot’s cockpit? Connecting the “on-board” (on-board computer) to all existing sensors inside the car, processing the received data and presenting them in a form convenient for the driver - this is the main task that is assigned to the BC.
The task of the On-Board Computer is not only to collect information from the car’s sensors, but also to process it, correct it, analyze it and present it in a form convenient for the driver.
Instructions for self-diagnosis of VAZ-2114
To enable self-diagnosis in a domestic car, take the driver’s seat and sequentially perform the following manipulations:
- Find the odometer key on the instrument panel, press and do not release.
- At this time, turn the key in the ignition, setting format 1.
- The odometer key can now be released.
- Observe what changes occur on the instrument panel, namely the arrows should jump.
- Press the odometer key again and release it again, after which numbers indicating the firmware of the vehicle’s on-board computer are visible on the speedometer.
- All that remains is to press the odometer key a third time, and then remove your hand, and the display of a combination of faults on the screen will not take long. Please note that at a service station the error consists of 4 digits; if you diagnose it yourself, it assumes 2 digits.
Diagnostics using special equipment
1. Diagnostic connector
2. Connecting a wire with an adapter to the diagnostic socket
3. Connecting the wire to the computer
4. Launching software for testing
The diagnostic process using special equipment consists of checking the car using a laptop. To connect to the diagnostic connector you will need a cable with an adapter. Using this cable, we connect the computer to the connector via USB output. For testing you will also need software; the power of the computer used is not important. There are many versions of different testing programs on the Internet.
Diagnostics is performed as follows:
- It is recommended to inspect the vehicle before starting the inspection. Check the volume of consumables - engine oil, brake fluid, coolant.
- Find the diagnostic connector and connect your laptop to it. If you have a special scanner, then that's even better. But since finding a scanner is not so easy, and buying one is not cheap, you can use a laptop. Before testing can begin, the ignition must be activated. There is no need to start the power unit.
- After connection, the testing utility starts. The software interface may vary. When you launch the software, graphs or a list of parameters with numbers may appear. This information will allow you to draw conclusions about the operation of the power unit.
- The scan starts. Fault codes will appear on the laptop screen. To decrypt, use the information provided in this article. We could not describe all the codes, but we deciphered those that occur most often. Usually, when downloading a program to a computer, users are provided with a separate file describing the faults.
- After decryption, the problem is repaired.
What does error 8 mean and how to fix it
Error 8, reflected on the on-board computer of the VAZ-2114, means low voltage on the on-board network. Reasons that can cause a decrease in voltage in the VAZ-2114:
- the battery is almost completely discharged;
- erasing or “freezing”, lack of adequate operation of the brushes on the generator.
That is, you can remove error 8 and correct problems in the operation of the VAZ-2114 by charging the car battery or replacing the brushes on the generator, and all this can be done without turning to specialists, in your own garage with your own hands.
On-board computer codes and their meaning
Now let's talk about common error codes that can be identified by diagnosing the on-board computer of your VAZ 2114. It should be borne in mind that we are talking about electronics, which can also sometimes work incorrectly. But, as practice shows, in the vast majority of cases, error codes on the on-board computer correspond to real problems on the car.
BC connection diagram
It takes an incredibly long time to study each error. Therefore, in this table we have collected the most common ones that VAZ 2114 owners encounter regularly.
| Codes | Description of the problem |
| 0102, 0103 | Incorrect signal level of the mass air flow sensor. |
| 0112, 0113 | Incorrect signal from the intake air temperature sensor. It needs to be replaced |
| 0115 – 0118 | Incorrect coolant temperature sensor signal. It needs to be replaced |
| 0122, 0123 | Interference or incorrect signal from the throttle position sensor. It is recommended to replace the sensor |
| 0130, 0131 | Oxygen sensor not working |
| 0135 – 0138 | The oxygen sensor heating device does not work. Replacement required |
| 0030 | Failures in operation or a break in the control circuit of the oxygen sensor heater to the converter were detected. |
| 0201 – 0204 | An open circuit was detected in the injector control circuit. |
| 0300 | Random or persistent misfire detected. The car may not start immediately |
| 0301 – 0304 | Misfire detected in engine cylinders |
| 0325 | There was a malfunction in the detonation device circuit |
| 0327, 0328 | The knock sensor has failed. It needs to be replaced |
| 0335, 0336 | A malfunction of the crankshaft position sensor has been detected. The device needs to be replaced |
| 0342, 0343 | The phase sensor has failed. Device needs replacement |
| 0422 | The neutralizer is faulty |
| 0443 – 0445 | The canister purge valve does not work. Device replacement required |
| 0480 | The cooling fan is not working. Device replacement required |
| 0500, 0501 , 0503, 0504 | The speed sensor has failed. The device needs to be replaced |
| 0505 – 0507 | The idle air control malfunctions, which affects the number of revolutions (lower or higher). Detection of such an error indicates the need to replace the regulator. |
| 0560, 0562, 0563 | There are failures in the supply of mains voltage. A more thorough diagnosis is needed that will identify the exact areas in the circuit that need to be replaced. |
| 0607 | The detonation channel does not work |
| 1115 | Oxygen sensor heating circuit is intermittent |
| 1135 | An open circuit was noticed in the heating circuit of the oxygen sensor; a short circuit may have occurred. The sensor must be replaced |
| 1171, 1172 | Potentiometer gas level is not correct |
| 1500 | An open circuit was detected in the control circuit of the fuel pump device |
| 1509 | The electrical control circuit for the idle control element is overloaded. |
| 1513, 1514 | The on-board computer detected an open circuit in the idle speed device. |
| 1541 | There is an open circuit in the fuel pump relay control circuit |
| 1570 | Traction control system has an open circuit |
| 1600 | Traction control data is not sent to the on-board computer |
| 1602 | It is one of the most common codes when diagnosing fault codes. Indicates a loss of on-board power supply voltage on the electronic control unit |
| 1606, 1616, 1617 | A breakdown of the uneven road surface detection sensor has been detected. |
| 1612 | Electronic control unit reset fault detected |
| 1620 | Problems with the persistent storage device |
| 1621 | Failure of the random access memory device. |
| 1689 | If this combination of numbers appears during diagnostics, the on-board computer may show incorrect error codes. |
| 0337, 0338 | Errors in the functioning of the crankshaft position control element or an open circuit. |
| 0481 | The second fan of the cooling system has broken. The device requires replacement |
| 0615 – 0617 | Open or short circuit detected in starter relay circuit |
| 1141 | The heating device for the first oxygen sensor after the neutralizer has failed |
| 230 | The fuel pump relay is faulty and cannot be repaired. The device needs to be replaced soon |
| 263, 266, 269, 272 | These codes indicate a breakdown of the driver of the first, second, third or fourth injectors - the elements need to be replaced. |
| 640 | This combination indicates an open circuit in the CheckEngine lamp circuit. |
By studying the error codes, you can understand what exactly is happening with your car, what explains its incorrect behavior, and what actions you should take in the near future.
Loading …
How to charge a VAZ-2114 battery yourself
You need to know how to charge a VAZ-2114 battery not only if self-diagnosis shows error 8. Correct and timely charging of the battery will extend its life. To do this, follow the recommendations of experts:
- Remove the battery and carefully go over it with a cloth, your task is to thoroughly clean it from dirt. Focus on the top of the piece.
- Now check the electrolyte load indicators. According to service station workers, the electrolyte level should be between the minimum and maximum icons located on the battery case. If the electrolyte is not enough, it must be added to the norm.
- Charge the battery when the plugs are turned out with a current of 5.5 A. Also monitor the density of the electrolyte.
- While charging, the battery can reach a temperature of 40 degrees, this is the maximum allowable value. However, experts believe that even this figure is too high - it is necessary to lower it to 27 degrees by interrupting battery charging.
- When should charging be completed? If a large volume of gas comes from the battery, the electrolyte voltage and its density are kept constant. 3 measurements are taken as a basis.
- If the density is different, then it needs to be adjusted. The increased density can be reduced by adding distilled liquid to part of the material. If it is low, use the method of adding electrolyte with increased density.
- When the adjustment has been made, do not remove the battery from charging for up to half an hour, then turn it off and check the electrolyte readings after half an hour. If the material level is too high, use a rubber blower to remove excess material.
How to replace generator brushes
To get rid of error 8, which occurred in the VAZ-2114 due to worn alternator brushes, follow these instructions:
- Remove the wiring harness.
- Disconnect the rubber cap from the terminals of the plus wires, which is designed to protect the part. To do this, unscrew the wire fixing nut and remove the wires from the generator housing.
- Remove the black casing, made of plastic, by disconnecting 3 fasteners on spring mechanisms located along the perimeter of the block.
- Find the regulator responsible for adjusting the voltage and use a Phillips head screwdriver to unscrew it.
- All that remains is to pull out the regulator along with the brushes attached to it, and then disconnect the wire block.
- Now replacing the brushes will not be difficult.
- Installation of the updated VAZ-2114 voltage generator is carried out according to the same instructions, but in reverse order.
Sources
- ladaautos.ru/vaz-2114/chto-oznachaet-oshibka-8-na-paneli-priborov-vaz-2114-i-ee-ispravlenie.html
- ladaprofi.ru/vaz-2114/kak-ispravit-oshibku-nomer-8-na-paneli-vaz-2114.html