Print this article Font size 16
The heater motor plays an important role in ensuring the normal functioning of your car's heating system. Therefore, if the motor fails, it needs to be replaced.
Appearance of the device
Work on replacing the stove motor can be divided into two main stages:
- Preparation;
- Replacement.
About each stage in more detail.
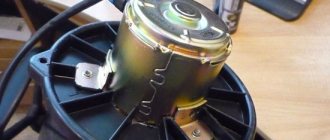
Stove fan
Structurally, the fan consists of a DC electric motor with a commutator-brush assembly and an impeller mounted on the electric rotor. motor. The electric motor is powered from the vehicle’s on-board network. There are several modes of fan operation, the difference between which comes down only to the rotor rotation speed, and this is realized by inserting a resistor into the power supply circuit of the electric motor.
The fan operating mode is set using a handle located in the heater control unit on the center console. Initially, on the VAZ-2110, this handle was part of the design of the SAUO controller, but functioned separately from the controller itself. Later, the ACS added an automatic fan control function (position “A” on the handle), using which the controller regulates the rotation speed of the electric motor in order to maintain the set temperature.
The electric motor used in the design of the VAZ-2110 fan is simple, but it has “weak points” - the commutator-brush assembly and bearings. Wear of these elements causes incorrect operation and complete inoperability of the fan. Short circuits and winding breaks in the stove drive are rare, but don’t forget about these breakdowns either.
Symptoms of failure. Heater components that affect fan operation
Signs of a malfunctioning stove fan are quite obvious and impossible not to notice. Common symptoms of failure:
- Increased noise, grinding noise during operation.
- Significant reduction in air injection efficiency.
- The fan does not turn on.
- Spontaneous change in the rotation speed of the electric motor.
- It can be determined by ear that the electric motor is operating under heavy load.
In some cases, such consequences result from malfunctions in the power supply and fan control circuits, so you should check them first. This applies to:
- fuse (blowout is the cause of complete failure of the electric motor);
- resistor (if it is faulty, some speed modes of the electric motor stop working);
- controller (the knob for switching fan modes is part of its design, so malfunctions of the automatic control system affect the functioning of the electric motor);
- wiring terminals of the power and control circuits (oxidation, damage to wires is one of the reasons for a malfunctioning electric fan).
If diagnostics of these elements shows that they are in good working order, it is necessary to dismantle and repair the fan itself. But it can be diagnosed first.
Fan check
A check is done by directly powering the electric motor from the battery (we lay wires from the battery terminals and connect them to the power terminals of the motor) - operation under load, difficulty in gaining rotation speed, squeals and squeaks indicate wear of the drive components and the need to replace them. But if, even with direct voltage supply, the electric motor does not start, it is most likely that it has burned out or the windings have broken. Such faults are difficult to fix and it is easier to replace the entire unit.
Design features of the stove of the old and new models
The design of the electric motor of the stove on the VAZ-2110 is identical, but the fans and their location are different. On models of the first years of production, the electric fan is installed in the stove housing in front of the radiator and it is located horizontally (old-style stoves). Afterwards, the design was revised - the fan was already placed in the cabin filter housing and installed vertically (new model heaters).
Despite the design features, dismantling the fan is a simple operation and does not require complete disassembly of the stove.
On a VAZ-2110 with an old-style heater, to remove the electric fan you need to:
- Dismantle the frill.
- Remove the front wall of the niche in which the heater is located.
- Remove the back cover of the fan housing by first unscrewing the screws and removing the clamps.
- Disconnect the wiring from the fan and remove it.
As for models with a new type of stove, the technology for removing the electric stove fan on such cars is different:
- dismantle the “jabot” and the front wall;
- remove the air filter;
- unscrew the fastening of the filter housing to the stove body and separate them;
- disconnect the wiring;
- remove the filter housing together with the fan;
- dismantle the electric fan.
After removing the electric motor with the impeller, we disassemble it, perform troubleshooting, replace worn elements and put it back together.
Fan repair (step by step)
The disassembly technology is very simple, but proceed carefully. Since electric motor failure lies in the wear of bearings and graphite brushes, let’s consider how to replace these elements:
- Let's disassemble the electric motor. To do this, first remove the impeller, and then the two spring clamps of the motor support.
- We remove the support.
- Unscrew the screws securing the brush assembly and remove it.
- Carefully knock out the rotor.
- We clean the elements from dust and dirt.
- From the inside of the stator, carefully bend the edges of the plate holding the bearing.
- We knock out the bearing and install a new one in its place (for replacement you need bearing No. 609).
- We bend the edges of the plate back.
- We inspect the condition of the collector plates on the rotor and, if necessary, sand them with sandpaper (fine-grained).
- We replace the worn brushes with new ones (we solder the wires of the worn ones, and in their place we solder the wires of the new elements).
- We bend the stops of the brush springs (this will allow you to easily install the brush assembly in place).
- We put the rotor in place.
- We install and fix the brush assembly, having previously seated the brushes in their seats.
- We install brush springs into the holes that covered the stops and bend the stops back.
- Install the fan support and impeller.
- We install the repaired fan on the car.
As you can see, it is not difficult to repair the VAZ-2110 heater fan, and this task can be handled in a garage, even without special skills in car repair.
Source
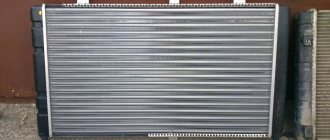
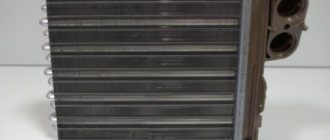
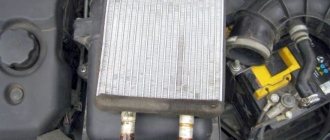
Replacing the heater radiator on VAZ 2110 and 2112. When the resource is exhausted
- Old model (until 2003);
- New model (since 2003).
- Remove the rubber seal from the wind lining;
- The fasteners are unscrewed and the frill is removed;
- Remove the windshield trim. To do this, unscrew the nuts and screws located along its edges;
- The hose is removed from the front window washer. It should be moved to the side, otherwise it will interfere with further work;
- Unscrew the wiper fastenings;
- The cover (wind deflector) is finally removed;
- The metal clips are removed from the stove body. They are examined carefully, if corrosion is visible on them, then they need to be replaced with new ones;
- Remove the filter in the cabin, which is attached to the heating radiator with screws; Turn off the fan. To do this, remove the positive connector and unscrew the nut from the negative terminal (on the body);
- Unscrew the 3 screws securing the stove cover;
- Loosen the hose clamps. We remove the radiator.
- The supply hoses are dismantled. Also remove the steam exhaust hose. It is enough to disconnect it from the stove. They are all attached to clamps;
- Chips are removed from the fan;
- The gear motor is disconnected from the power supply;
- Unscrew 3 screws securing the gear motor;
- We find the places where the radiator is attached to the body and unscrew the screws;
- Unscrew the screws from the filter cover. We extract it;
- Unscrew the screws securing the radiator halves;
- Now you can remove the heater itself. We first pull out the left part, then the right;
- Unclamping the brackets, remove the damper.
Causes of malfunction
Replacing the heater motor of a VAZ 2110
As a rule, there are many reasons for such a malfunction, these include:
- clogging with slag from the stove radiator;
- stove motor failure.
If the stove motor is not functioning, or some of its speeds are not working properly, then it is first recommended to check the resistor, which in other words can be called the stove rheostat. This element is responsible for the speed of the fan. You can purchase such a part in a specialized store that sells auto parts. As for replacement, this can be done with the help of a specialist or on your own, which is not so difficult even for an inexperienced specialist.
Note! In the case of repairing or replacing the heater radiator, it is recommended to contact a car service center, since it is difficult to remove the radiator yourself. To replace the stove motor, you will need minimal knowledge and detailed instructions.
There are heater malfunctions that can be easily fixed by any car enthusiast. For example, a situation may occur when cold air is blowing through the side deflectors and the windshield heating duct of the heating system, while a hot air flow comes from the lower and central air ducts. Most likely, the reason will be the unsatisfactory operation of the heater damper, which is designed to cut off cold air. In some cases, it prevents the normal passage of cold air. Such faults are most easily identified in the cold season
When bending the damper drive rod, special care must be taken so as not to damage the plastic parts. Please note that in winter the plastic becomes more fragile
Replacing the motor for the stove on a VAZ 2110
Of course, a non-functioning stove causes many problems in winter.
If this is not so important in the summer, then in the winter the windows will fog up. You can figure out what the reason is when disassembling the heating system of the car
Let's sum it up
Malfunctions of the VAZ-2110 heater control unit can lead to both incorrect functioning of the vehicle’s heating system and complete failure of the heater. During the cold season, this will affect not only a comfortable stay in the car, but also safe driving for the driver of the vehicle.
Repairing the stove control unit can be done on your own if you have basic knowledge of electronics, a desire to work and improve your comfort.
High-quality repairs and timely regular inspections of the unit before the onset of cold weather will help you save money on stove repair services at service centers and the purchase of expensive heating system elements.
On the VAZ 10th family, which includes the VAZ 2110-2112 models, the designers used an electronically controlled interior heating system, thanks to which the temperature set by the driver is maintained automatically.
On the VAZ-2110, instead of a manual heater control mechanism with a cable drive of the main elements - the coolant shut-off valve and dampers, an automatic heater control system (AHC) controller with a temperature sensor and a gearmotor that regulates the position of the dampers are used.
In such a stove, the valve for shutting off the antifreeze supply is no longer used, and the adjustment of the heater operating mode - “heating” or “ventilation” - is carried out by a central damper, which directs the air flow through the radiator or bypassing it.
Preparing for replacement
If you have at least some skills in working with wrenches and screwdrivers, replacing the stove motor will be a feasible repair for you.
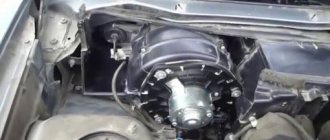
To get to the electric motor of the VAZ 2110 heater, you first need to open the hood and remove the “-” battery terminal.
Now, in fact, we are removing the motor itself, which does not work as we need, or has completely failed:
- The windshield wipers need to be removed. To do this, pry off and remove the rubber caps, take a 10mm wrench, unscrew the nuts, disconnect the brushes;
- We pry up the decorative plugs (a slotted screwdriver is useful here), unscrew the screws that secure the frill, then a couple more nuts on the edges (with a 10mm socket wrench), remove the frill;
- Having removed the rubber seal, unscrew the screws with which the engine compartment shield is attached;
- Now, remove the hose that supplies washer fluid to the injectors;
- The most difficult task is getting to the right side of the engine compartment to remove it. It has two nuts at the bottom (also for a 10mm socket wrench). It would seem easy to unscrew, but it’s just painfully inconvenient. Although there is a positive point here - these nuts do not have to be completely unscrewed - the shield can be pulled out after a few turns;
- Before disconnecting this shield, remove the clamps from the hose going to the vacuum brake booster;
- Unscrew the screws (4 pieces) from the cabin filter cover and remove it;
- The heater motor has already appeared. It is necessary to disconnect the heater motor block, as well as the resistor block;
- Now you can pull out the left side of the stove, and with it the fan motor;
- It became possible to replace the heater fan;
- Reassembly is carried out in the same order, only exactly the opposite.
Be prepared for the fact that for the first time replacing the heater motor on a VAZ 2110 (repair) will take you a couple of hours.
Lada 2110 Banditskaya 10 - ka › Logbook › Replacing the heater motor of a new VAZ 2110
Unfortunately, it was a quick repair; I had to do everything myself in 2 days off, given that it’s 15-18 outside, and it’s not too warm in the garage, down to -10. In general, let’s go step by step. Breakdown: I was driving for work. And suddenly, after one of the stops, I started my car, and realized that when I turned the heater motor control, nothing was happening, at first I thought, well, who knows, it happens, I tried a few more times, silence, checked the fuse, everything is fine. Realizing that the engine was noisy not because it had not been lubricated for a long time, but because it was dying, I put the car in the garage and a decision was made to repair it myself, since the cost of the engine ranged from 1000 to 1800 rubles, and I paid for the repair If only about 1000 rubles more, let's move on to the main thing: - The first thing you need is to disconnect the negative terminal! to avoid any short circuits - Next, you need to unscrew all the screws holding the casing, exactly as shown in the photo with yellow arrows.
Next, we remove the frill and see this picture
further, for more convenient removal, you will need to either bend the casing or remove it, it is difficult to remove because it is attached from below in hard-to-reach places, but I was able to do it, I think you will find it and it will not be difficult to feel with your hand where exactly it is held, so we will skip this moment.
Next, remove the cabin filter, this is the thing on the left with a mesh, there are 4 fasteners. In general, I will indicate all the mounting points where you need to unscrew so that the engine is separated from the radiator
Next you need to naturally disconnect all the chips and carefully, try to move part of the stove to the left so that it comes out of the grooves on the right side, pay special attention to the fastening on the left to the body, because unfortunately I broke it off, but it does not particularly affect the fastening and installation .
Possible causes of malfunction
Before carrying out repairs, you should carefully study the possible causes of a malfunction of the car heater fan:
- Burnt fuse. The real reason is the most banal and simple, but at the same time it is the one that leads to the greatest problems in solving the existing issue. Replacing a fuse turns out to be a very simple procedure that any motorist can successfully handle. Despite simple repairs, it is extremely difficult to detect the short circuit that led to the blown fuse.
- Oxidation of contacts that should be used to establish the operation of a car heater.
- The ignition relay does not allow the heater to turn on and start working successfully.
- An additional resistor can result in only the third speed being operational.
- A faulty car interior heating switch requires replacing the fuse.
- A non-working electric fan motor is another important reason. In this case, it is necessary to replace the heater motor or at least check its contact with the vehicle. In most cases, the cause is hidden in a burnt-out electric motor, poor contact with the machine, or sticking electric motor brushes.
Regardless of the cause of the malfunction, you can successfully adjust your car heater
The most important thing is to understand what exactly is the cause of the breakdown or partial disruption of the functionality of the heating equipment
If diagnostics have confirmed that the cause lies in the heater motor, replacing the heater fan most often becomes a mandatory task. How to carry out such a responsible procedure and how easy does it promise to be?
The radiator fan on the VAZ-2114 is used to forcibly cool the engine and cooling system when natural cooling is insufficient. It turns off especially often if the temperature sensor is broken.
Its failure can lead to unexpected consequences, therefore, it is necessary to determine the cause of the malfunction in a timely manner and eliminate it. If the motorist is unable to do this, then it is worth contacting a car service center.
Throw off the » — » battery cable to replace the fan of the VAZ 2110 stove
2. Disconnect the “+” connector of the heater fan wires
3. Using a ten key, unscrew the nut...
4...and remove the negative wire.
5. Use a screwdriver to unfasten the four brackets...
6. carefully bending the lid,
7. Remove the stove fan and replace it with a new one if it is not possible to repair it.
When installing the electric motor, make sure that it does not touch the housing when rotating.
Why does the stove blow cold air? Causes of malfunction
In the interior of the VAZ 2110 you can quite often see that the heater simply does not respond to the temperature regulator. The answer immediately suggests itself - one of the elements of the system has simply failed. We start looking for him.
Problems with the interior temperature sensor
First of all, we check the interior temperature sensor. It is located on the ceiling, near the interior lighting. If the temperature regulator is turned to the extreme right position, and the stove reacts to this, then the sensor needs to be changed. If everything is fine, we look further.
Problems with the heater damper
The heater damper may oxidize and jam. Many experienced owners of these cars install an aluminum damper, which better distributes air and retains heat in the cabin. But you can only get to it from under the hood.
If the stove on a VAZ 2110 blows cold air, but is itself heated to a temperature of 90 degrees, then the reason is hidden in the standard air ducts. Most likely, they are either damaged or have fallen off from the stove itself. And to get to them you will have to disassemble and remove the entire panel. If you still cannot restore them, you can simply replace them with corrugated hoses purchased from building materials and install them. And seal all joints tightly and thoroughly with polyurethane foam or modelin.
The heater radiator is clogged
If the stove on a VAZ 2110 blows cold air, then there is only one reason - the stove radiator is clogged. If the engine is cooled with water, then rust can form in the radiator, and at high temperatures, scale can also form. Small pipes in the radiator can become clogged if you (accidentally) mix antifreeze with antifreeze, this mixture will simply curdle. In addition, some short-sighted car enthusiasts add a special radiator sealant to the coolant, which also clogs the radiators from the inside. It's quite easy to check. You need to warm up the engine to a temperature of 90 degrees, turn on the heater and check the inlet and outlet pipes of the heater by touch. If the temperature on them is different, then the radiator is simply clogged and must be replaced. But the process of replacing it is quite labor-intensive.
The heater fan is broken
The stove fan may fail. Both he and his fuse are checked.
The gasket between the head and the engine block may be broken, allowing coolant to enter the cylinders. As a result, the coolant level may drop. If thick white smoke comes out of the pipe, then the gasket is definitely broken and requires immediate replacement.
If the cabin filter is clogged with dust, then there is no or almost no cold air intake to the fan of the VAZ 2110 stove. It must be immediately taken out, cleaned, and if that fails, then replaced with a new filter.
There may be a low level of antifreeze or antifreeze and there is simply not enough for the stove due to air locks in the cooling system. When the pump squeezes out and expels this plug from the system, you must add liquid.
Thermostat failure
The most common reason why the stove on a VAZ 2110 does not heat with hot air is the thermostat. It just starts to stick in the upper or lower position over time. If this happens, then you just need to replace it. But the same situation can happen to a new one. So what should we do then, change it again? There is a proven way to bring a stuck thermostat back to life.
To do this, you will need to park the car on a slight slope. In this case, the front wheels must be 25–35 cm higher than the rear wheels. The engine must be running. You need to open the hood and prepare a small wooden (precisely wooden, to avoid damaging the thermostat) stick, or the handle of a shovel. Now, once you get behind the wheel, you need to change the gas 2-3 times. Immediately go out and tap the thermostat with the butt of a stick. After this, touch all incoming and outgoing pipes near the thermostat. Such manipulations need to be carried out 3 – 5 times, after which the thermostat will work like new again.
Cracks in pipes and pipes
Another serious malfunction of the stove is coolant spilling out under your feet. There are usually two reasons. A leak in the radiator or a crack in the pipes. It is best to replace both elements, since repairs and sealing them will cost longer and more expensive.
How to replace the heater fan on a VAZ 2110-VAZ 2112
These instructions for replacing the heater motor are suitable for many cars of the tenth family, but not for all, because dozens were produced in very different configurations and designs over the entire time, some VAZ 2110 even had an engine from Opel installed from the factory, such a car is marked VAZ 21106, therefore, we won’t be able to write about everything (since it will be a very long article), we’ll just take the most common tenth family and use its example to show how to replace a stove motor through descriptions and pictures!
1
First of all, you will need to get to the motor, it is hidden under a trim that is located under the windshield, and inside this trim, the motor is still placed in a casing, so you will have to remove a lot of decorative elements, in more detail how to do this is described in the article entitled: “Replacing the cabin filter on a VAZ 2110” and by the way, the trim that is located under the windshield cannot be removed without removing the brush, and when you lift it, pay attention there will be a tee under it (see the large photo for the location where it is located) , disconnect the hose from it that is connected at the bottom (see small photo) and the trim can then be removed from the car
2. We go further, as soon as all the elements that prevent access to the casing in which the motor is located are removed, find the wires coming from the motor, or to be more precise, one Plus wire and one Minus wire, so the minus (Indicated by a green arrow) is attached to nut (Indicated by a blue arrow), you unscrew it, but the plus (Indicated by a yellow arrow) is connected to the other wire through a wire block and a connector (see small photo), disconnect them from each other.
3. Then, using a flat screwdriver, pry out the four latches (They are indicated by arrows) that fasten two casings together, on one of which the stove motor is attached. Be sure to replace any latches that will be broken during their removal with new ones during reassembly. It is recommended to install all the fasteners in their places to prevent the housings from moving between each other.
4. And finally, unscrew all the screws that hold the casings together, there are only about 8 or 10 of these screws (We could be wrong), when they are all unscrewed, the casings can be separated (see small photo), but just remember where the screws go they are twisted because they have different lengths and you cannot wrap the long ones where the short ones should be located and vice versa.
The stove motor can be removed assembled with the casing, or you can immediately take it out separately, it’s up to you how to do it, but having taken out everything assembled, it will be much easier to disconnect the motor (since it will be more convenient), and the motor is separated in the following way, you will only need just remove two wires (minus wire and plus wire) from the hole into which they are threaded in the casing and that’s it!
5. Installation is carried out in the reverse order of removal, after installing the stove, you will have to use the help of an assistant and find out whether you installed the stove correctly in its normal place or with a skew (If it is skewed, then this will need to be removed immediately), in general, closer to topic, ask an assistant or even get into the car yourself and turn on the stove, while assembling it, i.e. tighten the fastening screws (You don’t even have to tighten everything) and install the clamps and, of course, put the minus on the body, and connect the plus to the connector, then turn it on and if everything works fine in all modes, then turn it off and go tighten the last screws, install the covers under windshield and of course install the brushes, the replacement is complete, if after turning on you hear a crackling noise, then this only means one thing, namely that the heater blades are touching the body in which it is located, then turn off the heater and unscrew the screws , remove the clamps and remove the body together with the stove, place the motor there correctly, tighten everything again and try until the noise disappears, just like it disappeared, screw everything back and install all the parts in the reverse order.
Selection and installation of the VAZ 2110 stove motor
The next step is to purchase and install a new fan motor for the furnace. The price of a new engine can be about 1,500 rubles. Before installing a new motor in the stove, you must first make sure it is working properly.
If the purchased motor is in working order, then you should begin installing it in the stove. And the next step will be to reassemble the stove and install it in the car.
As you can see, the procedure for replacing the stove motor is very simple to perform and does not require a large investment of time and money. This procedure can be done independently in the garage without contacting third-party car services. The price of such work in the service can range from 300 to 600 rubles.
Source
Work to replace the fan in the cabin
Replacing the heater motor of a VAZ 2110
The subsequent change of the heater motor will be done directly from inside the car:
Under the dashboard you need to find the block that goes to the electric motor. She disconnects. After this, you will need to unfasten the ground wiring of the electric motor. As a rule, it is pressed to the body by the front mounting nut of the heater. The trim and lining of the windshield frame are dismantled, and you cannot do without unscrewing the mounting screws. The right upholstery is removed from the interior heater, and the fastening nuts and screws should also be unscrewed. Heating hoses are disconnected
At this stage of work, extreme caution must be taken, since antifreeze residues may leak from these hoses and the heater radiator. To prevent the smell of coolant in the car interior, you need to lay a material that absorbs moisture well. The wiring is disconnected from the electric motor, from the micro-reducer, and also from the pneumatic valve. After these steps, remove the front housing with the stove casing. These elements are fixed with brackets and screws. It is worth noting that the engine and motor are located on the casing. The latches are removed, and the engine and motor are removed.
Recommendations for replacing the motor
Replacing the heater motor of a VAZ 2110
You can disassemble the electric motor yourself only to evaluate the collector and clean it. If the cause of the breakdown lies in another situation, then it is not advisable for a non-specialist in working with such parts to disassemble it. It is better to buy a new electric motor.
Note! It is also not recommended to dismantle the engine impeller on your own, since when it is installed in its place, the balancing, which plays an important role, will be disrupted. Naturally, the electric motor will function, but not smoothly, which can lead to breakage of the bearings and noise when the stove is turned on.
Since the stove is in a disassembled state, it becomes possible to calmly view the other components of the cabin heater. So:
- In order for more heat to come from the radiator, you need to dismantle it and wash it. It is fixed on the rear casing of the heater, which is removed by unscrewing the mounting screws. After this, the radiator can be easily removed and washed under the pressure of water flowing from a hose that is connected to the radiator inlet or outlet tube. The same pressure washes away dirt from the surfaces of the removed radiator.
- To disassemble the air ducts and heater control mechanisms, you will need to remove the instrument panel on which the main air ducts are located.
Note! Usually the panel with the main air ducts is made as one piece, so it must be handled with the utmost care so that it does not have to be replaced later. After this, you need to remove the interior air ducts, which are secured with special screws, and the decorative lining of the floor tunnel
After this, you need to remove the interior air ducts, which are secured with special screws, and the decorative lining of the floor tunnel.
Note! Under this trim there are air ducts for heating the feet, which are attached to the body with screws and latches.
- The air distributor is removed from the dashboard by unscrewing the mounting screws and disconnecting the damper control rod.
- Reassembly must be done in the reverse order of disassembly. If necessary, fix the damper seals with glue. You can also seal the attachment points of the hoses with the radiator with sealant.
- When all the parts are assembled and installed in their places, the functioning of all components is checked and antifreeze or antifreeze is added. It all depends on personal preference.
- At the final stage, they check the tightness of the attachment of the hoses to the radiator and the actual operation of the assembled stove.
For those who perceive information visually, it is recommended to watch a video with a detailed description of the actions and several photos that will help you do everything correctly.
Repair work can be carried out with your own hands, but subject to clear instructions. This will help you save a lot of money, because the price for services of this kind in car services is not cheap.
Replacement
Now we proceed directly to replacing the motor. You will carry out the procedure from the salon, so make yourself comfortable.
- Under the dashboard, locate the connector that goes to the heater motor. Turn it off.
- Next, you need to disconnect the negative wiring of the electric motor. Often on a VAZ 2110 this element is pressed to the body by the front fastening nut.
- You need to remove the trim and trim from your car's windshield frame. Along the way, you will have to unscrew several fasteners.
- You need to remove the right side of the upholstery from the stove, after which the fastening nuts are unscrewed.
- Be sure to disconnect the heating hoses. Try to be as careful as possible here, since coolant will most likely leak from the heating hoses. It is impossible to drain it all, even with the most careful approach.
- The ends of the hoses can be plugged with something like plugs to prevent liquid from spilling into the cabin.
- To prevent carpets and floors from being damaged by the cooling liquid, lay down absorbent materials. For example, diapers for adults are perfect. They are available at any pharmacy.
- Disconnect the wiring from the electric motor, micromotor gearbox and pneumatic valve one by one.
- Now you can dismantle the front housing along with the casing of your heating stove.
- These devices are secured using mounting screws and brackets.
- On the stove casing there is the desired motor, as well as the engine.
- Remove the latches, and then remove the engine with the motor.
Useful tips
After completing dismantling work, you can remove damaged, non-functioning elements and then install new ones in their place.
But when making repairs, we advise you to follow some important recommendations.
- You can disassemble the electric motor yourself only if you want to check the condition of the collector and clean it;
- If the cause of the breakdown is not the presence of debris and contaminants in the collector, then it is strongly not recommended to work with the electric motor yourself;
- Contact an experienced electrician who can disassemble and return the device to its previous functionality;
- Do not remove the engine impeller. If done incorrectly, you will upset the balance, which plays a huge role in the proper operation of your car's heater. The electric motor will operate if the balancing is out of balance, but the impeller will begin to rotate unevenly, which will lead to beating of the bearings and loud noise when the cabin heater is turned on.
Causes of malfunction
There can be many nuances that the heater motor has begun to work poorly. Among them are two main ones that can be helped by a small repair rather than a complete replacement of the fan. The commutator brushes may well wear out. The brushes themselves, in turn, can “gnaw through” the copper lamellas of the collector, which is why it does not want to work, and the heater motor “goes silent.”
Although this happens quite rarely, brass sleeves of plain bearings can squeak or whistle. Repairs are made by regular lubrication, although this usually helps for a short time; sooner or later the electric motor will need to be replaced. So, if you still have to get to the furnace fan, perhaps replacing it completely will be the best solution. In addition, it saves your time.
Adjusting the automatic control system
To check the functionality of the device, you should take a mercury thermometer and place it near the temperature sensor. After this, you need to activate the stove controller and set the fan control knob to position “A”. The automatic control system should be carefully adjusted only if after 15–20 minutes the temperature is more than two degrees below the data from the sensor.
In order for the self-propelled gun to work better, you will have to pull it out and then turn the knob located on the left side of the controller several times. You can increase the temperature by turning the knob clockwise, and decrease it by turning it counterclockwise.
After all the manipulations performed, you will need to check the functionality again and, if necessary, repeat everything from the beginning.
Causes of malfunction
As a rule, there are many reasons for such a malfunction, these include:
- clogging with slags from;
- stove motor failure.
If the stove motor is not functioning, or some of its speeds are not working properly, then it is first recommended to check the resistor, which in other words can be called the stove rheostat. This element is responsible for the speed of the fan. You can purchase such a part in a specialized store that sells auto parts. As for replacement, this can be done with the help of a specialist or on your own, which is not so difficult even for an inexperienced specialist.
There are heater malfunctions that can be easily fixed by any car enthusiast. For example, a situation may occur when cold air blows through the side deflectors and the windshield heating duct of the heating system, while a hot air flow comes from the lower and central air ducts. Most likely, the reason will be unsatisfactory performance, which is designed to cut off cold air. In some cases, it prevents the normal passage of cold air. Such faults are most easily identified during the cold season.
When bending the damper drive rod, special care must be taken so as not to damage the plastic parts. Please note that plastic becomes more brittle in winter.
Of course, a non-functioning stove causes many problems in winter.
If this is not so important in the summer, then in the winter the windows will fog up. You can figure out what the reason is by disassembling the heating system of the car.
Signs of a malfunctioning heater motor
First of all, you need to check the fuse.
It often turns out that this is the problem. If the heater fuse is blown for any reason, it should be replaced. If after replacing the fuse the stove still does not work, then you should proceed to dismantling and replacing the motor itself. The first sign of a malfunction of the heater motor on a VAZ 2110 may be noise from the motor itself. The reason for this sound may be the lack of lubrication on the engine, or it may indicate the imminent death of the heater motor on the VAZ 2110
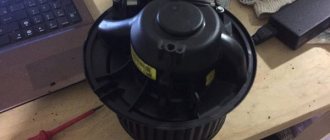
Heater motor
7.11.1. Design Features
| GENERAL INFORMATION |
Diagram of the automatic heater control system
| 1 – fan electric motor; 2 – additional resistor; 3 – controller; 4 – mounting block; 5 – ignition switch; 6 – cabin air temperature sensor; | 7 – recirculation switch; 8 – recirculation valve; 9 – micromotor gearbox for heater damper drive; A – to the instrument lighting switch; B – to power supplies |
3
Diagram of the automatic heater control systemAddresses of the output plugs of the heater control system controller
The controller receives information from:
– sensor 6
air temperature in the cabin (a small fan is built into the sensor);
– micromotor gear shaft position sensor 9
heater damper drive, i.e. information about the position of the heater damper.
Based on the information received and the set air temperature, the controller controls the position of the heater damper, sending appropriate signals to the damper drive micromotor.
If the fan operating mode switch handle is in position A, then the controller also controls the fan speed depending on the difference in the air temperature in the cabin and the temperature set point.
A valve is used to quickly warm up the air in the cabin. 8
recirculation with switch
7
. When the valve is turned on, the flow of outside air into the cabin is blocked and only cabin air circulates through the heater.
The vehicle is equipped with a heater fan electric motor of type 45.3730, excited by permanent magnets.
Additional resistor 2
serves to select the fan operating mode. It has two coils with a resistance of 0.23 and 0.82 Ohms. When you turn the heater fan switch knob on the heater control panel, you can turn on either both spirals (1st speed), or a spiral with a resistance of 0.23 Ohm (2nd speed), or turn on the engine directly without a resistor (3rd speed). I speed).
It is recommended to replace a faulty electric motor with a new one. The only possible repair is cleaning the collector.
Addresses of the heater control system controller output plugs
| Plug | Pad address | |
| 13-terminal | 6-terminal | |
| 1 | “Minus” of the micromotor gearbox shaft position sensor | Output "1" additional resistor |
| 2 | “Plus” of the electric motor of the micromotor gearbox | — |
| 3 | “Minus” of the cabin air temperature sensor | Housing ("mass") |
| 4 | “Plus” of the micromotor gear shaft position sensor | Output "3" additional resistor |
| 5 | “Plus” of the cabin air temperature sensor | Output “2” of additional resistor |
| 6 | "Plus" diagnostic output | "Plus" of the power supply |
| 7 | — | |
| 8 | “Minus” of the electric motor of the micromotor gearbox | |
| 9 | "Minus" diagnostic output | |
| 10 | — | |
| 11 | Input “Turn on backlight” | |
| 12 | Diagnostic output “+8 V” “Plus” of the electric motor of the cabin air temperature sensor |
The stove releases cold air
The first thing to do is to determine the cause of the breakdown. This will help you find ways to solve it. But there are quite a lot of them, so let's look at the most popular ones.
One common reason is that only cold air comes out of the unit. This is the first sign that the stove is not working properly. The reason lies in the fact that the interior temperature sensor has broken down - it is responsible for what conditions are in the cabin and whether they correspond to those set by the driver. If it fails, then its readings are incorrect. Thus, the stove receives information that it is hot in the cabin. It will therefore produce cold air to make conditions more comfortable.
It's easy to fix this problem. There are several steps you need to take. First, remove the lampshade by unscrewing it. Then install a new sensor and check it for serviceability.
Also, the reason that cold air comes out of the stove can be a breakdown of the gear motor. To determine it, you must first check the temperature sensor for serviceability. If everything is in order with the latter, then clearly the problem lies in the gearmotor. It is worth noting that this part, like the previous one, cannot be repaired. The only way to solve the problem is to replace it with a new one.
This process is a little more complicated. It consists in carrying out the following actions. First, the wipers are removed. Then you need to unscrew the bolts that are responsible for fastening the frill and remove it so that it does not interfere. Thus, access to the element that has failed will be obtained.
Then you need to remove the gearmotor itself. To do this, its fastening is unscrewed. A Phillips screwdriver will help with this. Next, you should carefully disconnect all the wires. This should be done as carefully as possible so as not to damage anything. This is the only way you can completely dismantle the broken part. Using the same principle, but in reverse, install a new element. At the same time, make sure that the cut of the part clearly fits into the damper.
Preparation
Preparatory activities do not include many complex operations. You will need to do the following:
- Remove the negative terminal from the battery to de-energize the car and protect the car from possible short circuits;
- Drain the coolant from the system. To do this, open the cap of the expansion tank to relieve excess pressure, and then unscrew the drain. The liquid must be drained into a special prepared container.
When draining the cooling liquid, one important rule must be observed - the procedure is carried out only when the engine has cooled down. If in the future you are going to use the same antifreeze or antifreeze, then choose a clean container for draining
If in the future you are going to use the same antifreeze or antifreeze, then choose a clean container for draining.
Design of the VAZ-2110 heater
The SAUO replaced manual control of the heater, but otherwise the stove remained structurally the same. As in earlier models, the interior heating system is a housing with a radiator installed inside, connected to the cooling system of the power unit - a heat source, dampers that redirect the air flow to the desired zones, and a fan driven by an electric motor, which creates the air flow. SAUO is a controller that, depending on the set parameters, monitors the temperature in the cabin and regulates the position of the dampers, maintaining the specified mode.
The efficiency of the VAZ-2110 interior heater would be low without the forced creation of air flow, and this task falls on the stove fan.
Model selection
Even if your VAZ 2110 has an old-style electric motor (manufactured before 2004), you can, of course, find a “original” fan. But it is quite possible to install a new type of motor instead - it is larger than the previous one, secured with three bolts. And its cost is not that high.
By the way, the new model heater fan from the VAZ 2110 is even suitable for some Nissan models with minor modifications. This is what the owners of this car often use when they install at least three times cheaper motors in their foreign car during repairs.