The automobile generator is equipped with a rotor with a commutator unit, which allows the excitation voltage to be supplied using carbon moving contacts. When parts burn or wear out, the functionality of the power source is impaired. Checking and replacing generator brushes does not require the use of special tools and is carried out by the owner independently.
Generator brushes - element information
The brushes we are interested in are made of graphite, which is why they are often called carbon.
They are used not only on cars with an internal combustion engine, but also on a wide variety of mechanisms and machines equipped with an electric motor (machine tools, lifting devices, urban public transport, and so on). The most common are EG-4 brushes. This brand is suitable for installation on many cars of different years of production, as it has standard operating parameters. Less commonly used are other products (for example, EG-61), which are characterized by a high margin of safety due to their impregnation with special compositions.
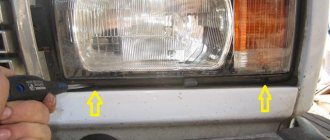
On domestic cars, the generator and brushes for it are located under the right front headlight of your “iron horse”. They are not difficult to find. It is enough to open the hood to see the generator - its winding and two lids, which look like tin cans, come to the surface.
Where are the generator brushes located?
Changing generator brushes is not difficult. They are located in the rear half of the device and are held in place by a single bolt. The brush assembly itself is located next to the slip rings and is connected to the voltage regulator. The brushes are held in place by springs next to the rings. Knowing the circuit diagram of the generator, it is not difficult to find the brushes. To replace, you will need a standard set of tools:
- Several wrenches;
- A pair of screwdrivers;
- New brushes;
- Liquid WD-40 (in order not to strip the threads of the bolts).
The brushes can be replaced in two ways, by removing the generator or without removing it. The design of the car, or rather the location in the engine compartment, will tell you which method is best to use. If there is free space, it is not difficult to repair the generator brushes without removing the unit, and if the engine occupies the entire engine compartment, it is impossible to do without removing the generator.
Tools and materials
No special tools or devices are needed for replacement. It is enough to prepare a set of keys and screwdrivers, as well as new brushes. If the work will be carried out in a poorly lit room, then you need to add a flashlight or lamp to the tools (the generator is often located in a hard-to-reach place).
Tools for replacing generator brushes
On older cars, some fasteners may rust, so use a special solvent such as WD-40 to remove them. With its help, the process of unscrewing fasteners will become easier.
To dismantle old brushes you also need a soldering iron
When do you need to change generator brushes?
During scheduled maintenance, no one pays attention to the small elements of the generator, of course. It is for this reason that the breakdown of its brushes always comes as a surprise to the driver. Experts advise that after 50 thousand kilometers (or once every four years) you must check their serviceability and functionality, and then no problems will arise with the operation of the generator.
It is noteworthy that you can check the brushes (and, if necessary, change them) without dismantling the rather bulky generator. In addition, the following symptoms may indicate the need to look under the hood of your car and check the graphite brushes:
- unpredictable shutdown of electronic devices in a vehicle, occurring for unknown reasons;
- reducing illumination of the car interior and external light sources;
- voltage reduction;
- a car battery that discharges unreasonably quickly, which, moreover, is then very difficult (and sometimes impossible) to charge.
Any of these symptoms tells the motorist that he most likely needs to remove the old brushes and install new ones instead. You can check old products for functionality very simply. We should remove the negative from the battery, remove the voltage regulator and visually evaluate to what height the graphite parts we are interested in protrude from their “shelter”. Brushes need to be changed urgently if their height is less than five millimeters.
This is interesting: ZAZ Tavria, basic data on adjustments and control, instructions online
Symptoms of a problem
Most often, brushes fail due to simple wear, and a malfunction will first be indicated by a poor battery charge. Car owners can independently understand that this part has failed based on the following signs:
- there will be constant disruptions in voltage;
- the battery will begin to charge very quickly or will not charge at all;
- optical devices will begin to illuminate the road worse;
- the lights on the dashboard will blink constantly;
- It will not be possible to operate electronics, for example, a car radio, due to insufficient voltage.
If the above signs of malfunction are detected, it is recommended to replace the brushes as soon as possible in order to maintain the functionality of the generator itself. After all, if this element fails, the cost of repairs will double or even triple.
According to experts, replacement is best done after 45,000 - 50,000 km.
In addition, it is advisable to have spare components so that, if necessary, you can replace a failed element yourself, without waiting for a tow truck, for whose services you will have to pay a lot of money.
Our services
- Repair of generator of cars, trucks, special equipment and boats;
- Exchange for a restored one that has undergone a full restoration cycle (complete overhaul);
- Sale of spare parts (original and analogues from leading global manufacturers);
- Sale of new and used generators;
- Sale of reconditioned units;
- Replacement and installation of a generator on a car;
- Arrangement of additional measures to protect the generator from environmental factors.
Diagnosis of generator malfunctions is free if the work is carried out in our workshop.
Replacement methods
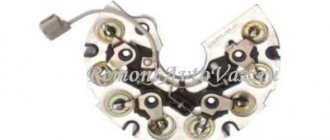
- Replace the brush assembly with the voltage regulator relay (chocolate). As is known, maintaining charging at the same level is carried out by adjusting the voltage supplied to the generator armature winding. For reliable contact, the brush leads are attached to the contacts of the voltage regulator relay by soldering. To simplify car repairs, brushes, brush holder and relay regulator are most often sold assembled. The advantage of the complete replacement method is its simplicity. For example, the low cost of the assembly for many VAZ cars makes separate replacement of brushes very impractical.
- Replace brushes separately. To do this, you will have to remove the old brushes and solder new copper-graphite products in their place (of course, for DIY repairs you will need a soldering iron, flux, solder and basic soldering skills). As in the case of complete replacement, the feasibility of the method largely depends on the cost of new rods. The point is not only the high price of parts for generators of many foreign cars, but also the fact that for some models (especially for old low-volume cars) it is simply impossible to buy a relay-regulator with brushes assembled. It is proposed to eliminate charging problems by purchasing a new generator. In this case, replacing worn-out elements is the only way to save a considerable amount. If you want to change the generator brushes yourself, you may encounter a lack of new parts for sale for your generator model. In this case, you should select suitable copper-graphite brushes from another car. For proper operation, the length of the rods is important (should not be less than that of new or slightly worn original rods) and the length of the copper flexible contact. New brushes should move freely in the brush holder. In fact, the shape of the new rods does not really matter, since they can be processed perfectly with a needle file.
This is interesting: How to remove the headlight on a Chevrolet Aveo T300 and replace the low beam lamp
Is it possible to replace without removing the generator?
Replacement without removing the generator from the car is possible only if there is enough space in the engine compartment to remove the voltage regulator relay. The part is located behind the rear cover of the generator. Inspect the location where the generator is installed to see if it will be possible to use wrenches and screwdrivers to remove the back cover and the relay itself. Perhaps it will be enough to just unscrew the generator to turn it into a convenient position, which will be useful if dismantling other units is necessary to remove it. For example, on a Lada Priora with air conditioning, it is most convenient to dismantle the generator by removing the right headlight.
How to replace brushes on a removed generator
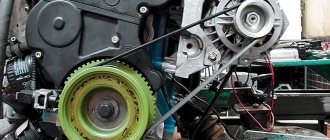
With the generator removed, work on replacing the brushes will be much easier. Having access from all sides, it is easy to examine the wear of the brushes and replace them. The main problem in this option will be removing the generator from the car. You need to unscrew the generator mounting bolt, loosen the belt tension, remove it and unscrew the mounting bolts connecting the generator to the engine housing. If you can get the generator from above, consider yourself lucky. There are often cases when, to remove the generator, you have to remove not only the air filter and pipes, but even the radiator.
First of all, you need to clean the mounting area of the brush holder from dirt and dust. You can wipe it with solvent and then blow it with compressed air. After this, you need to remove the brushes; to do this, you need to unsolder them. Leaving the generator without brushes, be sure to clean all contacts and check the springs for elasticity. It is advisable to polish the slip ring after this.
The replacement itself consists of unsoldering the old wires from the used brushes and soldering them to a new set. When carrying out this operation, you must be careful, since the material of the brushes is very fragile. After installing the brushes on the seat, you should make sure that they move freely.
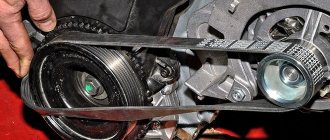
Installation of new brushes should be done in the reverse order, after which the generator is assembled and installed on the car. It is recommended to change the generator bearings when replacing the brushes. When installing a generator on a car, the main thing is to correctly adjust the belt tension. If the tension is insufficient, the belt will slip on the rollers.
It happens that the computer in the car begins to show a malfunction of the generator immediately after replacing the brushes. This occurs due to insufficient grinding in of new parts. During operation they will rub in and the error will disappear. If the error persists, the reason is that the case is stuck due to excess dirt. This problem can easily be eliminated by blowing the parts with compressed air. Before checking the operation of the generator, be sure to inspect the brushes for chips and cracks. New parts often have manufacturing defects.
It happens that the brushes are replaced together with the relay and generator regulator. In this case, the replacement process proceeds as follows:
- The negative terminal is disconnected from the battery;
- You need to remove the rubber tip from the positive wire;
- The generator is dismantled (if necessary, the air filter housing must be removed);
- You get a brush block with a relay regulator;
- The fixing springs are removed;
- The brushes are unscrewed;
- All associated wiring is disconnected;
- A new block is being installed.
This is interesting: How Chery Tiggo is repaired and tuned
The generator is connected only after checking the absence of defects on the new brushes. After assembly, we put the generator in place, tighten the belt, connect the battery and start the car.
Is it possible to restore brushes?
In emergency situations, when you can’t count on help, you can use the advice of experts on emergency restoration of the brush assembly. However, reliable operation of the brush assembly can only be fully ensured by using high-quality spare parts recommended by manufacturers. Recovery is always a temporary solution; As soon as the opportunity arises, you need to go to the service center.
The procedure for replacing brushes, despite its apparent simplicity, requires certain skills and special knowledge. Therefore, it is better to go to a car service center, where diagnostics and maintenance of your car’s electrical equipment will be performed quickly and with a quality guarantee.
Replacement instructions
- Remove the negative terminal of the battery.
- Disconnect the main positive terminal of the generator, the voltage regulator connector and the negative terminal, if necessary. In some car models, engine speed is read from terminal W on the generator; otherwise, the contact may not be connected or may be absent altogether.
- If the replacement is carried out by removing the generator, loosen the service belt and unscrew the fastening bolts (you can read more about replacing, installing and tensioning the belt in the articles: “What to do if the generator belt whistles” and “Tensioning the generator belt”).
- Unscrew the rear cover mounting bolts.
- Unscrew the voltage regulator relay. If you chose the complete replacement method, all you have to do is install the new part and assemble all the elements in the reverse order. In any case, we recommend that you at least check the generator bearings and the condition of the collector plates. If the wear of the plates is within normal limits, before installing new brushes, clean the surface to a shine with fine-grained sandpaper.
Soldering new rods
- File off as much of the solder as possible, holding the flexible contact of the old brush.
- Point the relay-regulator with the brushes down and heat the soldering area with a soldering iron.
Be prepared for the brush to fly out of its seat under the influence of the spring after soldering.
- Prepare a small piece of thin copper wire.
- Use an awl or a round file to widen the hole in the contact pad.
- Solder the copper wire to the flexible contact.
- Install the spring and pull the copper wire through the hole to then pull out the flexible brush contact.
- Press down on the brush to prevent it from flying out and unsolder the guide wire.
Holding the brush at a sufficient distance from the edge of the footprint, solder the flexible contact to the pad. The contacts must first be tinned well, and the excess length of the flexible contact must be cut off if necessary. After soldering, the rods should move in the landing shaft without jamming.
Nature of the malfunction
In the design of the generator, copper or copper-graphite brushes are used to supply voltage to the collector plates. Accordingly, the force of electromagnetic induction that occurs when current flows through the armature winding depends on the quality of the contact between the brushes and the commutator plates.
Since the armature constantly rotates during operation, abrasion occurs and the length of the brushes decreases (the plates themselves wear out to a much lesser extent). To compensate for wear, the brush holder has springs that press the brushes against the commutator plates. But when wear becomes critical, the spring force is not enough to make good contact, which leads to a drop in the current flowing in the circuit.
Symptoms
Such a malfunction leads to only one consequence - a drop in the generator charging voltage. On a working car, the generator should produce at least 14 volts, but you can only find out about critical brush wear after the critical battery charge level light on the dashboard lights up. This means that the car’s on-board power supply comes from the battery, and not from the generator. An indirect sign of wear may be difficulty starting the engine after inactivity. The situation is typical for the frosty season, when the amount of self-discharge of the battery increases. Worn alternator brushes lead to a decrease in charge level. Starting a cold engine, frequent trips over short distances with many consumers turned on (heater, headlights, wipers, heated mirrors, etc.) lead to the fact that the generator with worn brushes does not have time to recharge the battery.
Repair of generators and starters for Russian cars and foreign cars
Elektrostal, GSK "SPLAV", Avangardny proezd 2, near the Avangard stadium, We will come, change the starter, generator on site, We will bring the battery. Let's start the car.
Our phones Our mail Many interesting things on our other sites https://genrem.narod.ru https://startrem.rf https://geta1.narod.ru
Removal and installation of any starters and generators. Free check
You can exchange it immediately and not have to wait for repairs to be made.
For enterprises Repair of starters and generators for trucks, tractors, buses, special equipment, loaders cash and non-cash payments
Repair of starters and generators for all foreign cars Repair of starters and generators for any GAZelle, Volga, Valdai. For Zhiguli, eight, nine, ten, twelve, and everything that VAZ makes, you can install a more powerful generator. We will check and charge the battery
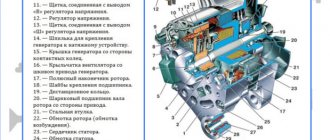
How does the main power source work?
The generator consists of two main parts: the stator and the rotor. These parts are housed in an aluminum housing. The stator is fixedly fixed, and the rotor is fixed to the shaft and rotates on bearings. The rotor shaft is connected to the crankshaft of the car via a drive belt.
When the crankshaft rotates, the generator rotor rotates, which generates electrical energy for the vehicle's on-board system. It should be noted that the generator produces alternating voltage current. The diode bridge rectifies the current and a constant voltage current of about 14 volts is supplied to the on-board system of the machine.
The generator, through a relay regulator, is directly connected to the battery. When you start the car, electricity comes from the battery. After starting the car, current from the generator begins to flow into the on-board electrical system.
The battery restores density by consuming electricity from the vehicle's on-board system. With a working generator, the entire electrical system works smoothly. When the generator fails, electricity comes only from the battery. If you do not recharge it, then soon the entire energy reserve will be used up and the car will stall.