Answers (1)
Replacing clutch fluid is very simple. To replace it, you will need 150 grams of brake fluid; if, for example, the brake fluid reservoir is at its maximum, then you can pump it out from there and pour it into the clutch.
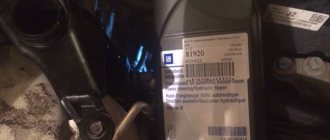
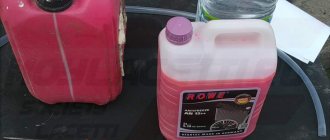
According to the regulations, the fluid in the clutch hydraulic system should be changed every 30,000 km or every 2 years. Fill with DOT4
1) Open the fluid cap - it is located near the brake fluid reservoir.
2) Pump out the old liquid from the tank using a syringe or bulb or other device.
How does the clutch master cylinder fail?
Cheap clutch master cylinders are coming out
failure
due to poor-quality piston seals, fluid leaks due to low precision manufacturing of parts and poor assembly quality
. It makes sense to repair such products; a low-quality cylinder
is completely replaced.
Interesting materials:
What is the purpose of a catalyst in a car? Why is there a Centrifuge in a washing machine? What are stabilizer bars for in a car? What is car wax for? What do you need to register a car? How long does it take to change the car's shoes? How long does it take to change the car's shoes? What is ground clearance in a car? What does DPR mean on license plates? DPR on car license plates?
Step-by-step instruction
Bleeding the clutch cylinder can be done with an assistant or independently, which determines the sequence of actions. It is important to do everything correctly, otherwise the hoses and hydraulic drive will become even more airy.
Leveling with the help of a second person
Let's take a step-by-step look at how to bleed the clutch in the easiest way with an assistant:
- Open the hood of the car. All actions are performed with the engine turned off.
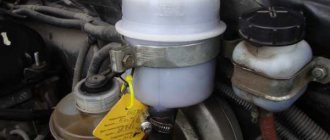
- Closer to the partition of the engine compartment and passenger compartment there is a fluid reservoir. Remove the lid and add the missing volume so that there is 2 cm left to the neck. The reserve will be needed, since part of the fuel fluid will be poured out during pumping.
Adding fluid to the reservoir in the engine compartment
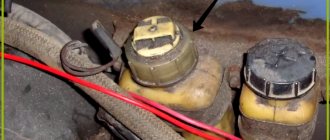
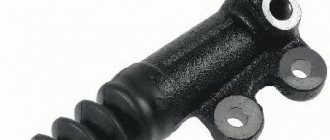
- Next to the clutch, locate the slave cylinder that pushes the fork with the release bearing. There will be a fitting on the top of the unit body. It is closed with a rubber cap to prevent clogging.
- Remove the cap from the fitting and place a transparent hose of the appropriate diameter on it.
- Take a cut plastic bottle, fill it with 150–200 ml of TJ and dip the free end of the hose into it.
- An assistant pumps the clutch pedal 2 times and on the third presses it in the maximum depressed position. This helps build pressure into the system.
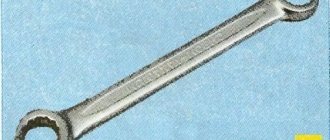
- Using an open-end wrench, unscrew the fitting one turn. Through the transparent hose you will see liquid and air leaving the system. The latter will appear in the form of bubbles in the receiving container.
Draining liquid through a tube into a bottle
With this action, the fork will return to its original position and connect the driven and driven discs, as the pressure is released. After this, the clutch bleeder screw is screwed in and the process is repeated two more times. If, upon completion, air continues to come out of the hose, then there is a lot of air in the system and more cycles will be required. The clutch bleeding is completed by adding technical fluids to the Max mark.
How to upgrade with the help of one person
If you do this work yourself, you will have to regularly move from the hood to the interior and back. You will need a brick or other heavy object to hold down the pedal. But without the help of a second person, you can pump the clutch in the opposite way.
Bleeding the clutch using the reverse method using a syringe
To do this you need:
- Open the hood and get to the fluid tank.
- Unscrew the cap and remove some liquid with a 10-cc syringe.
- Remove the rubber plug on the fitting and attach the transparent hose from the dropper to it.
- Insert a syringe with technical fluid into the free end of the hose.
- Make one turn of the fitting with an open-end wrench to open the channel.
- Slowly squeeze out the contents of the syringe.
- With this pumping method, the air will move in the opposite direction and it will exit through the tank. The pressure is created by the syringe, so the pedal is not activated.
- Tighten the fitting and make sure the fluid level is correct. Top it up if necessary.
Using this sequence, you will be able to bleed the system without the help of a second person.
Why bleed the clutch?
Bleeding the clutch is necessary to remove air pockets from the system and restore proper operation of the unit. To understand the importance of the procedure, let's briefly consider the clutch device and the way it is connected to the pedal in the cabin.
Main hydraulic drive device
In addition to the release bearing, basket and disc with friction linings, it uses a hydraulic drive. In the engine compartment of most cars there is a single reservoir with fluid (it is called TZh, antifreeze, “brake fluid”), which is used for the brake and clutch circuit. Correctly, such a liquid is designated as DOT with the corresponding number. In some older versions of the car, these systems are separated (brake and clutch) and each has its own reservoir. Pressure is supplied by the master cylinder.
It works with hydraulic fluid according to the following scheme:
- The driver presses the clutch pedal.
- The force is transmitted through a metal rod to the hydraulic unit, from where the fluid is pressurized.
- The clutch master cylinder pushes a slave cylinder piston and a fork connected to the release bearing.
- The discs open and any gear can be engaged, despite the rotation of the input shaft.
- The driver releases the pedal and the return spring forces the clutch sides together.
- Excess fluid flows from the working and master cylinders back into the reservoir.
General diagram of the transmission of force from the pedal to the clutch
When the system is working properly, all actions occur silently and switching is smooth. But if air gets into the hydraulic circuit with the liquid, then malfunctions will begin and the clutch will need to be pumped.
Malfunctions of the VAZ 2107 clutch hydraulic drive
Incorrect operation of the hydraulic drive leads to disruption of the functioning of the entire clutch mechanism.
The clutch does not disengage completely (the clutch “drives”)
If it is difficult to engage the first speed, and the reverse gear does not engage or is also difficult to engage, it is necessary to adjust the working stroke of the pedal and the stroke of the control rod. Since the gaps are increased, they need to be reduced.
The clutch does not engage fully (the clutch “slips”)
If, when you sharply press the gas pedal, the car accelerates with difficulty, loses power on inclines, fuel consumption increases, and the engine overheats, you need to check and adjust the pedal stroke and the distance of movement of the working cylinder rod. In this case there are no gaps, so they need to be increased.
The clutch operates jerkily
If the car jerks when starting from a stop, the cause of this may be a malfunction of the return spring of the main circulation center or the control center. Saturation of the working fluid with air bubbles can lead to the same consequences. It is necessary to find the causes of unstable operation of the clutch control hydraulics and eliminate them.
The pedal falls and does not return
The cause of pedal failure is usually an insufficient volume of operating fluid in the reservoir due to its leakage in the working (usually) or master cylinder. The main reason for this is damage to the protective cap and penetration of moisture and dirt into the cylinder. The rubber seals wear out and gaps form between them and the cylinder walls. Through these cracks, liquid begins to flow out. The rubber elements should be replaced, fluid should be added to the tank to the required level and air should be removed from the system by bleeding.
Do not add used brake fluid to the hydraulic clutch control system, as it contains tiny air bubbles.
Adjusting the travel of the pedal and pusher of the working cylinder
The free play of the pedal is regulated by a limiting screw and should be 0.4–2.0 mm (the distance from the top position to the pusher stopping in the master cylinder piston). To set the required clearance, use a wrench to loosen the lock nut of the screw, and then rotate the screw itself. The pedal stroke should be 25–35 mm. It can be adjusted using the working cylinder pusher.
To adjust the position of the clutch pedal using the limit screw, you will need a measuring ruler and a 10 mm wrench.
The length of the working cylinder pusher directly affects the gap between the end of the release bearing and the fifth basket, which should be 4–5 mm. To determine the size of the gap, you need to remove the return spring from the release bearing fork and move the fork itself by hand. The fork should move within 4–5 mm. To adjust the gap, use a 17 wrench to loosen the lock nut while holding the adjusting nut with a 13 wrench. During the adjustment, the pusher must be fixed. To do this, it has an 8 mm wrench flat, which is convenient to grab onto with pliers. After setting the required gap, the locknut is tightened.
Adjusting the length of the working cylinder rod allows you to change the gap between the release bearing and the fifth basket, as well as the magnitude of the clutch pedal stroke
The principle of operation of the VAZ 2107 clutch drive
The clutch is engaged and disengaged using the release bearing. Moving forward, it presses on the spring heel of the basket, which, in turn, retracts the pressure disk and thereby releases the driven disk. The release bearing is moved by the clutch on/off fork. This fork can be pivoted in different ways:
- using drive hydraulics;
- flexible, durable cable, the tension of which is automatically adjusted.
The clutch is engaged and disengaged using a release bearing, which presses on the spring heel of the basket, thereby retracting the pressure plate and releasing the driven disc
The operating principle of the VAZ 2107 clutch hydraulic drive is quite simple. When the engine is running and the clutch pedal is in the up position (depressed), the clutch and flywheel rotate as a unit. Pedal 11, when pressed, moves the rod with the piston of the master cylinder 7 and creates brake fluid pressure in the system, which is transmitted through tube 12 and hose 16 to the piston in the working cylinder 17. The piston, in turn, presses on the rod connected to the end of the clutch engagement fork 14 Rotating on the hinge, the other end of the fork moves the release bearing 4, which presses on the spring heel of the basket 3. As a result, the pressure disk moves away from the driven disk 2, the latter is released and loses traction with the flywheel 1. As a result, the driven disk and the gearbox input shaft stop. This disconnects the rotating crankshaft from the gearbox and creates conditions for changing gears.
Find out how to diagnose the clutch yourself: https://bumper.guru/klassicheskie-modeli-vaz/stseplenie/stseplenie-vaz-2107.html