What is needed to pump racks correctly
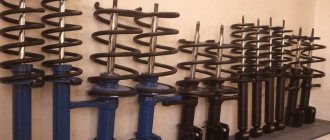
Any shock absorbers need to be pumped:
- front and rear,
- new and contract,
- one- and two-pipe,
- collapsible and non-collapsible.
The pumping process is not difficult. No special tools required. Just gloves will be enough to protect your hands from injuries and dirt. First, you should familiarize yourself with the general rules for its implementation:
- after completing the procedure, until the very moment of installation in its place, it is necessary to keep the part vertically - otherwise air may again get into it;
- It is important to consider the need to drain oil from some shock absorbers.
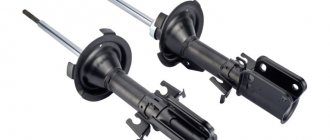
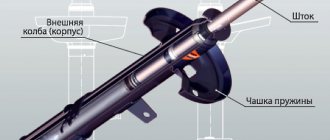
Shock absorbers can be either single- or double-tube, and there are also struts with a remote chamber.
Draining can be done in different ways:
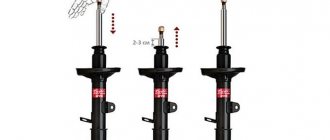
- by sinking the piston into the lower component of the part (there should be an undercompression of approximately 3 cm);
- through a groove designed for this purpose - it is usually present in the upper part of the part.
Why do you need to pump?
All new shock absorbers are stored in a lying position, this is convenient and does not take up much space.
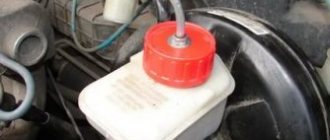
A compensation tank is structurally provided inside the product where oil can drain when it is in a horizontal position.
Therefore, if you install a shock absorber that is not pumped, then, as a rule, knocking noises appear immediately or after a while; after a couple of thousand kilometers, working fluid may leak. This is what many inexperienced car owners sin on.
Therefore, the idea is to, after pumping, return the working fluid to the cavities provided for it, and then leave the device in a vertical position until installation, so that overflow does not occur again.
You also need to understand that you can buy shock absorbers, each of which has been in the warehouse for a certain time and this time can vary greatly.
Therefore, you should not worry if the forces exerted on each of them during pumping, as well as the speed of movement of the strut rod to the reverse position, may differ - this is normal.
You also need to understand that if, for example, two shock-absorbing struts on the left or right sides fail, then all devices must be replaced at once, otherwise the car may rock while driving.
Bleeding shock absorbers: step-by-step instructions
An important element of the suspension of a modern car is the shock absorber. This component of the chassis is also called a shock absorber strut. It provides a comfortable and safe car ride. It is entrusted with the task of damping body vibrations and softening impacts when driving on the road.
Before installing a new shock absorber on a car, it is pumped. Incorrect preparation leads to rapid failure of the rack. Bleeding will help identify a manufacturing defect and replace the rack under warranty. This article will help you find out what a shock absorber strut is and how to properly bleed it?
How to properly bleed a shock absorber before installation: instructions and technology
If it comes in handy, here it is for you:
1. Of our domestic hydraulic oils, AMG-10 is still better; it is intended for use in aircraft hydraulics. And as you probably know, even modern passenger aircraft fly at altitudes of about 9000 m with year-round outside temperatures of -40 and below. That is, this oil works normally at such low temperatures. Where can I get it? ... well, think for yourself.
When using the AMG-10, there are pros and cons (figure out the pros and cons for yourself, this is a very personal matter):
- it is guaranteed to be of high quality, its characteristics are stable and do not depend on manufacturers ();
- the racks don’t “wrinkle” in the cold, well, there is no effect of a cart on wheels at sub-zero temperatures (in my opinion);
- the car becomes softer, more comfortable (I have a family car, in my opinion, but for GTechnicians this is a thing);
- not all seals tolerate this oil (maybe they do, but I use Japanese ones, so there are no problems with them). I check durability in the simplest way - I take a small jar, fill it with AMG and throw in the oil seal intended for the next replacement. Before “throwing” I measure the dimensions of the oil seal. The holding time is long - my last “repair kit” has been soaking for six months now, they just don’t seem to snot, they hold their geometry and it’s easier for me to keep them in a jar of oil until the next repair than to take them out, scrub and rinse them and store them somewhere. And so they lie quietly in the oil in a twisted mayonnaise jar. There was one case of instability, but these were our, domestic seals.
2. It’s not for me to teach you how to pump and expel air from the inner cylinder. But many people forget about flushing the rack with kerosene, which means an internal cylinder and a piston. I almost forgot, if the struts have already completely died and they have already been “punched” to the point of a characteristic knock, then most likely the valves on the piston are already broken. Then repairing the rack is more of a complacency, it will not work normally. They need to be changed or the valves need to be changed, along with the piston.
3. Do they solder the nipple away from the camera? Well, this is not our method.
You can, of course, make it simpler, drill a hole in the outer cylinder and insert a short nipple from a tubeless camera there (you’ve probably already met, there is a standard - long nipple, and there is a short one). I’m not asking the question of how to pump the same pressure into both racks, this is, in principle, more or less realistic - from one compressor-receiver it is simultaneously supplied to both racks and is turned off when the required pressure is reached. Unfortunately, less, because the pressure difference will still be due to the nipples. And do you know why? The fact is that the nipple opens at a certain difference in pressure at the inlet and outlet. This pressure difference is determined by the nipple spring, and it is different on each nipple, well, just a little, but different. Taking this into account, it turns out that we supply the same pressure to the input, but at the output we will get a different one. And if we also take into account the small volume of the pumped cavity... in general, the real difference is approximately 0.3 atmospheres. That is, the racks will turn out different. Well, besides, when driving, the pressure in the stand can reach tens of atmospheres. Forgive me, a sinner, but the nipple is not designed for this. He will simply start poisoning. For these reasons, I refused nipples.
And also interesting: Test drive of Lada Niva Travel: was there a “Ravchik”? - Russian newspaper
True, now I drive simply repaired ones, without “supercharging”, and you would be right in calling all of the above theorizing. Just rummaging around in all this near-column, another idea for the same “supercharging” appeared. Unfortunately, I haven’t done this on my stands yet (well, somehow they still run like that), so I think it’s too early to share my experience.
4. Often they do not replace the entire rack, but put it in the old cartridge. In this case, the inner cylinder with the piston is removed and the same cartridge is inserted into the outer cylinder. There is one subtlety here that is often forgotten and because of this the cartridge dies earlier than it could; death occurs most often in the summer.
So, when the cartridge is already inserted, then you need to pour any oil, even waste oil, into the cavity between this same cartridge and the wall of the old rack. And the point of this is that by placing the cartridge in the rack without oil, we get something like a thermos. The cartridge will heat up when driving; between it and the outer wall there is air, which is known to be a poor conductor of heat, i.e. the cartridge will not be able to transfer heat anywhere, it will heat up, heat up, and overheat to the point of failure. When we pour oil into this wall, the heat from the cartridge through the oil will be transferred to the outer wall and dissipated into the nature around us.
How to bleed oil
Bleeding oil structures has some peculiarities. The process itself is performed strictly in accordance with the presented algorithm.
- The part is installed with the rod down and after that it is necessary to smoothly compress the shock absorber itself until it stops.
- After compression is completed, follow for 2-3 seconds. leave it in this position without ceasing to hold it.
- Without releasing the rod, you should turn the part over - for no more than 6 seconds. you should leave it in a compressed position (during this time all the air should come out).
- The next stage is to extend the rod all the way.
- Next, the shock absorber will again need to be turned down with the rod and pause for no more than 3 seconds.
Usually you should do at least 3 approaches in accordance with the designated algorithm. The optimal number of such approaches is 6. Regardless of the total number of approaches, you should perform a control action on the third one.
It is performed as follows.
- The shock absorber is turned upside down.
- Sharp, short movements are made to compress the rod.
Its progress must be smooth, without jerks or any failures. If there are no problems, you can begin installing the shock absorber in place. It is not necessary, but it is advisable to replace shock absorbers in pairs. If possible, you should familiarize yourself with a video guide on how to carry out such a procedure in advance.
How are gases pumped?
The algorithm for working with shock absorbers filled with special gas is as follows:
- The part is turned over with the rod towards the ground.
- After this, you need to smoothly compress and fix it for several seconds.
- After completing the procedure, you need to turn the part over; you must hold it there for no more than 6 seconds.
- The next stage is to extend the rod all the way;
- The final stage is turning the shock absorber over.
Differences in the principle of operation of hydraulic and gas shock absorbers.
If possible, it is worth familiarizing yourself in advance with the video recording of pumping parts of this design.
How to work with gas oil
Help: The spelling “gas-oil” is erroneous. That’s right: “gas-oil.”
Gas-oil shock absorbers must also be pumped before installation, whether new or used.
Procedure:
- The stand must be turned into a vertical position with the cylinder facing up.
- It is necessary to compress the shock absorber and hold it in this position for several seconds. Hold the shock absorber in the lowered position for several seconds
- Next, the shock absorber turns over, but must be in a compressed position.
- The cylinder is pulled out very slowly to its original position. Smoothly pull the cylinder up
- The procedure should be performed 3-4 times at short time intervals - no more than a few seconds.
After bleeding, do not turn the shock absorber over, otherwise you will need to perform the procedure again. If you hear a slight slurping sound when you press the body, don’t worry. This is not a malfunction.
Also interesting: Reviews of TRIALLI CV joints: Ratings, Ratings, Website, Country
Process algorithm
It's time to find out how to bleed shock absorbers with your own hands. Below are step-by-step instructions:
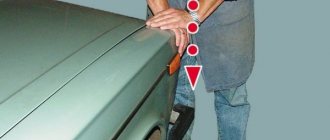
1) We install the stand vertically on the concrete floor, with the stem down, and begin to smoothly compress;
2) Hold the rack in this position for two seconds;
3) Now you need to turn the shock absorber over, placing it with the rod up and pull it out (if necessary), sometimes the rod itself goes up.
4) Leave it in this position;
5) We repeat the operation, turn the rod down, hold for two seconds, then with the rod up - hold for six seconds. You can repeat this procedure up to six times.
It is worth noting that after the third pumping of the struts, it is advisable to check them for smoothness. To do this, shake the shock absorber in the position with the rod up several times with short movements. If the rod moves smoothly and does not fall anywhere, then everything is fine.
Until the final installation of the racks, they should not be moved. Can't tilt
shock absorber, do not turn it over, otherwise all your efforts will be in vain.
Now a short video.
The pumping process is completed. Now you can safely start replacing it yourself, if necessary. Remember that without proper bleeding, the service life is reduced several times. The instructions are written in clear and intelligible language, I especially tried to chew it as much as possible. I hope that I have helped all motorists, regardless of their experience, to believe in themselves and start repairing their cars on their own.
We pump the original oil shock absorbers of the Lada Priora
These bleeding methods are suitable for most shock absorber struts installed on domestic cars, including the VAZ 2107.
Doing the work manually is not easy, but it is possible. Please note that the front shock absorbers on the Priora are not replaceable and those from other models, especially the VAZ 2110, are not suitable, they have different springs.
There are two methods of pumping, without turning over and with turning over the shock absorber strut.
But there are general recommendations that must be followed in all cases.
- When pumping, the shock absorber should be in a vertical position, and if tilted, then no more than a few seconds;
- Bleeding must be carried out immediately before installation on the car;
- Do not use a tool that can damage the product (gas wrench, hammer, pliers), hydraulics is a delicate matter, remember this;
- Do not allow the rod to rotate in the stand itself around its axis;
- Apply efforts smoothly, without jerking;
- An already pumped shock absorber must be in a vertical position at all times.
Bleeding shock absorbers: rules and recommendations
Oil and gas-oil struts are pumped differently. Some manufacturers, for example Kayaba (KYB), have developed their own recommendations; they are usually included in the packaging box and must be on the manufacturer’s official website. There are no significant differences. But there are general rules that must be followed.
General details
- Shock absorbers can only be rocked in a vertical position.
- Pumping is performed smoothly, without using force. Do not drive the rod with a hammer. If it does not move, then the rack may be faulty or there is another reason - for example, lack of oil in the rack.
- After bleeding, avoid horizontal position of the shock absorber. Before installing it on the vehicle, keep the rack with the stem facing up.
- Avoid turning the rod in the shock absorber housing. It is fixed with a special tool. Do not use pliers or a wrench.
Bleeding the oil
To bleed the oil shock absorber, do the following:
Shock absorbers must be pumped smoothly, without jerking. Do not fix the rod with pliers or a gas wrench.
- Remove the shock absorber from the packaging. If the rack is in a compressed state, then extend the rod 3/4 of the length and turn it over with the rod down.
- Press the rod in smoothly and without jerking. There is no need to squeeze it all the way. It is enough to leave the rod at a height of 5–7 centimeters from the rack body. Wait 3–5 seconds.
- Turn the shock absorber over. Wait 3–5 seconds.
- Extend the rod smoothly to 3/4 of the length. Wait a couple of seconds.
- Turn the shock absorber over and push the rod in again.
- Repeat steps 2–5 three to six times.
After the third swing, a check is carried out. In this case, you need to sharply press the rod several times - it should move smoothly without jerking.
We prepare for installation of gas-oil
- Remove the shock absorber from the packaging. Turn the stand upside down and wait 3-5 seconds.
- Compress the shock absorber and wait 3-5 seconds.
- Turn the stand, holding the rod, into a vertical position and wait up to 5 seconds.
- Let the rod come out, holding it with your hand.
- Repeat pp. 1–4 at least 4 times.
Bleeding gas-oil shock absorbers kayaba (kyb)
We will pump the front and rear Kayaba shock absorbers (KYB).
A standard pumping cycle looks like this:
- We push the Kayaba strut rod down all the way and hold it in this position for 10 - 15 seconds;
- Without letting go, turn the product over and continue to hold it in a compressed state for 10 - 15 seconds;
- We turn it over again and at this stage we help the rod unclench all the way, not paying attention to the slurping sounds that may arise. There must be at least 10 such cycles.
If there were no significant failures during the pumping process and after the overturn the rod comes out vigorously, then we can confidently say that the result is positive.
If the rod, when turning the shock absorber over to its initial position, does not extend completely, but stops in the middle (the edge of the weld is invisible), then the cycles still need to be completed to the end (i.e. up to 10).
Next, let the product sit in a vertical position for about 1 hour so that the gas and oil change their consistency, and do another 10 to 20 pumping cycles.
As a rule, after 10 cycles the piston will begin to actively come out and expand, and the device will thereby acquire factory characteristics.
But that's not all, the finishing touch still needs to be done.
We place the stand vertically upside down and, not paying attention to the slurping and possible slight dip, squeeze the rod until it stops.
Let go and let it return to its original position until the edge of the welding post is visible.
Squeeze again and release. Such cycles need to be done 5 to 10 times.
By the second or third time, the slurping and dips should stop.
As a result, you need to ensure that when the shock absorber, from a fully decompressed state, compresses, there should be no play or sound. The rod should also return quietly to the unclamped position.
That's it, the Kayaba shock absorber is pumped. We place it vertically (a small angle is allowed) and install it on the car in the same position.
As a result, we can say that pumping a shock absorber requires a certain amount of patience and effort.
Here, depending on your luck, some can cope with the task in 10 cycles, others will pump with twenty or more cycles, but in the end you will get a shock absorber that will last for many years and cover more than tens of thousands of kilometers.
And before you scold the newly purchased device and run to the auto shop to replace it under warranty, calm down and just pump it normally.
There is, of course, a certain percentage of defective products, but, as a rule, car owners neglect the points described above.
And remember, if you doubt the correctness of your actions, then go to the website of the product manufacturer; as a rule, there are instructions on how to properly upgrade it.
The point of pumping shock absorbers before installing them on a car
The working mechanism necessarily includes a special sleeve. If air gets into it, it will not be able to carry out its intended purpose. Moreover, it is necessary to remove air from new or used parts before installation. Often during repair work or troubleshooting, air ends up in the liner.
During storage and transportation, oil enters the outer cylinder, as a result of which gas begins to penetrate into the system. This is often the cause of knocking when using a newly installed part.
Through certain manipulations it is necessary to remove air from the cylinders before installing the rack. Why else would you do this? Sometimes the need for an air removal procedure also occurs on already installed parts. The reason for this may be improper operation or poor quality parts. Main goals of pumping:
- extraction of excess air and various liquids, if any;
- preliminary detection of cessation of normal operation of valves, identification of other malfunctions, violations of normal operation.
Also interesting: Bleeding the hydraulic clutch. VAZ 21213, 21214 (Niva)
When dips appear, there is a difference in the speed of movement of the piston - this is not a breakdown. Such phenomena do not affect the normal functioning of the rack in any way.
Diagram and principle of operation of an oil shock absorber
Why is this necessary?
Let us immediately note that if this operation is not carried out, this will cause failure of the entire piston system. And this, in turn, is a gross violation of the installation manual and will not give any guarantee that the racks will last for at least some time.
So, air particles remain in the strut sleeve. This negatively affects the work and the element no longer copes with its functions. Various knocks and noises when the racks operate are a characteristic sign of their incorrect installation.
So, the operation is carried out with the following goals:
1) Remove air from inside;
2) Remove oil from the element;
3) Diagnose possible jamming of the shock absorber valves or other malfunctions before installation.
Weak dips in the gas-oil mechanism are not considered a problem. In addition, a slight difference in the speed of movement of the rod in the same mechanism is not considered a deviation.
Method 1
Place the shock absorber strut on a level place with the lug facing down.
The task is to fully extend the rod when pumping at least 10 times and return it back, thereby ensuring that the liquid (oil) evenly fills the working space.
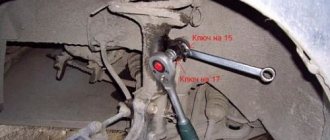
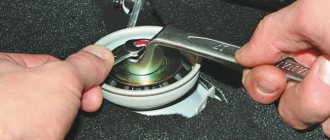
It is difficult to pull the rod out by hand, so they come up with different devices.
In our case, you can take a 30mm adjustable wrench with a hole in the handle whose diameter just allows you to use the tool as a lever.
Place the key on the rod so that the threads do not touch and take it to the break.
Do not sharply, using even force, pull it out until it stops.
We return it back smoothly, without any jerks.
The latter should go down easier than up, the ideal case is when the lowering occurs under its own weight. But if the rod does not fall without influence on it, this is not scary.
We repeat the steps cyclically at least 10 times, pay attention to possible jerks when retracting and pulling the stand, extraneous sounds and gurgling.
Their presence is allowed at the beginning and middle of the procedure, but at the end of pumping they should not be present. If necessary, increase cycles to 15–20 times.
The rear suspension struts on Priora are interchangeable; the rear strut from VAZ 2110, 2111, 2112, Lada Samara, Granta, Kalina will fit here.
Using the same wrench to 30 we pump up the rear shock absorber.
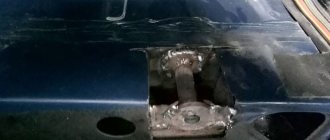
Please note that the rear strut does not come with a nut, which increases the likelihood of thread damage.
Temporarily screw in any nut or bleed with extreme caution.
Insert a rod (or a large screwdriver) into the hole at the bottom to hold the stand with your feet.
After pumping, the shock absorbers can be installed in the garage with your own hands, but since this is quite labor-intensive work, many people prefer to do it at a service station.
To prevent the devices from turning over to a horizontal position, they can be placed in factory boxes, twisting the latter with tape.
Method 2
The oil shock absorber is pumped according to the following algorithm:
- The rack rod must be positioned so that it is extended to 75% of its length;
- Turn the shock absorber over with the rod down and rest the latter on the floor;
- Applying even force, press the rod until 4-6 cm remains to the rack body. Wait 5-6 seconds.
- Turn the device over, wait 5-6 seconds again, and pull the rod out to 75% of its length. Break – 2-3 seconds.
- Press the rod in again.
Carry out the operation 6 to 10 times, and on the third and sixth repetitions, try to move the rod with sudden efforts, which in any case should move smoothly. If not, the procedure continues.
Zheka147 › Blog › Bleeding shock absorbers: step-by-step instructions
Varieties If a car enthusiast knows what shock absorbers he knows, then we will get something like this: oil, gas-oil and gas. This answer is partially correct. It is more correct to divide into two types: oil and gas. This division is based on the use of different working substances. Gas shock absorbers use an inert gas, most often nitrogen, pumped under high pressure. In oil shock absorber struts, hydraulic oil and air or gas are pumped into the working space. Structurally, they are divided into two types: two-pipe and single-pipe. The first type of shock-absorbing struts is the most common due to its simplicity and low cost of manufacture. Oil or gas and oil are used as the working substance. The main disadvantage of oil shock absorbers is poor cooling of the working substance. The oil gets very hot due to its small working volume. High temperatures cause the oil to foam and the shock absorber stops working correctly.
Gas-oil shock absorber struts are partially free of this drawback. Oil and air are pumped into a two-pipe housing under a pressure of 2–3 atmospheres. Sometimes nitrogen is used instead of air. This solution reduces the likelihood of aeration - foaming of the oil. Structurally, monotube shock absorbers do not have a working chamber. It is replaced by the rack housing. The tube is divided into two sections. The upper part is filled with oil, and the lower part is filled with high pressure gas. There is a valve between the sections. Gas shock absorbers are of particular interest to drivers. This is no accident. Gas struts are primarily used in motorsports. For sports driving, this type of rack is most often chosen. The operation of the gas shock absorber is ensured by pumped gas under high pressure. Such racks are the toughest and driving on city roads is accompanied by shocks and impacts. Such a ride cannot be called comfortable, but driving will be clear and controlled. Therefore, gas shock absorber struts are used mainly on racing cars. A special type of shock absorbers are the so-called “reversals”. They were given this name not because they can be placed upside down. In such racks, the reverse position of the rod is used. In conventional shock absorbers, the rod is directed upward. In inversions, the rod is directed downwards and is attached to the shock-absorbing strut body. There is a pseudo-rod on top. It looks much thicker. The operation of the inverted shock absorber is ensured by several plain bearings. This design reduces the vertical and lateral load on the rack. Bleeding shock absorbers: rules and recommendations Bleeding oil and gas-oil struts is carried out in different ways. Some manufacturers, for example Kayaba (KYB), have developed their own recommendations; they are usually included in the packaging box and must be on the manufacturer’s official website. There are no significant differences. But there are general rules that must be followed. General details The shock absorbers can only be rocked in a vertical position. Pumping is performed smoothly, without using force. Do not drive the rod with a hammer. If it does not move, then the rack may be faulty or there is another reason - for example, lack of oil in the rack. After bleeding, avoid horizontal position of the shock absorber. Before installing it on the vehicle, keep the rack with the stem facing up. Avoid turning the rod in the shock absorber housing. It is fixed with a special tool. Do not use pliers or a wrench. Bleeding the oil To bleed the oil shock absorber, do the following:
This is interesting: VAZ 2114 power windows do not work
To bleed the oil shock absorber, do the following: 1. Remove the shock absorber from the packaging. If the rack is in a compressed state, then extend the rod 3/4 of the length and turn it over with the rod down. 2. Press the rod in smoothly and without jerking. There is no need to squeeze it all the way. It is enough to leave the rod at a height of 5–7 centimeters from the rack body. Wait 3–5 seconds. 3.Turn the shock absorber over. Wait 3-5 seconds. 4. Extend the rod smoothly to 3/4 of the length. Wait a couple of seconds. 5. Turn the shock absorber over and press the rod in again. 6. Repeat steps 2–5 three to six times. After the third swing, a check is carried out. In this case, you need to sharply press the rod several times - it should move smoothly without jerking.
Preparing the gas-oil system for installation 1. Remove the shock absorber from the packaging. Turn the strut over with the rod down and wait 3–5 seconds. 2. Compress the shock absorber and wait 3–5 seconds. 3.Turn the stand, holding the rod, into a vertical position and wait up to 5 seconds. 4. Let the rod come out, holding it with your hand. 5.Repeat paragraph 1–4 at least 4 times. Video of pumping shock-absorbing struts You can learn more about how to properly pump a shock-absorbing strut by watching the video:
What is the difference between gas-oil products and oil products?
From the name itself it is already clear that their main difference is the working composition that is used inside the device.
In oil shock absorbers, the working space is filled with hydraulic oil.
The main disadvantage of these types of devices is aeration (oil foaming), which occurs as a result of changes in the physicochemical properties of the liquid when a piston acts on it in a small space.
This is manifested by a failure in the operation of the device and uncharacteristic sounds.
A partial reduction in aeration is achieved by replacing air with nitrogen gas; as a result, gas-oil analogues have appeared, which come in one or two pipes.
Single-pipe ones are often called gas ones, because there the oil and gas are separated by a movable jumper and do not mix.
IMPORTANT TO KNOW: Causes of shock absorber knocking.
Strong backpressure ensures gas pressure in the region of 10 - 30 atmospheres; there are also regulated analogues. Mainly installed on sports cars.
Twin-pipe gas-oil shock absorbers have less gas pressure - from 3 to 10 atmospheres.
But he won’t delve into the topic, because that’s not what you came here for. The shock absorber structure can be seen in the photo below.
Read news about the new Niva
- Technical characteristics of Great Wall Sailor 2005-2010 2.2 MT 105 / 78 at 4600 hp, pickup: Great Wall Sailor
- Niva chips in oil || Engine oil for fields
- Suzuki Grand Vitara | Automatic transmission control | Suzuki Grand Vitara
- Motor oil markings: how to decipher API, SAE, ACEA and other markings on the oil label
- How to do maintenance correctly at a dealership. | Peekaboo
- Generator Niva 2121, 21213, 21214: which one is installed, replacement || How much does a Niva generator produce?
- How does all-wheel drive work on Niva 2121?
Varieties
If a car enthusiast knows what shock absorbers he knows, then we will get something like this: oil, gas-oil and gas. This answer is partially correct. It is more correct to divide into two types: oil and gas.
This division is based on the use of different working substances. Gas shock absorbers use an inert gas, most often nitrogen, pumped under high pressure. In oil shock absorber struts, hydraulic oil and air or gas are pumped into the working space.
Structurally, they are divided into two types: two-pipe and single-pipe.
The first type of shock-absorbing struts is the most common due to its simplicity and low cost of manufacture. Oil or gas and oil are used as the working substance. The main disadvantage of oil shock absorbers is poor cooling of the working substance. The oil gets very hot due to its small working volume. High temperatures cause the oil to foam and the shock absorber stops working correctly.
Shock absorbers are structurally made into two-pipe and single-pipe. Oil and gas are pumped into the middle
Gas-oil shock absorber struts are partially free of this drawback. Oil and air are pumped into a two-pipe housing under a pressure of 2–3 atmospheres. Sometimes nitrogen is used instead of air. This solution reduces the likelihood of aeration - foaming of the oil.
Structurally, monotube shock absorbers do not have a working chamber. It is replaced by the rack housing. The tube is divided into two sections. The upper part is filled with oil, and the lower part is filled with high pressure gas. There is a valve between the sections.
Gas shock absorbers are of particular interest to drivers. This is no accident. Gas struts are primarily used in motorsports. For sports driving, this type of rack is most often chosen. The operation of the gas shock absorber is ensured by pumped gas under high pressure. Such racks are the toughest and driving on city roads is accompanied by shocks and impacts. Such a ride cannot be called comfortable, but driving will be clear and controlled. Therefore, gas shock absorber struts are used mainly on racing cars.
A special type of shock absorbers are the so-called “reversals”. They were given this name not because they can be placed upside down. In such racks, the reverse position of the rod is used. In conventional shock absorbers, the rod is directed upward. In inversions, the rod is directed downwards and is attached to the shock-absorbing strut body. There is a pseudo-rod on top. It looks much thicker. The operation of the inverted shock absorber is ensured by several plain bearings. This design reduces the vertical and lateral load on the rack.