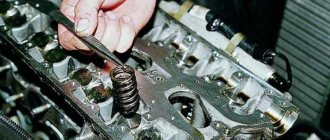
When pressing oil seals, one often has to deal with insufficient visibility of the work site, especially when the valves are actuated directly by the camshaft cams through cylindrical tappets without intermediate levers.
Devices and mandrels for installing and removing valve guide oil seals, drawings, diagrams and dimensions.
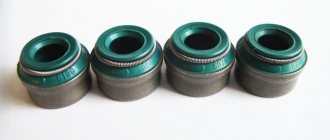
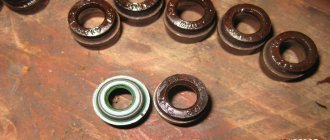
A collective image of the most commonly encountered oil seals is presented in the figure below, and the maximum dimensions are also indicated there. Bracelet cap springs come in diameters 1.2; 1.3; 1.5; 1.6 mm. With a diameter of 1.6 mm, it is better to remove the spring when pressing the cap. The seat diameter (internal), at least for a domestically produced cap, should be 10.45-10.60 mm, but there are caps with a diameter of 10.4 mm.
Oil deflector caps for valve guides with a nominal stem diameter of 8 mm, maximum and minimum dimensions.
Here, not only the size of the landing diameter plays an important role, but also the shape of the inner surface. To facilitate pressing, the seating surface of the cap is made with annular projections (grooves).
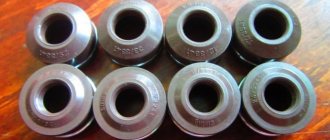
It is recommended to press oil seals using mandrels. The most commonly used mandrels for VAZ cars are shown in the figure below. For VAZ cars, it is recommended to press oil seals onto the valve bushings using the mandrel 41.7853.4016. The use of this mandrel is associated with certain problems.
Mandrels for installing oil seals.
The fact is that the mandrel has a conical surface (diameters 13.2-13.3 and 14.2-14.3 mm, the distance between them is 14 mm), interacting with the flange of the cap fittings (13.8-14.4 mm) . With a tightness of 0.3-0.5 mm in the sleeve-cap connection, practically no problems arise, but with lower tensions in the said connection, the cap (valve flange) gets jammed in the mandrel and cannot be removed from there.
The large length of the mandrel (160 mm) does not allow installing the cap on the exhaust valve sleeve of the 4th cylinder without first unscrewing the stud securing the camshaft bearing housing. Unscrewing a stud from an aluminum head is often a difficult task. It must be borne in mind that the pin is made of steel with a tensile strength of 80-100 kgf/mm2. For example, for the commonly used steel 45, this limit is no more than 70 kgf/mm2.
On VAZ-2101 - VAZ-2107 cars, it is recommended to press on the oil seals after installing the valve, and in order not to damage the cap by the edges of the groove for the crackers, you should use the mandrel 41.7851.4003.
Mandrels for installing oil seals and bracelet springs.
It is still more convenient to first press the cap onto the valve sleeve, and only then install the valves. By the way, this is what is recommended for VAZ-2108, VAZ-2109, VAZ-2110. The point here is probably that there is only one groove for the crackers on the VAZ valve stems and has sharp edges, while the Lada Samara valves have three, but with rounded edges.
In practice, for VAZ cars, the mandrel shown in the figure below is often used. The mandrel uses a rod from an old valve of any VAZ engine. The edges under the crackers should be blunted.
Mandrels for pressing oil seals for VAZ cars.
This method is also possible. The hole in the cap with a bracelet spring has a diameter of 6.7-6.8 mm, and if the spring is removed, the diameter of the hole will be 6.87-7 mm. Reducing the tension and, most importantly, increasing the compliance of the sealing edge of the cap minimizes the likelihood of damage.
The mandrel shown in the figure above will help you install the spring on the cap. When installing oil seals, especially on foreign cars, it is often not necessary to hit the mandrel with a hammer - you just need to press it with your hand.
Manual mandrels are shown in the figure above (b, c). They are designed for pressing oil seals with the valves installed. These mandrels can easily be converted into another type of mandrel, shown in the same figure (a).
It is more convenient to use manual mandrels for pressing oil seals when the seating surfaces of the valve bushings and oil seals look like those shown in the first figure (b). In this case, the cap (10.4 mm) is “put on” the sleeve (10.8 mm) by pressing the mandrel by hand with an interference fit of 0.2 mm on the side.
The mandrel recommended for the VAZ is too massive, which contributes to a loss of sense of proportion when hitting it, and the large length does not allow it, like the mandrel 41.7853.4016, to install the cap on the exhaust valve sleeve of the 4th cylinder without unscrewing the pin.
And that's not it. If you look closely at the maximum dimensions of oil seals and the corresponding dimensions of the mandrels, it becomes clear why sometimes pressing the caps ends badly for them. The mandrel must be in contact with the plane of the cap. It is in this case that the force is transferred to the metal part of the cap (reinforcement). Otherwise, the bracelet spring may collapse, the fitting flange will be deformed, and the rubber will be torn off from it.
What are valve stem seals used for?
In internal combustion engines, lubrication is combined, that is, oil enters the camshaft journals under pressure, and the remaining parts of this design are lubricated by splashing.
When the engine is running, so much engine oil collects in the top of the cylinder head that it even coats the top of the valve guides.
The function of valve stem seals is that they prevent the oil accumulated at the top of the head from flowing down the valve stems. If the caps are worn, then the oil flows through the valves directly into the working combustion chambers of the cylinders, hence the thick smoke from the muffler. The wear of the caps occurs gradually. Due to the high temperature of the engine, over time the rubber caps do not fit tightly to the walls of the valve rods and the oil begins to flow down.
Which valves burn out?
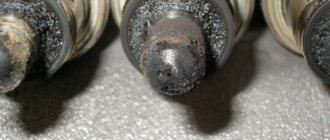
The exhaust valve operates at a higher temperature. Therefore, when the valve stem cap is worn out, oil flows onto the facet of the valve cap and at high temperatures it burns, forming carbon deposits on the valve cap. Then this carbon deposits fly off and sometimes the valve cap breaks off or breaks off at the edges.
Blog about UAZ
When pressing oil seals, one often has to deal with insufficient visibility of the work site, especially when the valves are driven directly by the camshaft cams through cylindrical pushers without intermediate levers.
Devices and mandrels for installing and removing valve guide oil seals, drawings, diagrams and dimensions.
A collective image of the most commonly encountered oil seals is presented in the figure below, and the maximum dimensions are also indicated there. Bracelet cap springs come in diameters of 1.2; 1.3; 1.5; 1.6 mm. With a diameter of 1.6 mm, it is better to remove the spring when pressing the cap. The seat diameter (internal), at least for a Russian-made cap, should be 10.45-10.60 mm, but there are caps with a diameter of 10.4 mm.
Oil deflector caps for valve guides with a nominal stem diameter of 8 mm, maximum maximum and small dimensions.
Here, not only the size of the landing diameter plays a huge role, but also the shape of the inner surface. To facilitate pressing, the seating surface of the cap is made with annular projections (grooves).
It is recommended to press oil seals using mandrels. More commonly used mandrels for VAZ cars are shown in the figure below. For VAZ cars, it is recommended to press oil seals onto the valve bushings using the mandrel 41.7853.4016. The implementation of the mandrel given to us is associated with certain problems.
Mandrels for installing oil seals.
The fact is that the mandrel has a conical surface (diameters 13.2-13.3 and 14.2-14.3 mm, the distance between them is 14 mm), interacting with the flange of the cap fittings (13.8-14.4 mm) . With a tightness of 0.3-0.5 mm in the sleeve-cap connection, virtually no problems arise, but with the smallest tightness in the mentioned connection, the cap (valve flange) gets jammed in the mandrel and cannot be removed from there.
The large length of the mandrel (160 mm) does not allow installing the cap on the exhaust valve sleeve of the 4th cylinder without first unscrewing the stud securing the camshaft bearing housing. Unscrewing a pin from a duralumin head is often a difficult task. With all this, it must be understood that the pin is made of steel with a tensile strength of 80-100 kgf/mm2. For example, for the commonly used steel 45, this limit is not more than 70 kgf/mm2.
On VAZ-2101 - VAZ-2107 cars, it is recommended to press on the oil seals after installing the valve, and in order not to destroy the cap with the edges of the groove for the crackers, you should use the mandrel 41.7851.4003.
Mandrels for installing oil seals and bracelet springs.
It is still more convenient to press the cap onto the valve sleeve first, and then install the valves later. By the way, it is recommended to do this with the VAZ-2108, VAZ-2109, VAZ-2110. The point here may be that there is only one groove for the crackers on the VAZ valve stems and has sharp edges, while the Lada Samara valves have three, but with rounded edges.
In practice, for VAZ cars, the mandrel shown in the figure below is often used. The mandrel uses a rod from an old valve of any VAZ engine. The edges under the crackers should be blunted.
Mandrels for pressing oil seals for VAZ cars.
This method is also possible. The hole in the cap with a bracelet spring has a diameter of 6.7-6.8 mm, and if the spring is removed, the diameter of the hole will be 6.87-7 mm. Reducing the tension and, most importantly, increasing the compliance of the sealing edge of the cap minimizes the possibility of damage.
The mandrel shown in the figure above will help you install the spring on the cap. When installing oil seals, it is often, especially on foreign cars, that you don’t need to hit the mandrel with a hammer at all—it’s quite easy to press it with your hand.
Manual mandrels are shown in the figure above (b, c). They are designed for pressing oil seals with the valves installed. These mandrels are simply converted into another type of mandrel, shown in the same figure (a).
It is more convenient to use manual mandrels for pressing oil seals when the seating surfaces of the valve bushings and oil seals have the form shown in the first figure (b). In this case, the cap (10.4 mm) is “put on” the sleeve (10.8 mm) by pressing the mandrel by hand with an interference fit of 0.2 mm on the side.
The mandrel recommended for the VAZ is very massive, which contributes to the loss of sense of proportion when hitting it, and the large length does not allow it, like the mandrel 41.7853.4016, to install the cap on the exhaust valve sleeve of the 4th cylinder without unscrewing the pin.
And that's not it. If you take a close look at the maximum dimensions of the oil seals and the suitable sizes of the mandrels, it becomes clear why from time to time pressing the caps ends badly for them. The mandrel must be in contact with the plane of the cap. Specifically in this case, the force is transferred to the iron part of the cap (reinforcement). Otherwise, the bracelet spring may be crushed, the fitting flange will be deformed, or the rubber will be torn off from it.
From time to time, the valve flange becomes so jammed in the mandrel that when trying to remove the latter from the valve sleeve, the pressed cap is also removed. As mentioned above, the caps can be “put on” the valve bushings simply by hand or using mandrels, which is customary on almost all engines. But in order to easily “put” the cap on the valve sleeve at the end, you need to change the cap landing space.
Pressing on the oil seal using an adjustable all-purpose tool.
It is convenient to press the cap onto the bushing using an adjustable all-purpose device. Before pressing, by rotating the nut, the collet is “adjusted” for this cap. The contact of the collet with the cap should occur, as noted above, along the plane of the cap. Having installed the cap on the sleeve and pressing the stop, we press the cap on by hand.
Removing the oil seal using an adjustable all-purpose tool.
If the bushing system is regular, it may be necessary to lightly tap the stop with a hammer (iron rod). The bushing seating space is lubricated with engine oil. When removing old caps, the collet snaps onto the cap and is tightened with a nut using a wrench.
Oil seal remover made from old pliers.
Next, holding the collet with the top knob, use the second knob to rotate the outer nut. To remove oil seals, you can also use an inertial device made with old pliers.
Based on materials from the book “Device for car repairs.” Ross Tweg.
Source: auto.kombat.com.ua
Signs of wear on valve stem seals
Oil seals are rubber seals that fit onto the necks of the valve stems and protect against oil leakage into the cylinders.
Signs of wear are:
- Engine oil consumption has increased. If the rubber seal does not hold, then the oil goes into the cylinder, therefore, the total volume of oil decreases, which after some time will be noticeable in the dipstick levels. Oil consumption is not necessarily a sign of worn rubber caps. Oil may also leak when the oil rings need to be replaced. Perhaps they have stuck to the piston, this is also called “stuck”.
- Immediately after starting the internal combustion engine, bluish exhaust smoke is observed. This effect occurs when oil accumulates on the piston. When the car was not running, oil flowed into the sump and down the piston rod through a broken oil seal.
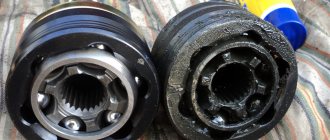
- Sometimes the engine stalls. Triple occurs when one spark plug does not spark at the right time or does not produce a spark at all. If oil gets into the cylinder, the spark plug is splashed with oil. This can be checked by unscrewing the spark plugs. If the base of the spark plug is covered in soot and oil, then this is a sign of wear on the caps.
It is useless to use various additives in these cases. It is better to quickly replace failed parts.
How to replace valve stem seals without removing the head
- Remove the valve cover, also known as the timing cover.
- Align the crankshaft and camshaft to the marks.
- Write down and take a photo of which pipe you took from where (for those who are doing it for the first time).
- Loosen the timing belt tensioner.
- If there is a chain instead of a belt, then you need to unscrew and remove the chain drive gear. It is better to remove the key from the groove so as not to lose it.
- Unscrew the bed fastening and remove the camshaft from the cylinder head.
- Inspect the journals and cams for wear.
- Depending on the design, when removing rocker arms or cups from hydraulic compensators, you need to remove the valve pushers.
- Pistons 1 and 4, after aligning the shafts to the marks, are at top dead centers (TDC). Therefore, we begin to change caps 1 and 4. To loosen the valve, it is required that it rests against the piston.
- There are designs where the intake manifold interferes with the installation of the desiccant. But rather than removing the manifold, it is easier to shorten the desiccant.
- The desiccant bracket must be secured to the bed fastening pin. And attach it in the middle part with a ring on the spring valve plate. Next, with one hand we press on the desiccant lever, and with the other, using tweezers, we pull the crackers out of the plate.
- Remove the crackers and remove the poppet spring valve.
- We install a collet puller on the cap. We lift the weight up the puller rod and hit it on the upper stop. In this way the oil seal is removed.
Article: PAVLOVSKY FROM 41.7853-4016, additional articles: 10285
Order code: 005047
Hi all! As the owner of products from the domestic automotive industry, there was a need to replace valve seals, since, judging by all the signs, they began to leak - increased oil consumption, spark plug threads in carbon deposits, smoke from the chimney during startup.
The car already has a decent mileage and requires constant investments, so I decided to save money and replace the caps with my own hands without resorting to service, at the same time combining this with replacing the worn camshaft and cams, so as not to have to climb ten times.
The necessary tools and materials were purchased in advance: a set of caps, a camshaft with rockers, a pair of springs and crackers, just in case. Among the tools, we will need a set of wrenches and sockets, a torque wrench, a hammer, a magnetized screwdriver or tweezers, narrow-nose pliers for removing caps, a valve sealer, a tin rod, a piece of heat-shrinkable tubing, if the seal kit does not include an installation sleeve.
The package arrived promptly with a mandrel for hammering in the caps.
It is a piece of metal rod, bored to fit the shape of the oil seal - simple and reliable.
So let's get started. We turn off the engine and let it cool. We remove the valve cover and set the timing marks at the Top Dead Center of the 4th cylinder (TDC).
In this position we can replace the caps on the 1st and 4th cylinder. We remove the camshaft sprocket and connect it to the chain so that the chain does not jump and the marks do not get lost, since we will still need to turn the crankshaft.
Now, using a flashlight, we make sure that the pistons of cylinders 1 and 4 are in the upper position. Let's start the replacement from the first cylinder, remove the springs and rocker. We put them aside according to the numbering of the cylinders, so that later during assembly we can put each one in its place.
We insert a tin rod into the spark plug hole under the valve on which we will replace the cap, put on the desiccant and push through the plate with the spring, removing the released crackers, remove the valve springs, as well as the lower plate of the small spring, since it will interfere with us.
That's it, access to the oil seal is open. Now, using narrow-nose pliers, carefully, so as not to damage the valve guide, remove the old oil seal upwards.
We wipe the seat from oil, put an installation sleeve on the tip of the valve so as not to damage the new oil seal on sharp edges, and carefully put on the cap, lubricating the working edge with oil. We remove the bushing, put on the mandrel and, with gentle blows of a hammer, press the oil seal into place until it stops.
How to install
- Remove the springs from the caps.
- Place the cap in the mandrel and lubricate the valve stem with a drop of oil.
- Place the oil seal together with the mandrel on the valve stem and move it down to the special seating lug of the guide. Using a hammer, not hitting the frame too hard, press it into place.
- Place its spring on the installed cap.
- Install the valve components and dry it using the same action using a puller as you removed it.
- Do this with all the caps.
- If the motor design does not have hydraulic compensators, then after replacing the caps with your own hands, you need to adjust the valves.
Video
In this video, replacing valve stem seals on a VAZ.
Remove the valve seals without removing the cylinder head.
How to make a do-it-yourself valve puller from a mounting gun.
How to work quickly.
In order for a car engine to work properly for as long as possible, and also to avoid increased oil and gasoline consumption, it requires timely maintenance or repair. Such mandatory procedures include replacing piston rings and valve stem seals. Next we will talk in detail about valve seals and look at what these parts are. In this article we will answer questions about what signs you can use to determine the need to replace the valve stem seals and how to change the valve stem seals yourself.
Read in this article
Useful tips
- There are additives for restoring seals. When you are tempted to use one of them instead of changing the caps, remember that there are no miracles in the operation of the internal combustion engine and natural wear and tear. These additives soften hardened rubber and supposedly restore the quality of the seals. Experience shows that these additives either have no effect on the rubber, or soften it too much, and as a result, the size of the working edge increases, and oil consumption after using the additive increases significantly. So you better think about how to change the valve stem seals. How much it will cost you depends on the type of internal combustion engine. But you will definitely be sure that the caps perform their function. Additives, alas, cannot guarantee you such an effect. You should not try such additives on your car.
- If you haven't found a device with a collet clamp for removing caps, but that hasn't stopped you. Remember that the landing step under the cap has a wall thickness of just over a millimeter and is very fragile, and when you try to remove the cap with pliers, this part of the valve guide is broken very often, and the repairs that are necessary after this (replacing the guide, milling the seat and lapping the valve) are much more expensive more expensive than replacing caps and related devices.
General information about valve stem seals
Oil seals (oil seals) are part of the oil distribution mechanism in the engine. The presence of oil is the most important condition for the operation of the internal combustion engine. But it doesn’t have to be everywhere. For example, the camshaft is always surrounded by oil mist during its rotation. But there should be no lubricant in the combustion chambers. There is only a fuel-air mixture, which burns. If you add oil to it, combustion will worsen, which will affect the increase in gasoline consumption.
In addition, carbon deposits will form on the bottom of the valves. As a result, the valve begins to close loosely. The same carbon deposits accumulate on the cylinder walls and on the piston rings. This phenomenon is called engine coking. Of course, all this does not improve its performance, but, on the contrary, reduces its service life. And it increases the cost of oil and fuel. Located on the stem, the cap (also known as the valve stem seal) removes oil from the valve during its downward movement and prevents it from entering the combustion chamber.
It is curious that this indicator practically does not depend on the manufacturer of the part itself: on expensive and budget cars they serve approximately the same. This will be useful for those who are thinking about the question: which valve stem seals are better? In this case, it is much more important to buy only those that match the engine and make of the car.
When to change caps
In a good way, these parts need to be replaced after several tens of thousands of kilometers. Experienced drivers are able to visually determine that it is time for another repair, as there are certain signs of wear on the valve stem seals.
The first sign is an increase in oil and possibly fuel consumption. After all, a worn cap will let oil into the combustion chamber with all the consequences mentioned above. The second sign is blue smoke from the exhaust pipe when accelerating. It should be noted that these signs already indicate the presence of a problem and the need for urgent repairs.
True, it’s not always a matter of seals. Sometimes the problem may be worn rings. Of course, the question arises: how to identify valve stem seals or rings, because the “symptoms” are almost the same. The answer is quite simple. It is necessary to unscrew the spark plugs and inspect them for oil and carbon deposits. The presence of both indicates a malfunction of the caps. This can also be checked by measuring the compression in the cylinder (the spark plug is unscrewed and a special device is screwed into its place). If it is normal according to the passport, then the rings do not require replacement. In addition, if the oil seals need to be replaced, the car will smoke during acceleration and during engine braking.
In general, the destruction of the oil seal occurs due to the fact that it is constantly in a chemically aggressive environment (oil). Plus is subjected to intense mechanical stress (friction). As a result, the rubber loses its elasticity, hardens and begins to collapse. Often, after removal, the caps simply fall apart in your fingers.
What you need to replace valve stem seals
If a car enthusiast decides to carry out this repair on his own, it will be much easier if he has everything he needs to replace the valve stem seals on hand. So, those who decide to act independently will have to acquire the following tools:
- spark plug wrench (spark plug head);
- a good long flathead screwdriver;
- tweezers or long-nose pliers (some use a medical clip);
- magnetic handle or oblong narrow (up to 2 centimeters) magnet;
- keys for removing valve covers and cylinder heads;
- oil seal remover;
- a tin rod 30-50 cm long and about 8 mm in diameter (if you plan to disassemble the engine to a minimum);
- valve desiccant (you shouldn’t skimp on this tool, because if it’s not strong enough, it will simply break during operation).
What you need to make your own desiccant
To make this device, you will first need suitable materials. For the clamp option you need to have:
- Metal profile or sheet metal 10-15 mm thick;
- A couple of large bolts or studs (screws will be made from them, so the length of each is at least 15 cm);
- Two nuts comparable to the bolts.
For the lever option, you must stock up on the following elements in advance:
- A metal pipe or rod with a diameter of about 15 mm and a length of up to 40-50 cm;
- Two steel strips 20-30 mm wide and 5 cm long. Thickness about 3 mm.
- Two strips 20-30 mm wide, up to 3 mm thick, 15 cm long;
- Two 6x25 mm bolts with nuts and washers;
- Two steel washers (you can make your own). The first has a diameter of 25 mm, a thickness of about 3 mm, and an internal hole of 8 mm. The second has a diameter slightly larger than the spring plates. Its thickness is at least 5 mm.
Replacing caps
- First of all, you need to disconnect the battery terminals for safety reasons.
- After disconnecting all the wires, you need to unscrew the spark plugs.
- Remove the cylinder head cover.
- At this stage, it is necessary to set the first cylinder to top dead center (TDC). There is a very simple way to do this: engage fourth gear, jack up the rear wheel and then, by rotating it, set the desired position according to the marks on the timing gear sprocket. After this, the jack can be removed.
- Now you need to remove the cylinder head. This is a rather labor-intensive process. Therefore, valve stem seals are often removed without removing the head. However, this simplified method has its drawbacks, as will be discussed below.
- Next you need to remove the camshaft. After this, it will be possible to remove the rockers from the valves (it is important to follow the order: where they are removed from, they are then placed there). By the way, this action is performed even when the engine head is not removed.
- After dismantling the camshaft, access to the timing valves will open and it will be possible to replace the seals.
- Using a puller (desiccant), you need to press on the valve spring, and when it goes down, carefully remove the crackers with tweezers or long-nose pliers (some people use their own fingers, but this is not very convenient).
- Now carefully remove the valve plate, springs (inner and outer) and the washer under them. It is important to install all parts in their places during assembly. That is, the springs and valves must match each other.
- Using a puller, you need to remove the valve stem seals.
- Before installing a new cap, the spring is removed from it (it is in the form of a ring). The cap is well lubricated with oil and, using a special adapter (a tube of suitable diameter will do), is pressed into place with light blows of a hammer. After this, the spring is put on.
- After replacement has been made on all valves, they are assembled and the entire engine is further assembled. In other words, everything needs to be put in its place.
However, to save time and effort, the engine head, as already mentioned, is not removed. In this case, the valve requires support during the process of dismantling the valve springs. This is where the tin rod comes in handy. It is bent in the form of a slightly bent letter “L” and the short end is inserted into the hole of the spark plug under the valve plate. Next, the dismantling and installation of valve stem seals proceeds according to the already described scenario.
Manufacturing of screw desiccant
- Making a frame bracket. This is the main part of this type of desiccant. It can be cut from a single sheet of metal, but it will be much more convenient to weld it from several pieces of profile or thick steel strips. The dimensions depend on the specific car model, but the average internal indicators are as follows: length of at least 210 mm, width of at least 150. The result is a frame in the form of a large printed letter C.
- After the bracket is ready, nuts are welded onto the ends of the short sections.
- A piece of pipe is also welded to one of the bolts. Either a large washer or a valve plate is welded to the second one - this will be a support.
- The bolts are screwed into the welded nuts so that when screwed they move towards each other and towards the center of the bracket.
Does installing new caps always help?
Of course, replacing the caps, especially if you do not remove the engine head, is not a panacea. It happens that the engine consumes oil even after replacing the valve stem seals. In this case, there is a possibility that an error or negligence was made during the work. For example, the oil seal is not fully pressed or is completely torn. But, as a rule, the problem lies in the piston rings. The engine will have to be disassembled (remove the head), remove the pistons and change the piston rings. They are replaced as a whole set.
Sometimes it happens that the car smokes after replacing the valve stem seals. In this case, the reason does not necessarily lie in the rings. Most often, this means that mistakes were made during the repair: the caps were incorrectly sized, carelessly installed, or not replaced at all. If the caps are not pressed in completely, they will fly off during operation with all the ensuing consequences, so to speak.
Before starting the procedure, you need to set all pistons to approximately the same position. To do this, sticks of the same length are inserted into the spark plug channels and by rotating the shaft by the nut, their alignment to the same level is achieved. After this, the decoking agent is poured into the holes.
After 4-6 hours, you need to remove any remaining liquid from the cylinders. To do this, cover the spark plug channels with a rag and crank the engine several times with the starter. Then the spark plugs are screwed into place and the engine starts. This won't happen right away. It may take several tries. While warming up, blue smoke will come out of the exhaust pipe. This is a normal phenomenon that goes away after the engine warms up at idle speed. As soon as the smoke stops, turn off the engine and immediately change the oil completely. The remaining coke deposits will burn out for another 100-200 km.
Injection engine
The next step is to rotate the crankshaft to match the marks on the gears and remove the timing belt. The crankshaft can, of course, be turned through the camshaft gear mounting bolt, but I advise turning it by the generator pulley mounting bolt, so as not to grind off the edges on the camshaft bolt. When the marks are set, use a 17 key to loosen the tension roller and remove the belt. To unscrew the camshaft gear, to the left of it you can see a pin on which we put a small tube through the holes in the gear so that it does not turn. And with the same key we unscrew the bolt and carefully remove the gear so that the key is not lost. Although it often fits well in place, it still happens when it falls out, so it is better to remove it and put it separately.
In the place where the tube was put to stop the gear, there is a bolt that needs to be unscrewed and the metal timing protection slightly bent so that the camshaft can be pulled out.
Using a 10mm socket or open-end wrench, unscrew the bolts securing the camshaft bearing caps, and then remove the camshaft itself. When removing the camshaft, try not to damage the oil seal, but the best thing to do is simply replace it with a new one.