Oil seals are located between the bushings and timing valves and prevent oil from penetrating into the combustion chamber of the vehicle's power unit.
The camshaft requires lubrication to operate, but it should not enter the combustion chamber to avoid the formation of carbon deposits on its surfaces, as this leads to deterioration in engine performance due to coking and multiple acceleration of camshaft wear. Valve seals remove oil from the rod and prevent it from leaking into the combustible mixture.
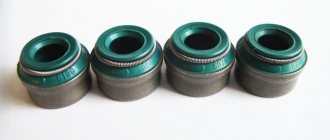
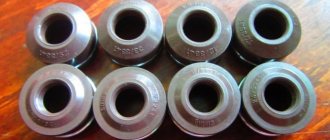
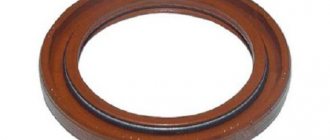
The structure of the oil seal is extremely simple: it is a rubber cap with a spring and a metal reinforced sleeve inside. The pressure density is affected by the quality of the material from which the caps are made: it should be elastic rubber (acrylate or recycled).
When are valve stem seals replaced?
When the engine is running, the seals experience heavy mechanical loads, as well as the negative effects of oils and exhausts. Long-term use causes the rubber to begin to harden and wear off. Of course, wear and tear is quite normal for any consumables. But the problem is that replacing caps is a rather complicated operation, requiring special skills and taking a lot of time. Fortunately, this does not have to be done very often: on average, one set of caps “travels” about one hundred thousand km.
How can you tell if the oil seal is worn out?
If you notice any of the following symptoms, then it's time to replace your valve stem seals.
1. Increase oil consumption. Most often, this indicates wear of the oil seals, and a little less often, oil scraper rings (in this case, leaks form in the breather pipe).
2. Exhaust gases with a bluish tint. They are formed due to oil entering the cylinder immediately after starting the engine (this color is given to the exhaust gases by combustion products).
3. The same oil consumption regardless of operating conditions (if oil does not flow into the sauna pipe, and its consumption remains significant, then it’s time to replace the seals).
4. Soot on candles. Due to worn oil seals, the spark plugs are filled with oil. This situation can even lead to engine failure (triplication).
Regardless of how many of the symptoms described above you find, one or all, the diagnosis is clear: the seals are worn out and need to be changed, otherwise the consequences can be very serious.
How to replace valve stem seals without removing the head?
Many car owners are trying to solve this issue with little effort - by using various additives and additives that supposedly help soften the rubber. As a rule, such an operation leads either to their excessive softening (and then wear occurs even faster), or does not give any result at all. Replacing caps without removing the head is a labor-intensive process that requires precise adherence to the sequence of actions and scrupulousness.
1. Wait until the car engine has completely cooled down.
2. Remove the timing cover. Do everything carefully so as not to damage the gasket.
3. Align the camshaft and crankshaft according to the marks. Mark the parts so that you don’t mess up anything later when assembling, or even better, write down your every action. Loosen the drive before removing the camshaft. Don’t forget to inspect the entire mechanism for wear (try to get the most out of the repair).
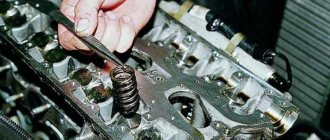
4. To “dry out” the valves, use special tools. The desiccant bracket must be secured to a pin, and the other end must be installed directly on the valve spring plate. Press the lever and, using tweezers, remove the “crackers”, and then remove the valve pushers.
5. Considering that the first and fourth pistons are located at the top, it is more convenient to start replacing from them. In this case, the pistons will provide support for “de-squeezing”. Be careful, if you lose the “cracker”, you will not be able to assemble the engine later. In practice, these small parts can fly away in an unknown direction and are almost impossible to find. Cover the motor openings with foam rubber to prevent dirt or “cracker” from getting into them.
Why are valve stem seals needed?
Valve stem seal – this is the name of this part. From its name it follows that it is installed on the valves in the gas distribution mechanism. The purpose of the caps is to prevent engine lubricant from entering the cylinder through an open valve. They look like rubber seals with compression springs.
The number of these parts is identical to the number of valves. When the valve opens the corresponding hole, it should be dry. But at the same time, due to constant friction, the rod must receive the necessary lubrication. Rubber bushings allow both effects to be achieved. Since they are made of elastic material, they wear out as a result of constant mechanical and thermal load, as well as exposure to engine oil.
Diagnosis of faulty valve caps
If the engine smokes white, then the problem is in the caps.
White smoke can also have a bluish tint. Based on this, the car owner urgently needs to change the seals on the valves, otherwise he will experience high engine oil consumption. This problem can be detected when the engine is running cold, or while driving.
Let's consider the first case. The car enthusiast should park the car in a garage or other place and wait until the engine cools down. After this, put it in neutral gear and start the engine, giving speed.
When starting in this way, white or bluish smoke will pour out of the exhaust pipe. This means that oil enters the combustion chamber through the valve caps.
The second method requires the driver to be observant. When the car is moving, you need to accelerate it, then brake the engine, and press the gas pedal again, giving significant speed. In this case, you need to constantly look in the rearview mirror. If white or bluish smoke starts pouring out, then you can safely diagnose a faulty cap.
What to do in this case. This problem can be solved in your garage. You just need to remove the old seals and replace them with new ones. This type of work does not require great skills and even a beginner can handle it.
It is important to remember that if the car still smokes with replaced oil seals, then the problem may be in other engine components, so in this case it is better to contact specialists and carry out professional diagnostics.
How valve stem seals work
The valve stem seal can be made in two different designs:
- Cuff. It fits onto the valve stem and is inserted into its guide. She speaks from the cylinder head. They cost less (compared to the next modification) and can be quickly replaced. The only problem is that dismantling requires a special device.
- Valve seal. It is installed under the valve spring. This element secures the cap and also presses its edges, ensuring stable sealing of the head in this part. These parts are more reliable because they do not experience the same temperature loads as previous analogues. They are also not in direct contact with the guide sleeve, therefore the mechanical load on the cap is less. No special tools are required to replace such modifications. The disadvantage is the high price. If you buy a budget set of caps, you may end up with low-quality elements made from less stable material. Preference should be given to options made of acrylate or fluorine rubber.
In order for the gas distribution mechanism to work without premature wear of the rubbing parts, it must constantly contain motor lubricant (how the timing mechanism is designed and the principle of its operation is described in a separate article ). However, oil should not enter the cylinder cavity.
If the timing belt did not use valve stem seals, the lubricant would be mixed with fuel and air. In its pure form, VTS is removed from the cylinder without residue after combustion. If oil gets into its composition, then this product forms a large amount of soot after combustion. It accumulates on the valve seat. This leads to the fact that the valve no longer presses tightly against the head body, and, as a result, the tightness of the cylinder is lost.
In addition to the valve, carbon deposits form on the walls of the fuel chamber (a cavity that does not contact the oil scraper rings), and on the pistons, and on the compression rings. Such “smoking” of the motor leads to a decrease in its efficiency and shortens its working life.
Cause of smoke in the exhaust pipe
In order to understand the question of why the engine smokes, you need to have an idea of what happens in it during operation.
A fuel mixture is formed in the combustion chamber, which is compressed by the piston and ignited by a spark from the spark plug. The mixture is supplied through the inlet valves, and the spent mixture is discharged through the outlet valves. The pistons have special oil intake rings; they are needed to collect excess oil on the cylinder walls so that it does not enter the combustion chamber.
The engine valves also have special seals (caps), which serve to ensure that the oil located in the cylinder head does not enter the combustion chamber. In addition, spark plugs also play an important role, and if they have a weak spark, or the gaps between the electrodes are incorrectly set, then the fuel mixture in the engine will not burn completely.
Based on this, we can identify the following causes of engine smoke.
- Spark plug . If the spark plugs are faulty, that is, they produce a weak spark, or the gaps between their electrodes are set incorrectly, then the fuel mixture does not burn completely and is discharged from the combustion chamber with blue smoke. In the most severe cases it may be black.
- Piston oil intake rings. As stated above, oil intake rings perform a function related to cleaning the cylinder walls of excess oil so that it does not enter the combustion chamber. They are subject to a powerful frictional force. If they wear out, the oil enters the combustion chamber and ignites along with the fuel mixture. In this case, black smoke appears. Similar functions are also performed by engine rings, which also remove excess oil from the surface of the cylinders and can wear out over time.
- Valve caps. These are seals that serve to prevent the oil in the cylinder head from entering the combustion chamber, and are made of dense rubber. When it wears out, the lubricant enters the combustion chamber and ignites. This produces white (or bluish) smoke.
The last two reasons for smokiness will be discussed below. If a car owner notices the appearance of blue or blue smoke, he needs to pay close attention to the operation of the power unit’s spark plugs and have them diagnosed or replaced.
You need to remember that sometimes the cause of smoke in the exhaust pipe can be bad gasoline. It may contain various additives or additives that will create black or other colored smoke. This problem usually disappears when refueling with other fuel.
The main signs of wear on valve stem seals
How can you determine that the valve stem seals have become unusable and need to be replaced? Here are a few main “symptoms”:
- The engine began to take oil. This is due to the fact that the cap does not collect the lubricant, but rather it enters the cylinder chamber.
- When the driver presses the accelerator, thick bluish or black smoke emerges from the exhaust pipe, which is not caused by cold engine starts in winter (this factor is explained in detail here ).
- Due to strong carbon deposits, the valves do not close tightly. This affects compression, which leads to reduced engine performance.
- During periodic replacement of spark plugs, carbon deposits appeared on their electrodes. Read more about the types of soot in a separate review .
- In a more neglected state, the smooth operation of the engine at idle speed is lost.
- With proper ignition and fuel supply systems, fuel consumption has noticeably increased. At the same time, it is important to make sure that the driver’s driving pattern has not changed towards an aggressive style.
None of the signs on this list are 100% evidence of worn caps. But taken together, they make it possible to determine that the problem is with the valve seals.
In older cars of the domestic auto industry, wear will begin to appear after the car has traveled about 80 thousand kilometers. Modern models use more reliable material, due to which the parts have an increased service life (about 160 thousand kilometers).
When the valve stem seals have lost their elasticity and begin to leak oil, the engine will imperceptibly begin to reduce power after each kilometer traveled.
FAQ
How long do valve stem seals last?
The intended service life of valve stem seals is about 100 thousand km. But due to overheating, the use of low-quality oil or violation of oil change intervals, the service life is reduced, so valve seals often have to be changed after 50–90 thousand km. If the car has been left unused for several years, the valve stem seals dry out and before you start using the car, you need to replace them.
What are the signs of faulty valve stem seals?
There are usually 3 main signs that the valve seals are worn out:
- bluish smoke from the exhaust and from the oil filler neck at the time of start-up before the engine warms up and when the gas pedal is pressed hard;
oil deposits on spark plugs;
- increased oil consumption.
How can you tell if your oil seals or rings are leaking?
Certain conclusions can be drawn from the nature of the exhaust, since the engine smokes when the valve stem seals are worn out only during start-up and re-acceleration. During quiet driving there is usually no smoke. You also need to inspect the breather: smoke from it usually indicates a problem with the CPG, or a clogged crankcase ventilation system. When the rings wear out, there will be constant smoke and the smell of burnt oil.
Consequences of driving with worn valve stem seals
Of course, it will be possible to drive with worn valve stem seals for some time. But if the driver ignores the signs listed above, he will worsen the condition of the unit to such an extent that it will eventually exhaust its service life without even completing the required mileage.
When compression in the cylinders drops, in order to maintain the usual driving mode, the driver will have to rev the engine harder. To do this, he will need to use more fuel. In addition to economic considerations, driving with exhausted caps will lead to unstable engine operation.
The power unit will gradually lose idle speed. There will be problems starting the engine, and at traffic lights and railway crossings the driver will need to constantly apply gas. This is distracting, which reduces his response in emergency situations.
When the engine begins to consume a large amount of oil, the motorist has to add lubricant. If its volume drops below the minimum, the engine may experience oil starvation. Because of this, engine repairs will definitely be expensive.
If a car has a catalyst in the exhaust system, this part will quickly fail, since its main task is to clean the exhaust from harmful impurities contained in the smoke. Replacing the catalyst in some cars costs much more than installing new valve stem seals.
In addition to safety (even if the driver has mastered driving skills so much that he can simultaneously perform several actions while driving), the engine will experience additional stress. And due to the increase in carbon deposits inside the unit, its parts will heat up more (due to the additional layer, the thermal conductivity of the metal elements is lost).
The listed factors bring the internal combustion engine closer to a major overhaul. In the case of some budget cars, this procedure is so expensive that it is cheaper to buy another car.
Diagnostics using compression
The above problems with the power unit can be identified through special diagnostics using a compression meter.
This is a device that measures pressure. You can do such diagnostics in your garage. To do this, you will need the help of a friend and the presence of the device itself.
To carry it out correctly, you need to adhere to the following algorithm. First you need to put the car in the garage and warm up its engine to operating temperature.
Replacing valve stem seals
In order for the repair to be carried out efficiently, the technician must adhere to the following recommendations:
- To remove worn caps, you will need a special tool. Thanks to this, the chance of breaking nearby parts is reduced;
- When the seals are replaced, the engine inlet and outlet ports are open. To prevent debris from getting in there, they need to be carefully covered with a clean rag;
- To prevent damage to the new valve stem seal during installation, it should be lubricated with engine oil;
- You should not purchase cheap elements, as less reliable material may be used for their manufacture;
- Old generation motors can be equipped with new type oil seals. However, in the case of modern engines, it is necessary to use exclusively new caps. Old-style analogues should not be installed.
If the work is being performed for the first time, then it is better to carry it out in the presence of a master who understands all the intricacies of the procedure. This way the chance of doing something wrong is minimized.
Quality or type of engine oil
Sometimes the cause of oil consumption can be the oil itself. This happens when kind car service employees fill you with winter oil instead of summer oil, or simply purified “waste oil”. Or an option from the series “a friend gave me oil, I’ll add it so it doesn’t go to waste.” In both cases, the oil may not meet your vehicle's specifications and may simply thin out to the point where the rings and caps cannot hold it. In addition to oil consumption, you get colossal wear and tear on all engine parts operating in an oil environment.
The way out of this situation is to replace the oil with a higher quality one that meets the requirements. Be sure to perform a flush.
Replacing valve stem seals with your own hands
To carry out the work of replacing valve stem seals yourself, you will need the necessary tools - a valve sealer, wrenches of the appropriate size, a mandrel for installing the valve seals, as well as special pliers for dismantling the oil seals.
There are two options for performing the work:
- Without removing the cylinder head. When performing this procedure, it is worth considering that when replacing the oil seal, the valve may fall into the cylinder. For this reason, each set of valves must be set to top dead center. This will allow the piston to hold the valve. In this case, the work will cost less, since after replacing the seals there will be no need to grind the head to replace the gasket.
- With head removed. The procedure is almost identical to the previous one, but it is better to perform it if you need to replace the cylinder head gasket at the same time. It is also useful if there are doubts about the good condition of the compression rings and pistons.
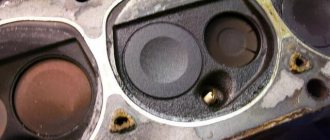
Replacement of oil seals proceeds according to the following scheme:
- Remove the valve cover;
- We set TDC or dismantle the head;
- The desiccant is used to compress the spring and release the crackers;
- Next, use pliers to dismantle the oil seal. You should not use pliers, as they can cause scuff marks on the valve stem mirror;
- We install the oil-lubricated cap and press it through the mandrel with light blows of a hammer (at this stage you need to be extremely careful, since the part is easily deformed);
- You can determine the correct installation of the cap in the seat by the characteristic dull sound when lightly tapping with a hammer;
- All oil seals are changed using the same method;
- Dry the valves (install the springs in their place);
- We assemble the gas distribution mechanism.
Some motorists use special auto chemicals that make old rubber elements more elastic, thereby extending their service life. It is possible to restore worn caps (if the material has simply become hardened), but this is not economically justified, because very soon the procedure will need to be repeated.
Since during dismantling and subsequent reassembly of the timing belt it is necessary to correctly set the necessary marks, it will be much cheaper to give the car to professionals who know how to properly tune the engine.
Here is a short video on the easiest way to replace valve seals yourself:
Replacing valve stem seals is the easiest way
Wear of the cylinder-piston group
The leakage of oil by the rings can be an indicator of wear not only of the rings themselves, but also of the cylinder-piston group as a whole. If the distance between the piston and the cylinder exceeds the permissible limit, then the width of the rings simply will not be enough to hold the oil at the bottom. This is the most unpleasant reason for oil consumption, but by performing a high-quality engine overhaul, you will forget about such troubles for hundreds of thousands of kilometers.
It may take you up to a month to fix the problem. It is necessary to perform such complex work as:
Thanks for subscribing!
- Removing and installing the engine on a car
- Boring and honing of engine block cylinders.
- Replacement of liners and pistons.
- Grinding the plane of the block at the junction with the cylinder head.
- Flushing the oil system.
- Replacing the oil pump.
- Replacement of other related elements.
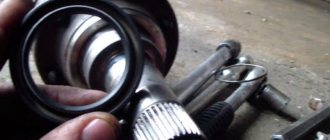
The price of the "cracker" remover for Toyota, Volkswagen, Audi and the principle of its operation
An integral attribute of replacing valve stem seals on any engine, be it a Lexus or a VAZ, is the so-called desiccant. This is a proprietary or universal (suitable for engines of various brands) tool for clamping valve springs, without which it is not possible to carry out repairs. The principle of operation of the cracker remover is quite simple: the cracker is attached to the engine body with support points, using mechanical pressure on the plate, the valve return spring is clamped, which allows you to remove the crackers.
Experienced car owners recommend paying special attention to the safety of crackers, as they tend to get lost and also get inside the engine.
It should also be taken into account that universal pullers are often not so multi-tasking - some designs are suitable for engines with the ONV, ONC, HV layout, others are designed specifically for servicing Opel SOHC engines, etc. You should clarify this point before purchasing the tool.
Desiccant price:
- for overhead valve engines - from 3,500 rubles;
- for OHV, OHC, CHV engines – from 2000 rubles;
- a comprehensive set of tools for desiccation on Toyota Camry, Volkswagen Golf, Mitsubishi Lancer, etc. engines – RUB 20,000.
The desiccant, as in the photo, is an essential attribute of replacing valve stem seals on any engine.