Print this article Font size 16
It is quite simple to determine the malfunction of the release bearing on the VAZ 2109 by the characteristic symptoms. Today we will talk about signs of wear on an element, and also tell you in detail how to replace it.
Element appearance
Which clutch bearing should I install?
The original clutch bearing number is 2108 1601182.
- Pilenga PC-P 2108 — 360 rub.
- Luk 500 0439 20 — 1156 rub.
- Fenox TP2116C3 — 345 rub.
We remove the “negative” terminal from the battery “4”, remove the connector from the mass air flow sensor (MAF) “2”, loosen the clamp securing the corrugation to the MAF “3”, remove the air filter housing “1” from the car.
Remove the clutch cable from the clutch fork. Loosen the two nuts securing the cable to the bracket on the gearbox.
Remove the clutch protective cover. Disconnect the ground wire and the top dead center sensor from the clutch housing. Disconnect the wires from the reverse light switch. Drain the oil.
Unscrew the 3 bolts securing the bracket to the body. Unscrew the nut securing the arm extension.
We jack up the car. We remove two bolts “1” and disconnect the ball joint of the suspension arm from the steering knuckle. Unscrew the nut “2” securing the brace to the suspension arm, and remove the longitudinal brace together with the lever.
We remove the wheel, unscrew the hub nut and unscrew the fastening of the ball joint to the steering knuckle, then remove the CV joint from the bearing hole.
Having rested the pry bar against the gearbox housing, we press the internal drive joint from the side gear, to do this we sharply hit the body of the internal joint with a hammer. We knock out the hinge from the side gear.
Mounting a ball joint without front wheel drive.
Loosen the clamp and disconnect the gear shift rod from the gear selection hinge. It is also necessary to support the engine, otherwise it may drop too low and tear off the interior heater hoses.
Having unscrewed the bolts securing the rear suspension support of the power unit, remove the suspension bracket from the eyes of the body spar.
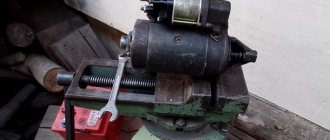
Using a 17mm wrench, unscrew the nut and remove the bolt of the left engine mount. Unscrew the three starter mounting nuts and remove the starter.
Using a 19mm wrench, unscrew the three bolts and one nut securing the clutch housing to the cylinder block, remove the gearbox from the engine and remove it.
Using an 8-mm spanner, unscrew the six bolts securing the clutch housing to the flywheel. To loosen the bolts easily, tap their heads with a copper hammer. You can also use a 8mm socket to loosen the bolts.
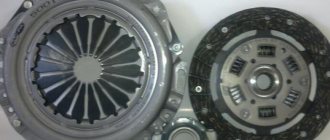
Remove the driven and driven clutch discs. We check the degree of wear of the friction linings. If the rivet heads are recessed less than 0.2 mm, the surface of the friction linings is oily or the rivet joints are loose, the disc must be replaced. Cracks or mechanical damage to parts of the driven disk are not allowed.
If a visual inspection reveals loosening of the rivet connections of the clutch basket and drive disc parts, the clutch drive disc assembly should be replaced.
Lubricate the release bearing seat on the shaft, as well as the clutch guide forks, then install the bearing.
When installing the clutch, we orient the driven disk with its protruding part towards the drive disk and insert the centering mandrel.
We insert the mandrel into the hole in the crankshaft and secure the clutch drive disc in this position, tightening the bolts evenly (one turn per pass). We tighten the bolts no more than one turn each, so as not to deform the flange of the clutch drive disc. We assemble everything in reverse order.
It is quite simple to determine the malfunction of the release bearing on the VAZ 2109 by the characteristic symptoms. Today we will talk about signs of wear on an element, and also tell you in detail how to replace it.
Element appearance
Clutch leads
- If the clutch does not slip, but moves, this may indicate insufficient pedal travel. By adjusting the clutch release drive, the malfunction can be eliminated.
- The clutch can also jam if the driven disc is warped. In this case, the disk is either replaced or straightened.
- A stuck HP hub can also cause the clutch to slip. You just need to clean the splines and rinse them with alcohol. If the splines themselves are very worn, the input shaft should be replaced.
- If the pressure plate is skewed or warped, replace the clutch housing.
- If the rivets are loosened or the friction lining is broken, the clutch will again not engage completely. In this case, the linings are replaced or the runout is checked.
- The performance and functioning of the clutch cable may be impaired. The cable is replaced and everything starts working as before.
vaz 2109 clutch replacement
The clutch is a metal disc designed to connect the engine flywheel and gearbox, for the subsequent transmission of torque to the wheels. The clutch is one of the main parts of the car's drive, because movement without it is impossible.
The main signs by which to judge that the clutch is in a faulty condition:
- At high engine speeds, the car picks up speed very slowly. This indicates that the disk has become sufficiently worn out and is beginning to slip, thereby transmitting torque unsatisfactorily and reducing the efficiency of the engine.
- After acceleration, a burning smell appears in the car interior.
- When driving in the final gears, at the slightest touch of the clutch pedal, the revolutions rise sharply. This is due to the weak contact area between the clutch disc and the engine flywheel, and the transmission of torque disappears at the slightest touch to the pedal.
If you find any of your faults on this list, then this is a signal that your car’s clutch is in poor condition.
On a VAZ 2109, the clutch can be replaced either with or without removing the gearbox. The first option is recommended, since during the replacement process it will be possible to check the condition of the gearbox from the inside and, if possible, eliminate minor faults, as well as clean it from dirt.
Procedure:
Drain the gearbox oil and loosen the hub nuts on the front wheels (do not unscrew them completely). We lift the car with a jack, put it on reliable supports and remove the wheels. We unscrew, now completely, the hub nuts, remove the calipers from the hub, unscrew the lower ball joints, pull out the hub, hang it on the upper hinges and remove both CV joints from the gearbox. Disconnect the battery and put it away during repairs. Remove the clutch cable and hang it to the side, away from the work area, so that it does not interfere with the process. The engine protection, of course, also needs to be removed. Unscrew and remove the starter and rocker rod. It is best to unscrew the link together with the hinge and leave it hanging under the car. Thus, we save time on adjusting the rod and lighten the weight of the gearbox for further dismantling. Now you need to put a jack under your pants and raise them a little. This action will help maintain the balance of the engine, because two of the three supports that hold the engine are located on the gearbox, and when removing the gearbox, the engine may fall over or even collapse. Remove the gearbox support from the driver's side member. Unscrew the cable that operates the speedometer and remove the clutch housing boot. It is a sheet of tin covering the flywheel on the engine side. Unscrew the bolts used to secure the gearbox to the engine and remove the gearbox
This is where you should focus your attention. The “nine” gearbox weighs about 30-35 kg and when removed it will have to be moved so that it comes out smoothly
This action is best done together. Now you need to unscrew the original clutch from the flywheel and install a new one purchased in advance. After replacing the clutch, you can begin assembly. Assembly must be done in reverse order.
By the way, about the choice of clutch. It is best to buy a clutch from a foreign manufacturer, because domestic ones have a short service life and quickly fail. The most positive reviews remained for the Valeo brand. Buying it or a disc with a flywheel of another brand is your choice; here we describe only a purchase recommendation based on the experience of many drivers.
Order of Operations
To carry out repair work, you need to place the car on an inspection hole, put it on the handbrake, disconnect the negative terminal to de-energize the on-board network, and remove the engine mudguard. Now you can start disassembling:
- Install a jack that will temporarily replace the front pair of wheels. You need to unscrew the nuts on them, remove the chassis and put them aside.
- To remove the contact part of the ball joint from the hub, you need to unscrew the bolts.
- Instead of the 2 upper conventional bolts, you need to install cylinder head fasteners.
Now you can remove the starter; it is attached to three nuts that need to be unscrewed.
At this stage it is necessary to install a jack under the engine. After this, the side motor support is detached.
After this, you can disconnect the rear engine mount and unscrew the gearshift linkage.
The protective cover must be removed from the clutch.
- The box is secured with several bolts; first you need to unscrew the front one.
- Now the transmission is accessible, the rear nut is unscrewed first.
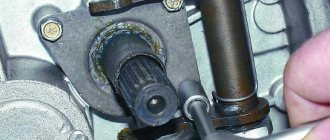
The gearbox bolts are located on the left wing side; they need to be unscrewed until they stop and the gearbox should be removed. It is important to ensure that the end of the assembly rests on the lever extension. This will create a gap that will allow you to remove the clutch. IMG9Disassembly is complete. At this point, the guide for the clutch remains. It needs to be thoroughly lubricated. After this, you can put the release bearing on the guide.
- Subsequent operations are performed in the reverse order of the above steps. Important! There is no need to rush while completing the work. All operations are performed consistently and calmly. Make sure that after assembly there are no “extra” spare parts left.
How to replace a VAZ 21099 clutch, watch this video:
How to replace the clutch - next steps
Remove the speedometer limit switch. All we have to do is turn off the cardan, which is located under the boot. Unscrew the stopper. They disconnected everything from above and unscrewed it, removing the clutch pedal cable.
Now you need to unscrew the rear airbag. The engine will hang, the box will tilt down a little. We unscrew the bolt securing the pillow to the side member and pull it to the side. Due to the fact that the engine is suspended, the box can flop around. We check that all the bolts have been unscrewed. Let's take a small montage. If you are removing the box for the first time, then place a board under it. Otherwise, without knowing the actual weight of the gearbox, you may drop it.
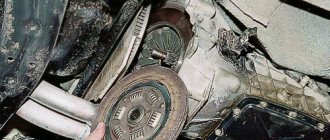
You will have to lower the engine a little, since the bracket does not allow the box to come out. With a slight movement of your hand, remove the box. Her weight is twenty kilograms. The problem was with the clutch, we see a half-dead release bearing, worn out petals that were sticking. Water got into the basket and there was rust.
Next, let's see how worn the clutch basket is. Here we see a leak of antifreeze from under the pipe. The wear on the clutch disc is visible. The car has traveled many kilometers, not 150 thousand, but more. The bolts all unscrew like clockwork.
Let's put another basket. Try to choose a clutch disc with a large number of springs and a clutch with a large number of petals, then everything will work smoothly. There is very little left to do to replace the clutch. Assembly is carried out in reverse order.
What to do next
First we install the guide, the disk, tighten the basket, then remove the guide and put on the box. How to replace the clutch on a VAZ-2109?
Do not forget to lubricate the splines inside the clutch disc with oil or lithol before installation. This is necessary to make it easier to put on the box. It is also easy to put on; unlike foreign cars, there is no need to remove the subframe. There is no muffler at the front, everything is very convenient and good. All that remains is to look at the tension of the handbrake, some electrical nuances, and the rest was done. The grip was exceptional.
Removing the box
Removing the VAZ 2109 box
- The mudguard and engine crankcase protection are dismantled;
- The oil is drained from the gearbox;
- The drive nuts break off.
Note. It is necessary to turn off the power to the battery and hang the front of the car using reliable supports.
- The clutch cable is dismantled;
- The speedometer cable is turned off;
- The bolts securing the ball joints are unscrewed;
- The longitudinal stretch is removed;
- The drives are pulled out of the gearbox.
Note. To prevent the differential from turning or falling apart, a special stopper is inserted into the gearbox.
- It's time to remove the starter;
- After which the reverse speed sensor is dismantled;
- The flywheel protective casing is separated from the box;
- The gearbox linkage is detached (the position should be marked before removing it);
- The bolts securing the gearbox to the engine are unscrewed one by one.
Note. It is imperative to secure the engine with a hydraulic jack or something else.
- We unscrew all the gearbox supports that connect the box to the car body;
- We weigh the box away from the engine (you can’t do it alone, you need an assistant).
Note. Only about 10 cm is enough for the input shaft to pop out of the clutch basket.
We remove the box, but do it very carefully so as not to damage the input shaft.
Increased noise when turned on
- If there is increased noise when the clutch engages, this indicates wear or damage to the release bearing. There may also be a grease leak from the release bearing. The solution is to replace the bearing (step-by-step instructions for the process are given below).
- Increased noise when the clutch is engaged can also be caused by a breakdown of the damper springs that make up the clutch driven disc. In this case, you will have to replace the driven disk itself.
- If jerking is observed when shifting the clutch, then the friction linings may have become oiled. Remedy: Thoroughly rinse the surfaces of the linings with a special liquid and be sure to replace worn gearbox and engine seals.
- Jerking can be caused by jamming in the clutch release drive. To eliminate this problem, you first need to find the reasons that contribute to the jamming. Then replace these same parts.
Expert advice
Along the way, some mistakes emerged. This is a grenade with a boot without a clamp. There is also a jamb in the drive, the CV joint boot is torn. The thread on the grenade is bad. The ball joints are still working well, but there is already some wear and tear.
So, don’t be afraid to change the clutch disc, release plate, or basket. If you are making a car for yourself and not for sale, then it is recommended to change everything as a whole. These are the clutch disc, basket, release bearing, drive seal. If you have never changed a box, do not be afraid to take on this task, it is not difficult. The only condition is that when you install the clutch disc, center it.
There is a hole, when you install the clutch disc and press it with a basket, it may move. You will never hit the splines with the input shaft, since the shaft fits into the splines, and the guide is then removed. This is a cylindrical rod, it fits the classic, front-wheel drive. Its diameter is 20 mm, inserted into the flywheel, 15 mm, length 100 mm.
Let's summarize
If the check shows that the free play is normal, but you doubt your competence in adjusting the unit, contact a service station. Incorrect settings can cause rapid clutch failure. If you want to complete the work yourself, you can find the necessary information on the vehicle manufacturer’s website or in its service book. It is important to complete the work in a timely manner so as not to get into an unpleasant situation on the road. Monitor the service life of clutch parts; for example, the service life of the driven disc is 100 thousand kilometers. But, if a motorist has an aggressive driving style, it can decrease by 2-3 times.
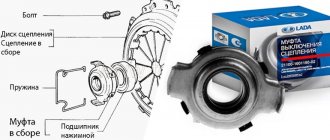
Worn clutch release bearing
Clutch VAZ 2109
Typically, those who like to drive fast are more likely to encounter the problem of bearing wear. At the same time, people who are supporters of quiet driving have often never even heard of this problem. If it is noticeable that the bearing is failing, it urgently needs to be replaced, otherwise:
- The very next trip can be fatal for the car.
- The disc will overheat, causing the pads to crumble.
- It will be necessary to change not only the bearing, but also the clutch disc.
- In addition, the clutch itself can become “covered.” A sign of this may be an incomprehensible noise coming from it.
To change the release bearing, you will need to completely disassemble the entire assembly, and this is a rather labor-intensive process.
How to replace
Clutch for VAZ 2109
To ensure that replacing the clutch bearing does not cause inconvenience, it is advisable to drive the car onto a lift or place it over an inspection hole.
Note: bearing replacement can also be carried out in “field” conditions, that is, with a jack
However, it is very important to ensure that the car does not roll down
Replacement occurs as follows:
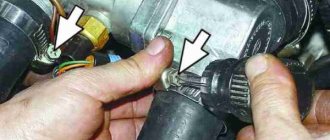
- Remove the negative battery terminal.
- Disconnect the flashlight connector.
- Disconnect the driveshaft.
- Remove the slave cylinder.
- Remove the gearbox, which is secured by several large bolts.
Note: to make this easier, you can bend the gear knob all the way. At the same time, the handle must not be allowed to “hang” freely. It is advisable to provide it with reliable support.
Once you have access to the clutch basket, you can begin removing it. To do this, unscrew the bolts that secure it to the flywheel (it must be completely motionless).
Note: You can use a large screwdriver for this.
- Pull out the clutch release fork.
- Remove the bearing.
- Change it.
- Press in properly using a key.
- Wipe the surface of all parts with a degreaser to remove dirt and foreign objects. This may cause the car to slip.
- Reassemble everything in reverse order.
Note: Before you begin assembling the gearbox, it is advisable to apply a little lubricant to the sprockets of the input shaft.
- When all the parts are assembled, the clutch should be adjusted.
- The length of the working cylinder should be slightly reduced.
Replacing the clutch bearing can be done at home and with your own hands. Usually in car services the price of this procedure is quite high. Therefore, if you want to save your money, you need to give preference to home repairs. Any instructions will also help you quickly and begin to review many photos and videos on this topic. perform quality work.
1200 rub. for the photo report
We pay for photo reports on car repairs. Earnings from 10,000 rubles/month.
Write:
Clutch failure is one of the troubles that can await a driver on the road. Usually, the car simply stops moving, even though the engine is running normally. Such a breakdown does not always occur suddenly; often before this you can observe some signs of an imminent breakdown.
Signs and causes of clutch failure
The VAZ 2108, 2109, 21099 clutch consists of a basket, a pressure bearing, a drive and driven disk. The main signs of a clutch malfunction are clutch slipping and incomplete disengagement:
- When switching off is incomplete (the pedal is pressed), there is difficulty shifting gears with the engine running, noise and crackling noises when changing gears, and large free play of the clutch pedal.
- When the clutch “slips” (the pedal is released), a burning smell may be felt in the cabin from the burning of the clutch disc linings, the car’s dynamics will deteriorate, the engine may overheat, and fuel consumption will increase.
Most often, the cause of a breakdown of the VAZ 2109 clutch is improper operation of the car. For example, if the car “sits down” in the snow and you continue to accelerate hard, or really like to start with slipping, all this shortens the life of the clutch.
In addition to the clutch disc itself, the release bearing can also fail - it serves to smoothly engage and disengage the clutch. When the release bearing wears out to the limit, you can hear a characteristic squealing sound - this is a sure sign that the bearing needs to be replaced. The cause of clutch failure may also be a breakdown in its drive mechanism, for example, a break or jamming of the clutch drive cable, a breakdown of the lever system, a fluid leak from the hydraulic drive if the clutch is hydraulic, or other similar breakdowns in the drive.
By the way, when replacing the release bearing at a service station, they may advise you to also replace the clutch disc. Usually, if problems begin with the clutch, it is better to replace all these parts, because replacing the clutch is very difficult: you need to remove the gearbox. But if someone wants to save on this, then all clutch parts can be purchased separately.
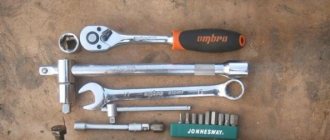
To work you will need the following:
- wrenches 8, 10, 13, 17 mm;
- torque wrench, 8 mm socket;
- jack;
- container for draining oil;
- inspection hole or lift.
- flat screwdriver, hammer.
When removing or installing the gearbox, do not rest the input shaft of the gearbox on the clutch pressure spring petals, so as not to damage them.
Replacing the clutch on a VAZ 2109/21099 without removing the gearbox
Replacing the VAZ 2109/21099 clutch without removing the gearbox is quite difficult. You will not find instructions or recommendations on this topic in the car's owner's manual. These recommendations are based on the experience of car enthusiasts who share their experience of replacing the clutch.
The main problem when replacing a clutch is that not every motorist has an overpass, a pit, and especially a lift, and it is necessary to make sure that the massive gearbox does not fall to the ground. But lifting it is problematic, since it is impossible to crawl under the car with it. All steps for removing the gearbox are almost the same as the instructions above, with the exception of some nuances:
- Purchase two bolts from the upper arm of the classic front suspension from the store. Their threads are exactly the same as those on the bolts that secure the box and the engine block together.
- Screw them in from above, only after that, with a small crowbar or screwdriver, we begin to disconnect the nodes. After moving away, the rear part of the box will rest on the transverse rod, and a gap of about 15 centimeters will form between the clutch housing and the flywheel.
- The release bearing is removed through the resulting gap and the bolts on the basket are unscrewed.
But the installation is slightly different from the process shown in the instructions:
- Place the new release valve in its place. Then a disk is installed on the flywheel and a basket on top of it.
- Just tighten the bolts a couple of turns, but do not overtighten!
- Carefully begin to slide the input shaft onto the splines in the disc.
- Then we move the box back and tighten the bolts on the basket. The basket fastening bolts are tightened only after the box is installed in its place.
- After this, you can install the gearbox and tighten the bolts on it.
First stage
The first question is: is it possible to replace the clutch on a VAZ 2109 without removing the gearbox? You can look through so many materials, videos and photos, but nowhere will you find a specific answer to this question. As a result, of course, you will come across some review in which the person directly points out that it is quite possible to do such a thing. And it will even give the basic requirements for carrying out such repairs. Then it will become clear that it’s enough to climb around in search of theory, it’s time to start practicing and repair or replace the clutch on a VAZ 2109 with your own hands. To do this, find two massive stumps, the height of which should be about 40 cm, as well as several bars. Of course, it’s scary that the car will fall during the repair process. Therefore, install two wheels nearby under the bottom for insurance.
Clutch disc VAZ 2109
Until the last moment, you can doubt whether it is possible to replace the clutch without completely removing the box, because you don’t want the massive gearbox to fall to the ground. But lifting it is problematic, since it is impossible to crawl under the car with it. First, disconnect the battery by de-energizing the system. So the whole story begins - start preparing the car for repairs, removing all unnecessary elements. Namely:
- Twist the wheels and move them to the side so they don't get in the way.
- Remove the tie rod ends to free up the struts.
- Remove the two bolts that secure the ball joint.
- Remove the engine protection.
- Drain the oil from the box.
- Loosen the nut on the rocker and remove it.
- Remove all nuts from the bolts on the two pads.
- Place a support or jack under the engine.
- Disable the reverse sensor.
- Disconnect the wires from the starter and remove it by unscrewing the three nuts.
- Unscrew the nuts from the flywheel protection.
- Remove the inner CV joint on the right side, do not touch the left one.
- Unscrew the three bolts securing the gearbox to the block.
- Unscrew the nut above the right CV joint.
Clutch replacement
Replacing the clutch and release bearing of a VAZ 2109
If the car is still hot after driving, you need to wait for it to cool down. After that:
- Unscrew the exhaust pipe clamp, remove the cardan (see Repairing the cardan yourself).
- Unscrew the rear flange.
Note: Since the pipe is all solid and there are no joints, it will be difficult to unscrew it.
- When the car has cooled down, you can begin to remove the starter. The top bolt must be unscrewed with a 13 key. After this, it will be possible to remove the starter.
- To remove the clutch, you need to unscrew the bolts by 13. Unscrew the mudguard, which is secured with bolts by 10 (there are only 2).
- Remove the 4 bolts securing the clutch to the engine. This can be done using the key 19.
- Unscrew the speedometer cable. Remove two bolts. Unscrew the traverse. After this, you can easily remove the box.
- In order to remove the clutch, you need to unscrew the 6 bolts securing the drive disc. You need to insert a special frame into the center. By the way, further actions will be much easier with it, otherwise it will be difficult to center.
Note: A regular input shaft can be used instead.
When all the bolts are unscrewed, you can remove the basket.
VAZ 2109 clutch
- You need to unscrew the bell. There are 6 bolts for 13 and one for 17.
- It is necessary to clean the gasket with a knife.
- Pull out the oil seal. To do this, hit the bell with a hard object. You need to insert a new oil seal in place of the old one and press it in.
- Insert the disk with the protruding part facing out.
- After that, it’s the turn of the clutch basket.
- Clean the entire surface and wipe with degreaser so that the sealant adheres well.
- In addition to replacing the clutch and oil seal, the oil must also be changed.
Note: it is advisable to place the canister so that the oil flows into it.
- Apply sealant and install gaskets (sealant should be installed in a thin layer so that it does not leak).
- Put on the bell.
- Insert new release bearing.
- Put the box in place and pour in oil (1.5 l). You need to fill it until it flows from the filler neck. Tighten the plug.
- Everything needs to be assembled in reverse order.
- Don't forget about the speedometer and reverse gear, as they need to be connected. If you forget this, you will have to repeat everything again later.
Symptoms of malfunction
The clutch release bearing itself will tell you that its life is already at its limit or it has completely failed. Therefore, your task is to monitor the behavior of the car and promptly respond to emerging problems.
Sign of breakdown
Peculiarities
The clutch pedal becomes hard to press
Initially, this only causes a certain discomfort, since you have to apply more force to change gears. But this phenomenon should not be ignored. Bearing needs to be replaced
Difficulty engaging first and reverse gears
This indicates that the bearing's life is gradually ending, and you urgently need to take action. If you don't do this, you will soon be unable to engage any of the gears in your transmission.
The car doesn't pull
There is a loss of efficiency and performance of the box. Consequently, it is not possible to change gears correctly and quickly. This makes maneuvers, overtaking and a banal increase in speed more difficult.
This happens occasionally at first, and therefore almost every time you change gears. This symptom clearly indicates that it is time to send the car to a service station or garage for repairs.
Old and new VP
If the release bearing is not replaced in a timely manner, the gearbox will soon fail, the clutch will not work, and this will lead to dire consequences.
Consequences of wear
If you have encountered such a phenomenon as wear of the clutch release bearing, then you probably often drive your own VAZ 2109. It is time and the many kilometers traveled that lead to such breakdowns.
If the bearing is not replaced in time, this will result in the following consequences:
- Any subsequent trip may be the last for the car;
- The clutch disc will overheat, which will lead to destruction of the lining;
- In addition to replacing the bearing, you will have to replace the entire clutch disc;
- It is not uncommon for the clutch to fail. If you hear an incomprehensible noise coming from the clutch system, then there is a problem with it.
General information about the bearing
The release bearing of the VAZ 2109 car (hereinafter referred to as VP) is an important part in the operation of the vehicle. If it breaks down, movement by car is impossible, so the driver will immediately know about the failure of this element.
If this component breaks down, then the optimal functioning of the car's clutch is already impaired. In particular, if the release bearing breaks down, the clutch stops disengaging, which means the vehicle cannot move. If this element fails, then there is no way to do without replacing it.
New and worn out VP for VAZ 2109