1200 rub. for the photo report
We pay for photo reports on car repairs. Earnings from 10,000 rubles/month.
Write:
Excessive wear of the gasket located on the valve cover is accompanied by small and in some places large leaks. Therefore, quite often you see an engine in classic models, all stuck with smudges of engine oil; it does not resemble a passenger car, but rather some kind of tractor. This photo report shows in detail how to replace the gasket under the valve block cover on a VAZ 2107 car with your own hands. It is worth noting that this photo report is also suitable for all “classic” models, from 2101 to 2107. There is nothing involved in the process of replacing the gasket complicated, the gasket itself costs mere pennies. The list of required tools looks like this:
- Flat head screwdriver;
- 10mm wrench;
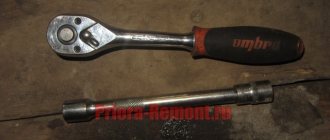
- Ratchet wrench 10;
The first step is to remove the air filter along with the housing, as it will interfere with further work. And then disconnect the carburetor damper control rod.
Then unscrew all the nuts securing the cover to the cylinder head.
Also remove all washers so you don't lose them when removing the cover. And after that you can lift the lid up, since nothing else holds it.
To replace the gasket, you must first remove the old one, and this is easy to do, since it stays there on its word of honor.
Hi people. In this article we will look at how to adjust valves on a classic car. Owners of domestic cars of the VAZ 2101, 2102, 2103, 2104, 2105, 2106, 2107 family have to deal with such engine operation when valves can be heard knocking. In this case, you need to find the reason why they are knocking and adjust it. They also need to be tuned; there were various works to repair the internal combustion engine, for example, replacing a valve, piston, gasket, etc.
Removing the valve cover and replacing the gasket
The valve cover on a VAZ 2106 has to be removed in many cases, from the procedure for tensioning the timing chain, adjusting the valves and ending with disassembling the engine. It is not difficult to remove and can be done in 10 minutes if you have the necessary tools, a full list of which I will give below:
- Heads for 8 and 10
- Extension
- Ratchet or crank
- Pliers
Before you begin this repair, you will need to perform some procedures to gain access to remove the valve cover. Namely, the first step is to remove the air filter housing, since it will get in the way.
To do this, unscrew the three nuts securing the filter cover and remove it, and then remove the filter:
Then unscrew the 4 nuts securing the body to the carburetor:
And remove the housing, having first disconnected the hose from the air intake breather:
Now you need to disconnect the carburetor damper drive rod by lifting it up and moving it to the side. If you have a retaining ring, you must first remove it:
It is also worth immediately disconnecting the choke cable. To do this, first loosen the nut with a size 8 wrench, which is shown by the arrow in the photo below, and use pliers to slightly release the cable clamp (bolt):
Then we remove the choke cable, since it is free and is not attached to anything else:
After this, you can begin to unscrew the eight nuts securing the valve cover of the VAZ 2106. The most convenient way to do this is with a ratchet with a long extension and a 10-mm socket.
When all the nuts are unscrewed, we try to lift the valve cover and remove it from the studs. It is finally removed at a certain angle; you will have to turn and tilt it a little on different sides so that it does not catch on anything and comes out freely.
After the valve cover is removed, you can carry out the necessary procedures, which is why it was removed. If the gasket needs to be replaced, it can be changed just as easily. Remove the old gasket, carefully wipe the seat on the cylinder head and put the new gasket on the studs. Before installation, it is also advisable to wipe the cover very well so that it is dry.
Installation is carried out in the reverse order of removal. Don’t forget to put back the carburetor cable and rod, and also put on all the disconnected hoses.
Replacing the valve cover gasket VAZ 2106 - 2107
02/04/2015, Category engine |
If you notice damp oil stains on the top of the cylinder head on your engine or you have adjusted valves, you will need to replace the valve cover gasket. The procedure is not complicated, you will need a minimum of tools, such as:
- wrench or socket 10
- new valve cover gasket
Removing the valve cover.
First of all, you need to remove the valve cover by unscrewing all the bolts going around. Then disconnect the carburetor rods. After unscrewing everything and freeing the cover from all excess, remove it. The next thing you need to do is remove the old gasket and clean the surface where the new gasket will be located. After this, we put the gasket in its place and begin to assemble everything in the reverse order of removal, this is where the replacement ends, if you have questions, ask them in the comments, and also read other interesting articles about how to build a cramp yourself on our website and join our VKontakte group.
Replacing the cover gasket of a VAZ 2106
Often, during this repair, many questions arise. Let's try to figure out this problem together. In order to replace the gasket, you will need the gasket itself, which you can easily find in specialized stores. In addition, you will need to stock up on available tools: a wrench with a 10-mm head, pliers and a screwdriver. If you don’t have a wrench of the required size at hand, then you can get by with a socket or socket wrench. You will need pliers to fix and pick up parts.
So, in order to successfully complete our task, you should pay attention to the following:
- 1. First, remove the carburetor air filter and its protective casing.
- The hose from the carburetor fitting, which serves to ventilate the crankcase, must also be disconnected.
- After the screws securing the control rod are loosened, it is necessary to separate this rod from the carburetor.
- The cylinder head cover fastening must be removed. To do this, you need to unscrew all eight nuts. Try not to lose the eight reinforcement washers, two of which are located in the corners.
- After this, remove the lock washer, which serves as a lever to drive the throttle valve. Only after this can you remove the lid itself.
This is, in fact, such a difficult procedure you need to carry out. After this, change the gasket and proceed in the reverse order. Don't forget about the reinforcement washers. When installing the cover, pay attention to the sequence of tightening the bolts to avoid disturbing the uniform pressure on the tin cover, which is already not very durable.
Aquagel - CAR GLASS PROTECTOR.
Aquagel - is not washed off by rain, snow and water.
The procedure for adjusting the valves of a VAZ 2106 car
The gas distribution mechanism plays a decisive role in a car. It depends on it when and at what moment a new portion of the mixture will be supplied and when the exhaust gases will be released. After repairing the cylinder head, and indeed after many kilometers of operation, many car owners are faced with the question of how to properly adjust the valves on a VAZ 2106. Indeed, this cannot be done without instructions, otherwise the engine may not start at all. Today you will learn what is the procedure for adjusting valves and why this is done.
Why do you need to adjust valves?
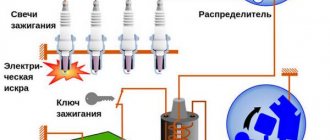
The gas distribution mechanism is installed at the top of the engine, and is also responsible for sealing the combustion chamber. Above each cylinder there are two valves, one of which is inlet and the other is exhaust. During operation, the intake valve first opens and admits the air-fuel mixture into the cylinder, then it closes, compression and ignition of the mixture occurs. After this, the exhaust valve opens and exhaust gases exit the cylinder.
Of course, all these processes are synchronized and happen much faster because the camshaft is mechanically connected to the crankshaft. In addition, the engine of any car, even such a VAZ 2106, is subject to the simplest laws of physics that relate to the heating of bodies. During heating, the bodies expand, which means that the gaps of many parts also expand, where the valve mechanism is no exception. If you adjust it close to the shock cam, then during the heating phase the phase will be longer, which means that fuel consumption will increase, in some cases, the car’s power will also be lost.
In addition, the need for clearances is necessary in order to ensure the best sealing of the combustion chamber after the engine has completely warmed up. After all, the more sealed the cylinder is, the more the mixture is compressed, which then ignites very well and pushes the cylinder down with greater force. Therefore, valve adjustment is necessary to maintain vehicle performance.
Valve adjustment, specifically the VAZ 2106, must be done every 10 thousand kilometers. In addition, if you removed the camshaft, this procedure must be repeated. The fact is that after removing this mechanism, you will not be able to put it back the way it was before, so all the previously set gaps are violated.
What is needed to adjust valves on a VAZ 2106
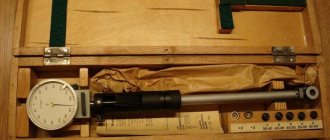
To adjust the thermal clearances of the valves, it is necessary to prepare all the appropriate tools in advance. It includes:
- Feeler gauges for measuring gaps. They are sold at any auto parts store and are not expensive, so having such a tool in the garage is only beneficial.
- New valve cover gasket for VAZ 2106. After you open the valve mechanism, the old gasket becomes unusable.
- Set of wrenches. In general, it is impossible to say exactly which specific key may be useful to you. During the repair process, you will see everything for yourself, so prepare a whole set at once.
- Screwdriver Set.
- A key that allows you to turn the crankshaft. If you don’t have such a key, it doesn’t matter; for these purposes, prepare a jack, and then put the car in 4th gear. This way, you can rotate the crankshaft by turning the rear wheel of the car with your hands. But in this case, you will need the help of a friend to monitor the position of the marks.
Preparatory activities
Unscrew the air filter cover by unscrewing the three fastening nuts on top and remove it. After this, pull out the filter element and tighten 4 more nuts that secure the filter housing to the carburetor. Be careful not to lose the nuts, which could easily fall into the carburetor chamber, as it will be very difficult to get them out later. The housing is removed and set aside.
Disconnect all hoses that pass through the cylinder head, plus unscrew the manual throttle control drive, then disconnect the cable. It is highly recommended to remove the distributor cover; it may interfere with inserting the dipstick into the valve mechanism clearance.
Before adjusting the valves, it is recommended to adjust the chain tension if it is loose or this procedure has not been carried out for a long time. To do this, use a 13mm wrench to loosen the special tensioner on the cylinder head and turn the crankshaft two to three turns in the direction of travel. The tension mechanism will automatically adjust, after which you must immediately tighten the tensioner.
Remove the valve cover of the VAZ 2106 car by unscrewing all the nuts around the perimeter. Don't forget to remove the old gasket. Now set the first cylinder to top dead center. The countdown is from the radiator grille. To do this, turn the crankshaft in the direction of travel until the mark on its pulley and the oil seal cover coincide. Please note that there are three marks on the cover, but you should use the longest one as a guide. To make sure that this is exactly the right stroke, there is another mark on the camshaft pulley in the form of a bold dot, which should be in the highest position and coincide with a special protrusion on the bearing housing.
The procedure for adjusting the valves of the VAZ 2106
Now the fun begins. You have set all the necessary marks, there should be no further errors. On the spark plug side there are valve mechanism adjustment bolts, which are represented by a large lock nut and an adjustment nut. To adjust the valves, you need to loosen the large nut and then turn the small nut in the appropriate direction until the feeler gauge begins to move in with some pinching. Once this happens, tighten the locknut, then move on to the next valve. At this point you should adjust valves 6 and 8. The countdown is also carried out from the radiator side.
After you have completed the above procedures, you need to rotate the crankshaft exactly 180 degrees in the direction of rotation. In this case, the camshaft will rotate 90. By the way, on some 2106 models there are special camshaft marks that clearly divide it into 4 angles of 90 degrees each, which is very convenient when adjusting the valves. You can make the same ones yourself using a center punch.
Now adjust the 4th and 7th valves. In the future, you will also have to rotate the crankshaft and adjust the valves in the following sequences: 1 and 3, as well as 2 and 5.
After that, you can pack up everything that was removed before. Once all the parts are in place, it is recommended to adjust the ignition timing so that the engine runs as smoothly as possible, because the old setting is only valid for the old chain tension.
This completes the adjustment of the VAZ 2106 valves. As you noticed, it was not difficult at all. We wish you good luck on the roads!
Video on the topic
Adjustment of valves
If knocking, unstable operation, or increased vibration occur, you should pay attention to the valves.
If the valve timing of the gas distribution mechanism is disrupted, they do not operate accurately, that is, the full volume of gas does not enter the working area of the cylinders, complete combustion of the fuel-air mixture in the working chamber does not occur, and the cylinders are not purged. This is all accompanied by the appearance of a shock load on the camshaft cams on the drive lever and the shaft rod. Fuel and engine oil consumption also increases. What happens if you drive with unadjusted valves? Answer: rapid wear of engine parts, increasing cost and repair time.
The greatest danger to a car engine is a gap that is less than permissible. Too little clearance between the drive lever and the camshaft cam prevents the valve head from sitting tightly in its seat on the cylinder heads. Through a valve that is not seated, gases from the burnt fuel-air mixture are knocked out of the combustion chamber. Because of this, the exhaust valve cap around the perimeter begins to burn.
Rubber oil deflectors, also known as oil deflectors, also burn out due to a burnt valve cap, which leads to increased engine oil consumption. If the wear of engine parts is large, then it may be better and easier to do an engine swap with your own hands or at a service station.
Do-it-yourself replacement of VAZ-2106 valve stem seals: repair instructions
Replacing valve stem seals on a VAZ-2106 must be done when repairing the cylinder head. These devices are necessary to remove excess lubricant from the valves when the engine is running. With a high mileage of the car, the valve stem seals wear out, they lose their positive qualities, and the elasticity of the springs decreases. As a result, the seal does not make good contact with the valve surface.
Features of repairs
In general, the caps should fit the valve stem as tightly as possible. If the integrity of the seals is compromised, carbon deposits can be seen on the electrodes of the spark plugs, and lubricant consumption will certainly increase. Smoke will appear from the exhaust pipe. Please note that similar symptoms appear when the engine breaks down. Therefore, it is necessary to determine exactly where the fault is.
Replacing valve stem seals on a VAZ-2106 with your own hands is quite simple, you just need to have all the necessary tools on hand. A prerequisite is that all work must be carried out in a clean garage. Dirt and dust must not get inside the cylinder head. In this case, the dust will act as an abrasive, causing all the engine components that come into contact to suffer extreme wear.
Repair tool
You will need the following list of tools:
- The desiccant can be used of any type. If you have a homemade one, then that will do. It should allow the removal of crackers.
- Set of flat and figured screwdrivers.
- Soft wire.
- A piece of tin.
- Socket heads, open-end and ring wrenches.
- Torque wrench.
Be sure to have tools such as pliers, side cutters, and tongs on hand. They can be useful for any work, in particular, when replacing oil seals on a VAZ-2106 engine.
Preparatory work
Before you begin any repairs, you need to wash the entire car as thoroughly as possible. Moreover, most of the attention should be paid to the engine compartment. Be sure to follow safety precautions - do not flood the ignition system, electronic sensors, or wires. Before you start washing, you must completely disconnect the power supply system. To do this, you need to disconnect the battery, preferably completely, and then remove it.
It is necessary to install wheel chocks under the rear wheels, then engage a lower gear and squeeze the handbrake. Since the car has rear-wheel drive, engaging the gear will prevent the car from rolling away. You definitely need to buy a set of valve stem seals. It is advisable to choose only those manufacturers recommended by AvtoVAZ.
Removing the block head
The valve stem seals can be replaced without removing the head. But if the cylinder head is being repaired, then in any case it will need to be removed. Therefore, you disassemble the gas distribution mechanism as follows:
- Unscrew all the spark plugs using a wrench. If the condition of the electrodes is poor, new ones must be installed during assembly.
- Then you need to unscrew all the bolts that secure the cylinder head cover. There are 8 of them in total, arranged in a circle.
- Install the camshaft exactly according to the marks.
- It is necessary to bend the petals on the camshaft lock washer and unscrew the bolt. To unscrew it without problems, you need to turn on the speed.
- Unscrew the nut securing the timing chain tensioner.
- After this, you can dismantle the tensioner and sprocket. Be sure to secure the drive chain to the sprockets with wire.
- Unscrew the nuts securing the camshaft bearing housing.
- Remove the housing and camshaft.
Then you need to completely remove the rocker arms and old caps.
How to remove the caps
It is necessary to completely remove the old elements before replacing the valve stem seals on the VAZ-2106. The repair instructions are as follows:
- If the replacement occurs without dismantling the cylinder head, then you need to install a tin rod in the spark plug holes. This will keep the valve in the up position. If you are making a replacement on a removed cylinder head, then you can hold the valves with your hands.
- Install the valve depressurizer.
- Compress the spring.
- Remove the crackers that are located on the groove in the upper part of the valve stem.
- Remove the spring, plate and support washer.
Using a flat-head screwdriver, pry up the oil seal and pull it out. You don’t have to spare the old elements; if it doesn’t work out, then use a sharp awl.
How to install new caps
On VAZ-2106 cars, the valve stem seals are replaced independently using a simple plastic device. It must be placed on the top of the valve stem to cover the recesses on it. In this case, you will not have to remove the springs from the valve seals. The work is carried out according to the following algorithm:
- Install the plastic bushing on the valve.
- Lubricate the auxiliary bushing and valve stem with engine oil.
- Push the oil seal on until it stops.
- Remove the plastic sleeve.
- Using a “10” tubular wrench or a large mandrel, you need to hammer in the cap.
- Install the support washer, spring and plate.
- Install the valve depressurizer and compress the spring.
- Put the crackers in place, and then release the desiccant.
This completes the replacement of the VAZ-2106 valve stem seals. If necessary, you need to double-check all gaps and correct them. Assembly of the entire assembly is carried out in the reverse order of removal.
If not changed in a timely manner
On some cars, gasket failure is a chronic problem. The original standard part can withstand no more than 70-80 thousand kilometers. During active use of the car, it breaks down even before the mileage of 40 thousand km.
Changing the gasket on time is extremely important. If this is not done, there will be many unpleasant surprises: the entire valve group of the engine will be subject to a powerful attack of dirt and dust, which will penetrate inside without obstacles; severe oil leakage will begin, and a lack of lubrication will have an extremely negative effect on the service life of the piston group and valves; oil will get on sensors, spark plug wells, wires, and other mechanisms in the engine compartment - the risk of fire will increase; cooling of the power plant will become worse.
Change the gasket as soon as it stops doing its job. If you choose a low-quality product or make a mistake during replacement, oil leaks will appear again within a few days after replacement.
This is interesting: VAZ 2112 hydraulic compensators with 16 valves are knocking: causes and solution to the problem
VAZ 2106: replacing valve stem seals with your own hands
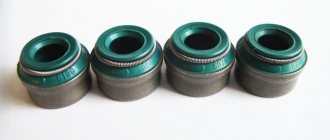
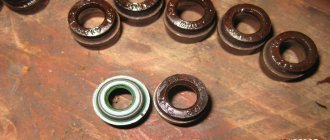
Intake and exhaust valve seals
Oil seals are designed to prevent oil from entering the combustion chamber through the valve openings of the engine head. The need to fit the valve stem into holes with a technological gap contributes to the entry of an oil film into the combustion chamber. Therefore, sealing of the gap is required, for which the installation of stuffing box caps is provided.
Signs of oil leaking through valve stems
Oil, when exposed to high temperatures, burns, releasing blue smoke. If the oil leak occurs through the valve stems, smoke will appear during startup and disappear after the engine warms up. In this case, excessive oil consumption will appear and an oily deposit will form on the spark plugs.
Dry and oil-wet candles
Necessary tools and accessories
Replacing the valve stem seals of a VAZ 2106 is done directly on the car, which significantly speeds up the work, since there is no need to remove and then reinstall the cylinder head. It is enough to place the car in a place protected from dust and precipitation. Apply the handbrake and put the gear shift knob in the neutral position. Replacing oil seals on a VAZ 2106 requires a set of caps and a new head cover gasket, standard tools, accessories:
- Carrying;
- Candle key;
- Spanners 17 mm., 13 mm.;
- Hexagonal internal heads 8 mm, 10 mm, 13 mm. with a collar;
- Pliers;
- Tweezers;
- Flat screwdriver;
- 8 mm thick soft metal rod;
- Torque wrench;
- Spring compression device
- Mandrel for installing caps
- Soft wire.
Different designs of special pullers for compressing springs
How to make your own devices
It is convenient to use a special device, since there is no need to hold it with your hands; it holds the springs compressed with a bolt. If you don’t have such a device, you can make it yourself. To do this, it’s enough to have two steel square rods 10x10 mm, 300 mm long. They need to be fastened at three points, at the ends and in the middle, so that there is a gap of 12 mm between them, like rails, then the price will be much cheaper. So:
- You can attach it in any way; bolts, clamps, welding, in the fastening points between the rods you need to place metal plates 12 mm thick, which will provide the necessary gap between the rods.
- The valve stem will fit into the gap when the springs are released. To install valves, instead of a mandrel, you can use a steel tube 120 mm long, with an internal diameter of 14 mm, and a copper washer with a hole matched to the rim of the cap.
Preliminary preparation
Before starting work, it is advisable to watch the video, replacing oil seals on a VAZ 2106; you definitely need to thoroughly wipe the surface of the upper part of the block and the head cover. For convenience, you need to remove the air filter housing. Cover the carburetor with film or cloth to prevent dirt from entering during operation. Unscrew the spark plugs, remove the cover with the gasket.
- Set the fourth cylinder to top dead center on the compression stroke. To do this, the crankshaft rotates to a position at which the intake and exhaust valves of the fourth cylinder remain closed before and after the piston passes TDC. This is determined by the valve clearance with the rocker arm.
- The position of the piston is determined by measuring with any rod through the spark plug hole. Check the alignment of the marks on the sprocket and the housing.
Checking whether labels match
- Use a screwdriver to bend the lock washer using a 17 mm spanner. Loosen, but do not unscrew, the nut securing the sprocket to the camshaft.
- Using a 13 mm spanner, unscrew the cap nut securing the tensioner two turns.
- Free up the chain as much as possible.
- Unscrew the nut completely and carefully remove the sprocket from the camshaft axis.
- To prevent the chain from falling off the sprocket, you need to tie it with wire and hang it together with the sprocket on the edge of the cylinder block.
Disassembly sequence
- Unscrew the nine nuts holding the camshaft housing and remove it along with the shaft.
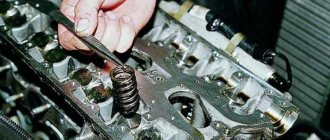
- Using a screwdriver, lift the pressure spring, pull out the pressure lever with a little force, push the spring out from under the stopper and pull it out.
- A soft wire is tightly inserted through the spark plug hole between the piston bottom and the valve so that the valve does not fall when the springs are pressed. The higher the part of the rod into which the fixing nuts are inserted, the less the springs will need to be pressed to install them.
Attention! It is not allowed to hold the valves with hard objects; there is a risk of scratching the piston or cylinder.
- A nut is screwed onto the camshaft housing mounting stud closest to the valve, as in the photo, to which a special puller or the end of a homemade device clings with a grip. It covers the stud on both sides, rests against the lower plane of the nut and rests on the upper plate of the springs.
- The valve stem with crackers is passed between the rods of the device.
Squeezing springs and removing crackers with tweezers
- We press the lever, the springs are compressed, the plate with crackers goes down, the crackers fall into the area of the narrower part of the rod, and are able to come out of the hole of the plate. You need to select them with tweezers or pliers.
Attention! It is forbidden to pull out the crackers with your hands, as you can get your fingers pinched.
- If the crackers are stuck and do not come out when the springs are significantly compressed, you need to knock them out with a weak hammer on the plate.
The device is released and removed sequentially:
- plate;
- outer spring;
- internal spring;
- inner spring lower washer;
- outer spring washer.
To remove the lower washers, you need to pry them off with a screwdriver.
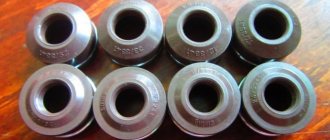
- The cap is grabbed with pliers, rocked, and rises along the valve stem.
- Then a new valve stem seal is installed and the valve is assembled in reverse order.
- They are sequentially disassembled and reassembled with new valve caps for the fourth and first cylinders.
- After this, holding the sprocket, the crankshaft rotates until the pistons of the second and third cylinders reach TDC. Consistently, similar work is carried out on their valves. We can assume that the oil caps on the VAZ 2106 have been replaced.
Assembly order
Pressing in valve stem seals using a bushing
- The valve stem, oil seal and cap are lubricated with engine oil; the valve cap corresponding to the valve is placed on the stem with the oil seal facing up. It descends down the stem, where it is pressed tightly against the hole with the valve guide.
- The end of the mandrel is pressed against the rim of the cap, by lightly tapping the top of the mandrel with a hammer, the cap is pushed into the hole until it stops. The cost of an error in case of strong impacts, damage to the oil seal or cap, will have to be replaced. The springs are installed in the reverse order of disassembly.
Attention! After installing the springs and removing the device for compressing the springs, you need to remove the plate from the spark plug hole and tap the end of the rod with a hammer so that the crackers sit in their place. This must be done carefully; if the crackers are positioned incorrectly, the springs may pop out.
Procedure for tightening the camshaft cover nuts
The camshaft cover, as required by the instructions, is pressed with a torque wrench with a force of 8 kg/m. tightening the nuts in the required sequence.
Basic faults
There is damage to the gasket in which the operation of the VAZ 2107 is strictly prohibited. But there are also breakdowns in which it is still possible to drive. So, here is a list of the main breakdowns:
- Destruction of the gasket between the lubrication and cooling channels. With such a breakdown, antifreeze begins to seep into the engine sump. Of course, mixing with engine oil occurs. If there is a suspicion of a gasket failure, then you need to remove the dipstick and check the lubricant level. It's also worth looking at the consistency of the oil. In this case, the antifreeze turns light brown. In the event of such a breakdown, it is strictly forbidden to even start the engine, as this can quickly lead to jamming.
- Destruction between the cylinders and the cooling system occurs if the cylinder head gasket is of poor quality. It is quite possible that there was a weak tightening torque of the VAZ 2107 cylinder head during assembly. Under pressure, the integrity of the gasket is destroyed. The result is that air gets into the engine cooling system, and something terrible happens in the expansion tank. The temperature rises, there are huge bubbles and seething in the tank. Of course, it is undesirable to continue driving in this case.
- Sometimes (much less often than in the two previous cases) destruction occurs between adjacent engine cylinders. The result is a significant decrease in compression and unstable engine operation.
- And, of course, one cannot help but mention the banal marriage. In this case, the cylinder head gasket of the VAZ 2107 simply collapses, literally before our eyes. In this case, you can see how antifreeze begins to leak between the cylinder head and the engine block. In this case, tightening the bolts has no effect. Most likely, there is unevenness in the gasket itself, which leads to a similar result.
Replacing the Valve Cover Gasket VAZ 2108
Replacing the cylinder head cover gasket on a VAZ 2108-VAZ 21099
The cylinder head cover gasket is needed to seal the gap between the cover and the cylinder head itself; if it is removed, then when the engine is running, oil will flow out through this gap, thereby polluting the engine of your car and increasing the consumption of this engine oil, in addition it prevents dust and dirt from getting into the inside of the cylinder head through this very gap, because it closes it tightly.
To replace this gasket, you will need to take from the tools: All the keys that you have, of which the most useful for you will be a wrench (or extension) with socket heads, box wrenches and wrenches will also be needed, in addition, screwdrivers will be needed, and accordingly the gasket itself is brand new, but just buy a normal gasket in trusted auto stores, just if you don’t find one that’s great, in other words, there’s a possibility that it will leak oil and the gap won’t be properly sealed, by the way, take a regular sealant just in case, in general We always recommend lubricating the gaskets with sealant so that there are no third-party cracks through which oil can escape or dirt can get into the engine (inside)!
Where is the cylinder head cover gasket located?
Firstly, let’s explain to you where the cylinder head cover itself is located, in fact it’s not at all difficult to see (this applies to both carburetor and injection engines), to do this, open the hood of the car and at the very top of the engine a rather large cover (Indicated by a reddish arrow, in the photo there is an injection car of the Samara family), under this very cover there is a gasket that closes the gap between the head and the cover, the approximate location of the gasket is indicated by a blue arrow, due to the fact that the angle in the photo is not convenient, you You won’t be able to see this gasket normally, but we have already shown you in the photo where it is approximately located.
When do you need to change the cylinder head cover gasket?
If you notice that a little oil has begun to ooze through the cylinder head cover, namely in the place where the gasket is located, then this indicates that it has become unusable and needs to be urgently changed, if not changed, the engine will soon become clogged, and the leaking oil itself will stain it (And oil is not so easy to wash off from the engine, especially frozen oil), in addition to all the above problems, the gasket is changed when removing the cylinder head cover (the cover can be removed for various reasons during the operation of the car, bright for that for example, adjusting valves, for which the cover must be removed from the car).
Replacing the valve cover gasket on a VAZ 2114 1.5i 8 valve
About the tracks. Write in the comments. I’ll write the name.
What types of valve covers are there?
There are several types of flap covers.
Depending on the type of lid, you need to select a liner. 1970-1974 The cover is more angular than later ones, the stamping under the timing star is high, the oil filler neck is high.
Full size
1974-1979 The oil filler neck is high, the timing star stamping is low, the corners are rounded
Full size
1980 onwards Same thing, but with a low neck
The injection version does not have a gas drive bracket; there is an air duct mounting bracket on the front part.
Cover 2123-1003260 (Shniva) has a double wall and a threaded neck.
Full size
As suggested by Dim23rus, the 2105 covers also come in different shapes, round and angular
Well, homemade/cooperative/dealer options
The last one is produced by BIMOtorsWhat is the function of the gasket?
As soon as the cuff loses its properties, the motor starts to leak. The gasket ensures complete tightness of the lid and neck for filling the lubricant.
The element is located under the valve mechanism cover and is attached with it using bolts and nuts. The cuff is made of a special type of rubber that does not lose its characteristics for a long time when heated. Then the quality of the material gradually deteriorates, the part loses its elasticity and is unable to hold oil under pressure. You have to shoot and think what to do next.