January 14, 2015 Lada.Online 560 500 0
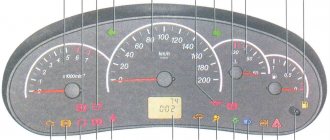
The Lada Priora/Kalina instrument cluster is designed to display driving characteristics, the current state of vehicle systems that ensure traffic safety, as well as the correct operation of the entire vehicle as a whole. If you are a novice driver, then this description of the dashboard will help you understand the readings of instruments and indicators.
- Tachometer. Shows engine speed in real time. The red scale zone indicates a dangerous operating mode for the engine;
- Malfunction lamp of the electronic brake force distributor. To check, the lamp lights up red for a few seconds when the ignition is turned on. The burning of the lamp in other cases indicates a malfunction; when driving with a burning lamp, increased safety measures must be observed;
- Battery charge lamp. To check, the lamp lights up red when the ignition is turned on and goes out after the engine starts. If the lamp is lit in other cases, it indicates a lack of battery charge;
- Left turn signal lamp. Flashes when the turn signal or hazard lights are on;
- Speedometer. Shows at what speed the car is currently moving;
- Engine oil pressure warning lamp. To check, the lamp lights up when the ignition is turned on and goes out after the engine starts. In other cases, the lamp is lit indicating low pressure in the engine lubrication system. It is not recommended to operate the engine in such conditions;
- Right turn signal lamp. Flashes when the turn signal or hazard lights are on;
- Handbrake lamp. Lights up red when the parking brake is applied;
- Coolant temperature gauge. Engine operating temperature is 90 degrees and above to the red zone. It is prohibited to operate the vehicle if it overheats. When the arrow reaches the red zone, a buzzer will sound. To extend engine life, it is recommended not to operate the engine at high speeds until the coolant temperature reaches operating temperature;
- Gasoline level indicator in the tank. The arrow shows the fuel level. Lack of gasoline can damage the fuel pump;
- Fuel reserve lamp. Lights up with an accompanying buzzer signal when there is less than 10 liters of fuel left in the tank;
- Button for switching display modes and resetting daily mileage readings. A short press switches between daily and total mileage. When you hold the button, the daily mileage is reset, accompanied by a sound;
- Hazard warning light. Flashes red when the emergency lights are turned on simultaneously with the turn signals.
- Electric power steering (EPS) malfunction lamp. To check, the lamp lights up yellow when the ignition is turned on for a few seconds. Lighting of the lamp in other cases indicates a malfunction of the EUR;
- Headlight high beam lamp. Lights up when the high beam headlights are turned on;
- Lamp for turning on external lighting. Lights up when the headlights are turned on or the headlights are low beam;
- Airbag system malfunction lamp. To check, the lamp lights up yellow when the ignition is turned on for a few seconds. In other cases, if the lamp is illuminated, it indicates a malfunction in the airbag system. In this case, in the event of an accident, the airbags will not deploy;
- Immobilizer lamp. If the system is working properly and the engine is allowed to start, when the ignition is turned on, the lamp flashes once and goes out. If the lamp flashes constantly (accompanied by short beeps), then the system is faulty. If, after turning on the ignition, the lamp lights up for 15 seconds and goes out, then the anti-theft system is not activated;
- Liquid crystal display of the on-board computer (BC). Displays daily and total mileage, as well as information from the BC;
- Seat belt warning light (optional). The lamp lights up when the driver's seat belt is not fastened, accompanied by buzzer signals for 1.5 minutes;
- Brake system emergency lamp. To check, the lamp lights up red when the ignition is turned on for 4 seconds. In other cases, the lamp is lit indicating an insufficient level of brake fluid, or another malfunction of the brake system;
- Front passenger airbag lamp (optional). Passenger airbag deactivation lamp;
- Anti-lock braking system fault lamp (optional). To check, the lamp lights up when the ignition is turned on and goes out after a few seconds or after the engine starts. When the lamp is lit, there is a malfunction in the ABS system, but the brakes remain fully operational;
- Engine management system malfunction lamp (Check Engine). To check, it lights up when the ignition is turned on and goes out after the engine starts. In other cases, the lamp is lit indicating a malfunction in the system. See the error code.
Standard instrument panel - article number and price
The original car tidy exists in three types.
- the first is an option for a pre-restyling car;
- the second panel is for a restyled car;
- and the third is the “Lux” option for the restyled one, which has become faintly similar to all previous torpedoes.
Each of them contains standard elements such as a tachometer, so their functionality does not decrease. . Who wants to do tuning of the instrument panel, this option is for them.
Priora first generation
The instrument cluster for the first generation Lada Priora received catalog number 2170-3801010. Cost – about 6,000 rubles. Everything is standard with it - from left to right there are four arc scales with red arrows: odometer, speedometer, coolant temperature, fuel level. Below the speedometer there is a small on-board computer display, and above the arches are all the indicators, including the direction indicators.
Priora 2
For the Priora “Lux” variation there are two more “subtypes” - with or without a CAN bus. Different subtypes were made so that the panel could be connected to any car. Catalog number – 2170-3801010-50 without tire, 2170-3801010-60 with tire. It is distinctive in that it contains an elongated display with a screen that can highlight the navigator.
The catalog number of the combination for the “Norma” assembly is 21720-03801010-20. Cost – 6,500 rubles. Like the “Lux” version, it received a brighter speedometer and odometer, and the coolant temperature along with the fuel level indicator is hidden at the bottom of the speedometer and odometer. The base will not create a route on the display, but will show all the information in color.
Reasons for the light indication
Each vehicle is equipped with a feedback system that helps the driver quickly receive information about the occurrence of problems. An exclamation mark on the car panel indicates the presence of breakdowns or errors of the following nature:
- Drop in brake fluid quantity. Often the icon starts blinking, indicating that when moving, the remaining consumables are splashing and the level changes as you go. You need to check whether there is a leak and what condition the pads are in. According to the regulations, the fluid needs to be replaced every two years.
- Decrease in pressure in the vehicle. Occurs due to problems with the vacuum booster. It is necessary to conduct a full diagnosis to determine the exact problem.
- Damage to the warning system. When sensors fail, a lamp appears on the display, which may light or flash.
- Problems with the handbrake. The parked vehicle may not be completely turned off, or the handbrake position sensor may be faulty.
The combination of an exclamation and the ABS icon indicates that the wheels need to be checked for damage.
Flashing exclamation point
Express diagnostics, which modern built-in computers allow a car to undergo, helps to collect information about the condition of the vehicle. This way you can identify the reason why the exclamation mark is lit on the dashboard in the car. A description of the fault will appear on the display.
The BMW brand is characterized by display problems. A lit icon on a BMW X1, E60 or E90 shows the owner that:
- tire damaged;
- the stability control system or ABS has failed;
- The battery is dead;
- the lubricant in the crankcase has overheated;
- the oil level has dropped;
- the brake line has failed;
- The electrical part of the handbrake needs repair.
Accurate decoding is possible only after computer diagnostics in the service.
Life hack: dashboard of a Lada Priora car, everything you need to know
Priora has several panels, depending on the year of manufacture, plus non-standard ones made specifically for it. Everyone knows how important it is to know the instantaneous status of instruments and machine parameters.
The panel, also known as the control panel, on a Lada Priora car is, in fact, brief information about the condition of the car at the moment. It contains all the basic information, from movement speed to indicator readings on malfunctions of the main units and components of the machine. When something in it doesn’t work, it’s immediately alarming, because it’s current information. A description of all the icons and their meaning can be found below in the article. Technology is gradually developing, so the dashboard is becoming more and more technologically advanced. But since the Lada Priora is a low budget car, the panel on it is of the same quality. On the first devices, the backlight often does not light up, or is only half lit. Of course, this doesn’t look good on Priora.
The instrument panel on the Priora car changed with the restyling of the 2nd Lada car. And Lux cars come with navigation. In fact, its basic functionality remains the same - all basic information is visible. Here you can monitor the operation of the engine, monitoring the speed, and understand that it is time to take the car for maintenance when one of the lights comes on. The price of a first (1) and second (2) generation part starts from 6,000 rubles and above. Tidying saves you from speeding, helps you refuel on time and prevent the Priora from boiling.
Bench diagnostic systems
These systems are not connected to the vehicle's on-board electronic control units and are therefore independent of the vehicle's on-board diagnostic system. They usually diagnose individual engine mechanisms and ignition systems, which is why they are often called engine testers. The main elements of the motor tester are sensors, as well as a processing and display unit for the measurement results of perceived signals. Sensors and recording devices are connected to cables using plugs and clamps.
Motor testers are computer-based and have a keyboard, display, disk drives, and a CD-ROM drive. The kit usually includes a set of connecting wires and cables, a strobe light, and in some cases an exhaust gas analyzer. Information is entered into a computer using an appropriate analyzer, which houses analog-to-digital converters, comparators, amplifiers and other signal pre-processing devices. The analyzer is connected to the necessary elements on the car using a set of cables, which is a set of wires connected to the negative and positive terminals of the battery and the ignition coil, high voltage wires to the ignition coil and to the spark plug of the first cylinder, and in addition, a contactless current sensor on the bus battery charging, engine oil temperature sensor (inserted instead of the dipstick), vacuum sensor in the intake manifold, etc.
The main part of the motor tester is an oscilloscope, on the screen of which various oscillograms appear, reflecting the operating mode and technical condition of the parts and ignition system devices being tested. Evaluation of the signal appearing on the oscilloscope screen is based on an analysis of changes (in the presence of faults) in the nature of electrical processes occurring in low and high voltage circuits. Based on individual parts of the image, one can also judge the operation of certain elements of the power and ignition systems, and the nature of the changes allows one to identify the causes of malfunctions.
The motor tester computer processes the information received from the engine and presents the results on the display or as a printout on a printer. The motor tester can be supplied with a set of laser CDs with technical information about various car models, as well as instructions to the operator on the procedure for connecting the motor tester to the car and the sequence of control operations.
Before diagnosing, enter the car model, type of engine, transmission, ignition system, fuel injection and other parameters characterizing the object being diagnosed. Motor testers are capable of diagnosing most automotive systems, including starting systems, power supply, ignition, assessing compression in cylinders, and measuring power system parameters.
Modern motor testers can provide information about the state of the ignition system in the form of numbers or an oscillogram of the process. An example is the M3-2 motor tester (Belarus), with which you can determine the condition of the engine (by developed power, power balance among cylinders, relative compression), starter, generator, relay regulator, battery, switch distributor, electrical wires, spark plugs ignition, lambda sensor, injectors of the injection system of gasoline engines, diesel fuel equipment, measure ignition timing for gasoline engines and injection for diesel engines using a strobe.
As automotive electronics become more complex, the functionality of stationary systems also expands, since it is necessary to diagnose not only engine management, but also braking systems, active suspension, etc.
The versatility of computer motor testers is determined by their software. Many of them work in the Windows operating system familiar to most users.
The disadvantages of motor testers include the fact that with their help it is difficult to detect intermittent faults in complex electronic systems, when a fault in one system manifests itself in the form of symptoms in other systems that are functionally related to the first.
The process of removing the console and dashboard on a Priora
How to remove the console from the car?
You need to be able to do this process and know how to do it if you are replacing an old console with a new one. You need to take into account the fact that in this case the console and instrument panel are a single element in the car, so you will have to work hard and get used to removing this part. In order to properly tune the interior, we disassemble these devices. You will need a set of wrenches, both ring and open-end, and a screwdriver. We remove the console on a Priora in cases where, for example, you need to connect a DVR to a panel with navigation.
Car enthusiasts are pleased that the console trim is quite easy to remove. Removing the panel will be a fairly simple task, and it is designed to be able to quickly and easily reach the various parts and devices behind it and penetrate the dashboard.
The console is secured with 4 screws. Two of them are located below the ashtray, and two more are slightly lower than the glove compartment. The car often already has a radio installed in advance, so you need to carefully disconnect it, freeing the wiring first. Do not touch cables with the navigation panel. Then the cover is removed. You need to apply a little force, because... At the top of the lining there are special tight holders.
Because If the console and dashboard with navigation are removed together, you need to disconnect the battery. Then you should remove the steering wheel on the Priora along with the adjacent steering column switches. Now a special cover is removed from the floor tunnel. To make a replacement, you need to unscrew the screws on the side from the center and pull out the instrument panel.
Then the nozzles intended for blowing glass are removed. This will allow you to unscrew the nuts for securing the front panel on the Priora. The next step is to remove the cover from the safety block (here you need to unscrew all the latches). Then the amplifier is removed. You need to be careful not to touch the dashboard lights.
It will be necessary to unscrew all the fastening screws that are located near the instrument panel and on both sides of the steering column. Then the pads themselves are disconnected. To do this, the clamps near the dashboard are moved. The cables from the ignition switch and the steering wheel are removed.
Additional nuts near the instrument panel wires also need to be unscrewed. Next, the harness is removed, and it is gradually disconnected one by one from all elements near the instrument panel. The instrument cluster itself is removed along with the console. It’s better to do this not alone, but with an assistant, because... the number of all devices here is not small, and they are quite heavy all together.
All these manipulations to remove the devices will not take 10 minutes. It is best to take the advice of experienced professionals and study the instructions in advance, because... the instrument combination with its various cables and screws will be described there, this will make the work not so difficult.
Instructions for dismantling and repair
Dismantling the tidy may be required to perform tuning, replacing backlight bulbs or repair work. You can find out how to remove the instrument panel on a Lada Kalina from the car's operating instructions.
LED instrument lighting
Before disassembling the Kalina 2 instrument panel, you need to prepare the following materials and tools:
- a set of keys;
- Phillips and flat screwdriver;
- replacement parts and bulbs.
Before carrying out work, turn off the power to the vehicle by removing the negative terminal from the battery.
Removing the Kalina torpedo
Algorithm of actions
The disassembly procedure consists of the following steps:
- Using a Phillips screwdriver, you need to unscrew two self-tapping screws.
- Next, you need to remove the trim from the instrument panel.
- At the next stage, the spring clips are removed from the clutch.
- After unscrewing two screws, you need to slide the panel towards you.
- The latch holding the block must be pryed up using a flat-head screwdriver and turned.
- Next, you need to disconnect the connectors with the wires and you can safely remove the tidy.
- To remove the glass from the instrument panel, unclip the plastic clips.
After dismantling, you can replace faulty parts and lighting tabs. If the LED warning lights on the Lada Kalina have burned out, it is impossible to replace them, since they are soldered in. In this case, you need to change the entire instrument panel of the Lada Kalina 2. The Kalina instrument panel is assembled in the reverse order.
Thus, knowing how to disassemble the panel on Kalina, you can repair it yourself if the backlight or signal lights do not light up.
What do the icons on the Priora dashboard mean?
There is a separate group of icons indicating the presence of breakdowns and malfunctions within the vehicle’s on-board systems. The emblems are displayed in the space surrounding the main instruments. The following is a transcript of the signs with photo accompaniment.
| Icon | Decoding |
| If the car with the key is flashing, this indicates a malfunction or lack of response from the immobilizer. To fix the problem you need to check the block. | |
| An exclamation mark surrounded by brackets blinks on the dashboard, indicating a malfunction in the brake system or ABS. A similar indicator located slightly higher may indicate an incorrectly pumped brake system. | |
| The electric power steering is faulty or defects have been detected in the operation of the mechanism. Mostly installed on cars after 2011 model year. | |
| Failure in the wiring or units responsible for controlling the airbags. If the icon lights up after starting the engine, the specified element may not work under shock load. | |
| Seat belts are not fastened. Can also be red. At the same time, it is accompanied by a sound signal. | |
| The passenger airbag is not activated or is faulty. Usually lights up when the engine starts. | |
| If the indicator blinks constantly, this indicates a battery failure or critical discharge. | |
| An urgent check of all engine systems is necessary - a critical malfunction has been detected. |
The reasons why these icons may light up always require driver intervention. Ignoring machine signals can cause serious damage.
Depending on the year of manufacture and configuration, the interpretation of the instrument panel indicators may differ. The exact definition can be found in the vehicle's service manual.
Instrument cluster VAZ-2170
The instrument panel of the Lada Priora consists of the following parts.
- Tachometer. The crankshaft speed is shown here. The red zone is a threshold that is not recommended to be crossed when revving the engine. Maximum 6 thousand revolutions per minute.
- Left turn indicator. When a left turn is engaged, a green light comes on and flashes continuously. Accompanied by sound confirmation.
- The speedometer is an indicator of the speed of the car.
- Right turn indicator.
- An arrow that shows the temperature of the cooling liquid. If the indicator needle reaches the red zone at a temperature of more than 115°C, the buzzer will signal this for 5 seconds. until the liquid temperature drops to 110°C. If you cannot lower the temperature of the fluid within 10-15 seconds, you need to quickly turn off the engine to prevent it from overheating. The reason why the coolant boiled must be identified.
- Arrow to indicate fuel level. When the red zone is reached, the red indicator lights up to indicate the fuel reserve. This means that there is no more than 5 liters of fuel left. It is not recommended to use fuel completely, as debris that collects at the very bottom of the gasoline tank can clog the fuel system. Then it will have to be repaired.
- Fuel reserve indicator. It looks like a drawing of a column for refueling. Lights up orange and indicates that you need to refuel. The buzzer sounds two times with a 0.25 second interval.
- A button that resets the daily mileage readings and switches indicator modes. If you press it, the mileage will return to zero.
- Emergency crew. If pressed, the light will flash red. The side lights of the car start blinking, indicating a breakdown.
- Electronic power steering indicator. It lights up orange when the ignition is on and goes out when the engine starts.
- High beam indicator. If you turn on the high beam headlights at night, it lights up blue.
Appearance of a standard torpedo
- Parking brake indicator. When the brake is applied, it lights up red.
- Indicator of switched on external lighting. If you turn on the low beam or side lights, it lights up green.
- Airbag indicator. Orange color when the ignition is on for 3 to 4 seconds.
- Emergency oil pressure indicator. Lights up red when the ignition is on. When the engine starts, it goes out. It is imperative to monitor the operation of this indicator when you turn on the ignition. If the indicator does not light up, it means that it is broken or there are problems with the sensor. When the engine is running, the buzzer sounds for 5 seconds. when the indicator lights up. This indicates that the oil pressure is lower than required. You need to turn off the engine and fix the problem. If the oil pressure level is insufficient, the engine cannot be operated. It may fail.
- Immobilization system indicator. Lights up orange. Shows the position of the immobilizer and the order of security of the car.
- LCD computer indicator. The top row is the total mileage or per day. Middle row - all trip computer functions.
- Seat belt unfastened indicator. Lights up red. The buzzer beeps intermittently.
- Battery discharge indicator. Lights up red when the ignition is turned on and goes off when the engine is running. It is necessary to strictly monitor the operation of this sensor. If it does not light up when the ignition is on, there may be a breakdown in the battery charging system or the sensor itself may be damaged. If it lights up when the engine is running, it means the battery charge is low. Perhaps the timing belt is loose or broken, the alternator brushes are worn out, or the alternator itself has broken down.
- Emergency brake sensor. Lights up red when the ignition is on. After the engine starts, it stops lighting. If this does not happen, the vehicle cannot be operated.
Location of all sensors on the panel
- Indicator of failure of the electronic brake force distribution.
- Front passenger airbag deactivated indicator.
- ABS failure indicator.
- Engine sensor. When the ignition is turned on, it lights up orange. Goes off when the engine starts running. If it lights up when the engine is running, a malfunction has occurred. The damage needs to be repaired.
Return to contents
Error codes on the Priora dashboard
When entering self-test mode, combinations of numbers and letters may appear on the display indicating the part of the circuit where a malfunction is detected.
Usually, after entering the service mode, one or more numbers appear on the device:
- 2 – a critical overvoltage was detected in the on-board network, caused by a short circuit or breakdown of the unit;
- 3 – an error has been detected in the fuel level sensor, a circuit break is possible;
- 4 – there is overheating of the cooling system, or the corresponding sensor is broken;
- 5 – the thermometer that determines the temperature outside is broken or there is an open circuit in versions before 2012, mounted optionally;
- 6 – the engine has boiled, you need to wait for cooling or check the serviceability of the sensors;
- 7 – the oil pressure in the crankcase of the power plant is too low, the sump may leak or the lubricant level has dropped significantly;
- 8 – breakdown of the brake line or units of the corresponding system;
- 9 – the battery is discharged or the element is faulty; it can also appear after the car has been idle for a long time in the cold;
- E – the firmware has failed or there is a critical error in the EEPROM data packet.
Diagnostics using the built-in BC
To view the error codes, you need to find the daily mileage reset button on the dashboard, press it and, holding it, turn the ignition key. The self-diagnosis mode will turn on. All arrows on the instruments should move from minimum to maximum values and back, and all positions on the LCD display should light up. You need to look: if any position does not light up or the arrow on any device does not move, then you should check the corresponding sensors, their networks or display for malfunctions.
Priora on-board computer
In the same mode, press any button for switching modes of the built-in BC 2 times, after which digital codes may appear on the liquid crystal display:
- 2 - very strong voltage in the BS;
- 3 - errors in the fuel level sensor system in the gas tank;
- 4 - error in the coolant temperature sensor system;
- 5 - error in the air temperature sensor system outside the car;
- 6 — motor overheating;
- 7 — emergency low oil pressure;
- 8 - malfunctions in the brake system;
- 9 - battery is low;
- E - error in the data packet stored in the EEPROM.
Many drivers ask how to reset error codes on a Lada Priora. Perhaps their built-in BC is faulty, since a working on-board computer automatically exits the diagnostic mode after 30 seconds if you do not press any control buttons.
Designation of dashboard indicators Priora 2
- Tachometer (shows the number of crankshaft revolutions per 1 minute at the current moment);
- Parking brake warning light;
- Turn signal indicator;
- ABS failure indicator;
- Battery discharge indicator;
- Brake system failure indicator;
- Indicator for minimum oil pressure in the internal combustion engine;
- Alarm;
- EUR breakdown;
- Driver's seat belt warning light;
- Check Engine (check engine);
- Airbag malfunction;
- Turn indicator;
- Pedal adjustment;
- ESC activation indicator;
- Opened door;
- Gearbox failure;
- Low tire pressure;
- Button for switching daily mileage to main;
- Immobilizer activation;
- ESC shutdown indicator;
- Fuel reserve;
- LCD screen with information;
- Inclusion of dimensions;
- Turning on the low beam;
- Turning on the high beam;
- Fuel level sensor;
- Coolant temperature sensor;
- Reserve;
- Speedometer;
- Start-stop;
- Reserve;
- Turn on cruise control;
- Speed limiter activation;
- Turning on the rear PTFs;
Video “How to quickly change light bulbs in PP Priora?”
We invite you to familiarize yourself with a detailed guide on how to independently replace the light bulbs in the Priora dashboard (the video was shot by Kirill Zhukov).
Don’t ask me anything, I wrote everything I know.
You can copy this article to your blog, then notify me so that I can delete this entry.
First type of devices:
Kalinas and Prioras without can tires.
On the VAZ-1118 (Kalina) from 2004 to 2011, the device was installed 1118-3801010
All these devices have a 32-pin connector. You can, for example, install a Priorovskaya tidy instead of a Kalinovskaya one, but it is advisable to select the desired model (1118 or 2170).
Instead of such a tidy, you can install an expensive tidy with navigation 1118-3801010-50 for Kalina and 2112 with Europanel or 2170-3801010-50 s for Prior produced before July 2012 (without CAN bus). And they additionally need a GPS antenna and a wiper switch with a joystick (they are described below).
Addition from Shurik5891
On the first releases of 1118 devices, there are no LEDs for ABS, ESD, or seat belts.
Addition from Shandys
On Kalina1 2013
with e-gas and cable drive gearbox there is a tidy 11180-3801010-20 vdo _____________________________________ Second type of
Grant devices of the 1st generation
Granta appeared in 2011
From a smart book: “The electronic engine control system of the LADA GRANTA car implements a data exchange interface between the ECM, instrument cluster and diagnostic device via the CAN bus. The CAN bus is a two-wire line: - CAN L low level line (contact “X2/D2” of the ECM - contact “7” of the instrument cluster - contact “14” of the diagnostic block); - CAN H high level line (contact “X2/F1” of the ECM – contact “8” of the instrument cluster – contact “6” of the diagnostic block). The immobilizer is integrated into the instrument cluster." Pinout of devices 2190
: 1 - To the emergency oil pressure sensor, 2 - To the parking brake switch, 3 - Service. Panel diagnostics, 4 — To the exterior lighting switch, 5 — To the right turn signal switch, 6 — To the left turn signal switch, 7 — CAN-L, 8 — CAN-H, 9 — To the seat belt sensor, 10 — “RESET” key » on the steering column switch, 11 - To the brake fluid level sensor, 12 - To the high beam headlights, 13 - To the low beam headlights, 14 - To the rear fog lamp, 15 - To the front fog lamps, 16 - Immobilizer antenna input (b) , 17 — “Ground” panel, 18 — Immobilizer antenna input (a), 19 — To terminal “30,” 20 — To electric power steering, 21 — To terminal “15,” 22 — To door sensor, 23 — MK key “ forward", 24 - MK key "back", 25 - To the outside temperature sensor, 26 - To the fuel level sensor. Instrument clusters are interchangeable.
Pinout provided by fellow teemest
The connector for these devices is 26-pin.
Some devices have sound for turn signals and/or hazard lights, some do not. This is normal and is not a malfunction. Instead of a temperature indicator, there was only a light bulb, the lighting of which indicated overheating. On June 16, 2014, they began installing the device with firmware 092, and in the window it was possible to select engine temperature readings. On cars with the standard configuration, there is no outside temperature sensor. If the device has firmware 090, you can take sensor 2115-3828210, one contact to the body, the second to contact 25 of the devices, and the function of displaying the outside temperature will work. Devices may also differ in the presence/absence of an indicator for front fog lights, an indicator for an automatic transmission, etc. And there are these same devices with navigation.
The exclamation mark is on - what to do?
We have noticed that new topics often appear on car forums where drivers ask about the exclamation marks that are displayed on the Lada Priora panel. They rarely specify where it is lit and what is depicted on the icon. In this section we have collected a small FAQ Below are all the exclamation marks that can light up on the instrument panel of a VAZ 2170 car. The designations of these icons are as follows:
- The red exclamation mark in the circle (bottom) is lit. The indicator indicates that there is a problem with the vehicle's brake system. This is usually a low brake fluid level. Add it to the tank and, most likely, the sign will stop lighting. If this does not happen, then it is worth checking the system for damaged components. When igniting, the indicator lights up for 4 seconds and then goes out.
- The red exclamation mark in the triangle/circle (above) is lit. Modern versions use a triangle instead of a circle. The indicator tells us about defects in the operation of the brake force distributor. Use extreme caution if the light comes on while driving.
- Exclamation mark next to the steering wheel icon. When illuminated for a long time, it indicates a malfunction in the electric power steering (EPS). Like other icons, it lights up when ignited and goes out after a few seconds if the system is working properly.
If the red triangle lights up while the engine is running, then you should diagnose the brake force distributor.
Sometimes the cause of the indication is a malfunction in the electronics. Terminals are coming off, contacts are oxidized, defects in the on-board computer are a few reasons for the random appearance of icons. To avoid damaging one of the systems, check the electronics first. To do this, it is enough to dismantle the device on the Lada Priora and see if the terminals are securely seated in the sockets. If the brake system indicator lights up, first check the fluid level in the reservoir, and only then fill in new antifreeze.
Where and how exactly to hang or glue it
As already mentioned, the sign must be located on the outside of the car and in its rear. It is advisable that it does not interfere with the view. But the last requirement is not important if the car is equipped with two full-fledged rear-view mirrors. The use of cartoon signs such as a teapot on a yellow background is not prohibited, but for the traffic police inspector they will simply be a colorful sticker. But the sign established by law will not be on the car. At best, the driver can get off with a warning, at worst - a fine of 500 rubles. Therefore, the use of different teapots to indicate that the driver is inexperienced is unlawful.
It is better to mount the sign on the rear window of the car on the left.
Only a sign of officially established shape and size should be used. You can buy it at almost any auto store. The law does not regulate the method of installing the sign. It can be glued or attached with suction cups. In this case, the main thing is its compliance with the norms of the law: color, size, location in the rear of the car. When stopped, a traffic police inspector cannot make a claim that the sign, for example, is attached to suction cups. Some people do just that because they care about the beauty of their car. After all, this sign, after just two years, will have to be removed. But a trace of it may well remain on the body of the car. The second fact is the “teapot syndrome”, the owners of which feel disadvantaged on the road with a similar sign on their car. Let’s imagine, for example, a university professor who has it in his blood to teach and instruct, but as a driver he himself is also in some way a student. The question has been repeatedly raised that the “Beginner Driver” sign should be glued to a self-adhesive film in order to avoid its periodic and unauthorized removal. But the Road Traffic Rules only say that “the sign must be installed,” without specifying exactly how.
Some “dummies” made fun of themselves and attached several signs to their cars. The presence of several such signs, in principle, is not a violation if it does not interfere with the view of the situation behind the car.
It must be added that it is also impossible for those whose license is younger than two years to undergo a periodic technical inspection without a sign. If earlier they could simply turn a blind eye to its absence, now, as has already been said, it has become mandatory. You can remove the sign from your car yourself after two full years from the date of obtaining your driver’s license.
Drivers of motorcycles or mopeds, who also have a minimum experience of not exceeding two years, do not need to buy and attach a sign. The law doesn't say anything except that they can't carry passengers anyway. Transportation for new riders is prohibited in any form: both with a stroller and in the case of a motorcycle without one. The traffic rules also do not provide for the installation of a sign on a vehicle considered to be agricultural machinery, self-propelled vehicles and ATVs.
Some novice drivers, due to their ignorance of traffic rules, believe that the “Beginner Driver” sign may well be replaced by a triangle with the letter “U”, which was mentioned earlier. But this approach is a grave mistake, since a sign in the form of a triangle with the letter “U” can only be placed on training vehicles driven by driving school students who drive together with an experienced instructor and under his supervision. Such tactics, according to those using it, should lead to the fact that experienced people will stay away from the vehicle that has this sign.
If a traffic police inspector stops a driver with less than two years of driving experience, he will certainly pay attention to this and understand that he studied very poorly in driving school. Since this vehicle is not a training vehicle, the inspector has the right to demand that the defect be corrected on the spot and the driver will be required to remove this sign from his vehicle in his presence
Since, naturally, he will not have a yellow square with an exclamation mark, he is almost guaranteed to receive a fine of 500 rubles.
Traffic police officers, commenting on the innovations, note that they are aimed at significantly reducing the accident rate and reducing the number of road accidents in which beginners are involved. Accordingly, the severity of the consequences of possible road accidents should also be reduced.
Video about the need for use
How to enable autotesting on Priora
Self-diagnosis of the VAZ Priora dashboard is necessary to be able to detect hidden problems or defects in on-board systems. To complete the procedure, you will need to perform a certain sequence of actions.
- Get into the car and insert the key into the ignition lock.
- Press and hold the daily mileage reset button.
- At the same time, turn on the car's ignition.
- If everything is done correctly, the instrument arrows will make several full revolutions and return back. All indicators will also flash.
The problem will be identified if any signal does not respond to manipulation.
Central lock Lada Priora
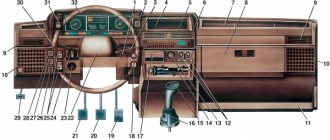
To lock (unlock) the locks of all doors outside the car, turn the key in the driver's door lock cylinder clockwise (counterclockwise). When you turn the key in the lock cylinder of the front passenger door, the lock of only this door is locked (unlocked). You can also lock and unlock all doors using the operating key remote control. From inside the vehicle, all door locks can be locked by pushing down the driver's door lock button or pressing the door lock button located in the switch block on the driver's door armrest. When the lock is locked, the door cannot be opened using either the outside or inside handle. To unlock the locks of all doors, press the lock button in the switch block again. The front doors can only be locked or unlocked when the doors are closed. When the exterior lighting is turned on, the switch keys are illuminated in green. Driver's door: 1 — door lock button; 2 — armrest; 3 — switch block; 4 — interior handle; 5 — exterior lock
Switch block on the driver's door armrest: 1 - key for locking and unlocking the locks of all doors; 2 - key for the power window switch of the left rear door *; 3 - key for the power window switch for the driver's door; 4 - control for the electric drive of external mirrors; 5 - switch button for adjusting the right mirror ;6 - switch button for adjusting the left mirror;7 - front passenger door power window switch key;8 - rear right door power window switch key*;9 - rear door power window lock switch key*
* Connected to the vehicle’s electrical equipment only if rear door electric windows are installed. Rear door: 1 - external lock; 2 - internal handle; 3 - door lock button; 4 - window handle; 5 - plug (power window switch key - for vehicles with the optional version)Additional rear door locking
The rear door lock can be locked by recessing the lock button, both on an open and closed door. At the ends of the rear doors (near the locks) there are latches for additional locking, which can be used when traveling with children or in other cases - to prevent opening doors from the inside. To additionally lock the rear door lock, press the latch down and close the door. In this case, the rear door can only be opened from the outside when the lock button is raised.
Icons on the factory dashboard
All indicators should light up like a Christmas tree for three seconds when the engine starts. If some icon remains, it means the system is signaling a breakdown. To make it easier to understand all the indicators, here is a schematic picture:
1,5,9,10 are already known scales that display the main parameters that can change. 19 – on-board computer display. Further:
- 2 – Icon indicating the operation of the braking system.
- 3 – Battery condition. If the light remains on, the battery is discharged or the charge level is too low.
- 4.7 – Doublers for direction indicators (“turn signals”).
- 6 – Oil level (indicates low level).
- 8 – Handbrake. Lights yellow when the lever is tightened.
- 11 – “Gasoline light bulb.” Lights up when there are only 10 liters left.
- 12 – Button for switching on-board computer modes.
- 13 – “Emergency”.
- 14 – Electric power steering (indicates a breakdown).
- 15 – High beam on.
- 16 – Side lights/low beam.
- 17 – Airbag condition (malfunction).
- 18 – Immobilizer (if you hear a beep and the icon itself blinks, the immobilizer is faulty).
- 20 – Seat belts not fastened.
- 21 – Unsatisfactory condition of the service brake system.
- 22 – Disabling the airbag.
- 23 – ABS malfunction.
- 24 – “Check”, “Check Engine” - engine failure.
Interpretation of the symbols for the rear wiring harness of the VAZ Priora
The rear part of the electrical wiring chain is responsible for the vehicle's lighting and peripheral systems. This includes lights, locks and windows. The pinout of tips and terminals looks like this:
- 1 – dashboard response;
- 2 – power supply for the door behind the driver;
- 3/28 – power supply for the front passenger panel equipment;
- 4 – maintenance of power windows and door locks;
- 5-6 turn signals;
- 7 – interior lighting;
- 8 – handbrake indication switch;
- 9-10 – aft dimensions;
- 11 – temperature inside the car;
- 12-15 – circuit breakers for lighting the interior of the machine;
- 16/17 – power supply to the devices of the aft right and front left doors, respectively;
- 18/19 – voltage to the rear right and left speakers, respectively;
- 20 – cigarette lighter power core;
- 21 – EBN;
- 22 – contact group of the cargo compartment lighting circuit breaker;
- 23 – heated rear windshield;
- 24 – luggage compartment lighting lamp;
- 25 – additional stop;
- 26 – power line to the electric lock of the luggage compartment lid;
- 27 – power supply for rear number plate illumination;
- A1-4 – mass;
- ХР1/3 – electrical package power controller.
Pinout for rear license plate illumination of VAZ 2170
The small harness, located in the luggage compartment, has only three terminals:
- 1 – power supply to the stern license plate lights;
- 2-3 – license plate lighting lamps;
- 4 – trunk lid lock motor.
Pinout for the driver's door of the Priora
The harness is routed to supply power to the driver's door equipment. There is an output to the key panel installed in the armrest. There are six elements in total:
- 1 – additional terminal to the rear of the machine;
- 2 – line to the left fuse;
- 3 – electric window drive;
- 4 – armrest control module;
- 5 – door lock drive;
- 6 – rear view mirror control chip.
It will be useful: Installing an alarm system on a Lada Priora with your own hands: step-by-step instructions for installing the system, features of central locks, connection points and location
Front Passenger Door Wiring Harness
The unit duplicates the voltage supply from the center console to the passenger keypad located on the right side of the car. There are only seven connectors here:
- 1 – continuation of the main highway to the rear;
- 2 – terminal of the line to the right front speaker;
- 3 – window lift drive;
- 4 – electric window lift button;
- 5 – door lock drive;
- 6 – control of the position of the rear view mirror, as well as heated glass;
- 7 – continuation of the highway to the rear.
Rear door harnesses
The rear door wiring diagram has only two terminals. In this case, the side of the car is not of fundamental importance:
- 1 – continuation of the highway;
- 2 – locking drive.
Possible faults
The instrument cluster does not always tell the truth, and sometimes its readings can mislead the driver - they may seem absurd. For each common malfunction, a brief commentary will be given on the possibility of eliminating them:
- The fault lamp does not light up (check the lamp);
- the lamp is on - check the sensor, reset the error via the diagnostic connector.
If none of the above measures help resolve the problem, carefully inspect the wiring - damage to it may cause the light bulb to activate or deactivate.
Failures in the idle speed system (IAC) and ESC
- P0500 - speed sensor is broken.
- P0506 - very low engine speed at idle.
- P0507 - too high speed at idle.
- P0511 - the XX regulator network is faulty.
- P0560 - BS voltage is below the minimum threshold.
- P0562 - very low voltage in the BS.
- P0563 - very high voltage in the BS.
- P0601 - ROM checksum error.
- P0615 - the wires of the additional starter relay are broken.
- P0616 - the same wires are shorted to ground.
- P0617 - they shorted at the BS.
- P0627 - the fuel pump relay wires are broken.
- P0628 - the same wires are shorted to ground.
- P0629 - they shorted it to the BS.
- P0645 - break in the wiring of the air conditioning compressor clutch relay.
- P0646 - the same wiring has shorted to ground.
- P0647 - she shorted to BS.
- P0650 - Malfunction indicator light circuit does not operate.
- P0654 - Tachometer control circuit is faulty.
- P0685 - the main relay electrical wire is broken.
- P0686 - the same electrical wire has shorted to ground.
- P0687 - he shorted it to the BS.
- P0691 - the electrical wiring of the fan control relay is shorted to ground.
- P0692 - the same wiring has shorted to the BS.
Hi all! I discovered a huge number of topics dedicated to instrument panel errors and many questions related to them, therefore, I decided to write everything in one topic. Materials were used from the Internet, and in particular: www.drive2.ru, www.priorovod.ru/
When do you need dashboard repair or replacement?
The Priora tidy does not have a large number of parts that are subject to frequent breakdowns. Typically, repair of the indicator unit comes down to replacing light bulbs and individual elements of the device. Users resort to replacing the board only when there is a malfunction of the contact group, connectors, or the board is damaged.
In case of serious damage (major short circuit leading to burnout of the main structural elements), repair may not be cost-effective. The cost of labor and materials often exceeds the price of a new module.
Possible malfunctions and ways to eliminate them
When operating a vehicle, individual components of the instrument panel may fail. Among the most common breakdowns are factors.
- Burnt out contact of one of the indicator lamps. Usually resolved by replacing the light bulb.
- Failure of the contact group can be eliminated by completely replacing the module - resoldering the part is not economically profitable.
- Malfunction of arrow indicators. It can be fixed by replacing the block.
ABS turns on randomly, the light blinks or lights up periodically
One of the most difficult forms of breakdowns is the constant blinking of the ABS light. This means that the anti-lock braking system sensors send incorrect signals to the computer, which, in turn, issues other incorrect commands to the vehicle's systems and modules. In such cases, many people prefer to simply turn off the anti-lock system, since unpleasant incidents may occur. For example, turning on ABS at a speed of 90 kilometers per hour with light braking can damage the chassis of the car and contribute to a complete loss of control over control. It's better to do this:
- bring the car to a service center for diagnostics, find out the reason for the chaotic operation of the equipment;
- for domestic cars equipped with a primitive anti-blocking device, it is better to immediately disable the system;
- complex designs and on-board electronic systems of foreign cars will have to be reflashed for repair;
- on some machines it will be easier to find the problem and fix it than to disable the anti-lock;
- you need to keep in mind that this particular system is not always the cause of the ABS light coming on; the problems can be different;
- During the diagnostic process, it is better to check the entire on-board electrical system and equipment.
By paying a certain amount for a car inspection, you can get the right answers to important questions. Sometimes a light that comes on on the panel can develop into a full-fledged repair of important units and components of the car, so you will have to spend a lot. But in most cases, this problem is not so expensive to solve. The cost of repair work depends, of course, on the make and model of the car, and on the price of spare parts. If an ABS sensor for a domestic car costs from 600 rubles, then a Japanese SUV will cost more than 10,000 rubles to replace one such sensor. We suggest watching a video about solving a similar problem using computer diagnostics:
Symbols on the on-board computer
The instrument panel on the dashboard can provide a lot of diagnostic data.
The on-board computer display will help determine the breakdown, depending on the number:
- The on-board network is damaged due to increased current caused by a short circuit.
- There is a problem with the fuel sensor.
- Overheating of the cooling system or a malfunction in the sensor.
- The external thermometer is broken. Please note that until 2012 they were optional.
- The engine has overheated, you need to let it cool down.
- The engine oil level has dropped significantly.
- Brake system problems.
- There is a problem with the battery, it may simply be low.
The letter “E” may also appear on the screen. She talks about the firmware crashing.
Information indicators
The lights on the dashboard can indicate failures in the operation of the engine and other systems, or be of an informational nature. In any case, the car owner must be able to decipher the “messages” transmitted by the control module in order to promptly fix the problem in the event of a breakdown. First, let's look at the description of information indicators.
| Icon | What does it mean |
| A yellow wrench in the background of the car indicates that the system has detected a malfunction in the engine. The EPC failure indicator may indicate problems with the sensors or controllers; sometimes the wrench icon appears when there is a malfunction in the electronic component of the transmission. Computer diagnostics of the car can tell you exactly what this error means. | |
| A red indicator in the form of a car with a lock usually lights up in the event of malfunctions in the operation of the anti-theft system, in particular, we are talking about a standard installation. In practice, such malfunctions are usually accompanied by the inability to start the power unit. If the indicator simply blinks when the car is locked and its security is activated, then there is no need to worry. | |
| The exclamation mark indicator can only appear in a car with a hybrid power unit; its appearance is due to problems with the operation of the electric drive device. When such an indicator appears, it is better to perform computer diagnostics - this option is the most relevant if you want to get accurate information about the breakdown. | |
| An icon in the form of a car with an open door may light up on the instrument panel if the ignition is turned on or the car engine is running and one of the doors is open. This can also apply to the trunk lid as well as the hood. If you checked the doors and are sure that they are all locked, then most likely the reason is inoperative limit switches that are installed on the doors or on the pillars between the door and the body. It may be that the electrical circuit connecting the limit switch is damaged. | |
| The ESP icon is a vehicle stability control sensor. The indicator may appear if the system has detected a slippery section of the road along which the car is moving. Activation of this unit is carried out to prevent wheel slipping by reducing the power of the power unit. In principle, the appearance of an icon does not threaten the car with anything bad, since the indicator itself is informational. However, if a yellow triangle, wrench or wear symbol lights up next to the light, then you need to worry about the performance of the system. | |
| The wrench symbol in yellow tells the driver that the vehicle is due for maintenance. You need to change the oil, check the filters, etc. When the maintenance is completed, the indicator can be reset by briefly disconnecting the battery terminals. |
Pinout of the instrument panel of a Priora car
The panel pinout looks quite complicated, but there is a more simplified diagram that will help you figure out the wires connected inside:
The decoding is as follows:
- EUR
- "emergency light"
- Engine oil
- Handbrake
- Immobilizer
- Airbags
- Headlights and dimensions
- Right turn signal
- Left turn signal
- Electronic control unit
- Pad wear sensor
- Seat belts (closing sensor)
- ABS
- Reset button
- Brake system, brake fluid
- ABS
- High beam headlights
- Torpedo shield lighting
- "Weight"
- Thirtieth terminal
- Fifteenth terminal
- Fuel consumption
- Forward key
- Back key
- Ambient temperature sensor (minus)
- Ambient temperature sensor (plus)
- Fuel level
- Speed sensors
- Coolant temperature
- Odometer
- Diagnostics of the shield (service)
- Generator regulator
Removing and installing a torpedo on a Priora
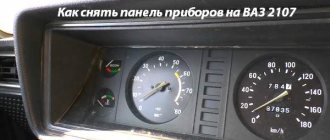
How to remove the dashboard on this car? Quite simple if you follow the instructions. On a Lada Priora, removing the torpedo will not be difficult. This must be done if you need to install a soundproofing shield, or paint the panel itself, or replace it.
You will need tools such as screwdrivers (flat and Phillips), pliers (specifically with narrow jaws) and a number 10 head. To remove the dashboard on a Priora, you need to disconnect the negative terminal from the battery. The work must be carried out carefully so that the instrument panel lighting is not affected. After this, you can remove the steering column switches.
Now the surface of the safety block on the Priora is disconnected. To do this, you need to rotate the locks of this cover 90 degrees, and then remove the latches from the safety block on the Priora. Now you need to carefully remove all the wires from the ignition switch. Then the instrument cluster is carefully removed. After this, the center floor tunnel is released. It is necessary to remove the cables from the power steering on the Priora.
Next, you need to perform these actions in turn. Loosen the latches and remove the pillar upholstery on the left side. Use the same steps to remove the upholstery on the right side of the Priora. Then the glass blower is removed from the right and left sides. It is better to use a screwdriver with a soft cloth underneath it to avoid damage.
To remove the torpedo on the Priora, you need to further unscrew the nuts, which are the upper fasteners of the torpedo. These nuts are located on either side of the blower nozzle, which is already disconnected. Then you need to remove the tips from the torpedo. Be sure to further remove the blocks with cables that connect the dashboard.
These pads are located near the bracket. All pads are removed one by one. It is necessary to remove not only the side pads, but also the central one. To do this, unscrew the fastening nut from the controller near the center console.
On the other hand, the fasteners also need to be disconnected. Now you need to remove the controller from the torpedo. After this, you can squeeze the center pad latches and pull it out. You need to disconnect its two connectors along with the cables. Next, the harness near the bracket is released. You need to be careful, because... The dashboard lighting should not be damaged.
Now you need to unscrew the screws in the side mount of the torpedo. Phillips screwdrivers are used for this. Similarly, on the other side, the fastenings are disconnected. You need to carefully monitor navigation devices. Now you should open the glove box (glove compartment). There you can also unscrew the torpedo screw. Then the side screws of the console are removed. After this, you need to carefully remove the torpedo on the Priora. If it is necessary to reinstall the torpedo, then all steps are performed in the reverse order.
Do-it-yourself tuning and dismantling of the center console
Dismantling the center console on the Lada Priora is quite simple, but has a number of secrets.
First, you need to remove the “Open” cover and unscrew the two screws underneath it. Then remove the ashtray and also unscrew a couple of screws under it. Next, remove the tape recorder and take out the frame, under which again there will be two screws that must be unscrewed. The cover needs to be pulled towards you in order to remove the central nozzles from the stove at the top (overcoming some resistance). After the top disconnection, you need to stick your hand in and remove the connectors from the heating, clock, emergency lights, control system. The center console can now be completely removed. Car interior tuning
The Lada Priora, which came off the assembly line, has fairly light colors in the interior, which can be made darker by painting the center console, door handles, and replacing the upholstery. For painting we will need white spirit, varnish, acetone, primer for metal and plastic, and spray paint. The center console is degreased, primed in a couple of layers with drying between them, painted in 2-3 layers (also with intermediate drying), and varnished.
The situation is much worse if the instrument panel in the Priora is faulty and requires repair. In this case, pinout is needed, i.e., matching the contacts and wires to a particular device. The description of the combinations for the shield states that contacts 2,3,5,6,8,9,16, 17,22, 28-30 are reserve,
- while contact No. 1 goes to the power steering, No. 4 goes to the parking brake switch (both negative),
- No. 7 - to the lighting module (plus),
- No. 8 - on CAN_H,
- No. 9 - on CAN_L,
- No. 12-13 - immobilizer antenna inputs (a and b),
- No. 14 - to the “Reset” switch,
- No. 15 - to the brake fluid level sensor (minus),
- No. 18 - to the backlight adjustment module,
- No. 20 - to the terminal on the battery “30” (plus),
- No. 21 - to the ignition terminal “15” (plus),
- No. 23 - to the “menu down” key on the steering column switch, No. 24 - to the “up right” key on the steering column switch (both negative),
- No. 25-26 - to external temperature sensors (minus and plus, respectively),
- No. 27 - to the fuel level sensor,
- No. 31 - to the diagnosis of the instrument cluster.
Advantages of spacers under the hood of Priora Prosport
Existing instrument clusters for Lada Priora
Installation of additional Priora door seals
How to increase ground clearance (clearance) for a Lada Priora car?
Replacing the Priora dashboard backlight
Experts strongly recommend replacing the failed component as quickly as possible, because it is these elements that warn car owners about the occurrence of a malfunction, which must be dealt with immediately. According to experienced drivers, it is better to replace not just one failed lamp, but the entire set at once, since the service life of these elements is approximately the same. If the first lamp burns out, you won’t have to wait long for the subsequent lamps to fail.
Types of lamps installed on a car dashboard
- before removing the lamp, you need to unsolder the “whiskers” from the socket;
- remove each lamp one by one from its “socket”;
- install a new one in place of the failed one, making sure to solder the “whiskers” to the cartridge.
You can choose an easier way to replace lamps if you buy new elements equipped with a suitable socket.
And even buy an option in which soldering of the “whiskers” is not provided, which in the future, if the lamp fails again, will make replacement much easier.
Many car owners opt for LED lamps, as they are able to illuminate the dashboard much brighter. You can use LED elements for replacement, but when installing them, according to experts in their field, you must observe the polarity, otherwise they simply will not light up.
Step-by-step replacement of failed light bulbs
- Using two screwdrivers (Phillips and flat), remove the dashboard panel. To remove it, you need to unscrew the two upper fasteners;
- carefully remove the panel located under the steering wheel column by turning 3 fasteners located at the bottom of the column;
- The 2 fasteners located under the panel must also be unscrewed so that the steering wheel can be lowered to the lowest position to remove the dashboard trim;
- unscrew the two fasteners that secure the dashboard using a screwdriver that has a magnetized tip;
- the panel freed from the fasteners must be carefully pulled towards you, having found the wires and the block, be sure to disconnect them by pressing the so-called “tab”, which will completely release the panel and it can be removed without effort;
- the Priora instrument panel has 5 lights for illumination: one lamp helps illuminate the lower part of the display, and the other 4 illuminate the middle of the panel;
- It is best to replace all the lamps at once, so as not to repeat the entire replacement process again in a few days;
- after the last lamp has been replaced with a new one, the shield is assembled in the reverse order.
As you can see, the process of replacing light bulbs on the instrument panel is quite simple and does not require special skill, so even a Priora car owner without experience can cope with this task. But if questions or difficulties arise during the replacement process, you can watch a training video on an online resource at a convenient time.
Replacing light bulbs in the dashboard of Lada Kalina, Priora
During vehicle operation, the backlight of the vehicle's instrument panel may burn out, causing some of the readings to lose their illumination. There is no need to disassemble the “tidy” for this. This instruction tells you how to change the light bulbs on the dashboard of a Priora or Kalina. The process looks similar on both cars.
Required. remove the instrument cluster. buy new backlight lamps for the instrument cluster (A12-1.2 W1.2W with a power of 1.2 W).
- Turn the panel with the back side facing you.
- Remove the backlight bulb by turning the socket counterclockwise.
back side of the instrument panel Lada Priora/Kalina replacement of instrument panel lamps Lada Priora/Kalina instrument panel lamp Lada Priora/Kalina
We install the lamp and socket in the reverse order.
The panel can use various sockets, some of which require the use of a soldering iron to install the lamp. In this case, to save time, it is recommended to buy the lamp together with the socket assembly. By the way, you can use LEDs instead of conventional lamps. When installing them, observe the polarity, otherwise it will not burn.
- The entire process of replacing lamps in the instrument cluster is also shown in the video:
- Let us remind you that the backlight can be modified so that it turns on with the ignition.
How to tune the instrument panel on a Priora?
Tuning the Priora instrument panel mainly consists of connecting additional lighting and installing several color inserts inside the device. No specific replacement of parts is required, nor is the installation of expensive new items required. How to implement a budget tuning option?
Factory equipment
Lada Priora became the first VAZ model to use a new type of material for the dashboard. “Soft look” plastic has a visual similarity to leather, so the console looks quite solid. The dashboard includes all the most necessary devices to inform the driver:
- tachometer;
- speedometer;
- fuel sensor;
- oil quantity sensor;
- There are many small indicators on the instrument panel: turn, lighting, reserve fuel, etc.
In fact, the dashboard is fully equipped and does not require any technical modifications or installation of additional sensors. Then the next question arises: is it worth redoing the instrument panel at all? If you are quite satisfied with its appearance, leave everything without modifications.
But if you are going to remodel the interior, then changes will be required for the instrument panel. You can change its color, strengthen it a little, change the lighting of the devices. In addition, you can add a few details for yourself.
For example, highlight the most important indicators in a certain color - the amount of gasoline, the speed of the car, so as not to search for them throughout the entire panel.
Choice of modifications
The only thing the Priora's instrument panel really lacks is brightness.
While the structure itself looks pretty decent, a few details and additional lighting will greatly improve its visual appeal. The backlighting of the sensors can be changed so that only the main devices are highlighted, making them much easier to find.
While the car is moving, the driver should be minimally distracted by looking at the sensors; the backlight will help with this. An excellent example of do-it-yourself tuning is highlighting the indicator arrows of instruments.
If the sensor arrows look more expressive, it will be much easier to navigate the operation of the machine’s systems. At night, proper lighting will tire your eyes less.
A set of good lamps, plastic or polyethylene multi-colored inserts, a little time and the ability to solder will allow you to transform your instrument panel. Where should I start?
Installing the backlight
For do-it-yourself tuning you will need:
- a set of LEDs (3 pieces per device) and resistors according to the number of lamps;
- conductor for connecting lamps;
- translucent material - plastic, polyethylene.
The following are fairly simple manipulations:
- The panel is dismantled. Using a Phillips screwdriver, all fasteners are removed and the inside of the shield is exposed.
- The instrument panel is disassembled piece by piece. The devices are carefully removed, disconnected from the power supply for the duration of work, and the sensor arrows are removed.
- The panel trim is removed and will need to be updated.
- If you want a pure white panel color, simply remove the green coating from the removed cover. To change the color, a colored translucent plastic insert or a piece of polyethylene is useful.
- The insert is lubricated with glue, and then applied to the panel, evenly distributing the adhesive.
- Light bulbs are replaced by LEDs, which are connected to each other by wires into one strip. The lamps are distributed evenly along the inner border of the panel and secured by soldering.
- The instrument displays are disassembled and the filters are changed to others with the preferred color.
- The arrows are covered with colored material, and the panel is put back together.
Instrument panel tuning
Cars are usually produced in large quantities. Of course, Priora is a high-quality car, but there are quite a lot of such cars on the roads. To improve the appearance and performance of cars such as the Lada Priora, tuning is used. The English word "tuning" means "tuning". What model options are possible? If there are performers and money, you can do any tuning of the Lada Priora.
Changing the instrument panel lighting is easy. If you have technical skills and desire, tuning the Priora can be done with your own hands.
Auto tuning panel
Sequence of actions when tuning the backlight on the Lada Priora instrument panel.
- First you need to remove the panel, then unscrew all the fasteners.
- Disassemble the instrument panel and remove the arrows, placing a bank card under them so as not to scratch the panel.
- Remove the panel cover by separating it from the plexiglass base.
- When the color of the instrument panel illumination changes from green to white, you need to remove the green coating with a knife. Then we take a plastic bag and cut out a piece of the desired color from it. It is glued to the instrument panel trim on the rear side.
- Ordinary light bulbs are not suitable for even illumination, so we install LEDs. Glue the LED strip around the perimeter of the scale. The glued pieces of tape are connected by thin wires. Power is being output.
- The next step is to disassemble the display. The light filter is removed from it or changed to any other one if the backlight is needed in a color other than white.
- Installing back arrows on the instrument panel.
What devices does the Priora panel show?
The instrument cluster on the Lada Priora looks like this, and it is somewhat different from the configuration of the Lada Kalina:
- tachometer;
- turn locks;
- scale of the device displaying the value of the fuel remaining in the tank;
- Priora engine temperature meter scale;
- indicators for connecting and switching off various machine systems;
- LCD display of trip computer;
- other indicators.
When a driver drives a Lada Priora (it doesn’t matter whether it’s a luxury class or an economy class), he has to look at the instrument panel under the glass from time to time to understand whether the car is working properly, when to stop to refuel, whether the turn signal is on, whether it needs repairs . In the event of a malfunction, an experienced car enthusiast will immediately notice the error on the unit, determine what exactly is not working and draw the appropriate conclusions.
Sources
- https://priorik.ru/lajfhak-panel-priborov-avtomobilya-lada-priora-vsyo-chto-nuzhno-znat/
- https://LadaKalina.club/repair/tsifrovaya-pribornaya-panel-dlya-lada-priora
- https://1ladapriora.ru/modifikacii/kombinatsiya-priborov-navigatsiey.html
- https://rus-avtomir.ru/remont/panel-priora
- https://enginehack.ru/oboznachenie-paneli-priborov-priory/
- https://remontvazov.com/panel-priborov
- https://NaDomkrat.ru/ustroistvo-avtomobiley/panel-priborov/oboznachenie-znachkov-pribornoj-paneli-na-lade-priora
- https://svet100led.ru/baza-znanij/zamena-lampochek-v-pribornoj-paneli-na-lade-priora-kakie-stoyat.html
- https://CarsUp.ru/obzory/itelma-pribornaya-panel.html
[collapse]
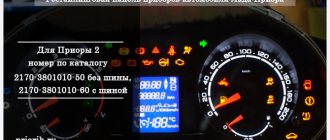
Required
The Itelma instrument panel with navigation can be of two types (externally they are no different):
- 2170-3801010-50 without CAN bus;
- 2170-3801010-60 from CAN bus.
They are not interchangeable, so before purchasing, you should determine whether your vehicle uses a CAN bus or not.
- until 06.2012, cars were produced without a CAN bus;
- remove the instrument cluster and look at the article number or at the block with wires (see pinout of connectors below).
For Kalina (VAZ 1117, 1118, 1119) - all cars without a CAN bus.
- Right steering column switch with joystick (catalog number: 1118-3709340-20);
- Antenna (for roof installation): 1118-7903074.
New-style Priora instrument panel steering column switch with joystick Kalina/Priora/Granta antenna for the Priora instrument panel
You can also buy ready-made kits (device + antenna + switch):
- for Lada Priora - 2170-3801010-55;
- for Lada Kalina 1 - 1118-3801010-55.
old-style Priora dashboard
New Priora dashboard
Replacing the old instrument panel without CAN with a dashboard with navigation without CAN (2170-3801010-50) is carried out without modifications. We remove the old panel and install a new one in its place, insert the connector with wires, connect the antenna (we fix it on the roof) and, if necessary, change the right steering column switch.
If the old instrument cluster without navigation, but with CAN, and instead of it it is planned to install a new dashboard with navigation with CAN (2170-3801010-60), then you need to rearrange contacts 10-11 to 28-29 (if after connecting it still does not work, change 28 and 29 places).
After installing the new instrument panel, the mileage will be reset to zero.